If you're looking for a delightful and creative way to express your artistic side, making small paper roses is a fantastic choice! These cute little flowers can brighten up any space and serve as charming decorations for gifts, parties, or even as a personal touch in your home. Plus, they make for a fun and engaging DIY project that anyone can enjoy. With our complete video guide, you'll be able to craft beautiful paper roses in no time, regardless of your previous crafting experience. Ready to get started? Let’s dive into what you’ll need!
Materials Needed for Paper Roses
Getting started on your paper rose journey is easy! The first step is gathering all the necessary materials. Here's a simple list to keep you organized:
- Colored Paper: Choose your favorite colors! Craft paper or cardstock works best for durability.
- Scissors: A sharp pair will help you cut clean edges for your petals.
- Glue or Hot Glue Gun: To assemble your roses securely, you’ll need a strong adhesive.
- Pencil: Handy for tracing petal shapes or marking where to cut.
- Floral Wire: This will serve as the stem for your paper roses. You can also use wooden skewers or pipe cleaners.
- Green Tape or Tissue Paper: Use these materials to create realistic leaves or to cover the stem.
- Templates (Optional): You can find or create templates for petal shapes if you want precision.
To give you a more detailed overview, let's explore each of these materials:
- Colored Paper: The essence of your paper roses lies in the paper itself. You can choose from a variety of colors based on the look you want to achieve—classic reds for romantic roses, vibrant yellows for sunny vibes, or even a mix for a whimsical bouquet.
- Scissors: While any scissors will do, specialized craft scissors can make cutting curves and shapes easier. Just ensure they are sharp for the best results!
- Glue or Hot Glue Gun: Regular craft glue works well, but a hot glue gun can provide a quicker and sturdier bond. Just be careful not to burn yourself!
- Pencil: For those who prefer to trace before cutting, a pencil is essential. You can lightly mark your petal shapes on the paper before cutting.
- Floral Wire: This provides the backbone for your rose. The gauge matters; thinner wire is more flexible, while thicker wire offers sturdiness. Choose based on your design needs.
- Green Tape or Tissue Paper: This is perfect for adding a realistic touch to your roses by mimicking the look of real leaves or the taped stems found in real flower arrangements.
- Templates (Optional): Many crafters find it helpful to use templates for consistency, especially if you're making multiple roses. You can create your own or find free templates online.
Now that you have all your materials gathered, you’re ready to dive into the fun part—crafting your beautiful small paper roses! With the right supplies, the process will be smooth, and the results will be gorgeous blooms that you’ll be proud to show off!
Also Read This: Understanding Rumble Pricing and Subscription Options
3. Step-by-Step Instructions for Making Small Paper Roses
Welcome to the fun part! Making small paper roses is a delightful craft that requires a few basic materials and some patience. Let's dive into the step-by-step instructions that will guide you through the process of creating these charming little blooms.
What You'll Need:
- Colorful paper (preferably cardstock or crepe paper)
- Scissors
- Hot glue gun or regular craft glue
- Pencil
- Florist wire (optional for stems)
- Green tape (for stems, if applicable)
Now that you've gathered your materials, let's get started:
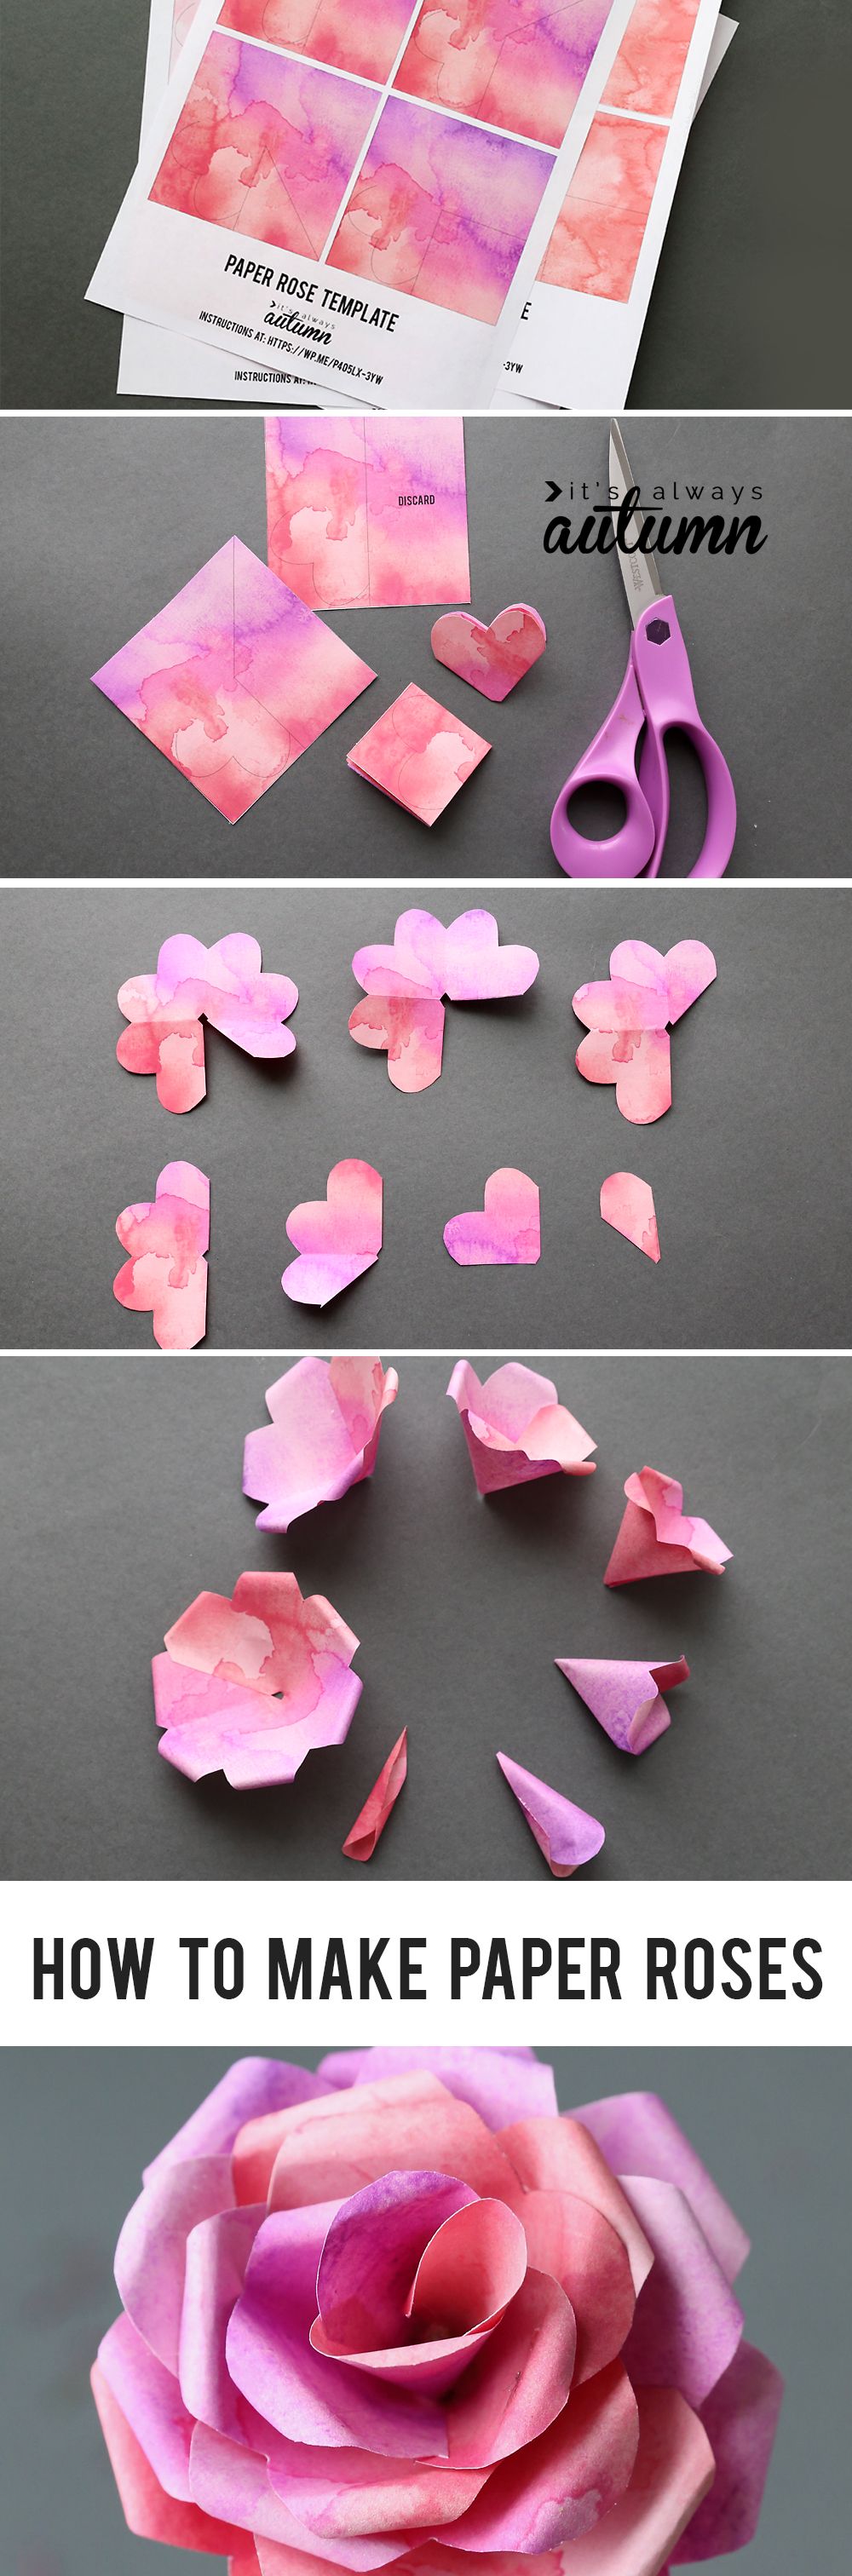
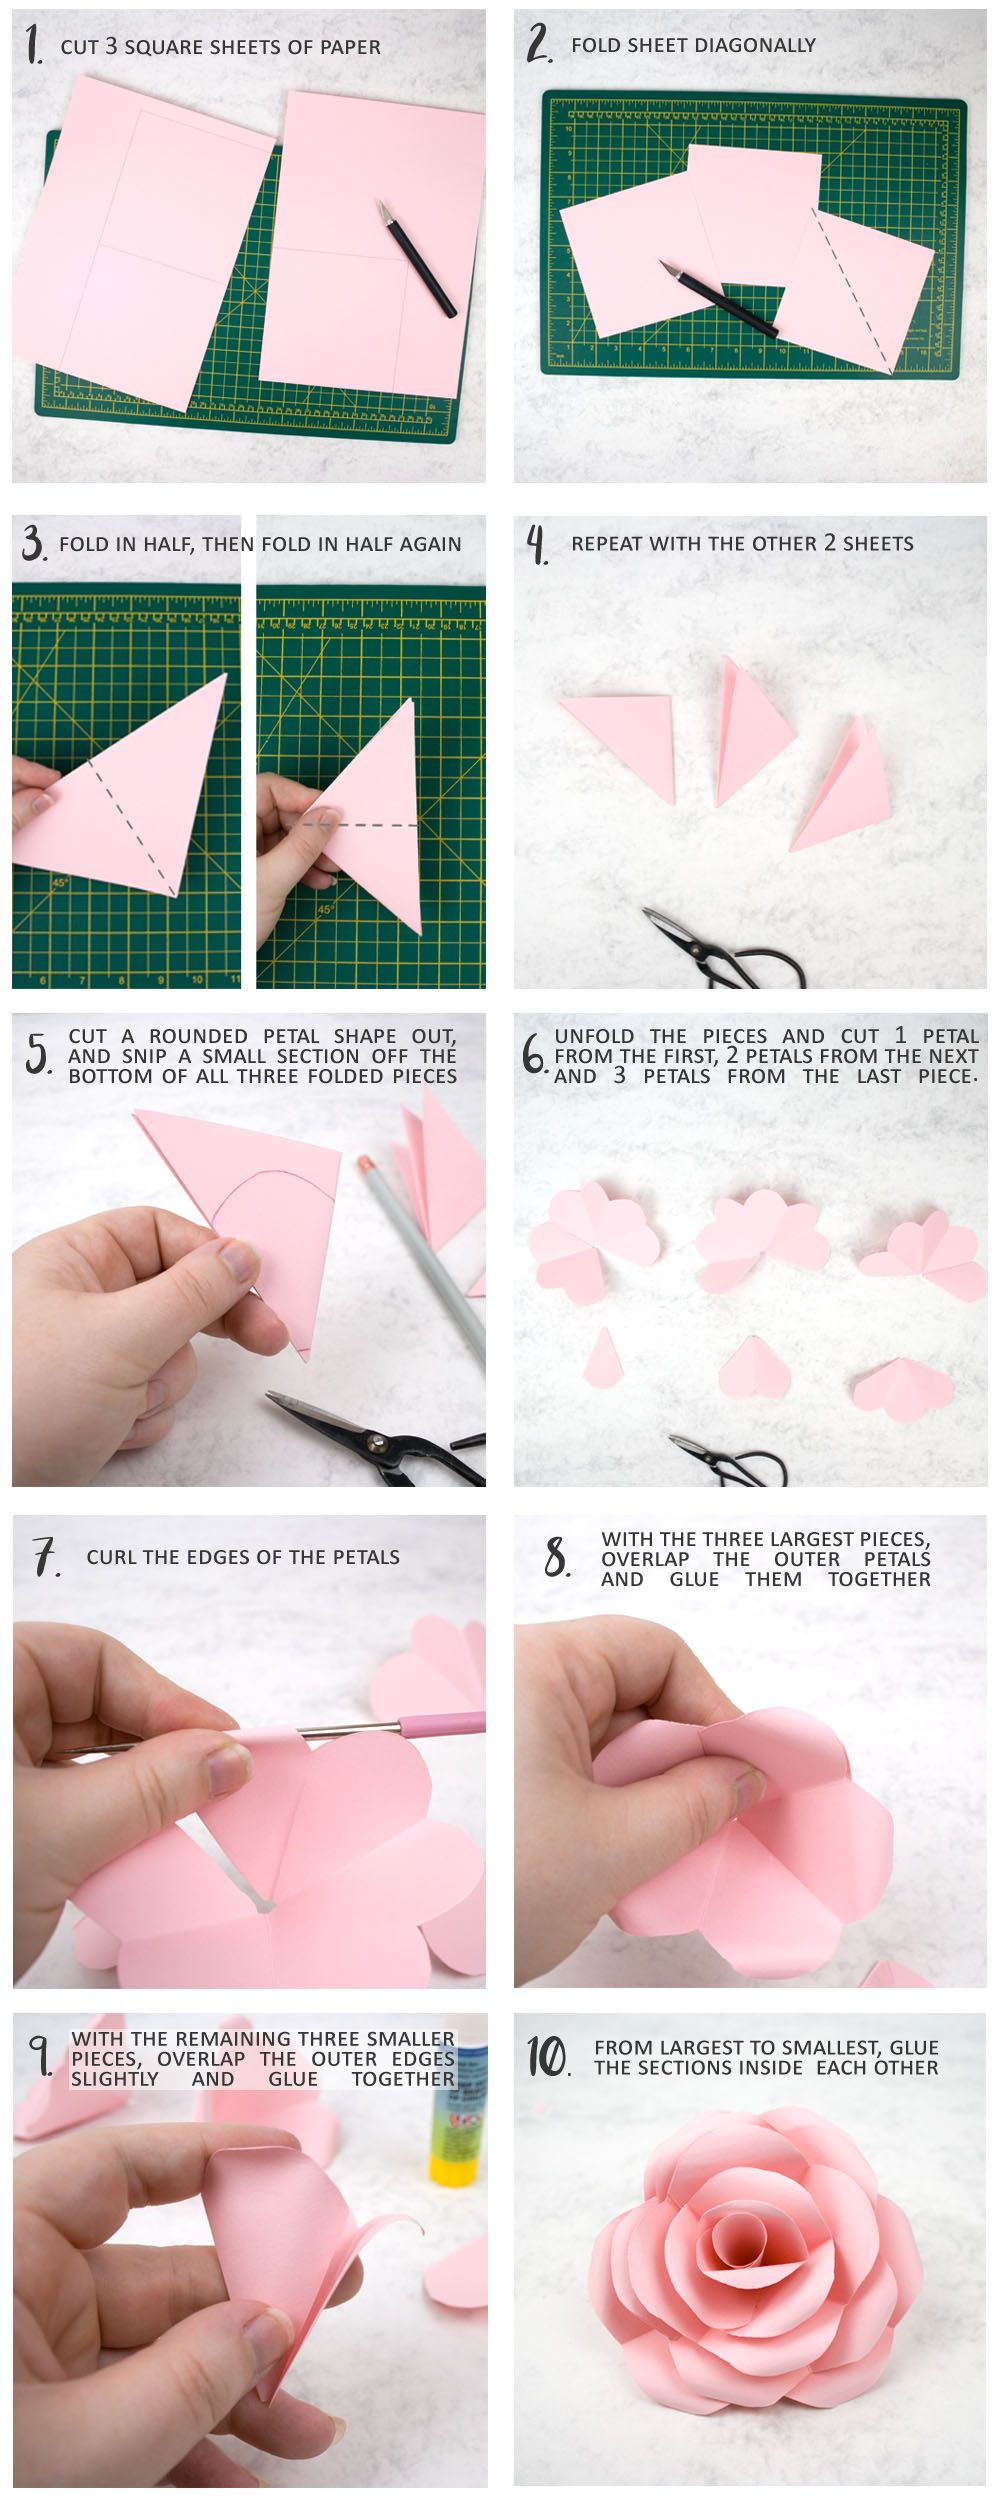
- Cut the Petals:
Start by cutting out petal shapes from your colored paper. You can create a template to make this easier. A simple petal shape is a rounded teardrop, approximately 3 inches long. Aim for about 5-7 petals per rose for a fuller look.
- Shape the Petals:
Next, take each petal and gently curve the edges. You can do this by rolling them around a pencil or your finger to give them a natural, wavy look. This step adds dimension and realism to your roses!
- Assemble the Rose:
Start with one petal and add a small dab of glue to the base of it. Begin wrapping the second petal around the first one, securing it with glue. Continue adding petals one at a time, overlapping them slightly as you go, until you achieve your desired rose shape.
- Add the Center:
For the center of your rose, you can either use a small rolled piece of paper or simply tighten the last petal around the center to give that traditional rose appearance.
- Finish with a Stem (Optional):
If you want your paper rose to have a stem, take a piece of florist wire and insert it into the base of the rose. Secure it with green tape to ensure it stays in place. This also gives your rose a realistic touch!
And there you have it! Your very own small paper rose! You can create them in different colors and sizes, or even combine them in a bouquet to showcase your newfound skills!
Also Read This: How to Apply Mascara Perfectly for Full Lashes on Dailymotion
4. Tips for Perfecting Your Paper Roses
Now that you know how to make small paper roses, let's talk about some tips that will take your crafting to the next level. Whether you’re making these flowers for home decor, gifts, or special occasions, here are some handy hints to ensure they turn out beautifully:
- Choose the Right Paper: The type of paper you use can significantly affect the look of your roses. Crepe paper is stretchy and provides a lovely texture, while cardstock is sturdier and allows for better shaping.
- Experiment with Sizes: Don't hesitate to play around with different petal sizes! Mixing small and larger petals can create a more dynamic and interesting rose.
- Add Details: Use a marker or paint to add details like veins or shading on the petals. This small touch can enhance the realism of your flowers and make them visually appealing.
- Practice Your Forming Technique: The key to realistic petals is how you shape and position them. Spend some time practicing the curling and overlapping techniques until you find a look that you love.
- Use Floral Tape Wisely: When adding stems to your roses, wrapping the florist tape smoothly around the wire will create a clean and professional look. Be sure to stretch the tape slightly as you wrap, which makes it adhere better.
Making small paper roses is all about practice and creativity! Don’t hesitate to customize your flowers based on your style or the occasion. With these tips and your own artistic flair, you'll be crafting stunning paper roses in no time!
Also Read This: How to Make Friendship Bracelets with Rubber Bands on Dailymotion
5. Variations and Techniques for Different Roses
If you’ve mastered the basics of making small paper roses, it’s time to experiment with some variations and techniques! Not only will this allow you to create different styles, but it’ll also add a personal touch to your floral creations. Here are some exciting variations you can try:
- Color Combinations: Instead of using a single color for your roses, mix and match shades to create a gradient effect. For instance, start with a deep red at the base and gradually transition to a lighter shade at the tips. This adds depth and dimension to your roses!
- Different Petal Shapes: Rather than the typical rounded petals, why not try creating pointed or jagged edges? This simple change can mimic the look of different rose varieties, such as garden roses or wild roses.
- Using Different Paper Types: Experiment with textured papers like tissue, crepe, or even patterned scrapbook paper. Each type will give your roses a unique finish, from soft and delicate to bold and vibrant.
- Size Variations: Play around with the size of your petals. Create smaller roses for a delicate look, or larger ones for a statement piece. Just adjust the dimensions of your templates slightly to achieve different flower sizes.
- Layering Techniques: For a more realistic appearance, consider layering multiple rows of petals. Start with three larger petals at the bottom and gradually add smaller petals on top. This gives your roses a fuller look that replicates real blooms.
These variations not only enhance your skills but also open up new creative avenues for your projects. Don’t hesitate to combine these techniques to craft unique designs that truly represent your style. Remember, the joy of crafting lies in exploration—so get those creative juices flowing!
Also Read This: Don Tiger King on Dailymotion – Watch the Viral Series
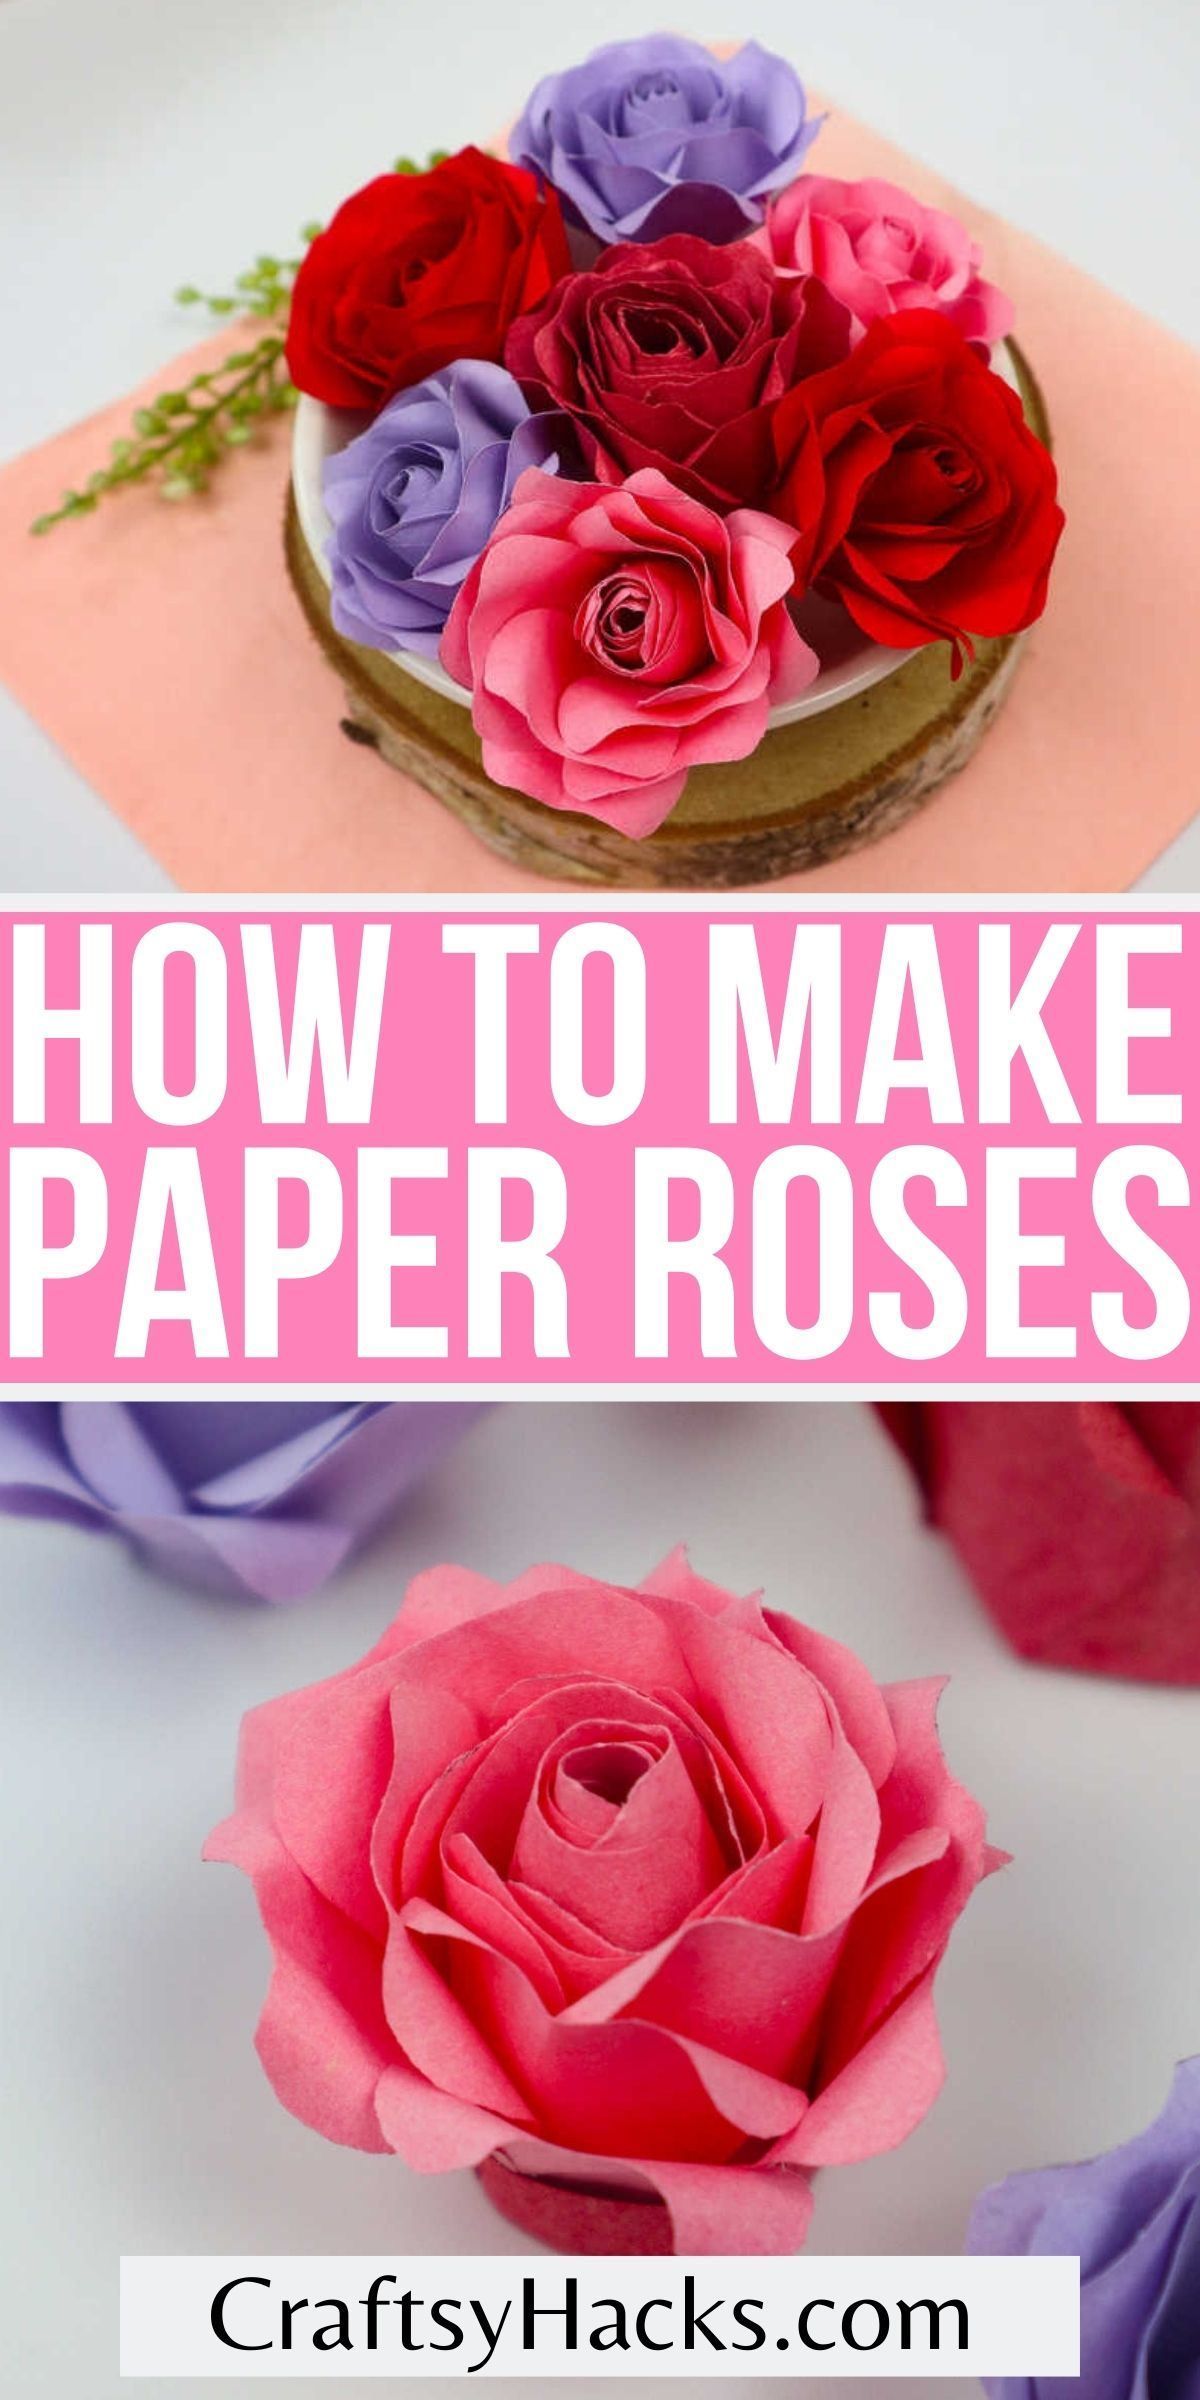
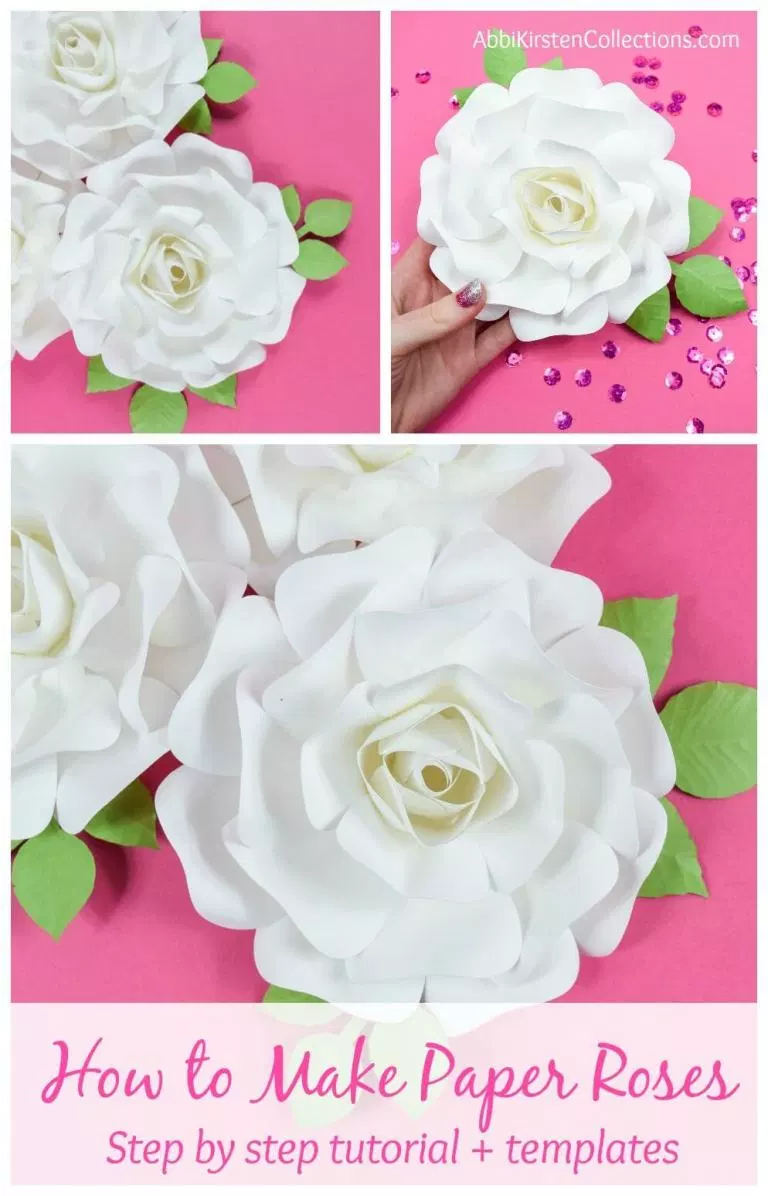
6. How to Use Your Small Paper Roses in Decor
So, you've made these adorable small paper roses—now what? The good news is there are countless ways to incorporate them into your decor, adding a splash of color and charm to every space! Here are some fun and easy ideas:
- Table Centerpieces: Arrange a bouquet of your small paper roses in a beautiful vase as a centerpiece. Mix different colors and sizes for an eye-catching design that can elevate any dining table or coffee table.
- Wall Art: Create a stunning wall display by attaching your paper roses to a canvas or directly onto the wall. You can arrange them in a heart shape, a wreath, or even scatter them randomly for a whimsical touch.
- Gift Wrapping: Use your small roses as finishing touches for gift wrapping. Tie a few roses onto your gift with twine or ribbon to add a personal touch that your loved ones will appreciate.
- Party Decorations: For birthdays, weddings, or any special event, use your paper roses to create garlands or table runners. Hang them up or scatter them around the venue for an enchanting atmosphere.
- Hair Accessories: Get creative and make hairpins or headbands featuring your small roses. Attach them to bobby pins or use them in a floral crown for special occasions!
Incorporating your small paper roses into your decor not only showcases your crafty skills but also brings warmth and personality into your home. Plus, since they’re made of paper, they’ll last much longer than real flowers—making them a smart choice for a sustainable and lasting decoration. So, let your creativity run wild and see how far you can take these lovely blooms!
Conclusion and Final Thoughts
Creating small paper roses can be a delightful and fulfilling craft project. Not only do these lovely flowers add a personal touch to various decorations, but they also serve as a wonderful way to express creativity. Throughout this guide, we have taken you through the steps needed to create these charming paper roses, and we hope you found the process enjoyable and rewarding!
Here are some key takeaways from our complete video guide:
- Materials Matter: Choosing the right type of paper, such as crepe or cardstock, can significantly impact the final appearance of your roses.
- Practice Makes Perfect: Don’t be discouraged if your first few attempts aren't perfect. Crafting is all about honing your skills over time.
- Personalize Your Blooms: Feel free to experiment with colors and embellishments, making each rose unique to your style!
- Use Your Creations: Small paper roses can be used in various ways, such as in bouquets, gift decorations, or even home decor.
We encourage you to take the knowledge shared in our video guide and let your imagination blossom! Remember, crafting is not just about the end result but also about enjoying the journey of creation. So, gather your supplies, unleash your creativity, and start making beautiful paper roses today!
 admin
admin


