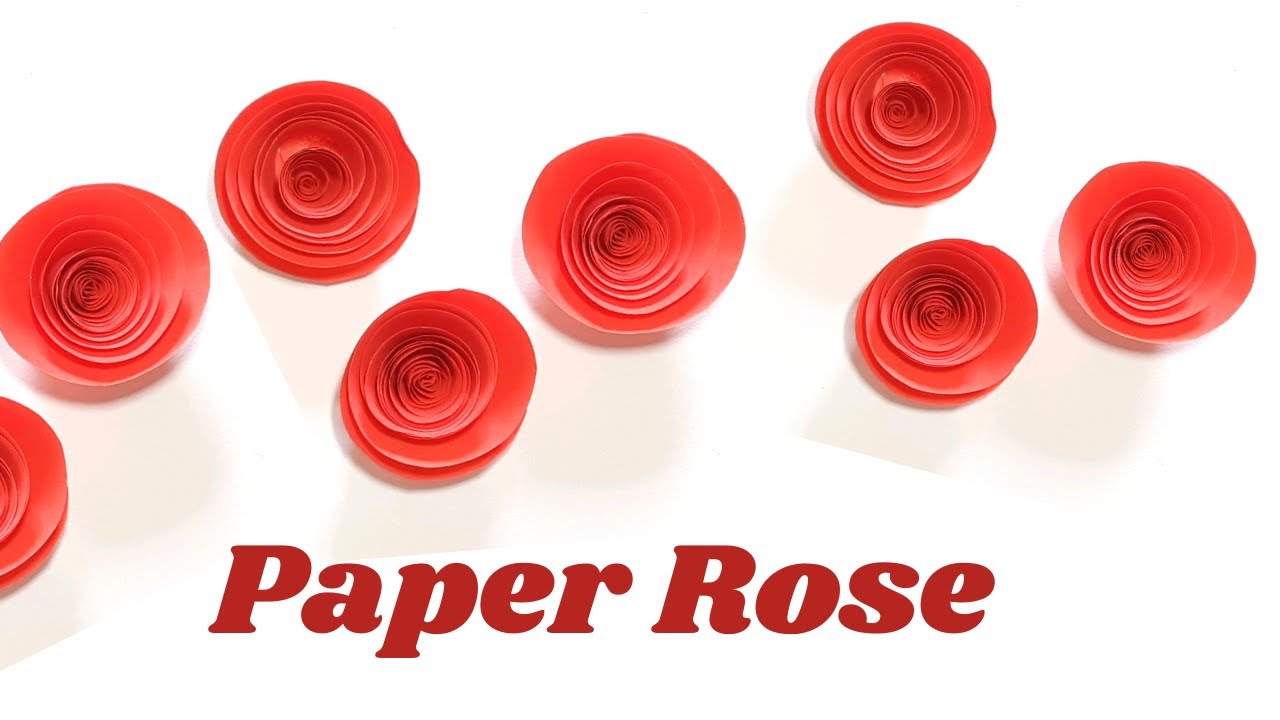
Have you ever gazed at a beautiful rose and wished you could capture that beauty forever? Making small paper roses is a delightful way to express your creativity and add a touch of charm to your space. Not only are these roses perfect for decoration, but they also make thoughtful gifts for friends and loved ones. With just a few materials and some simple steps, you can create stunning paper roses that bring a smile to anyone's face. Ready to dive into the world of paper crafting? Let’s get started!
Materials Needed for Crafting Paper Roses
Before we roll up our sleeves and start crafting, let’s gather all the materials you’ll need. Here’s a handy list to ensure you have everything at your fingertips:
- Colored Paper: You can use any color you like! Construction paper, scrapbook paper, or even old book pages work wonderfully.
- Scissors: A good pair of craft scissors will help you cut accurately.
- Glue: A glue stick or liquid glue will help keep your petals together.
- Pencil: For tracing and marking your petal shapes.
- Florist Wire: This will serve as the stem for your roses.
- Green Tape: Floral tape is great for wrapping the stems and adding a natural look.
- Ruler: For measuring and ensuring your petals are uniform.
- Optional Materials: Glitter, beads, or buttons for extra flair!
Once you have all these materials ready, you’ll find that making paper roses is not only easy but also incredibly rewarding. Each piece of paper transforms into a beautiful flower with just a bit of patience and creativity. So, let’s move on to the fun part — crafting our lovely paper roses!
Also Read This: How to Make a Waterfall Braid: Dailymotion’s Simple Hairstyling Guide
3. Step-by-Step Instructions to Create Small Paper Roses
Creating small paper roses is not only a fun craft but also a delightful way to add a personal touch to gifts, decorations, or even your home. Let’s dive into the step-by-step process!
Materials You Will Need:
- Colored paper (craft paper or origami paper works best)
- Scissors
- Glue or double-sided tape
- Pencil
- Green paper for leaves (optional)
- Wire (for stems, optional)
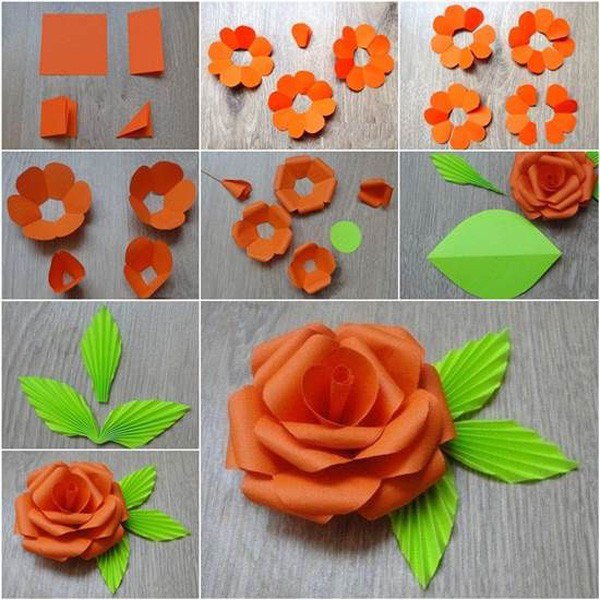
Step 1: Cut the Petals
Start by cutting out petal shapes from your colored paper. You can make your petals any size you like, but a good starting point is to make them about 2 inches long and 1 inch wide. Aim for 5 to 7 petals per rose for a fuller look.
Step 2: Shape the Petals
To give your petals a more realistic look, gently curl the edges using a pencil or your fingers. Just wrap the edges around the pencil to create a slight curve. This will add depth to your rose.
Step 3: Create the Rose Center
Take one petal and roll it tightly from the base up to form the center of your rose. Secure it with a bit of glue. This will be the heart of your flower, so make sure it’s nice and tight!
Step 4: Add More Petals
Now, one by one, take your additional petals and glue them around the center. Overlap them slightly to create a natural look. Continue adding petals in a circular fashion until you’re happy with the fullness of your rose. You can adjust how close or far apart the petals are based on your preference.
Step 5: Secure the Rose
Ensure all the petals are securely glued. If you want to add a stem, you can attach a piece of wire to the base of the rose. For a more natural touch, wrap the wire with green paper or floral tape.
Step 6: Create Leaves (optional)
If you’d like to add leaves, cut simple leaf shapes from green paper. Attach them to the stem or base of the flower. This will complete the look and give your rose a more realistic appearance!
And there you have it! With just a few steps, you've created a beautiful small paper rose. Feel free to experiment with different colors and sizes!
Also Read This: How to Download Dailymotion Videos on iPhone: Quick Tips and Tricks
4. Tips for Perfecting Your Paper Roses
Now that you’ve made your first small paper rose, let’s talk about some tips that will help you perfect your crafting skills and elevate your flower-making game!
Tip 1: Experiment with Paper Types
Different types of paper will yield different results. For a delicate look, try using tissue paper. For a sturdier rose, cardstock can work well. Explore different textures and colors to find what you love most!
Tip 2: Use a Variety of Petal Shapes
Don’t feel confined to a single petal shape! Try making some petals longer or wider for a unique look. You could even create a mix of shapes within the same rose for added charm.
Tip 3: Add Fragrance for a Special Touch
If you want to give your paper roses an extra special touch, lightly spritz them with a floral scent. Just be careful not to soak the paper!
Tip 4: Practice Makes Perfect
Like any craft, making perfect paper roses takes practice. Don’t get discouraged if your first few attempts don’t turn out as you hoped. Keep experimenting and refining your technique!
Tip 5: Watch Online Tutorials
If you want to see the process in action, check out video tutorials online. Sometimes watching someone else can spark new ideas or techniques you hadn’t considered.
By incorporating these tips into your crafting, you’ll find your skills improving and your roses becoming more beautiful with each creation. Happy crafting!
Also Read This: How to Verify Your Facebook Page for Free on Dailymotion
5. Creative Ways to Use Your Paper Roses
Once you've crafted your beautiful paper roses, the fun doesn’t have to stop there! There are countless creative ways to incorporate these charming blooms into your life. Here are some ideas to inspire you:
- Home Decor: Use your paper roses to brighten up any space! Create a stunning wall arrangement by grouping several roses of different sizes and colors. You can also add them to vases, jars, or even hang them from the ceiling for a whimsical touch.
- Gift Wrapping: Elevate your gift-giving game by attaching a paper rose to your gift wrap. It adds a personal touch that shows you care. You can make a small rose as a gift topper or create a bouquet of smaller roses to accompany a larger present.
- Party Decorations: Planning a party? Incorporate your paper roses into your decorations. Use them as table centerpieces, string them together for garlands, or place them in mason jars on the buffet table. They’re perfect for birthdays, weddings, or any special occasion!
- Cards and Scrapbooking: Add a unique touch to your handmade cards or scrapbook pages with your paper roses. They can be used as focal points or embellishments that will surely impress anyone who receives your thoughtful creations.
- Hair Accessories: Transform your paper roses into beautiful hair accessories! Create hairpins or clips by attaching small roses to bobby pins or barrettes. They’re perfect for adding a pop of color to any hairstyle!
These are just a few of the many ways you can use your paper roses. Let your imagination run wild! You’ll find that these delicate flowers can brighten up any corner of your home or add a special touch to your gifts.
6. Conclusion and Encouragement to Share Your Creations
Congratulations on mastering the art of making small paper roses! This delightful craft not only allows you to express your creativity but also provides a way to spread joy and beauty in your surroundings. Remember, every rose you create tells a story of your creativity and passion for crafting.
As you explore different ways to use your paper roses, don’t forget to share your creations with friends and family. You can inspire others to pick up this enjoyable hobby and create their own unique pieces. Consider taking photos of your projects and posting them on social media, using hashtags like #PaperRoseArt or #CraftyCreations. You never know who you might inspire!
So, roll up your sleeves, get crafting, and embrace your inner artist! Enjoy the process, and remember that it's not just about the final product but also the joy and relaxation that comes with creating something beautiful. Happy crafting!
 admin
admin


