Are you tired of the hassle that traditional nail polish brings? Fret not! Peel-off nail polish is not only innovative, but it also offers a fun and mess-free way to update your nails. In this blog post, we’ll dive into how to make peel-off nail polish at home easily. This DIY project is not only straightforward but also lets you choose your colors and customize your designs. Say goodbye to the harsh chemicals and tedious removal processes and let’s embrace a more convenient way to look fabulous!
Why Choose Peel-Off Nail Polish?

Peel-off nail polish is gaining popularity, and for good reasons! Here are a few compelling reasons why you might want to consider switching to this exciting alternative:
- Easy Application and Removal: One of the biggest advantages is that it’s incredibly easy to apply. Just paint it on like a regular polish, and when you’re ready to change your look, simply peel it off!
- No Harsh Chemicals: Many traditional nail polishes contain toxic chemicals that can be harmful to both your nails and your health. Peel-off formulas often contain safer ingredients, making them a healthier option.
- Less Damage to Nails: Because peel-off nail polish is removed by lifting it off, it’s less likely to cause damage like traditional acetone removers can. This means healthier, happier nails!
- Fun and Versatile: You can mix and match colors and create fun designs effortlessly. Whether for a special occasion or just a day at home, peel-off nail polish provides limitless creativity.
- Kid-Friendly: If you have little ones who love to play with nail polish, peel-off formulas are perfect! They can paint their nails (and remove them) without the need for adult supervision.
With all these benefits, it’s no wonder why so many are opting for peel-off nail polish. Ready to try making your own? Let’s get started!
3. Ingredients Needed

Making your own peel-off nail polish at home is not only easy but also fun! Plus, you get to customize the colors and finishes to suit your style. Here’s what you’ll need to gather before we dive into the fun process:
- White Glue: A water-based white glue, like school glue or PVA glue, is the star of this DIY nail polish. It's non-toxic and easy to wash off, making it perfect for your peel-off polish.
- Food Coloring or Nail Polish Pigment: You can use food coloring to add stunning shades to your polish, or if you have some leftover powdered nail polish pigments, those work beautifully too!
- Water: Simple tap water will do to help thin and mix your glue and color together.
- Clear Top Coat (Optional): If you want to add an extra glossy finish to your nails, a clear top coat can give that salon-like shine!
- Nail Polish Remover: Though this is not an ingredient per se, having some remover on hand will help you clean up any mess or remove the polish later on.
Gather these ingredients, and you’re ready to unleash your inner nail artist! Now let's move on to the exciting part—creating your very own peel-off nail polish!
4. Step-by-Step Tutorial
Ready to whip up your own peel-off nail polish? Let’s get to it! Follow these simple steps to create your colorful concoction:
- Preparation of Your Workspace: Start by laying down some newspaper or paper towels to catch any spills. It’s always a good idea to keep things tidy!
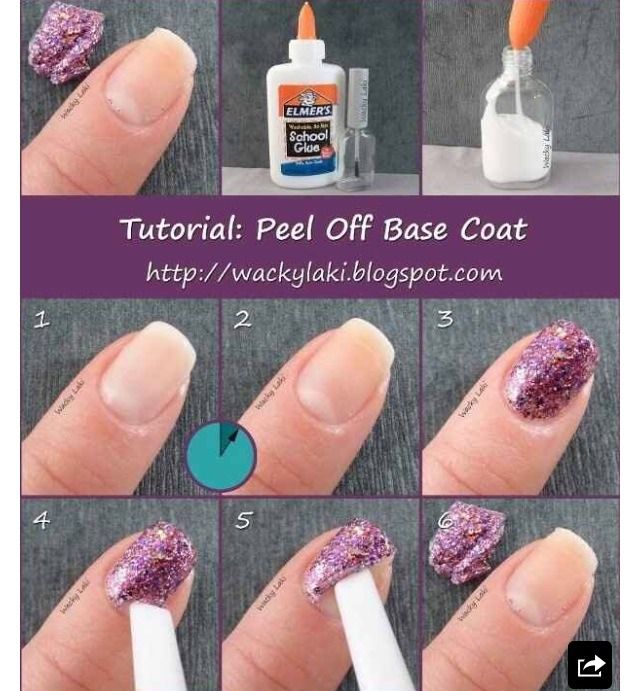
- Mixing the Base: In a small bowl, pour about 2 tablespoons of white glue. Next, add 1 tablespoon of water to thin out the mixture. Stir thoroughly until it's well combined.
- Add Color: Now, drop in a few drops of food coloring or nail polish pigment. Remember, the more you add, the more intense the color will be. Feel free to mix different colors for a unique hue!
- Final Mix: Stir the mixture until you achieve a consistent color. Make sure there are no lumps—smooth is the goal here!
- Application: Using a nail brush or the small brush from an empty nail polish bottle, carefully apply the polish to your nails just like you would with traditional nail polish.
- Drying Time: Allow your nails to dry completely. This should take about 20-30 minutes, depending on how thickly you applied the polish.
- Optional Finishing Touch: If you want a more durable finish, you can apply a clear top coat after the colored polish is dry.
- Peeling Off: The fun part! When you’re ready to remove your polish, simply peel it off from the edges. It should come off easily without any fuss!
And just like that, you have your very own homemade peel-off nail polish! Enjoy experimenting with different colors and finishes, and let your creativity shine!
Tips for Best Results
Making peel-off nail polish at home can be a fun and rewarding endeavor. Here are some tips that will help you achieve the best results:
- Choose the Right Base: Start with a high-quality base that is specifically formulated for peel-off formulas. Some common options include PVA glue or a water-based nail polish. Each will yield different results, so experiment with what works for you.
- Layering is Key: Apply multiple thin layers of polish rather than one thick coat. Thin layers dry faster and allow for easier peeling later on. Aim for three to four thin coats.
- Allow Proper Drying Time: Patience is essential! Make sure each layer is completely dry before applying the next. This can prevent smudging and will ensure that the polish adheres well to the base.
- Use a Topcoat: Consider applying a clear topcoat after your colored layers for added shine and durability. Just make sure it's compatible with your peel-off base!
- Keep Your Tools Clean: Always use clean brushes and utensils to prevent contamination. This will help ensure that your DIY polish comes out exactly how you envisioned it.
- Test on a Small Area: Before going all-in, test the peel-off polish on a small section of your nail to see how well it applies and removes. This gives you a chance to tweak your formula!
By following these simple tips, you’ll be well on your way to creating beautiful, peel-off nails that are easy to apply and remove!
Frequently Asked Questions
If you're new to making peel-off nail polish at home, you might have a few questions on your mind. Here are some of the most frequently asked questions along with their answers:
| Question | Answer |
|---|---|
| Can I use regular nail polish instead of a peel-off base? | No, regular nail polish is not designed for peeling off. It will not work effectively and may damage your nails. |
| How long does homemade peel-off nail polish last? | It lasts about 3-5 days before you may need to reapply, depending on your daily activities. |
| Can I add glitter or other decorations? | Absolutely! Just make sure they are compatible with the base you're using. |
| Is it safe to use glue as a base? | While PVA glue is commonly used, ensure it’s non-toxic and safe for cosmetic use. Always perform a patch test first! |
| What’s the best way to remove peel-off nail polish? | Simply gently lift the edge of the polish and peel it off! It should come off smoothly if applied correctly. |
Hopefully, this clears up any confusion and helps you feel more confident about making and using peel-off nail polish at home.
How to Make Peel-Off Nail Polish Easily at Home
Creating your own peel-off nail polish at home is a fun and cost-effective way to achieve beautiful nails without the hassle of traditional nail polish removal. With just a few simple ingredients, you can customize colors and finishes to suit your style. Here’s how to do it.
Ingredients Needed
- White Glue (school glue or PVA glue) - This will serve as the base of your peel-off polish.
- Food Coloring or Nail Polish Pigments - For color.
- Clear Nail Polish - To add shine and finish.
- Small Mixing Bowl - For combining the ingredients.
- Brush or Wand - To apply the polish.
Step-by-Step Instructions
- Start by taking approximately 2 tablespoons of white glue and pour it into the mixing bowl.
- Add a few drops of food coloring or nail polish pigments to achieve your desired color.
- Stir the mixture until the color is uniform and well combined.
- To give it a glossy finish, mix in 1 tablespoon of clear nail polish.
- Transfer the mixture into a clean nail polish bottle or a small container for easier application.
Application Tips
Shake the bottle gently before use to mix the contents. Apply a thin layer to your nails and wait for it to dry completely. You can apply additional coats for a more vibrant look.
Removing the Peel-Off Polish
Once you’re ready to remove the polish, simply start peeling it off from the edges. It should come off easily without any damage to your nails.
Conclusion
Making peel-off nail polish at home is not only an exciting DIY project but also allows for creativity in nail art. With just a few simple ingredients and steps, you can enjoy personalized nail polish that is easy to apply and remove.


