Have you ever thought about turning your love for nail art into a fun DIY project? Making your own nail paint at home is not only creative but also super fun! You can customize your favorite colors, avoid harmful chemicals found in commercial products, and even save money. Plus, it’s a great way to express your personality through unique shades and finishes. In this post, we’ll explore the benefits of creating your own nail polish and guide you through the process of making it at home. Let’s dive in!
Benefits of Making Nail Paint at Home
Creating your own nail paint is a rewarding experience that comes with numerous benefits. Here are some great reasons to consider whipping up your own polish:
- Customization: One of the biggest perks of homemade nail polish is that you can create custom colors that may not be available in stores. Want a stunning lavender with a hint of shimmer? Go for it! You can mix and match pigments until you find the perfect shade that reflects your style.
- No Harmful Chemicals: Many commercial nail polishes contain toxic ingredients like formaldehyde, toluene, and dibutyl phthalate, which can be harmful in the long run. By making your own polish, you can choose safer ingredients, ensuring that your nails and health are protected.
- Cost-Effective: Retail nail polish can add up quickly! By making your own, you can significantly reduce your beauty budget. Ingredients like clear nail polish base and pigments are usually inexpensive and can be used for multiple batches.
- Eco-Friendly: Home beauty projects typically use less packaging and can minimize waste. You can also reuse containers for your DIY creations, reducing your environmental footprint.
- Fun Activity: Making your own nail paint can be a delightful DIY project to enjoy with friends or family. You can host a nail-painting party where everyone creates their unique shades, mixing colors and discussing designs. It’s a great way to bond over a fun craft!
- Creativity Boost: Experimenting with colors, textures, and even scents allows your creativity to flourish. You can try adding glitter, flakes, or even essential oils for added effect. Each batch is a chance to innovate and try something new.
In summary, making your own nail paint opens up a world of possibilities that are as exciting as they are rewarding. With an array of benefits like customization, safe ingredients, cost savings, and an eco-conscious approach, it's an enriching experience to indulge in. Plus, it’s simply gratifying to show off the unique colors you've created yourself! So, why not roll up your sleeves and give it a try?
Also Read This: How to Make Paper Cars Easily
3. Essential Ingredients for DIY Nail Paint
If you're diving into the world of DIY nail paint, you'll need to gather a few essential ingredients to create your masterpiece. The beauty of making your own nail polish is that you can customize the colors and textures to suit your personality and style. Here are the key ingredients you'll need:
- Clear Nail Polish Base: This is your main ingredient. You can either buy a base coat or use a clear nail polish that's running low. It acts as the foundation for your vibrant colors.
- Color Pigments: These can be purchased at craft stores or online. Consider using eye shadow, mica powders, or even colored cosmetic pigments to create the hue you desire.
- Matte or Shimmer Additives: If you want to create a matte finish, use some cornstarch or specific matte pigments. For sparkle, try fine glitter or shimmer powders!
- Dilutants: To achieve the right consistency, you might need some alternatives like nail polish thinner or even a few drops of acetone. Be cautious with acetone, as too much can alter the entire mixture.
- Essential Oils (optional): For a delightful scent, add a few drops of essential oils like lavender or lemon. Plus, some oils can be good for your nails!
Once you have your ingredients lined up, you’re well on your way to creating beautiful, personalized nail polish. Just remember to have fun with the process and don’t hesitate to experiment with different colors and textures!
Also Read This: How to Apply Perfect Eyeliner for a Bold Look on Dailymotion
4. Step-by-Step Guide to Creating Your Nail Paint
Now that we’ve covered the essential ingredients, it’s time to get our hands dirty (figuratively, of course)! Creating your own nail paint is not only simple but also incredibly satisfying. Let’s break it down step by step:
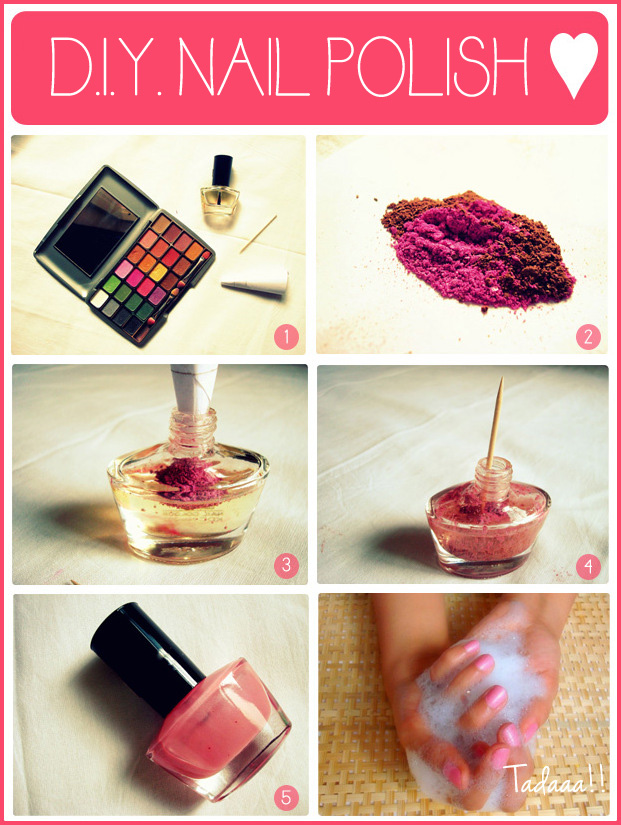
- Prepare Your Workspace: Start by clearing a workspace where you can mix your ingredients without distractions. Lay down some newspaper or paper towels to catch any spills and make cleanup easier.
- Gather Your Tools: You’ll need a small mixing bowl, a stirrer (a toothpick or a small spoon works well), a funnel (optional), and empty nail polish bottles to store your creations.
- Mix the Base: Pour about 3 parts of clear polish base into your mixing bowl. This will be the bulk of your nail paint.
- Add Color Pigments: Start adding your chosen color pigments to the base. If you’re using powdered pigments, a little goes a long way! Mix thoroughly until you achieve your desired shade.
- Add Additives: If you want a matte finish, sprinkle in a small amount of cornstarch. For a little sparkle, add fine glitter. Stir well to ensure an even distribution.
- Adjust Consistency: Check the consistency of your polish. If it’s too thick, slowly add a few drops of the dilutant and mix until you get a smooth, pourable consistency.
- Transfer to Bottles: Using a funnel (or carefully pouring), transfer your freshly mixed nail polish into the empty bottles. Make sure to leave a little space at the top to allow for easy application.
- Seal and Label: Once filled, securely close the bottles and label them with the color name or date. This helps you keep track and know what to expect next time you decide to pamper yourself!
And there you have it! Your DIY nail paint is ready to be applied. Don't forget to do a quick patch test on your nail to see how it looks and feels. Enjoy your custom creations and get ready to show off those beautiful, personalized nails!
Also Read This: Create an Origami Rabbit Easily: Watch the Video on Dailymotion
5. Tips for Customizing Your Nail Paint Colors
Whether you're feeling a bit adventurous or just want to match your nail color to that fabulous outfit, customizing your homemade nail paint colors is a fun way to express your personality! Here are some simple tips to help you create stunning shades:
- Start with the Basics: Utilize a clear base for your nail paint. Once you have your transparent base ready, you can mix in pigments or colorants to achieve the look you want. White base can also help to make colors pop!
- Mixing Colors: Don’t be afraid to blend different colors! Much like painting, combining two or more colors can yield a unique shade. For example, mixing red and white gives you a lovely pink. Keep a notebook of your color blends to recreate your favorites!
- Use Household Items: If you find yourself short on traditional pigments, you can use items like food coloring, powdered spices (like turmeric for yellow or matcha for green), or even eyeshadow! Just be aware that results may vary, and test them on a small scale first.
- Experiment with Textures: Want to add a twist? Try incorporating glitter, shimmer, or even chalk dust for a matte finish! Just ensure they mix well with your base and won’t clump when applied.
- Test Before You Commit: Always do a test run! Paint a small swatch on a piece of paper or a clear plastic sheet to see how the color looks once it dries. This prevents any surprise outcomes on your nails!
- Label Your Creations: Keep your custom nail colors organized! Use small containers with labels so you can remember the recipes or ingredients used for each mix.
Customizing your nail paint is all about experimentation and having fun! Don’t be afraid to go wild with your colors. Remember that your nails are a canvas for creativity!
Also Read This: Simple Steps to Train a Dog to Follow Commands with Dailymotion Guides
6. How to Properly Store Your Homemade Nail Paint
One of the most critical aspects of maintaining your DIY nail paint is proper storage. After spending time creating your masterpiece, you want it to last! Here are some effective tips on how to store your homemade nail paint to keep it fresh and effective:
- Keep It Cool and Dark: Store your nail paint in a cool, dark place away from direct sunlight. Sunlight can alter colors and degrade the quality of your paint, while heat can alter its consistency.
- Use Glass or Plastic Containers: Opt for airtight glass jars or plastic containers to store your nail paint. Avoid using metal containers as they may react with the ingredients and spoil your paint.
- Seal It Tight: Ensure that the lids of your containers are tightly sealed. This prevents air from getting in, which can dry out your nail paint and change its texture.
- Label and Date Your Products: As with any DIY product, it's essential to keep track of when you made your nail paint. Label each container with the date and the color mix to make it easier to identify and ensure you use the oldest ones first.
- Shake Before Use: Over time, your nail paint might separate. Before using it again, give it a good shake to remix all the components. If you notice it’s too thick, you can add a tiny bit of solvent (like nail polish remover) to thin it out.
- Check for Shelf Life: Different ingredients have different shelf lives. Keep an eye on your creations, and if you notice any changes in smell or appearance, it’s best to discard them.
Taking the time to store your nail paint correctly means you can enjoy your colorful creations for longer. Plus, it’s always satisfying to look through your little collection of homemade nail paints, knowing you crafted each color yourself!
Also Read This: Understanding What Sets Dailymotion Apart from Competitors in Video Hosting
7. Safety Precautions When Making Nail Paint
Creating your own nail paint at home can be a fun and rewarding experience, but safety should always be a priority. Here are some essential safety precautions to keep in mind while making your own nail paint:
- Use the Right Ingredients: Always opt for cosmetic-grade ingredients. Some pigments and additives can be toxic if used improperly. Avoid using art supplies that are not specifically made for cosmetic use.
- Check Allergies: Before trying a new ingredient, conduct a patch test on a small area of skin to ensure you don’t have an allergic reaction.
- Work in a Well-Ventilated Area: Nail paint ingredients can have strong odors or fumes. Ensure you’re working in a room with good airflow or near an open window to prevent inhalation of harmful substances.
- Wear Protective Gear: Consider wearing gloves and a mask to protect your skin and lungs from any irritants. Don’t forget safety goggles to protect your eyes, especially when handling pigments.
- Keep Ingredients Away from Children and Pets: Store your materials in a place that’s inaccessible to children and pets. The vibrant colors may attract them, but some ingredients can be harmful if ingested.
- Handle Ethyl Acetate with Care: If you're using ethyl acetate as a solvent, remember that it is flammable. Keep it away from heat sources or open flames.
- Dispose of Materials Properly: If you have leftover chemicals or materials, dispose of them according to local regulations. Never pour them down the sink, as this can harm the environment.
By following these precautions, you can enjoy the creative process of making your DIY nail paint while keeping yourself and your surroundings safe.
8. Conclusion: Enjoying Your DIY Nail Paint Experience
Embarking on the journey of creating your own nail paint can be an exciting and fulfilling experience. Not only does it allow you to express your creativity, but it also gives you complete control over the ingredients and colors you use. Here are a few tips to make the most of your DIY nail paint experience:
- Experiment with Colors: Don’t hesitate to mix and match your pigments! You can create endless shades by blending different colors.
- Customize Your Formula: Adjust the thickness and drying time of your nail paint by altering the amount of solvent or thickening agent. This creates a more personalized product that suits your application style.
- Rediscover Application Techniques: Try out different applicators such as sponges or brushes to create unique nail art designs. The application process can transform your color into a work of art.
- Share Your Creations: Enjoy your nail paint alone or share it with friends! Hosting a DIY nail paint party can be a fun way to show off your creations and learn from others.
- Document Your Journey: Keep a journal of your recipes, adjustments, and results. This helps you refine your process for future creations and catalog your favorite mixes.
So, gather your friends, unleash your inner artist, and enjoy the vibrant world of DIY nail paint! Whether you’re preparing for a special occasion or just looking to add a creative flair to your daily routine, homemade nail polish can brighten your day while keeping it personal and fun. Happy painting!
 admin
admin


