Have you ever visited a Behance portfolio and felt frustrated by slow-loading images? You’re not alone! Optimizing image sizes is crucial for creating a smooth user experience and showcasing your work effectively. In this post, we'll dive into how to optimize your images on Behance, ensuring they load quickly and look stunning. Let’s get started!
Why Image Size Matters for Loading Speed
When it comes to loading speed, image size plays a significant role. Here’s why you should care:
- First Impressions Count: Visitors often judge your portfolio within seconds. Large images can create a lag that may turn them away before they even see your work.
- SEO Benefits: Search engines prefer fast-loading websites. Optimizing your images can improve your search rankings, making it easier for potential clients to find you.
- User Experience: A smooth browsing experience keeps visitors engaged. Fast loading images mean less waiting and more exploring.
- Mobile Responsiveness: With many users accessing Behance via mobile devices, smaller image sizes ensure that your portfolio looks great on any screen without excessive data usage.
But how do image sizes affect loading speed? Here’s a breakdown:
| Image Format | File Size (Typical) | Best Use Case |
|---|---|---|
| JPEG | 100 KB - 1 MB | Photographs and detailed images |
| PNG | 50 KB - 500 KB | Images with transparency or fewer colors |
| GIF | 100 KB - 1 MB | Simple animations |
| WebP | 30 KB - 500 KB | High-quality images with smaller file sizes |
As you can see, different formats have varying impacts on file size. Choosing the right format for your images can drastically affect loading speeds. For instance, opting for JPEG for photos while using PNG for graphics with transparency can balance quality and performance.
In summary, image size is more than just a number; it directly impacts how visitors perceive your portfolio and interact with your work. By optimizing your images, you not only enhance loading speed but also improve overall user satisfaction. So, let’s keep those images lean and mean for the best Behance experience!
Also Read This: Create Your Own Behance Portfolio with a Personalized URL
3. Steps to Resize Images for Behance
When it comes to showcasing your work on Behance, image size can make a big difference in how quickly your project loads and how it engages viewers. Here’s a simple step-by-step guide to resizing your images effectively:
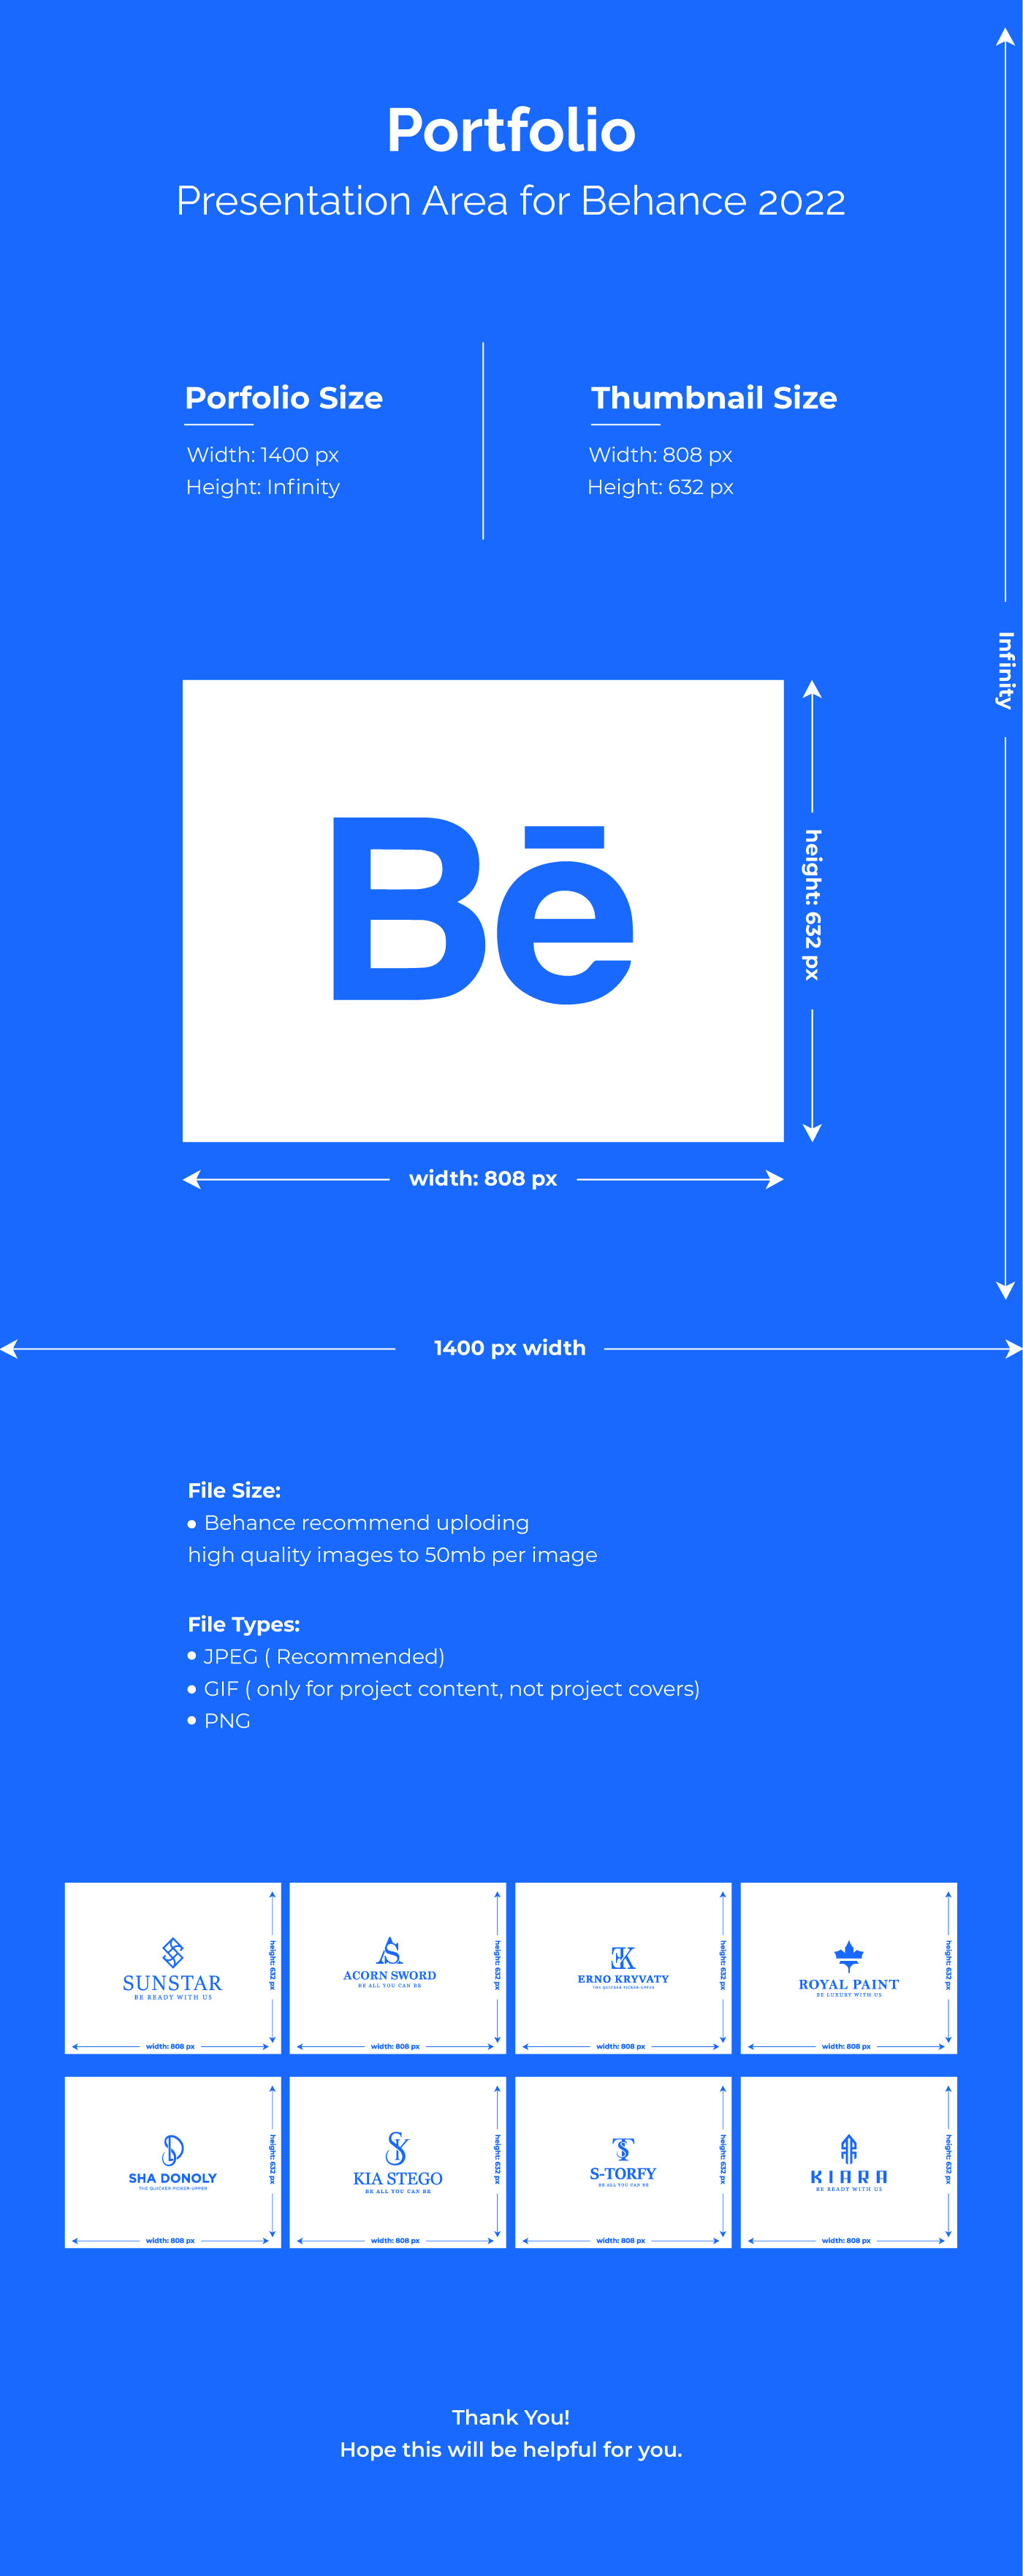
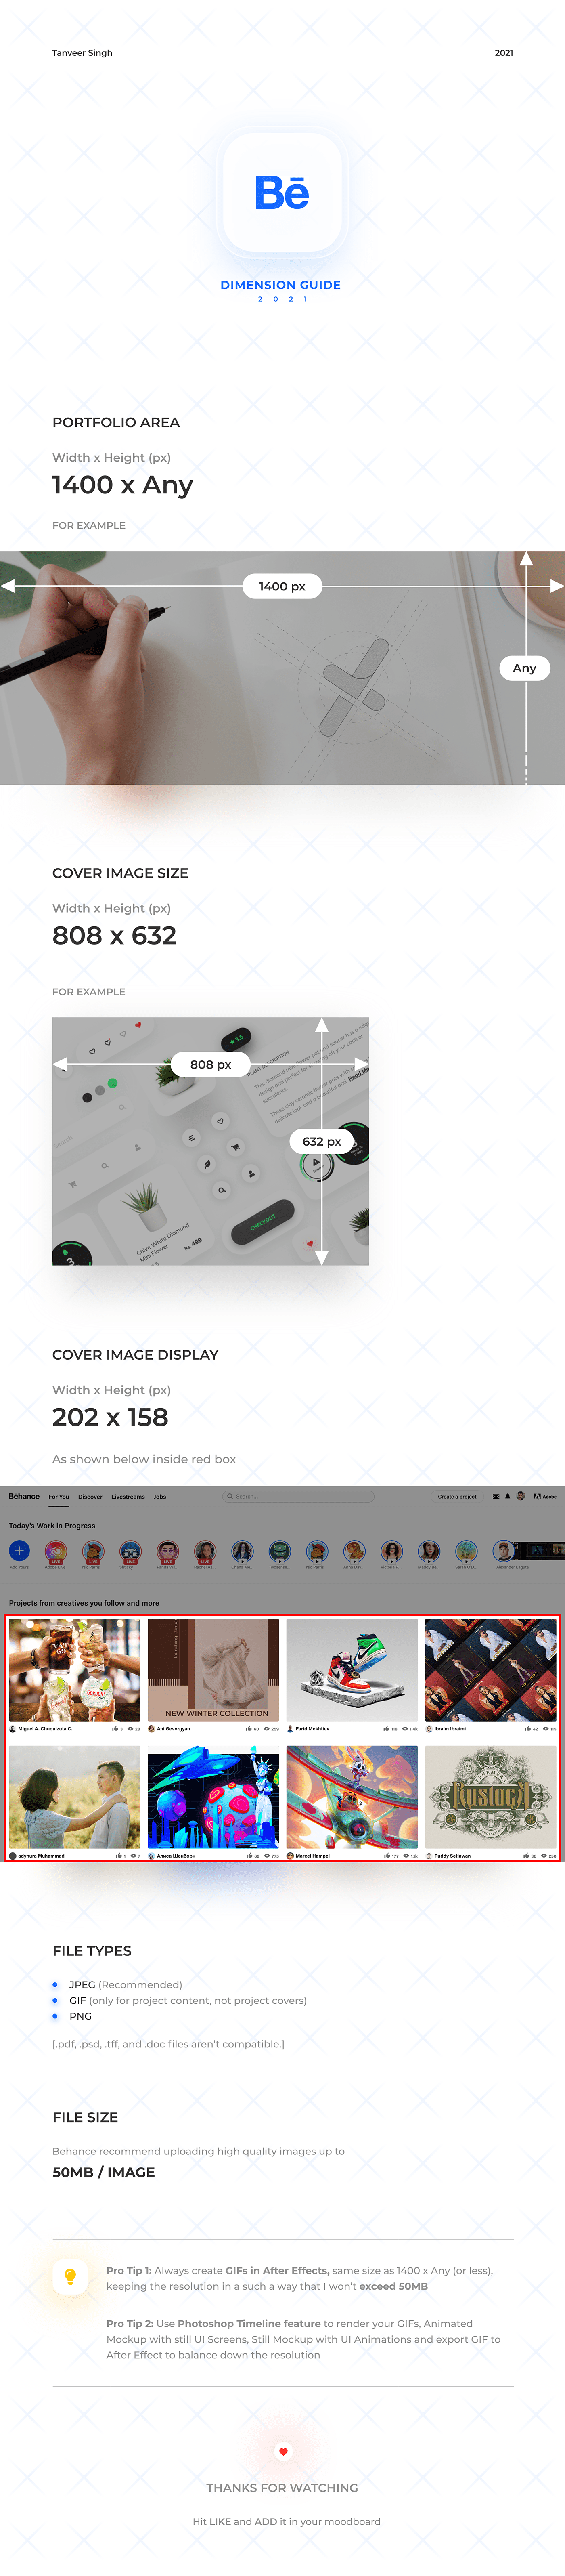
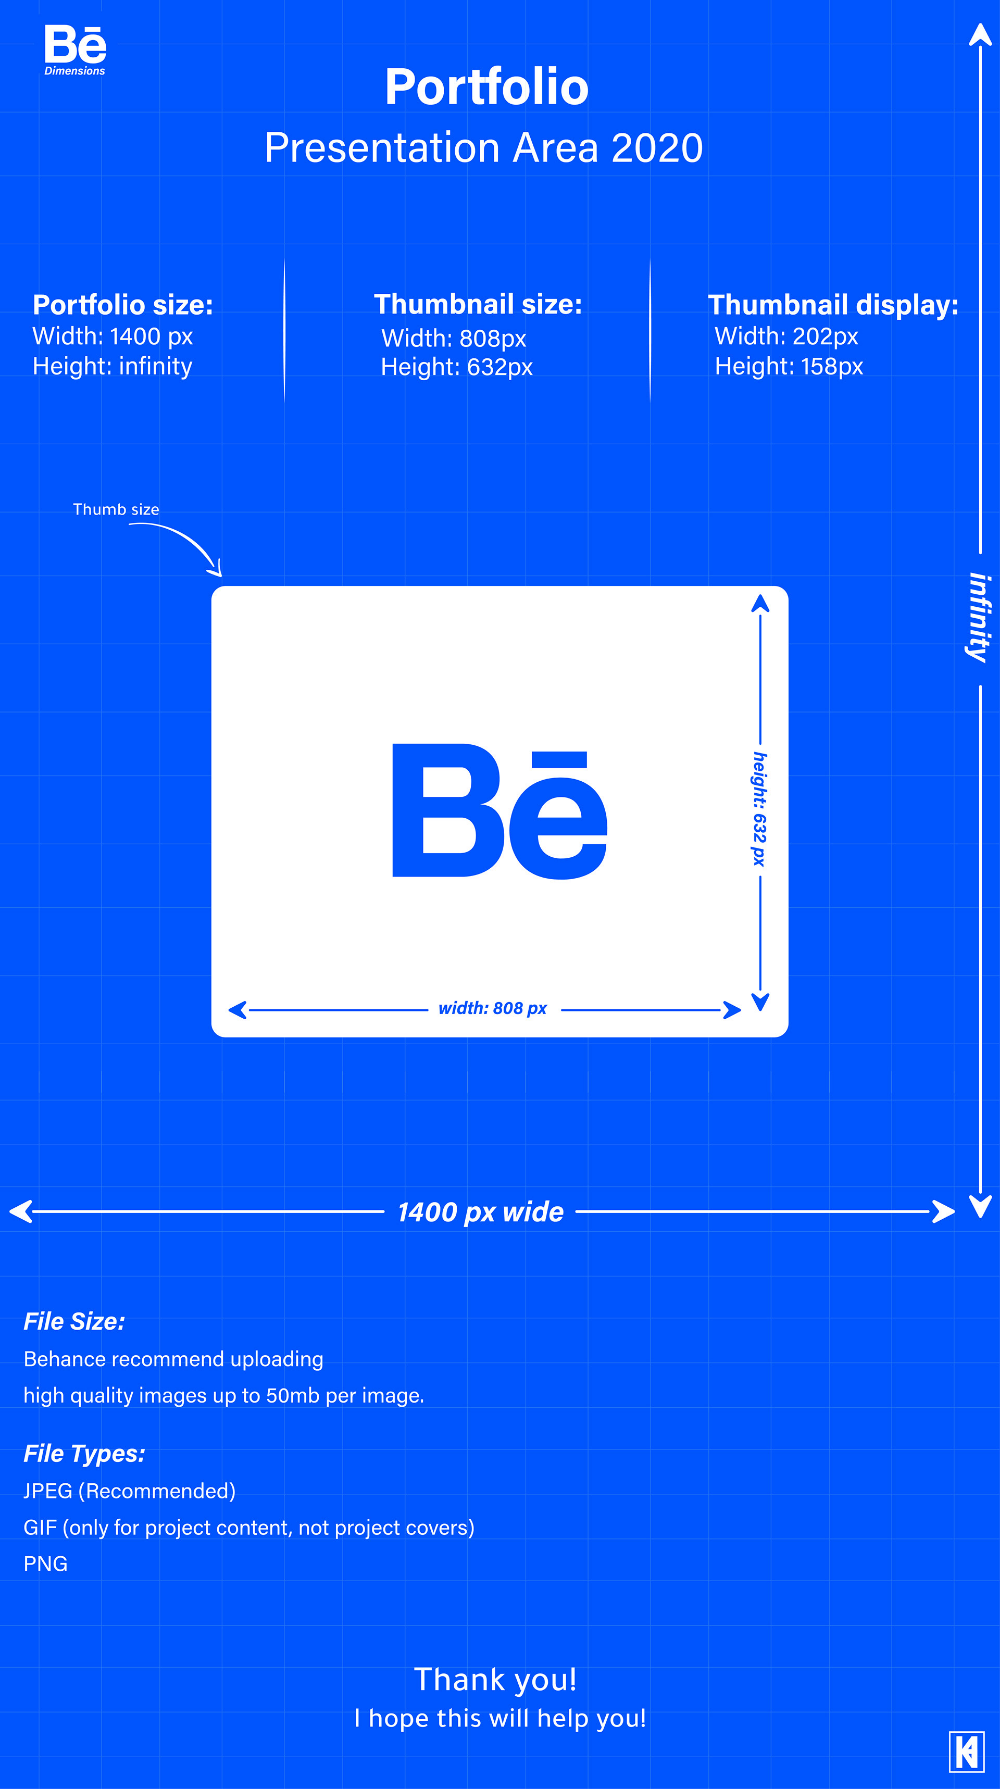
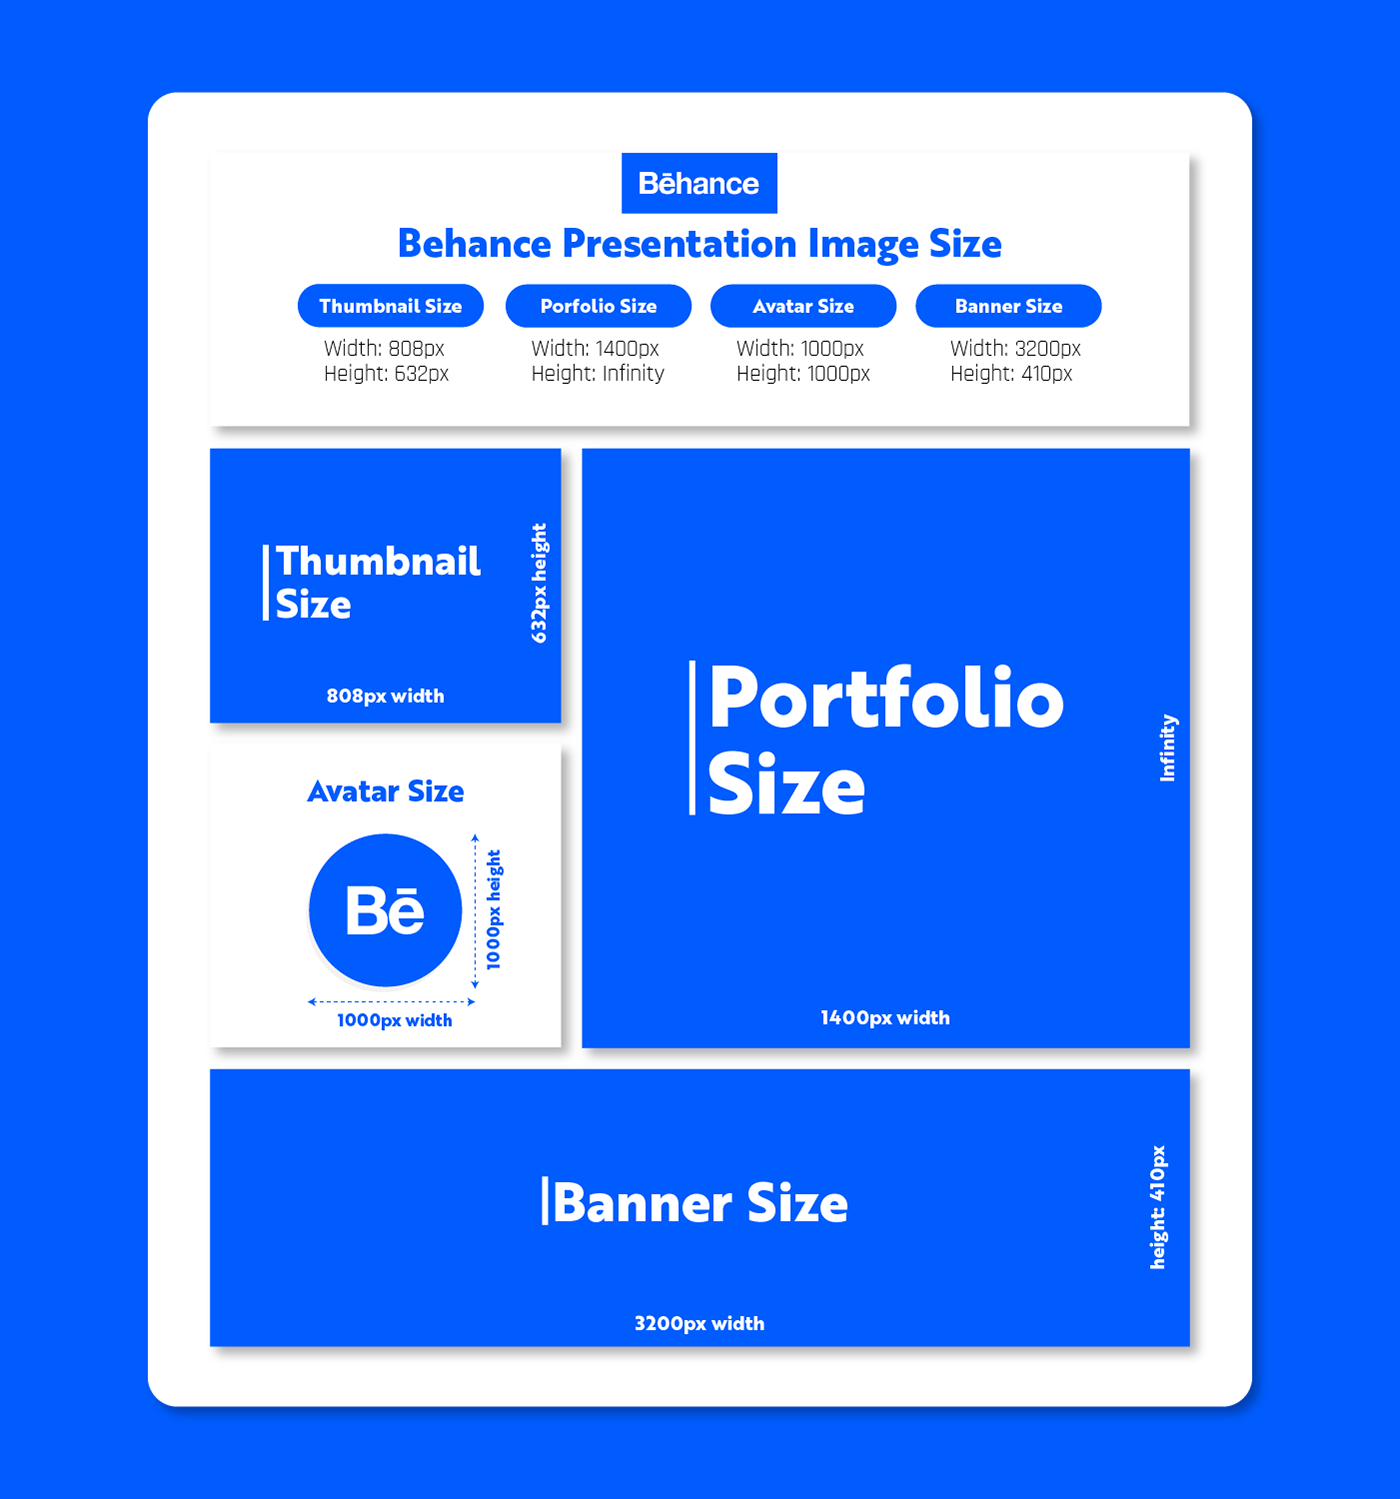
- Choose the Right Dimensions: Before resizing, it’s essential to know the optimal dimensions for your images. For Behance, aim for a width of around 1400 pixels. This resolution strikes a balance between quality and loading speed, ensuring your images look great without being too heavy.
- Select the Right Software: You can use various software tools to resize your images. Adobe Photoshop is a popular choice, but free options like GIMP and online tools like Canva or Pixlr work well too.
- Open Your Image: Launch your chosen software, and open the image file you want to resize. Ensure that you are working with a high-resolution version for the best results.
- Resize the Image: In the software, look for the 'Image Size' or 'Resize' option. Enter your desired width (1400 pixels) and make sure to maintain the aspect ratio. This prevents distortion and keeps your image looking professional.
- Save for Web: When saving your image, select the 'Save for Web' option if available. This feature often allows you to adjust quality settings and file types, optimizing the image for faster loading without sacrificing too much clarity.
- Check the File Size: After saving, check the file size. Ideally, aim for images to be under 300 KB. You might need to experiment with different formats (JPEG, PNG, or GIF) to find the best balance of quality and size.
These steps will help ensure your images are not only visually appealing but also optimized for performance on Behance. Remember, a great image can attract viewers, but a slow-loading page can drive them away!
Also Read This: How to Download Projects from Behance and Save Your Favorite Designs Easily
4. Best Tools for Image Compression
Now that you know how to resize your images, let’s dive into some of the best tools available for image compression. These tools can help you reduce file sizes without losing significant quality, making them perfect for your Behance projects:
| Tool Name | Features | Price |
|---|---|---|
| TinyPNG | Uses smart lossy compression techniques to reduce file size. Supports PNG and JPEG formats. | Free (with limits) |
| ImageOptim | Removes unnecessary metadata and compresses images without losing quality. Great for Mac users. | Free |
| Compressor.io | Supports various formats (JPEG, PNG, GIF, SVG) and provides a simple drag-and-drop interface. | Free |
| Adobe Photoshop | Offers advanced features like 'Save for Web' to customize image quality and formats. | Subscription-based |
| Kraken.io | Provides both lossless and lossy compression options, along with an easy-to-use interface. | Free (with premium options) |
Each of these tools has its strengths, so experiment with a few to find which one fits your needs the best. Remember, a well-compressed image can significantly enhance your Behance portfolio, ensuring it loads quickly and keeps your audience engaged.
Also Read This: How to Add Your Behance Link to LinkedIn Integrating Your Portfolio
5. Tips for Maintaining Image Quality
When it comes to optimizing images for faster loading on Behance, it’s crucial to strike a balance between reducing file size and maintaining image quality. Here are some tips to help you achieve that:
- Choose the Right File Format: JPEG is typically your best bet for photographs due to its compression capabilities, while PNG is ideal for images that require transparency or sharper lines, like logos or icons.
- Use Compression Wisely: Tools like TinyPNG or ImageCompressor can help you compress images without significantly sacrificing quality. Aim for a compression ratio that keeps your images looking sharp but reduces file size.
- Resize Before Uploading: Always resize your images before uploading them to Behance. If your project is only going to be viewed at a maximum width of 1200 pixels, there’s no need to upload a 5000-pixel-wide image.
- Sharpen Images After Resizing: Often, resizing can make images look a bit soft. Use sharpening tools in your image editing software to bring back that crisp look without adding too much noise.
- Optimize for Retina Displays: High-DPI screens require images to have higher resolutions. Consider saving a version of your images at 2x the size for those viewers while also providing a standard resolution for regular displays.
By following these tips, you’ll be able to maintain the quality of your images while ensuring that they load quickly on Behance, providing a smooth experience for your viewers.
6. How to Test Your Image Loading Speed
Once you’ve optimized your images, it’s essential to test their loading speed to ensure everything runs smoothly on your Behance project. Here are some effective methods to check loading speeds:
- Use Page Speed Insights: Google’s PageSpeed Insights is a fantastic tool that not only measures loading speed but also provides suggestions for improvement. Just input your Behance project URL, and it will analyze how your images are performing.
- GTmetrix: Another powerful tool is GTmetrix. This site provides detailed insights on loading times, including specific metrics about images. It even lets you see how your project performs across different regions.
- WebPageTest: For a more detailed analysis, try WebPageTest. You can run tests from various locations, which is excellent if you have a global audience. It shows loading times, file sizes, and even a waterfall chart of how each element loads.
- Browser Developer Tools: Don’t forget about the built-in tools in browsers like Chrome. Press F12 to open Developer Tools, go to the Network tab, and refresh your page. You’ll see how long each image takes to load, which can help you pinpoint any issues.
Regularly testing your image loading speeds ensures that your Behance projects remain user-friendly and visually appealing. Keeping an eye on these metrics will help you refine your approach and deliver a seamless experience for your audience.
 admin
admin


