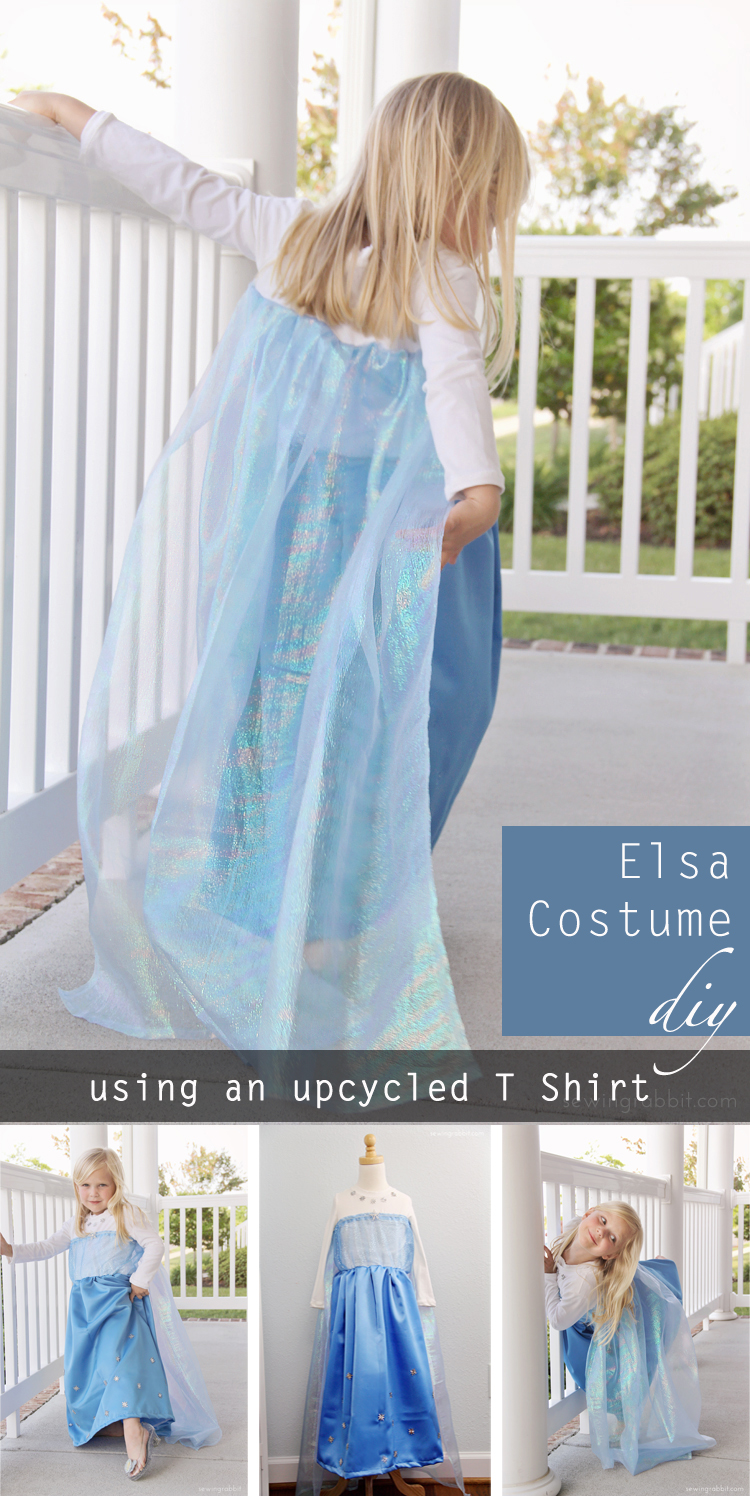
Are you ready to transform your little one into the ice queen herself? Making a DIY Elsa dress is a fun and creative project that not only sparks joy but also nurtures their imagination. Whether it's for a birthday party, Halloween, or just a day of play, this tutorial will guide you step-by-step, ensuring that you create a magical outfit that’s sure to impress. Let's jump right into the materials you'll need to get started!
Materials Needed for the Elsa Dress
Before you dive into the sewing and crafting, it’s essential to gather all your materials. Here’s a handy list to ensure you have everything on hand:
- Fabric:
- Light blue satin or silk for the dress
- White sheer fabric for the cape
- Thread:
- Light blue thread to match your fabric
- White thread for the cape
- Pattern:
- A basic dress pattern (you can find free patterns online or create your own)
- Accessories:
- Sequins or glitter for embellishments
- Blue rhinestones for added sparkle
- A silver tiara (optional, but highly recommended!)
- Tools:
- Sewing machine (or a needle and thread for hand sewing)
- Scissors
- Measuring tape
- Pins or fabric clips
- Iron (for pressing seams)
Now that you have everything gathered, you’re one step closer to creating that stunning Elsa dress! With a little bit of time and a lot of creativity, you’ll make a dress that’s not just a costume but a cherished memory. Next, we’ll delve into the actual sewing process. Ready? Let’s go!
Also Read This: Understanding Video Analytics on Dailymotion
3. Step-by-Step Instructions

Ready to create your very own Elsa dress? Let’s dive into the fun! Gather your materials and follow these simple steps for a magical transformation.
- Prepare Your Materials: You’ll need:
- Light blue fabric (satin or tulle works great)
- White fabric for the cape
- Elastic band (for the waist)
- Scissors
- Sewing machine or needle and thread
- Glitter or rhinestones (for that extra sparkle)
- Optional: A tiara to complete the look!
And voilà! You have a stunning DIY Elsa dress that’s sure to impress! Encourage your child to twirl and feel like the Ice Queen herself.
Also Read This: How Dailymotion Brings Creative and Educational Tales to Life for All Audiences
4. Tips for Perfecting Your Elsa Dress
Creating the perfect Elsa dress is all about the details! Here are some tips to take your DIY project to the next level and ensure your little one looks enchanting.
- Choose the Right Fabric: Opt for fabrics that have a nice drape, like satin or silk for the dress and sheer tulle for the cape. This will enhance that magical feel.
- Use a Pattern: If you’re unsure about freestyle cutting, consider using a dress pattern. This can provide a more structured look and make assembly easier.
- Layering is Key: For a more dramatic effect, layer different shades of blue or add a sequined overlay. This creates depth and captures the light beautifully.
- Practice Your Sewing Techniques: If you’re new to sewing, practice on scrap fabric first. Mastering techniques like gathering or hemming will ensure your dress looks polished.
- Get Creative with Accessories: A tiara or a pair of sparkly shoes can really elevate the outfit. Consider adding matching gloves or a wand for a complete look.
- Involve Your Child: Letting your child help with certain tasks can make the process even more special. They might enjoy picking out the accessories or choosing where to place the rhinestones!
With these tips, your DIY Elsa dress will not only look fantastic but also carry the love and creativity that went into making it. Happy crafting!
Also Read This: How to Do Windmill Step by Step on Dailymotion
5. Accessorizing Your Elsa Look
Once you’ve crafted the perfect DIY Elsa dress, it’s time to take your transformation to the next level with some fabulous accessories! Elsa’s style is all about elegance, so let’s explore a few key pieces that will elevate your ensemble.
Crowns and Hair Accessories
No Elsa look is complete without a stunning crown. You can easily create one using gold or silver craft wire, adorned with faux gems. Here’s a quick guide:
- Gather your materials: Craft wire, hot glue gun, faux gems, and a headband.
- Shape the wire: Form a crown shape by twisting the wire into a circle, adjusting it to fit your head.
- Glue on the gems: Secure the faux gems at intervals around the crown for that magical sparkle!
For hair, consider a simple braid, just like Elsa! Use hair extensions if you want extra length, or add some silver hair spray for that icy touch.
Jewelry
Keep your jewelry minimal but elegant. A pair of sparkling earrings or a simple silver necklace can complete your look without overpowering the dress. Remember, less is more! You could even make DIY jewelry using beads to keep in line with the magical theme.
Footwear
While Elsa often wears ice-blue heels, comfort is key, especially if you’re attending a long event. Here are a few footwear options:
- Glittery Flats: Easy to wear and perfect for twirling!
- Ice Blue Heels: If you’re going for elegance, a pair of satin heels can really shine.
- Boots: For a more casual look, consider knee-high boots in a light color.
Accessorizing is all about balancing comfort with style, so choose what makes you feel like the queen of Arendelle!
6. Where to Share Your DIY Creations
Now that you’ve created your stunning DIY Elsa dress, it’s time to showcase your hard work! Sharing your creations with the world not only allows you to show off your talent but can also inspire others to take on their own projects. Here are some great platforms to share your DIY magic:
Social Media Platforms
- Instagram: Post stylish photos of your finished look using relevant hashtags like #ElsaDress, #DIYFashion, or #Cosplay. Create a story to document your crafting journey!
- Pinterest: Pin your photos along with your DIY tutorial. This platform is fantastic for DIY enthusiasts looking for inspiration.
- TikTok: Create a short video showcasing your dress-making process or a fun transformation. TikTok is all about creativity, so let your personality shine!
Community Forums and Groups
Join online forums or Facebook groups dedicated to DIY fashion or cosplay. These communities are often filled with like-minded individuals who appreciate your work and can provide constructive feedback. Share your journey, from sketches and fabric choices to the final product!
Personal Blog or Website
Consider starting a blog where you can share detailed tutorials, experiences, and tips on creating your own fashion pieces. This not only serves as a portfolio but can also help you connect with a wider audience interested in DIY projects.
Remember, sharing your creations is about celebrating creativity and inspiring others. So don’t be shy—let your Elsa shine!
 admin
admin


