Making dough at home can be a fulfilling and straightforward process. Whether you're preparing pizza, bread, or pastries, understanding the basics of dough-making opens up a world of culinary opportunities. Homemade dough not only tastes better than store-bought versions, but it also allows you to control the ingredients, making it a healthier option. Plus, there's something incredibly satisfying about kneading your dough and watching it rise, isn't there? In this guide, we will explore how to create your own dough from scratch with an easy recipe tutorial and some helpful tips!
Essential Ingredients for Dough
Before we dive into the recipe, let's chat about the essential ingredients you'll need to create a phenomenal dough. The beauty of dough is its simplicity; it usually requires just a handful of core ingredients:
- Flour: The backbone of any dough, flour provides structure. All-purpose flour is the most common choice, but you can also experiment with bread flour for a chewier texture or whole wheat flour for added nutrition.
- Water: Hydration is key! Water activates gluten in the flour, which gives the dough its elasticity. The temperature of the water can also affect the yeast activity—warm water speeds up the process, while cold water slows it down.
- Yeast: This little organism is what makes dough rise! You can use active dry yeast or instant yeast. Be sure to check the expiration date if you're using older packets to ensure it's still active.
- Salt: Salt enhances flavor and helps to strengthen the gluten network in the dough. Be careful not to add too much, as it can inhibit yeast activity.
- Optional Ingredients: Depending on your recipe, you might also want to add sugar (to feed the yeast), fats like oil or butter (for a richer flavor), and eggs (for enriched dough). Feel free to get creative!
Now that we’ve covered the essentials, you're well on your way to mastering the art of homemade dough!
3. Step-by-Step Dough Preparation
Making dough at home can be a fun and rewarding experience! Follow these simple steps to create a delicious dough that you can use for bread, pizza, or pastries. Let's dive into the process:
- Gather Your Ingredients:
- 2 cups of all-purpose flour
- 1 packet (2 ¼ teaspoons) of active dry yeast
- 1 teaspoon of salt
- 1 teaspoon of sugar
- ¾ cup of warm water (110°F or 43°C)
- 1 tablespoon of olive oil (optional)
- Activate the Yeast:
In a small bowl, mix the warm water, sugar, and yeast. Let it sit for about 5-10 minutes. You’ll know it’s ready when it becomes frothy.
- Combine Dry Ingredients:
In a larger bowl, whisk together the flour and salt. This step ensures an even distribution of salt, which is crucial for proper fermentation.
- Add Wet Ingredients:
Once the yeast mixture is frothy, add it to the dry ingredients. If you’re using olive oil, add that too! Stir until a shaggy dough forms.
- Knead the Dough:
Transfer the dough to a floured surface and knead for about 5-7 minutes. Look for a smooth, elastic texture. If it's sticky, sprinkle a little flour as needed.
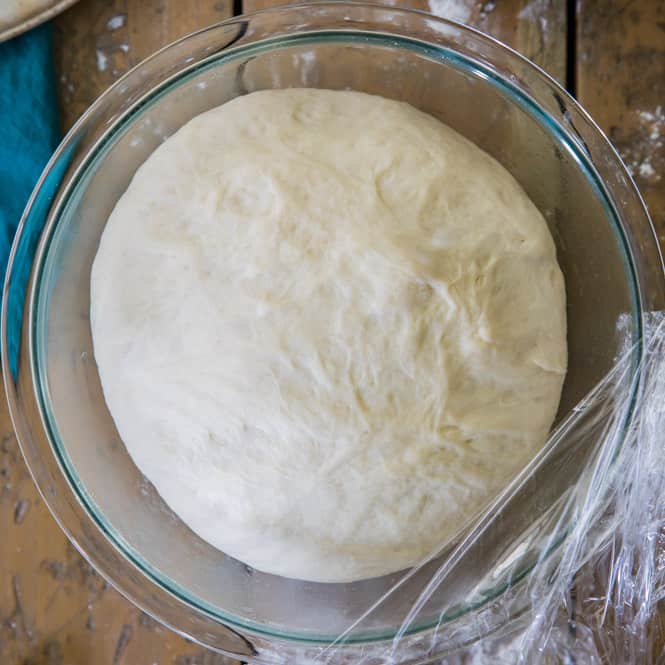
- Let it Rise:
Place the kneaded dough in a greased bowl, cover it with a cloth, and let it rise in a warm area for about 1 hour or until it doubles in size.
- Shape and Use:
Once your dough has risen, punch it down to release air. Now it’s ready to be shaped for whatever delicious recipe you want!
And voilà! You’ve just made your own dough from scratch. It’s that easy!
4. Common Mistakes to Avoid
Even the best home bakers make mistakes sometimes. Here are some common pitfalls to avoid when making dough:
| Mistake | Solution |
|---|---|
| Using Cold Water | Always use warm water (110°F) to activate the yeast properly. |
| Not Measuring Ingredients Accurately | Use a kitchen scale for precise measurements, especially for flour. |
| Ignoring the Kneading Process | Kneading helps develop gluten, which gives the dough structure. |
| Skipping the Rise Time | Patience is key! Give your dough enough time to rise properly. |
| Not Using Enough Flour While Kneading | Sprinkle flour as needed, but avoid adding too much, which could dry out the dough. |
Avoiding these simple mistakes can make a world of difference in the quality of your dough. Remember, practice makes perfect, so don't be discouraged if you don’t get it right the first time. Happy baking!
Tips for Perfecting Your Dough
Making dough at home can be incredibly rewarding, but it can also be a bit tricky if you’re not aware of a few key tips. Let’s dive into some essential advice that will elevate your dough-making game!
- Measure Accurately: Precision is key when it comes to baking. Always use a kitchen scale for dry ingredients like flour and sugar. For liquids, measuring cups with clear markings work great. This ensures your ratios are spot on.
- Know Your Flour: Not all flours are created equal! All-purpose flour is versatile, but consider bread flour for a chewier texture or cake flour for a lighter, tender dough. Experiment to find what works best for your recipe.
- Room Temperature Ingredients: Make sure your eggs, butter, and any other dairy products are at room temperature. This helps them incorporate smoothly into the dough, resulting in a better consistency.
- Don’t Overwork the Dough: It’s tempting to knead until everything is smooth, but over-kneading can lead to tough dough. Knead just until the dough comes together and has a slightly elastic feel.
- Let It Rest: Patience is a virtue in dough-making! After kneading, let your dough rest for at least 30 minutes. This allows the gluten to relax, making it easier to roll out or shape.
- Monitor Your Environment: Temperature and humidity can greatly affect your dough. In a warmer kitchen, you may need less time to rise, while a colder environment could require more. Keep an eye on these factors!
By following these tips, you’ll be well on your way to mastering the art of dough-making in your own kitchen!
Different Types of Dough You Can Make
When it comes to dough, the possibilities are truly endless! Each type of dough serves a distinct purpose in the culinary world. Here’s a rundown of some popular varieties you can easily make at home.
| Dough Type | Description | Common Uses |
|---|---|---|
| Basic Bread Dough | This is your standard yeast dough with flour, water, salt, and yeast. It’s simple and versatile. | Breads, rolls, pizza crusts |
| Pasta Dough | Made with flour and eggs, pasta dough can be rolled thin and cut into various shapes. | Homemade pasta, ravioli, lasagna sheets |
| Pie Crust Dough | A flaky mixture of flour, fat, and water, perfect for sweet or savory pies. | Pies, tarts, quiches |
| Cookie Dough | Sweet dough typically made with flour, sugar, butter, and eggs, it can be customized with add-ins. | Cookies, bars, icebox cookies |
| Sourdough | This dough relies on natural fermentation, requiring a sourdough starter for that tangy flavor. | Breads, pancakes, crackers |
With these different types of dough at your disposal, you can create a wide array of delicious dishes. Each type has its own unique characteristics and uses, so don’t hesitate to get creative and try making them all!
7. How to Store and Refreeze Dough
Now that you've successfully made your dough, the next step is figuring out how to make it last. Proper storage can help extend the life of your dough and maintain its quality for future baking adventures! Here’s how to store and refreeze dough effectively:
Storing Dough
If you've got leftover dough that you're not using right away, here’s what to do:
- Refrigeration: Wrap your dough tightly in plastic wrap or place it in an airtight container. Dough can typically be refrigerated for up to 2 days. Just remember to let it come to room temperature for about 30 minutes before you roll it out again.
- Freezing: To freeze dough, wrap it tightly in plastic wrap and then place it in a resealable freezer bag. Make sure to remove as much air as possible to prevent freezer burn. Dough can last in the freezer for up to 3 months.
Refreezing Dough
Wondering if you can refreeze dough? It’s generally not recommended, especially for yeast-based dough, as it can affect the dough’s rise and texture. However, if you've thawed dough and decide not to use it, you can refreeze it but try to do it only once. Here’s how:
- Thaw the dough in the refrigerator overnight.
- Once thawed, use the dough as you normally would, then if you have leftover dough, wrap it up and refreeze it carefully.
That said, always pay attention to how the dough looks and smells. If it seems off, it’s better to err on the side of caution and not use it!
8. Conclusion and Additional Resources
Making dough at home may seem a bit daunting at first, but once you get the hang of it, you’ll find it's a breeze! With just a few simple ingredients and steps, you can create a variety of delicious bases for your favorite snacks and meals.
As a recap, remember to:
- Follow the recipe measurements closely for the best results.
- Pay attention to the texture and don’t hesitate to adjust with more flour or water.
- Store dough correctly to prolong its freshness.
For additional learning, consider checking out these resources:
- King Arthur Baking Company - A treasure trove of recipes and baking tips.
- Food Network - Offers video tutorials and easy recipes.
- Bon Appétit - Great for getting inspired with new dough recipes!
So roll up your sleeves, get your hands into that dough, and enjoy the wonderful world of baking. Happy baking!
 admin
admin