Are you looking to add a splash of color to your home or find a unique gift idea? Crepe paper flowers can brighten any space and are surprisingly easy to make! In this tutorial, we will guide you through each step, making the process enjoyable and fulfilling. Whether you’re a crafting novice or have some experience under your belt, creating beautiful crepe paper flowers is a delightful way to express your creativity. Let’s dive in and explore how you can make your own stunning paper blooms!
Materials Needed for Crepe Paper Flowers
Before we get started, let's gather all the materials you'll need. Having everything prepared will make the crafting process smoother and more enjoyable. Here’s a simple list of items you should have on hand:
- Crepe Paper: Choose your favorite colors! You’ll need at least two different colors for each flower (one for the petals and one for the center).
- Scissors: A sharp pair will make cutting crepe paper easy and precise.
- Floral Wire: This will serve as the stem of your flowers. Choose wire that’s flexible yet sturdy.
- Tape (Floral Tape or Masking Tape): This will help secure the petals and stem together.
- Hot Glue Gun and Glue Sticks: Essential for attaching components together securely.
- Ruler: For measuring out your paper strips accurately.
- Pencil: Useful for marking measurements or outlining petal shapes.
- Additional Embellishments (Optional): If you want to add some sparkle or texture, consider glitter, beads, or other decorative items.
Once you have these materials ready, you will find that creating vibrant crepe paper flowers is not only manageable but fun! The tactile nature of crepe paper allows for a wide range of designs and styles, so don’t be afraid to experiment as you become more comfortable with the process. By combining colors and shapes, you'll be able to create a stunning bouquet or a single show-stopping piece!
Now that you’re equipped with everything you need, let’s get started on crafting these charming paper blooms!
Also Read This: How to Make Baby Dress: Simple DIY Guide on Dailymotion
3. Step 1: Preparing the Crepe Paper
Before diving into the exciting world of making crepe paper flowers, we need to prepare our materials to ensure a smooth crafting experience. Properly prepping your crepe paper can make all the difference in the final look of your flower, so let’s get to it!
First, gather your supplies. You’ll need:
- Crepe paper in your chosen colors
- Sharp scissors
- Floral wire or pipe cleaners
- Floral tape
- Hot glue gun (optional)
- Ruler and pencil (for measurement and marking)
Once you have everything ready, the next step is to cut the crepe paper into manageable pieces. You’ll want to standardize your sizes for uniform flowers, especially if you’re planning to create a bouquet. Generally, large flowers will require larger pieces of paper, while smaller flowers will need smaller ones.
To prepare the crepe paper:
- Measure and Cut: Use your ruler to measure strips of crepe paper. For example, a good starting size for flower petals is about 7 inches by 3 inches. Cut several strips in varying lengths and shapes, depending on the type of flower you are making - think wider petals for daisies and narrower for tulips!
- Choose Your Color Palette: You can create a stunning floral arrangement by mixing different shades of the same color or complementary colors. Don’t hesitate to experiment a little here; the beauty of crafting is that there are no mistakes! If you’re going for a more realistic look, consider using gradient shades.
- Stretch the Crepe Paper: Gently pull on the crepe paper to stretch it slightly. This will help give your petals some texture. Crepe paper has a natural crumple to it, and stretching it can enhance that organic look.
Once your paper is prepared, you’re all set for the next step!
Also Read This: How to Change Your Icon on Dailymotion: A Simple Guide
4. Step 2: Cutting the Flower Petals
Now that your crepe paper is prepped and ready, it’s time to cut out the flower petals! This is where your creativity truly shines as you can experiment with shapes and sizes to make unusually beautiful flowers.
Here’s how to cut your flower petals:
- Decide on the Petal Shape: The shape of your petals will determine the type of flower you end up creating. For example, round petals are perfect for flowers like peonies or daisies, while elongated petals work well for lilies. You can sketch your desired petal shape onto the paper or simply cut freehand. Don’t worry about perfection; nature isn’t perfect!
- Cut the Petals: Use your scissors to carefully cut out the petal shapes. Depending on how many flowers you want to make, consider cutting several petals at once. For fuller flowers, you might want 5 to 8 petals. For simpler flowers, fewer petals can also look great. Just remember that odd numbers often create a more natural aesthetic.
- Curving the Edges: For a more dynamic look, you can curve the edges of the petals slightly. This can be done easily by using your scissors to round off each tip.
- Layering: If you’re feeling adventurous, you can also cut smaller petals to layer on top of your larger petals. This not only adds depth to your flower but also enhances visual interest.
With your flower petals cut and ready, take a moment to appreciate your progress! You're well on your way to crafting beautiful crepe paper flowers that will impress friends and family alike. Remember, the key is to have fun during this process, so don’t be afraid to try out new ideas.
Also Read This: How Reliable Is Dailymotion? A Review of Its Stability and Performance
5. Step 3: Shaping the Petals
Now that you have your petal shapes cut out, it’s time to get creative! Shaping the petals is an essential step that will give your crepe paper flowers that beautiful, lifelike appearance. Let’s dive into how to do this!
First off, you'll need to work with your crepe paper petals. Lay them flat on your workspace, and you’ll want to gently stretch each petal. This stretches the paper and gives it a soft contour, which is key for a more natural look. Here’s how to go about it:
- Stretch the Edges: Take one petal at a time and hold it by its base. Use your fingers to gently pull and stretch the outer edges of the petal. This will create a lovely curve and help mimic the way real petals look.
- Curl the Tips: For an extra touch, you can use a pencil or your finger to curl the tips of each petal inwards. Just gently roll the edge around the pencil and release. This small detail makes a big difference!
- Add Texture: To add more depth, try lightly crumpling the petals. Just scrunch them a bit in your hands and then smooth them out. This will give your flowers a more organic feel, resembling the natural texture found in real blooms.
As you shape each petal, don’t worry about achieving perfection. Nature is inherently imperfect, and that’s where the beauty lies! Just aim for a variety of petal shapes and sizes to make your flower look dynamic.
Once you’ve shaped all your petals, it’s a good idea to lay them out and assess how they look together. Try mixing and matching different sizes until you find a combination that speaks to you. Remember, have fun with this process—it's all about expressing your creativity!
Also Read This: Learn How to Open a Door Lock Without a Key Using Dailymotion Videos
6. Step 4: Assembling the Flower
Alright, the moment you've been waiting for—assembling your flower! This step is where all your hard work comes together, transforming your individual petals into a stunning bloom. Let’s walk through the assembly process, step by step.
Here’s what you’ll need for this part:
- Your shaped petals
- Floral wire or a strong craft wire
- Floral tape (optional)
- Glue (liquid craft glue or hot glue gun)
Now, let’s assemble your crepe paper flower:
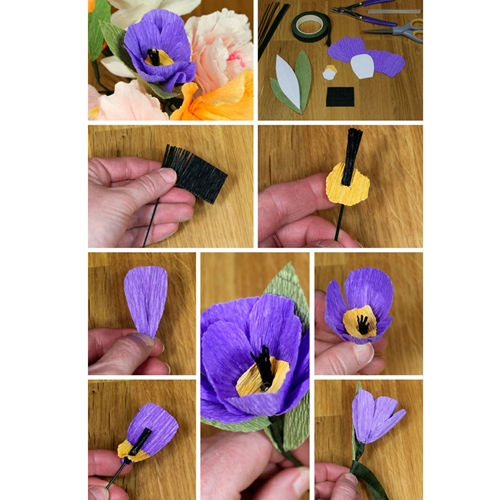
- Select the Center: Start by choosing a smaller petal or a piece of pollen center (you can create one using yellow or orange crepe paper). This will be the heart of your flower.
- Layer Your Petals: Begin layering your petals around the center. Aim for a circular arrangement, overlapping the edges slightly. I usually start with the smallest petals first and move to the largest on the outside.
- Secure with Glue: As you layer, add a little glue at the base of each petal where it meets the center. This gently holds them in place as you continue assembling.
- Attach the Floral Wire: Once you have secured all the petals, grab your floral wire. Poke it through the center of the flower, pushing it down gently to hold everything together. Twist the wire to secure the base and prevent the petals from moving around.
- Wrap it Up: If you’d like, you can take some floral tape and wrap it around the stem for a neat finish. This adds a professional touch and keeps everything snug!
Voila! You’ve made your first crepe paper flower. Since practice makes perfect, why not create a whole bouquet? Try different colors and combinations to bring a burst of joy into your crafting space. Enjoy the process and let your creativity bloom!
Also Read This: Learn How to Download from Dailymotion on PC with No Hassle Using This Tool
Step 5: Creating Flower Stems
Now that your beautiful crepe paper flowers are complete, it's time to give them some sturdy stems! This step is crucial because the stems are what will make your flowers come to life, allowing you to display them beautifully in a vase or utilize them in festive decorations.
To create the stems, you’ll need the following materials:
- Floral wire (available at any craft store)
- Floral tape
- Green crepe paper or green wrapping paper (optional, but adds a nice touch)
Here’s how to make your stems:
- Cut the floral wire: Cut the floral wire to your desired length, usually around 12-15 inches, depending on how long you want your stems to be.
- Attach the flower: Take your flower and gently insert the end of the wire into the center of the flower, pushing it through the crepe paper until it holds securely. You can wrap the base of the flower around the wire for extra support.
- Wrap with floral tape: Starting at the base of the flower, begin wrapping the floral tape around the wire to secure the flower. Stretch the tape slightly as you wrap; this will make the adhesive stick better and ensure a neat look.
- Add more wrapping: If you want a thicker stem or more visual appeal, you can wrap the wire with green crepe paper. Just cut a strip, about 1 inch wide, and wrap it around the floral tape, securing it down as you go.
And voila! You now have beautiful flower stems ready for your arrangement. Feel free to adjust the lengths of the stems based on personal preference or the type of arrangement you have in mind. The best part about these stems is that they're fully customizable!
Also Read This: Step-by-Step Guide to Applying Lipstick Perfectly with Dailymotion
Step 6: Adding Finishing Touches
With your flowers blooming and stems beautifully crafted, it's time to put the final touches on your crepe paper flowers. This part is all about personalization and enhancing the beauty of your creations.
Here are some fun ideas to consider for adding those finishing touches:
- Pollen Centers: Use tiny pom-poms or beads to create realistic pollen centers. All you have to do is glue or press them into the center of the flower.
- Additional Petals: If you want to add extra fullness, create smaller petals using a contrasting color of crepe paper. Layer them under the existing petals for more texture.
- Spray with Fragrance: Lightly spritz your finished flowers with a mild floral scent to give them an added sensory dimension. Not only do they look lovely, but they’ll also smell great!
- Arrange in a Bouquet: If you’ve made several flowers, now's the time to create a bouquet. Group flowers of various sizes and colors together, and tie them with ribbon for a charming finish.
If you're feeling particularly adventurous, try experimenting with different styles of flowers! Perhaps roses, tulips, or daisies could add even more variety to your display. Don't forget to let your creativity shine through in this final step!
Remember, the beauty of making crepe paper flowers is in their personalization. Each bouquet can reflect your unique style and creativity, making them fantastic decorations for any occasion. Once you’ve added those final touches, step back, and admire your handiwork. You've just crafted a stunning piece of art!
Also Read This: How to Add Captions to Videos on Dailymotion
9. Ideas for Using Crepe Paper Flowers in Your Decor
Crepe paper flowers are not just beautiful; they are also incredibly versatile! Whether you’re looking to add a pop of color to your home, planning a special event, or searching for unique gifts, these flowers can do it all. Here are some creative ideas to inspire you:
- Centerpieces: Use a mix of different-sized crepe paper flowers to create stunning centerpieces for your dining table or coffee table. Combine them with greenery for a charming touch.
- Wall Art: Elevate your wall space by crafting a colorful floral wall art piece. Create a bouquet or a larger floral arrangement that can serve as a backdrop for photos or simply to brighten up the room.
- Gift Wrap and Tags: Instead of traditional wrapping paper, why not create a unique gift presentation with crepe paper flowers? Attach a single flower to a wrapped gift or use smaller flowers as charming gift tags.
- Wreaths: Design a delightful wreath for your front door using crepe paper flowers. Choose seasonal colors to keep it relevant, switching them out as the seasons change.
- Party Decor: For birthdays, baby showers, or weddings, crepe paper flowers can add an exquisite touch. Use them in garlands, hanging decorations, or as accents on tables.
- Floral Frames: Decorate photo frames with small crepe paper flowers. This personal touch makes your photos even more special.
- Hair Accessories: Create beautiful hair clips, headbands, or even corsages using your flower creations for special occasions.
These are just a few ideas, and the possibilities are endless! Let your creativity flow, and see how you can infuse these beautiful flowers into various aspects of your decor. Not only are they eye-catching, but they also carry a personal touch that can’t be replicated with store-bought items.
10. Conclusion and Tips for Successful Crepe Paper Flowers
Congratulations! You’ve traveled through the exciting world of crepe paper flowers, and now it's time to wrap things up. These delightful creations don’t just bloom beautifully; they also allow for a wonderful outlet of creativity. Here are some essential tips to ensure your craft is a success:
- Quality Materials: Invest in good quality crepe paper. This makes a noticeable difference in the flexibility and vibrancy of your flowers.
- Practice Makes Perfect: Don’t be discouraged if your first few flowers don’t turn out exactly as you imagined. Practice is key, and you'll improve over time.
- Experiment: Feel free to mix colors and styles. The beauty of crepe paper flowers lies in their versatility, so let your imagination run wild!
- Use Hot Glue Sparingly: While hot glue is great for securing flowers, using too much can make your flowers look overly bulky. A little goes a long way!
- Store Properly: Keep your flowers away from direct sunlight and humidity to ensure they last longer.
- Ask for Feedback: Share your creations with friends and family and ask for their thoughts. Their feedback can help you improve and inspire new designs!
In conclusion, making crepe paper flowers is not just a delightful craft, but it’s also a wonderful way to bring color and life into your space. So gather your supplies, embrace the creative process, and watch as your paper blooms bring joy into your life and the lives of those around you. Happy crafting!
 admin
admin


