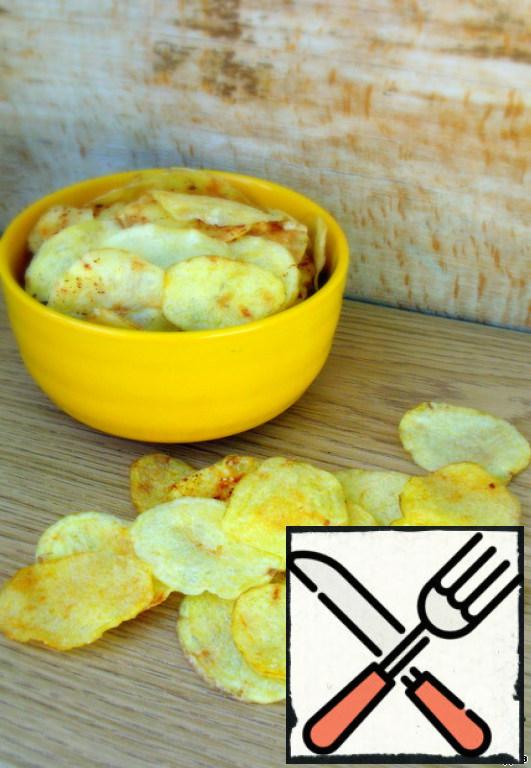
If you're craving a crispy snack but don't want to deal with the hassle of frying, microwave chips are a game-changer! These homemade delights are quick, easy, and can be tailored to your taste. Whether you prefer classic potato flavors or want to experiment with sweet potatoes or even kale, the microwave can whip up a batch in no time. Ready to get started? Let's dive into the benefits of making chips in the microwave!
Benefits of Making Chips in the Microwave
Making chips in the microwave comes with a host of perks that can change the way you snack. Here are some of the standout benefits:
- Healthier Option: Unlike traditional frying, which adds unnecessary oils and fats, microwave chips can be made with minimal to no oil. This means you can enjoy your crunchy snack without the extra calories and grease.
- Quick and Convenient: Need a snack in a hurry? Microwaving chips takes just minutes! You'll spend less time cooking and more time enjoying your crispy creation.
- Customizable Flavors: One of the best things about making snacks at home is that you can experiment as much as you like! Add your favorite spices, herbs, or seasonings to create a unique flavor profile that suits your palate.
- Minimal Cleanup: With standard frying, you'll deal with messy pots and pans. Microwave chips require just a microwave-safe dish and maybe a cutting board, making cleanup a breeze.
- Perfect for Portion Control: When you make your chips at home, you can easily control your portion sizes. Instead of opening a bag of store-bought chips, you can make just the amount you want—helping you to avoid mindless munching.
Making chips in the microwave encourages creativity, too! You can use vegetables beyond the usual suspects. Try beets, zucchini, or even apples for a sweet treat. Each vegetable will impart its character to the chips, creating a delightful medley of textures and flavors.
Whether you're preparing a quick snack for yourself, hosting a movie night, or looking for a healthy alternative to store-bought chips, microwave chips offer a fun and tasty solution. Next time the craving strikes, you'll be glad to know just how easy it is to satisfy it.
Also Read This: Sing Along to Your Favorite Track What Makes You Beautiful Karaoke on Dailymotion
3. Ingredients Needed for Microwave Chips
If you're excited to whip up a batch of delicious microwave chips, you’re in luck! The ingredient list is super simple and likely consists of items you already have in your kitchen. Here’s what you’ll need:
- Fresh Potatoes: You can use any type of potato, but russet or Yukon golds work best for getting that perfect chip texture.
- Salt: Sea salt or kosher salt adds flavor, but you can adjust the amount to your taste.
- Oil (optional): A light mist of olive oil or cooking spray can enhance crispiness and flavor without making the chips too greasy.
- Seasonings (optional): Feel free to get creative! Try garlic powder, paprika, or even a pinch of cayenne for a spicy kick.
*Tip:* If you’re looking for a healthier alternative, you can skip the oil altogether—these chips are still delightful when made without any added fats!
Also Read This: Can You Download Dailymotion Videos on iPhone and iPad? A Complete Guide
4. Step-by-Step Instructions for Making Microwave Chips
Ready to turn those simple ingredients into crispy, crunchy microwave chips? Follow these straightforward steps, and you'll have a delightful snack in no time!
- Prep the Potatoes: Start by washing your potatoes thoroughly to remove any dirt. No need to peel them—keeping the skin adds flavor and nutrients! Once clean, slice your potatoes very thin (about 1/16 inch thick) using a sharp knife or a mandoline for uniformity.
- Soak the Slices: To achieve that perfect crunch, soak your potato slices in cold water for about 30 minutes. This helps to remove excess starch. After soaking, drain and pat them dry with a clean kitchen towel.
- Season the Chips: In a mixing bowl, toss the dried potato slices with a bit of oil (if using) and your preferred seasonings. Make sure each slice is evenly coated for the best flavor.
- Arrange on a Plate: Lay the seasoned slices in a single layer on a microwave-safe plate. Avoid overlapping, as this will prevent the chips from crisping up properly.
- Microwave Time: Microwave the chips on high for about 3-5 minutes. The exact time will depend on your microwave and how thick your slices are. Keep an eye on them towards the end to avoid burning!
- Cool and Enjoy: Once they’re done, carefully remove the plate from the microwave (it will be hot!). Let the chips cool for a minute or two before enjoying. They’ll become even crisper as they cool down.
And there you have it—your quick and easy microwave chips are ready to munch on! Perfect for snacking or as a side dish. Feel free to experiment with different seasonings to create your personalized chip experience!
Also Read This: How to Apply Lipstick Perfectly: A Comprehensive Guide on Dailymotion
5. Tips for Perfectly Crunchy Chips
Getting the perfect crunch in your microwave chips is all about the details. Follow these handy tips to elevate your chip-making game:
- Thin Slices: The thinner you slice your potatoes, the crunchier your chips will be. Aim for slices that are about 1/8 inch thick. A mandoline slicer can be your best friend here!
- Soak the Slices: After slicing, soak your potato slices in cold water for about 30 minutes. This helps remove excess starch, which can prevent crispiness.
- Pat Dry: After soaking, don’t forget to pat your slices dry with a clean kitchen towel. Removing the moisture is crucial for achieving that delightful crunch.
- Even Spacing: When placing your slices on the microwave-safe plate, ensure they're spaced out well. Overlapping can lead to uneven cooking and soggy chips.
- Use a Microwave Crisper Pan: If you have one, a microwave crisper is a game changer! It helps to distribute heat evenly and gives your chips that extra crunch.
- Preheat the Microwave: Some microwaves have a preheat option. If yours does, using it can help start the cooking process at just the right temperature.
- Watch the Cooking Time: Every microwave is different! Start with shorter cooking times (about 3-4 minutes) and keep an eye on the chips. If they’re not done yet, gradually increase the time in 30-second intervals.
Follow these tips, and you’ll be well on your way to achieving delicious, crispy chips that can rival any store-bought version!
Also Read This: A Detailed Guide to Dailymotion’s Red Band Features and How They Work
6. Flavor Variations and Seasoning Ideas
The beauty of homemade microwave chips is that you can customize them to suit your taste preferences. Here are some fun flavor variations and seasoning ideas to get you started:
Classic Seasonings
- Salt and Vinegar: A simple sprinkle of sea salt and a drizzle of malt vinegar can give your chips that traditional flavor.
- Garlic Powder: For a savory twist, add garlic powder or even fresh minced garlic for a bolder taste.
- Chili Powder: If you like a kick, sprinkle a bit of chili powder or cayenne pepper for some heat!
Cheesy Delights
- Parmesan and Rosemary: Sprinkle your chips with grated Parmesan and finely chopped rosemary before microwaving.
- Nacho Cheese: After cooking, dust your chips with nacho cheese powder for a bold and cheesy flavor.
Sweet Twists
- Sweet Cinnamon Sugar: For a sweet treat, mix sugar with a pinch of cinnamon and sprinkle it over your chips before microwaving.
- Chocolate Drizzle: Once your chips are nice and crispy, drizzle melted chocolate over them for a delightful dessert version!
Herb Infusions
- Italian Herbs: A mix of basil, oregano, and thyme can transform your chips into a flavorful Mediterranean snack.
- Spicy Taco: Combine paprika, onion powder, and cumin to create a zesty taco flavor that’s out of this world.
Get creative with these ideas! You can even mix and match seasonings to create your own unique blend. Whether you prefer them savory or sweet, the possibilities for flavoring your microwave chips are virtually endless! Enjoy snacking on your delicious creations!
Also Read This: Download Audio from Dailymotion Effortlessly
7. Frequently Asked Questions About Microwave Chips
If you’ve just stumbled upon the idea of making microwave chips, you probably have a few questions. No worries! Let’s tackle some of the most common queries you might have:
1. Can I use any type of potato?
Absolutely! While classic potato chips are made from white or yellow potatoes, you can experiment with sweet potatoes, purple potatoes, or even other root vegetables. Each type will offer a unique flavor and texture!
2. How thin should I slice the potatoes?
The thickness of your slices is crucial for achieving the perfect crispiness. Aim for slices that are about 1/16 inch thick. Using a mandoline slicer can help ensure all your chips are consistent in thickness, leading to even cooking.
3. Do I need to soak the potatoes before microwaving?
Soaking the potato slices in cold water for about 30 minutes can help remove excess starch, which may yield a crispier chip. If you're short on time, this step can be skipped, but it’s helpful for that ultimate crunch!
4. Why are my chips soggy?
Sogginess can occur due to a few factors: not using enough oil, overcrowding the microwave plate, or cooking them at too low a wattage. Make sure to use a light coating of oil, arrange the slices in a single layer, and adjust your cooking time based on your microwave's wattage.
5. Can I season the chips before microwaving?
Absolutely! Sprinkling on salt, pepper, or any seasoning of your choice before cooking is a great idea. You can also experiment with spices like paprika, garlic powder, or even Parmesan cheese for extra flavor!
6. How do I store leftover chips?
If you have some chips left over (which is rare, but it can happen!), store them in an airtight container at room temperature. They are best enjoyed fresh, but they can be kept for a day or two. To revive their crispiness, pop them back in the microwave for a few seconds.
7. Can I make chips in bulk?
Yes, but it’s best to do so in small batches to avoid sogginess. If you want to make a lot, consider investing in a food dehydrator or an air fryer for even better results with larger quantities!
8. Conclusion: Enjoy Your Homemade Microwave Chips
And there you have it! Making homemade microwave chips is not only a fun kitchen experiment but also a healthier alternative to store-bought chips. With just a few simple ingredients and a microwave, you can whip up a delicious snack that satisfies your cravings without the guilt.
Whether you decide to stick with classic seasoning of salt or get adventurous with different spices, the possibilities are endless. Don’t hesitate to play around with foods beyond potatoes, and let your creativity flow. It’s all about what you love!
So, gather your ingredients and get ready to enjoy your very own crispy creations. We’d love to hear how your microwave chips turn out! Share your experiences or any tips you discover along the way. Happy snacking!
 admin
admin


