Have you ever tasted freshly made cheese? There's something incredibly satisfying about creating your own cheese right in the comfort of your kitchen. Not only does homemade cheese taste amazing, but it also allows you to customize flavors and textures to your liking. In this blog post, we'll delve into the basics of cheese making, breaking it down into manageable steps. Whether you're a complete novice or have dabbled a bit in the art of cheese making, you're in for a delightful journey to crafting your very own cheese.
Essential Ingredients and Equipment
Before diving headfirst into the cheese-making process, it's crucial to gather the right ingredients and equipment. Here’s a simple list to help you get started:
Ingredients:
- Milk: Choose whole milk for creamier cheese. You can go for cow, goat, or even sheep's milk!
- Acid: This can be vinegar, lemon juice, or citric acid. It helps in curdling the milk.
- Rennet: A natural enzyme needed for curd formation. It's available at most grocery stores or online.
- Salt: For flavor and preservation. Go for kosher or cheese salt to avoid additives.
Equipment:
Next, make sure you have the following tools:
| Equipment | Purpose |
|---|---|
| Large pot: | To heat the milk. |
| Thermometer: | To monitor the milk temperature accurately. |
| Slotted spoon: | For stirring and transferring curds. |
| Cheesecloth: | To strain the curds from whey. |
| Mold or container: | To shape your cheese. |
With your ingredients and equipment ready, you’re all set to embark on your home cheese-making adventure! The process is not just about the end result but also enjoying the journey of creating something delicious.
Choosing the Right Cheese Type for Beginners
Stepping into the world of cheese making can feel a bit overwhelming, especially with all the options available. But fear not! Starting with the right type of cheese can make your experience both enjoyable and successful. Here, we’ll dive into some beginner-friendly cheeses that are perfect for your first creations.
When choosing a cheese type, consider the following options:
- Ricotta: This Italian cheese is soft and requires minimal equipment. You simply need milk, an acidic component (like lemon juice), and some salt. It’s a great starting point!
- Paneer: A popular Indian cheese, paneer is made by curdling milk with lemon juice or vinegar. It’s straightforward to make and doesn’t require aging.
- Cream Cheese: Perfect for spreads and dips, cream cheese is another quick cheese to whip up. Just mix cream, milk, and some lemon juice and let it thicken.
- Mozerella: If you want a bit of a challenge, homemade mozzarella is a crowd-pleaser. It requires a few additional ingredients, like rennet, but is incredibly rewarding!
Remember, it's essential to start with fresh, high-quality ingredients. The type of milk you use can affect the final flavor and texture of your cheese, so choose whole milk if possible. Above all, have fun experimenting! Cheese making should be a joyous process, not a stressful one.
Step-by-Step Process of Cheese Making
So, are you ready to roll up your sleeves and dive into cheese making? Let’s break this down into simple steps that anyone can follow. Here’s a basic outline for making a simple cheese, like ricotta or paneer:
- Gather Your Ingredients: You’ll need:
- Milk (preferably whole)
- An acid (vinegar or lemon juice)
- Salt to taste
- Heat the Milk: Pour the milk into a large pot and gradually heat it over medium heat. Stir occasionally to prevent it from burning. Aim for a gentle simmer, around 190°F (90°C).
- Add Acid: Once the milk is hot, slowly add your chosen acid. Stir gently until you see curds beginning to form. This should happen almost immediately!
- Let It Sit: Turn off the heat and let the mixture sit for about 10 minutes. This resting period allows the curds to form fully.
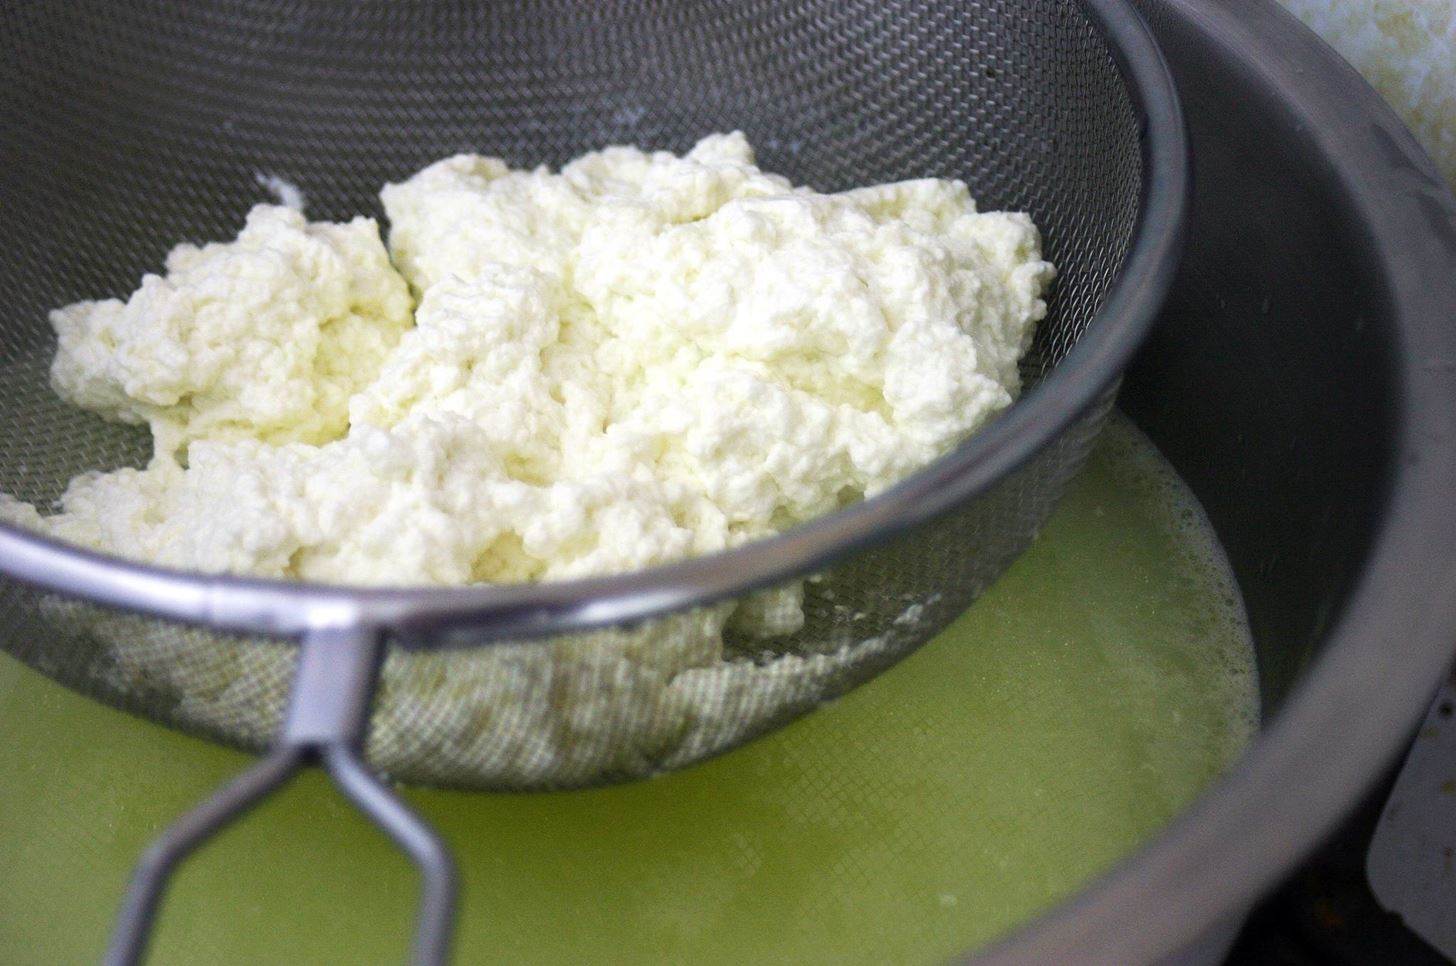
- Strain the Curds: Using a cheesecloth or fine mesh strainer, carefully pour the curds and whey mixture to separate them. Rinse the curds under cold water to remove any residual acidity.
- Season and Shape: Transfer the curds to a bowl, add salt to taste, and mix well. You can also shape them into a ball or press them into a mold for a firmer cheese.
- Enjoy! Your delicious homemade cheese is ready to be used in recipes, spread on bread, or eaten on its own!
And there you have it! With just a few simple steps, you’ve turned milk into a delightful cheese. Don’t hesitate to experiment with herbs, spices, or different types of milk as you gain confidence. Happy cheese making!
Common Mistakes to Avoid When Making Cheese
Making cheese at home can be an incredibly rewarding experience, but it’s easy to trip up along the way. Here are some common mistakes that beginners often encounter, and how you can avoid them:
- Not Using the Right Ingredients: Cheese-making requires specific types of milk and cultures. Using ultra-pasteurized milk can ruin your cheese, as it lacks the necessary bacteria for fermentation. Stick to pasteurized cow, goat, or sheep milk!
- Skipping the Thermometer: Temperature control is crucial in cheese-making. Many aspiring cheese-makers neglect this and lose track of their milk's temperature, leading to suboptimal results. Invest in a good food thermometer!
- Ignoring Hygiene: Cheese is a dairy product and must be made in a clean environment. Make sure all utensils, containers, and your hands are sanitized to prevent unwanted bacteria from ruining your batch.
- Under- or Over-Processing: Whether it's curd cutting, cooking, or draining, not following the recommended times can affect texture and flavor. Always adhere to the recipe's guidelines!
- Not Allowing for Adequate Drainage: If your curds aren't drained properly, they can end up too wet, affecting both texture and flavor. Ensure you give them enough time to drain completely.
By keeping these common mistakes in mind, you'll be better prepared to enjoy the delightful process of making cheese at home, while achieving delicious results!
Storing and Aging Your Homemade Cheese
Once you’ve put in the effort to create your own cheese, proper storage and aging are key to savoring its full flavor. Here are some practical tips for both:
| Type of Cheese | Storage Method | Aging Time |
|---|---|---|
| Fresh Cheeses (Like Ricotta) | Refrigerate in an airtight container | Consume within 1 week |
| Soft Cheeses (Like Brie) | Wrap in parchment paper, then in plastic wrap, and refrigerate | 1 to 2 weeks |
| Hard Cheeses (Like Cheddar) | Wrap tightly in wax paper, then in plastic wrap, and refrigerate | Several months |
| Blue Cheeses | Store in a breathable container (like a cheese dome) | Several weeks to months, depending on flavor preference |
Here are some additional tips to consider:
- Monitor Humidity: Cheese needs a specific humidity level. Consider using a cheese cave or a clutter-free refrigerator.
- Regularly Check Your Cheese: Inspect for unwanted mold or spoilage during aging; surface mold can often be trimmed away.
- Label and Date: Always label your cheese with the date it was made. That way, you’ll know when it’s time to enjoy it!
Storing and aging your homemade cheese properly can help you showcase the fruits of your labor, giving you great flavors and textures that are sure to impress friends and family alike!
Creative Ways to Use Your Homemade Cheese
Once you've successfully made your own cheese, the fun doesn't stop there! Homemade cheese can be incredibly versatile and can elevate a wide variety of dishes. Here are some creative ideas to get you started:
- Cheese Boards: Craft a stunning cheese board with your homemade cheese, paired with assorted fruits, nuts, crackers, and cured meats. It makes for a fantastic appetizer when hosting friends or family.
- Cheesy Pasta Dishes: Use your cheese to create a luscious mac and cheese or sprinkle it over your favorite pasta. A dash of herbs can make it extra special.
- Pizza Topping: Homemade cheese can be the star of your next pizza night. Try mixing different cheeses for a unique flavor and texture.
- Salads: Crumble soft cheeses over fresh greens or toss shreds of cheese into your salad for added richness and flavor. It’s a great way to enhance a simple leafy salad.
- Sandwiches and Wraps: Slice your cheese and layer it into sandwiches or wraps. It adds not just taste but also protein!
- Baking: Incorporate your cheese into baked goods like savory muffins or scones for a delightful twist. Used in moderation, cheese can be a delicious secret ingredient.
- Cheesy Snacks: Get creative with cheese snacks like cheese crisps or homemade cheese dip. Perfect for movie nights or lounging with friends!
By experimenting with your homemade cheese, you not only avoid waste, but you also surprise your palate with exciting flavors!
Conclusion and Encouragement to Try Cheese Making
It's time to wrap up our cheesy adventure! Making cheese at home can seem intimidating, but as we've seen, it's a rewarding and enjoyable process. You’ve learned about the materials needed, the steps to create various types of cheese, and how to incorporate your homemade creations into everyday meals.
Remember, practice makes perfect! Your first batch may not turn out exactly how you envisioned, and that's perfectly okay. Cheese-making is part art, part science—each attempt brings new insights and flavors. Plus, the satisfaction of pulling fresh, homemade cheese out of your fridge is truly unmatched.
So why not give it a go? Gather your ingredients, invite a friend, and make it a fun project. And don't forget to share your experiences with others; cheese lovers will appreciate your efforts and creativity! With practice, you’ll be crafting unique flavors and textures that will delight your friends and family.
Are you ready to embark on this cheesy journey? Grab your supplies and let’s get started—homemade cheese awaits!


