Welcome to the whimsical world of paper butterfly crafting! Whether you’re looking for a fun activity to do with kids or simply want to add a touch of creativity to your home, making paper butterflies is a delightful choice. These charming little creations can brighten up any space. In this tutorial, we’ll walk you through the steps to make your own paper butterflies, from gathering materials to the final touches. So, grab some paper and let’s flutter into this colorful craft!
Materials Needed for Paper Butterflies

Before we get started on our paper butterfly adventure, let’s gather everything you’ll need. Don’t worry; you probably already have most of these materials at home! Here’s a handy list to ensure you’re all set:
- Colored Paper: Choose vibrant colors for your butterflies! Construction paper, origami paper, or even old gift wrap work perfectly.
- Scissors: A good pair of scissors is essential for cutting out your butterfly shapes. Safety scissors are ideal for kids.
- Glue or Tape: You’ll need glue or tape to secure the wings or attach any embellishments.
- Pencil: A pencil will help you sketch the butterfly shape before cutting.
- Markers or Crayons: These are great for adding fun patterns or details on your butterflies.
- Pipe Cleaners or Straws (optional): If you want your butterflies to have a body or antennae, these materials are super helpful!
- Glitter (optional): For a touch of sparkle, sprinkle some glitter on your butterflies!
Feel free to get creative with your materials! You can experiment with different textures and patterns to make each butterfly unique. Once you have everything ready, we can dive into the fun part—crafting your beautiful paper butterflies!
Also Read This: Creative DIY Net Flower Craft Ideas
3. Step-by-Step Instructions for Making Paper Butterflies
Ready to spread your wings and dive into the delightful world of paper butterflies? Here’s a simple, step-by-step guide to crafting your own fluttering friends. Grab some colorful paper, scissors, and a glue stick, and let’s get started!
Materials You’ll Need:
- Colored paper (construction paper works great!)
- Scissors
- Glue stick or double-sided tape
- Pencil
- Markers or crayons for decoration
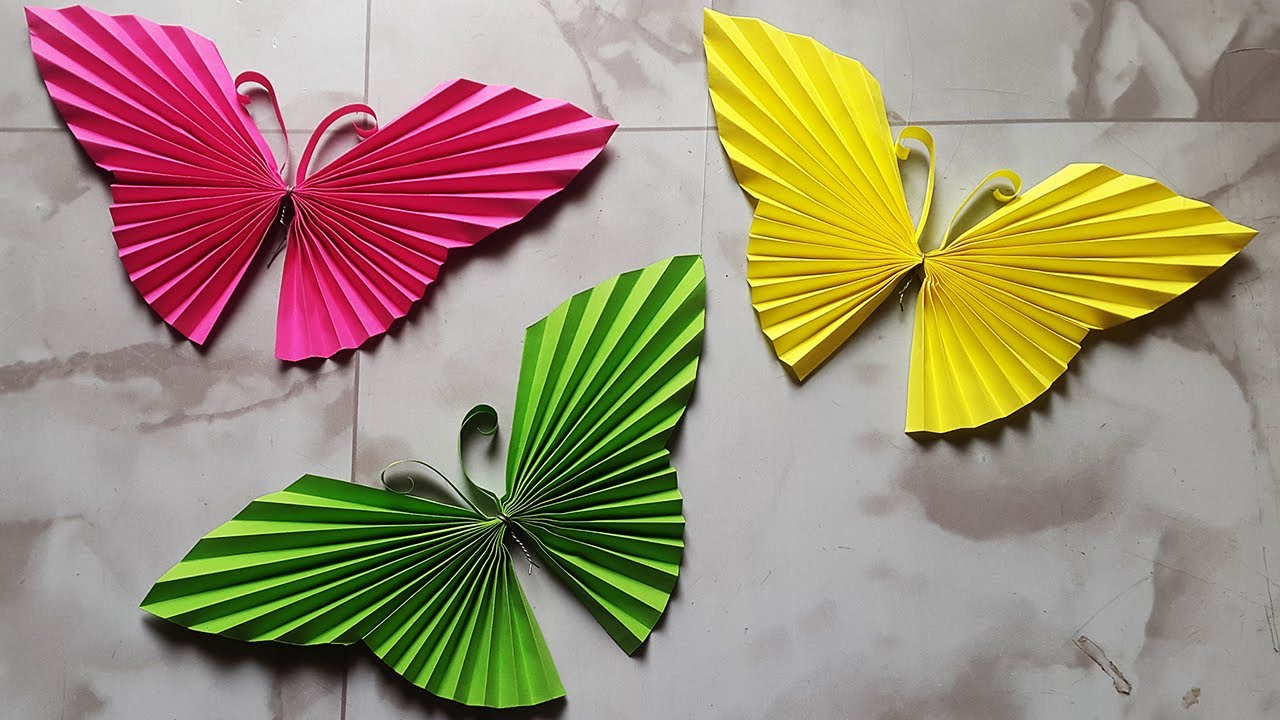
Step 1: Cut the Paper
Start by cutting a square piece of paper. A 6-inch by 6-inch square is perfect, but feel free to adjust the size based on your preference. Next, fold the square in half diagonally to form a triangle. This will give your butterfly a symmetrical shape.
Step 2: Create the Butterfly Shape
While the paper is still folded, use your pencil to draw the outline of your butterfly wings. Think about how wide and long you want them to be. A good guideline is to create a wavy line along the top edge for a more natural look. Once you’re happy with the outline, cut along the lines, keeping the paper folded. When you unfold it, you’ll reveal a beautiful butterfly shape!
Step 3: Add Details
Now, it’s time to personalize your butterfly! Use markers or crayons to draw patterns on the wings. You can create swirls, dots, or even little flowers. Get creative! The more vibrant, the better. Don’t forget to color in the body of the butterfly, too!
Step 4: Assemble the Butterfly
To give your butterfly some dimension, fold the wings slightly upwards at the center. Apply a small amount of glue or double-sided tape where the wings meet the body, holding them in place. Voila! Your paper butterfly is starting to come to life. You can create several butterflies in various colors and sizes for a stunning display.
Step 5: Display Your Creation
Now that your butterfly is complete, it’s time to show it off! You can hang them from the ceiling, attach them to a wall, or use them as bookmarks. The options are endless!
Also Read This: How to Make Coffee Designs: Creative Latte Art on Dailymotion
4. Creative Ideas for Decorating Your Paper Butterflies
Once you’ve mastered the basics of making paper butterflies, why not take it a step further? Here are some fun and creative ideas to decorate and personalize your butterflies, making them even more special!
1. Use Patterns and Textures
Instead of solid colors, try using patterned paper, like scrapbook paper with floral designs or polka dots. You can also layer different textures by gluing on materials like lace, felt, or even glitter for a sparkly effect!
2. Add Natural Elements
Bring the outdoors in by incorporating elements from nature. Use real flower petals, leaves, or pressed flowers to embellish your butterflies. Just make sure to use a strong adhesive to keep everything in place.
3. Create a Butterfly Mobile
For a stunning display, make a butterfly mobile! Cut varying sizes of butterflies and hang them from a coat hanger or a wooden dowel. Use string to hang them, allowing them to flutter gently in the breeze.
4. Personalize with Names or Messages
Write the names or special messages on the wings of your butterflies. This is a great way to personalize a gift or create a unique decoration for parties. You can even make them a part of a scavenger hunt by hiding butterflies with different names around the house or garden!
5. Incorporate Technology
If you want to mix some tech into your crafting, try using a printer to print butterfly outlines onto paper. Then, decorate them with digital designs or photos. This can add a modern twist to your creations!
With these creative ideas, your paper butterflies will not only be beautiful but also a reflection of your unique style. Enjoy the process, and let your imagination take flight!
Also Read This: How to Upload Videos Faster on Dailymotion: Tips and Tricks for Efficient Uploading
5. Common Mistakes to Avoid When Crafting Paper Butterflies
Creating paper butterflies can be a delightful activity, but even the most enthusiastic crafters can run into a few hiccups along the way. Here are some common mistakes to avoid, ensuring your butterflies turn out beautifully!
- Using the Wrong Paper: Not all paper is created equal! Avoid using thick card stock if you want delicate butterflies. Instead, opt for lightweight paper like origami or scrapbook paper. It makes folding easier and results in a more graceful wing shape.
- Skipping the Crease: A crisp fold is essential for a polished look. Don’t rush this step! Use a bone folder or the edge of a ruler to make your creases sharp and defined.
- Ignoring Proportions: If your butterfly wings are too large compared to the body, it might look off-balance. Pay attention to proportions when cutting your paper. A good rule of thumb is to make the body about one-third the width of the wings.
- Overcomplicating Designs: While it’s tempting to go for intricate patterns, simplicity often yields the prettiest results. Start with basic designs and add details gradually as you become more comfortable with the technique.
- Forgetting About Symmetry: When crafting your butterflies, aim for symmetry. It can be helpful to fold your paper in half to ensure both sides are identical. This ensures a nice, balanced look when the wings are spread out.
By avoiding these common pitfalls, you'll find your paper butterflies coming to life with ease and elegance. Remember, practice makes perfect, so don’t hesitate to try again if things don’t go as planned!
6. Tips for Displaying Your Paper Butterflies
Once you've created your stunning paper butterflies, the next exciting step is displaying them! Here are some creative ideas to showcase your beautiful creations:
- Wall Art: Create a whimsical butterfly wall display. Consider using a shadow box or a simple frame to add depth. Arrange the butterflies in a flight pattern, or create a cluster for a more dynamic look.
- Mobile: Hang your butterflies from a ceiling or a window using fishing line. This will give them a lovely floating effect, making it seem like they're fluttering in mid-air.
- Gift Wrapping: Use your paper butterflies to decorate gift packages. They can be glued onto gift bags or tied with ribbons as charming accents that make your gifts stand out.
- Table Centerpieces: Incorporate butterflies into your dining decor. Place them on a decorative plate or within a floral arrangement to bring an enchanting touch to your table setting.
- Seasonal Decor: Change your display according to the season. For spring, use pastel colors; for autumn, consider warm shades like orange and yellow. This keeps your decor fresh and exciting!
Remember, the way you display your paper butterflies can enhance their beauty and bring a touch of nature inside. Be creative, and let your imagination soar!
 admin
admin


