Creating a personalized anniversary card for your parents is a heartfelt way to show your love and appreciation. Instead of purchasing a generic card, why not make something unique that truly reflects their relationship? A DIY card can hold sentimental value that store-bought options simply can’t match. Plus, it's a fun project that allows you to unleash your creativity! In this post, we'll explore some fantastic DIY anniversary card ideas, plus the materials you’ll need to get started. So, let’s dive into the wonderful world of card making!
Materials Needed for DIY Anniversary Cards
Before you start crafting your personalized anniversary card, gather all the necessary materials to ensure a smooth and enjoyable creative process. Here’s a handy list of items that can help you design a memorable card for your parents:
- Cardstock or Construction Paper: Choose colors that resonate with your parents' style or match their wedding colors. Cardstock is sturdy and provides a professional touch.
- Scissors: You’ll need a good pair of scissors to cut out shapes, letters, or other decorative elements.
- Glue or Double-Sided Tape: Adhesives are essential for sticking different components together. Consider using double-sided tape for a neater finish.
- Markers or Colored Pencils: Use these to write messages or add colorful decorations. Metallic markers can add a special touch!
- Stickers: Look for themed stickers, such as hearts or flowers, that can add charm to your card.
- Stamps and Ink Pads: If you enjoy stamping, this can be a great way to create designs without drawing them freehand.
- Embellishments: Think sequins, ribbons, or washi tape to make the card pop. These can add texture and personality to the final product.
- Paper Trimmer: For more precise cuts, a paper trimmer or guillotine can give you clean edges.
- Envelopes: Don’t forget an envelope that fits your card. You can decorate it too!
Once you have all your materials ready, let your imagination run wild! Remember, there’s no right or wrong way to create a card. The value lies in the effort and love you put into it. From simple designs to intricate masterpieces, the only limit is your creativity. Get inspired, and get crafting!
Also Read This: Updating Your Profile Picture on Dailymotion Made Easy
3. Step-by-Step Guide to Designing Your Anniversary Card
Creating a DIY anniversary card for your parents is a heartfelt way to show your love and appreciation. Designing your card might seem daunting, but it can actually be a very enjoyable process! Here's a simple step-by-step guide to help you craft the perfect card:
- Gather Your Materials: Before you begin designing, make sure you have everything you need. You'll need:
- Cardstock or construction paper
- Markers, colored pencils, or paints
- Stickers or embellishments (like sequins or ribbons)
- A ruler and scissors
- Glue or double-sided tape
That’s it! You now have a lovingly crafted anniversary card ready to present to your parents. They’ll cherish the time and creativity you put into making it!
Also Read This: How to Use Your Own Pictures on Dailymotion: Upload and Share Custom Content
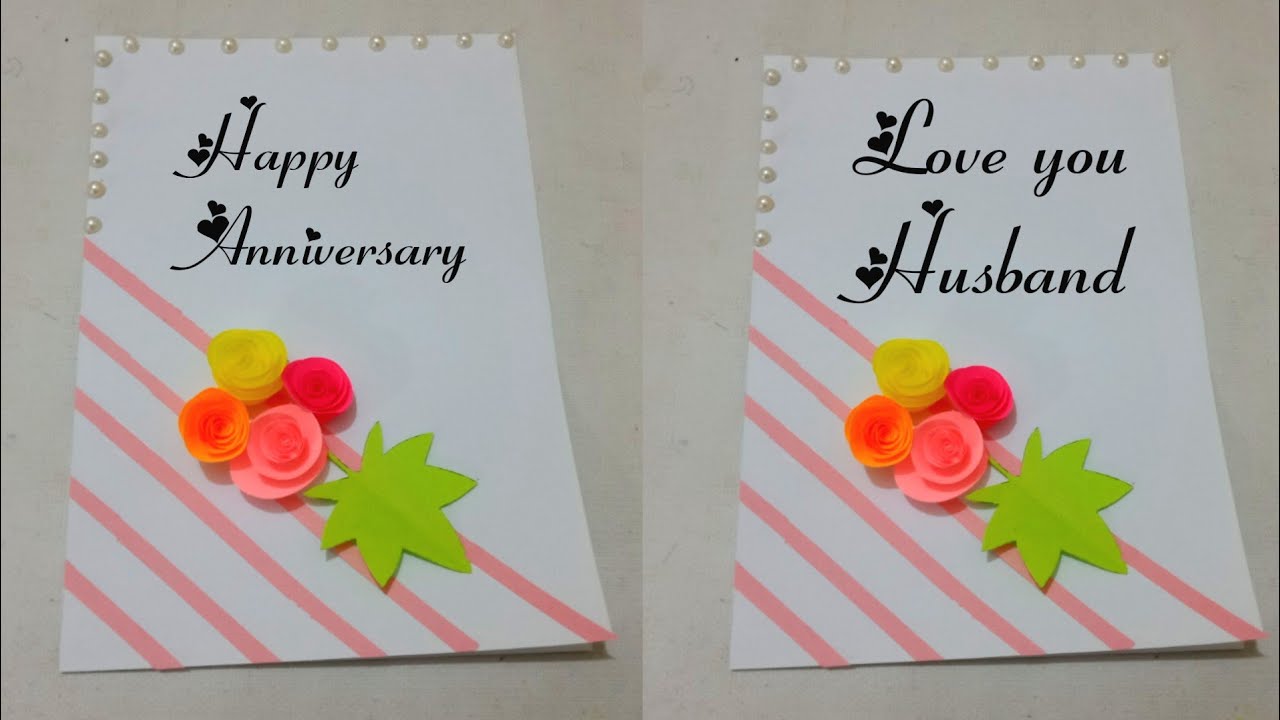
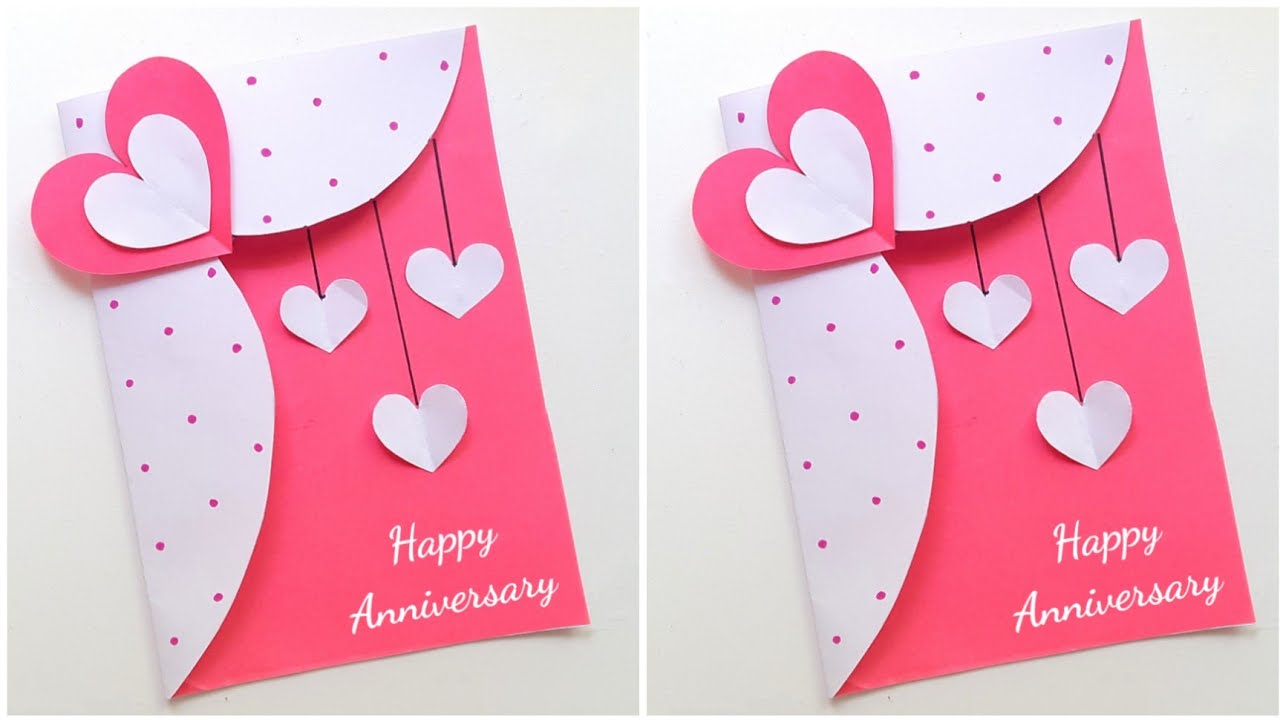
4. Creative Design Ideas for Unique Anniversary Cards
Want to give your parents a truly unique anniversary card? Here are some creative design ideas to inspire you:
- Photo Collage Card: Create a collage of memorable family photos. You can arrange these creatively on the card's front and even write little captions capturing those special moments.
- Pop-Up Elements: Make the card even more exciting by incorporating pop-up elements. A simple heart or cake shape that pops out when the card is opened can add a delightful surprise!
- Nature-Inspired Card: Use dried flowers or leaves as decorations. Attach them gently to the card's front or make a wreath design with them. This not only looks beautiful but also brings a natural touch to your card.
- Watercolor Wash: Experiment with a watercolor background. Simply dampen your cardstock and apply lightly mixed paints for a dreamy effect. Once dry, write your message over this lovely backdrop.
- Interactive Cards: Create a card with flaps to lift or sections to pull. Each layer can reveal a special message, a fun fact about their relationship, or even a reason why you love them!
- Personalized Coupons: Create a card that doubles as a coupon book! Each coupon could offer a day out, help with chores, or a special treat, giving your parents something to look forward to even after the anniversary is over!
- Quirky and Fun Messages: If humor is part of your family culture, leverage it! Design a silly card filled with funny quotes or inside jokes that only your family understands.
- Layered Designs: Use different textures and layers. Combine various types of paper, fabric, and even ribbons to create depth and interest on your card.
These creative ideas can help you design an anniversary card that's not only beautiful but also a true representation of your love for your parents. Let your imagination run wild, and enjoy the process of creating something special just for them!
Also Read This: Mastering the Pronunciation of Paulo Coelho with Dailymotion Videos
5. Tips for Writing Heartfelt Messages in Anniversary Cards
Writing a heartfelt message in an anniversary card is a wonderful way to show your parents just how much they mean to you. But sometimes finding the right words can be challenging. Here are some tips to help you convey your love and appreciation:
- Be Personal: Start by reflecting on their journey together. Mention specific moments or traits that you admire. For example, “I love how you two support each other through everything. Your partnership inspires me every day!”
- Use Humor: If your parents enjoy a good laugh, sprinkle in a light-hearted joke or a funny memory. A touch of humor can bring warmth and joy. Just make sure it’s appropriate!
- Express Gratitude: Take a moment to thank them for everything they have done, not only as a couple but as parents. A simple “Thank you for always being there for me” can go a long way.
- Share a Personal Story: Recall a memorable experience that encapsulates their love. Something like, “I’ll never forget the time you surprised each other for your anniversary. It showed me what true love looks like.”
- Look Forward: Conclude your message with a hint of excitement about the future. Whether it’s more family gatherings or travels, expressing hope for shared experiences makes your message timeless.
Remember, the most important thing is to be genuine. Your parents will appreciate the thought, effort, and love you put into your words. Keep it from the heart, and your message will resonate with them deeply.
Also Read This: How to Make a Tie Knot Step by Step: Dailymotions Simple Guide
6. Incorporating Photos and Memories into Your Card
Incorporating photos and memories into your DIY anniversary card can transform it from a simple greeting into a treasured keepsake. Here’s how you can do it:
- Photo Collage: Create a small photo collage on the inside of the card. Use pictures from their wedding, family trips, or significant milestones. This will create a beautiful visual representation of their love story.
- Memory Lane: Dedicate a section of the card to a timeline of special moments. For instance, list years next to memorable events—“1995: Wedding Day,” “2000: Birth of Your First Child,” “2010: Your 10th Anniversary Trip.”
- Incorporate Ticket Stubs or Clippings: If you have any old ticket stubs or clippings from events they attended together, attach them to the card. It’s a fun way to spark conversations about those cherished experiences.
- Handwritten Notes: Next to the photos, add short handwritten notes that describe the moment captured in the photo. For example, “This was the trip where Dad surprised Mom with a sunset dinner by the beach.”
Creating a visually appealing card doesn’t have to be complicated. Use scissors, glue, and craft supplies to get creative! You might even consider using colored paper or decorative washi tape to add some flair. When your parents open your card, they’ll be flooded with nostalgia and joy, reminding them of all the love they’ve shared over the years.
Ultimately, combining heartfelt messages with meaningful photos can turn your DIY anniversary card into a cherished memento. Your parents will treasure it for years to come!
Also Read This: Reduce Arm Fat in a Week with Easy Exercise Videos on Dailymotion
7. Finishing Touches: Adding Decorations and Envelopes
Now that you've crafted the main part of your DIY anniversary card, it's time for the fun part: adding those finishing touches! This is where your creativity can really shine. With just a few simple decorations and an envelope, you can transform a basic card into something truly special.
Decorative Elements
Here are some ideas for embellishments that can elevate your card:
- Stickers: Look for stickers that represent your parents' hobbies or interests. Whether it's gardening, travel, or cute animals, adding stickers can personalize the card immensely.
- Washi Tape: This decorative tape comes in various colors and patterns. Use it to border your card or create fun designs. It's easy to work with and can add a pop of color instantly!
- Ribbons and Bows: A small ribbon or bow can add a touch of elegance. Attach it to the card or wrap it around the envelope for that extra flair.
- Hand-Drawn Designs: Don't worry if you're not a professional artist! Simple doodles or hand-drawn hearts, flowers, or even a border can give your card a unique touch.
- Photos: If you have a cherished family photo, consider incorporating it into the card design. A small printed photo can make the card feel more intimate.
Creating an Envelope
Now that your card is beautifully decorated, it’s time to craft an envelope that complements it perfectly. Here’s a simple way to make your own:
- Select Paper: Choose a sturdy paper that matches or contrasts nicely with your card's colors.
- Cut the Paper: Cut a rectangular piece of paper. A common size for cards is 9"x6". Adjust depending on your card size.
- Fold the Edges: Fold the paper into thirds, bringing the sides to the center to create a flap. Then, fold up the bottom to form the base of the envelope.
- Seal it Up: Use a small amount of glue or double-sided tape to secure the edges. You can also add a decorative sticker or use washi tape to seal it.
By personalizing the envelope as well, you turn the whole gifting experience into something memorable. Perhaps add a special note on the front like "For Mom and Dad" or a tiny heart. Whatever you choose, it should reflect the warmth and love that you're sharing with them on their special day.
8. Conclusion and Encouragement to Share Your Creations
And there you have it! With a little time and creativity, you can create a heartfelt DIY anniversary card that your parents will cherish forever. There's nothing quite like receiving something handmade, and your unique touch can convey feelings that store-bought cards simply can't match.
As you finish your card, take a moment to think about the love story you’ve grown up with. The little details you added to the card can remind your parents of their journey together. Whether it’s their wedding date inscribed beautifully inside, a favorite memory recorded on the back, or a heartfelt message about how much they mean to you, these elements will make your card a treasured keepsake.
Don't forget to share! If you feel comfortable, snap a photo of your creation and share it with your friends and family, or on social media. Use the opportunity to inspire others to create their own DIY cards. Who knows? Your parents' anniversary card may spark a creative wave among your loved ones!
Lastly, encourage your parents to keep the card. It might be a small gesture, but one that can resonate for years to come. After all, it’s a symbol of love, appreciation, and cherished memories. So, grab those craft supplies, get inspired, and enjoy the creation process. Happy crafting!
 admin
admin


