If you've ever wandered through a craft store or stumbled upon YouTube tutorials, you've likely seen the colorful, stretchy wonders known as Infinity Loom Bands. These little bands have become a massive hit among crafters of all ages, transforming the simple act of weaving into an exciting hobby. In this post, we'll dive into what makes infinity loom bands special and how you can easily create your own unique designs. Ready to unleash your creativity? Let's get started!
Materials Needed for Creating an Infinity Loom Band
Before diving into the fun part of crafting your very own infinity loom band, it's essential to gather all the necessary materials. Don't worry; you won't need a long shopping list! Here’s what you’ll need to begin your loom band journey:
- Loom Band Kit: Most starter kits come with a loom, which is designed to help you create various band patterns. Look for a kit that includes different colored bands.
- Hook Tool: This handy tool is used for pulling the bands through and securing them. It’s similar to a crochet hook and is crucial for making intricate designs.
- Colorful Rubber Bands: The heart of your infinity loom band! You can choose from a wide array of colors, styles, and even glow-in-the-dark options.
- Clips or C-Clips: You'll need these to tie off your completed projects. They come in handy when securing your bands so that your creation doesn’t fall apart.
- Scissors (optional): If you're looking to trim any excess bands or need to detach a band, a pair of scissors might be helpful.
- A Workspace: Find a flat, comfortable area where you can spread out your materials and access everything easily.
Once you have all your materials ready, you’ll feel more confident and excited to start crafting. Remember, there's no rush; enjoy the process, and don't hesitate to experiment with different colors and styles for your infinity loom bands. The only limit is your imagination! Now that we’ve gathered everything, we're ready to jump into the fun of making your own infinity loom bands. Stay tuned for the next steps, where we’ll guide you through the process, step by step.
Also Read This: DIY Loom Bands with Pencils Easy Ideas on Dailymotion
Step 1: Setting Up Your Loom
Alright, let’s get started on this Infinity Loom Band journey! The first step is all about setting up your loom correctly. Don’t worry; it’s easier than it sounds. Grab your loom and let’s dive in!
First, make sure you have all your materials handy:
- Your Infinity Loom
- Some colorful rubber bands
- A hook (usually comes with the loom)
- Optional: A clip for securing your finished bracelet
Now, let’s configure the loom:
- Position your loom: Place your loom in front of you with the arrow pointing away. This is the direction that your design will flow as you work.
- Adjust your pegs: If your loom can be adjusted (some have adjustable peg setups), ensure it's set to the configuration that matches your desired design. For a basic bracelet, a straight line of pegs works perfectly.
- Check for stability: Make sure the loom is on a flat surface. This will help prevent any slips or accidents while you're working. You want everything to be sturdy!
- Inspect your loom: Before getting started, give your loom a quick once-over. Are all the pegs properly in place? Is it clean and free from any debris? A tidy workspace leads to a more enjoyable crafting experience.
Once you have everything set up, take a moment to admire your loom. You’re all set to transform those rubber bands into something beautiful! Let’s get to the fun part: choosing and preparing your bands.
Also Read This: How to Cook Authentic Pakistani Biryani with Dailymotion Tutorials
Step 2: Selecting and Preparing Your Bands
Now that your loom is set up, it's time to select and prepare your bands for crafting your infinity loom bracelet. This is where your creativity can really shine! Here are some easy steps to guide you:
First, think about the colors that you want to use. The beauty of loom bands is in their colors and patterns! Here are some ideas to help you choose:
- Rainbow effect: Mix all the colors for a vibrant look.
- Monochromatic: Use different shades of the same color for a chic vibe.
- Patterned bands: Incorporate bands with unique designs for a creative twist.
Once you’ve decided on your color scheme, here’s how to prepare your bands:
- Gather your bands: Collect the bands you’ve chosen and organize them by color. This will make it easier to grab what you need as you go.
- Stretch your bands: Gently pull them to give them a little stretch. This helps to ensure they will be flexible when you start weaving.
- Count your bands: Depending on the design and length of your bracelet, you’ll need anywhere from 30 to 100 bands. A good rule of thumb for a standard bracelet is around 50-60 bands.
- Keep them nearby: Place your bands within easy reach of your working area. This way, you won’t have to pause your flow when you need more bands.
And there you have it! With your loom set up and your bands ready to go, you are just one step away from creating your beautiful infinity loom band. Next, we’ll dive into the exciting part: the actual weaving process!
Also Read This: Easy Tutorials for Making Lasagna on Dailymotion
5. Step 3: Creating the Initial Loom Setup
Alright, it's time to get your loom ready! The setup is a crucial part of making your infinity loom band because it’ll affect how your final design looks and feels. Don’t worry; this part is easy, and soon you'll be amazed at how quickly you can start weaving.
First, take your loom and place it in front of you. Depending on the type of loom you are using—whether it's a traditional loom or a round one—you’ll have a slightly different setup process, but the principles are quite similar. Let's dive in!
- Identify the Pegs: For the traditional loom, you'll see that it has a number of pegs aligned in rows. If you're using a round loom, make sure the pegs are spaced evenly around in a circular fashion.
- Choose Your Pegs: For an infinity band, typically, you’ll need to use a specific number of pegs. Check your pattern for guidance, but for most designs, using 8-12 pegs is a good starting point.
- Positioning the Loom: Keep your loom positioned securely on a flat surface. This stability makes it easier to weave without everything shifting around.
Next, it's time to start placing your first loom band:
- Start with the First Band: Grab your first rubber band. For the initial setup, you’ll need to twist it into an “8” shape as you place it onto each peg. This twist is key to securing the band in place while weaving.
- Cover All Pegs: Continue to place your bands on each peg, ensuring that they are twisted into the “8” before you set them down. This can feel a bit repetitive, but it’s essential for even tension in your band.
- Double Check: Before moving to the next step, double-check that every peg has a rubber band in the right configuration. If everything looks good, you're ready to move forward!
Feeling good? Excellent! Now that your loom is set up properly, you’re just one step away from starting to weave your infinity loom band. Let’s lace up those bands and make something beautiful!
Also Read This: Is There an App to Download Dailymotion Videos? A Guide to Legal Downloading Apps
6. Step 4: Weaving Techniques for the Infinity Band
Now that you have your loom all set up, it's time to dive into the fun part—*weaving! This step is where your infinity loom band really starts to take shape, and it’s easier than you might think. Let’s go through some effective weaving techniques that will give your band that stylish look.
First, you’ll want to familiarize yourself with some basic weaving motions. The goal here is to create a pattern that will result in your infinity band. Here’s how you can get started:
- Grab Your Hook: Use your crochet hook (or loom hook) to lift the bottom band on each peg. Make sure to only lift the band that’s closest to the loom while keeping the top bands in place. This is an important step, as it’s what will create the woven effect!
- Pull Bands Over: With the bottom band lifted, pull it over the peg and let it fall down. This action secures the band and allows the top bands to remain in place. Continue this for each peg until you’ve gone all around.
- Repeat It! After you’ve pulled all the bottom bands over, repeat the process: lift the new bottom bands and pull them over. You may want to do this multiple times to build up the necessary length for the infinity band.
Now, there’s also a cool technique called the twist and turn* method. Here’s how you can incorporate that into your weaving:
- Twist Technique: Instead of just weaving in a straightforward line, you can add twists by rotating the hook before pulling the next band. This gives your band a unique, textured look.
- Turn Method: When you reach the end of the loom, turn the loom around and start weaving back. This helps create a well-rounded, cohesive infinity design!
Remember, practice makes perfect. Don’t be discouraged if your first few bands don’t turn out perfectly. Keep practicing these techniques, and soon you'll be creating gorgeous infinity loom bands effortlessly!
Also Read This: How to Make a Paper Car: Easy Step-by-Step Guide on Dailymotion
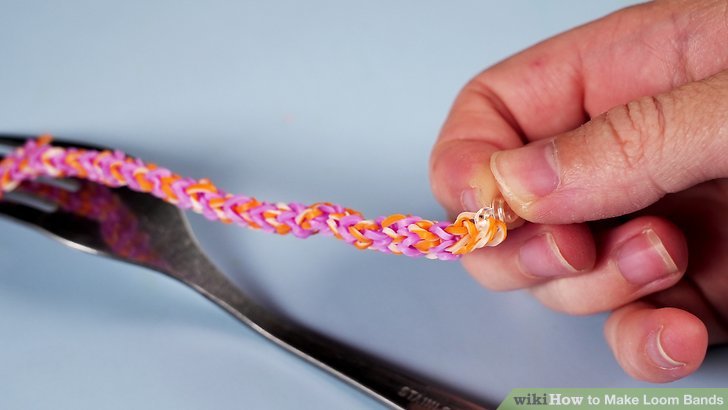
7. Step 5: Finishing Touches and Securing Your Band
Congratulations! You've woven your stunning infinity loom band, and now it’s time for those all-important finishing touches. This final step not only secures your hard work but also gives your band a polished look.
Here’s how to wrap everything up:
- Remove the Band from the Loom: Gently lift your bracelet off the loom. Be careful, as this is the moment when your creation comes to life! Use a hook to gently pry it away from the pegs without stretching it out of shape.
- Connect the Ends: Take both ends of your band and pull them together. This is where a clip or hook comes into play! If you’re using an S-clip or C-clip, attach one part to each end of your band. If you're using a single hook, simply loop both ends over the hook until they secure together.
- Check for Loose Stitches: Before you finalize everything, check your band for any loose stitches or sections that might unravel. If you find any, simply use your hook to reweave those parts back into place. It's better to fix it now than to have your beautiful band fall apart later!
- Add Personal Touches: This is the fun part! You can add charms, beads, or stickers to your band to give it a touch of personality. Feel free to get creative! Perhaps a heart for a loved one or a star for a bit of sparkle? The sky's the limit!
- Make It Shine: For a little extra flair, consider running a bit of baby oil or clear nail polish along the rubber bands. This will not only enhance the color but also give your band a shiny finish. Remember, a little goes a long way!
And voila! Your infinity loom band is now complete and ready to wear or gift! Remember that the more you practice, the better you’ll get at these finishing touches, so don’t worry if it feels tricky right now.
Also Read This: How to Change Dailymotion URL in 2017 Tips and Tricks for Easy Customization
8. Tips for Beginners: Common Mistakes to Avoid
As with any new craft, making loom bands comes with a few common pitfalls, especially for beginners. Don't let these small bumps in the road discourage you! With the right knowledge, you can easily sidestep these mistakes.
- Overstretching the Bands: It’s tempting to pull tightly on your bands to get a neat finish, but overstretching can weaken them and lead to breakage. Keep a firm but gentle grip!
- Poor Tension: If the bands feel either too tight or too loose, re-evaluating the tension might be in order! Maintaining consistent tension is key for elasticity while remaining comfortable on your wrist.
- Ignoring the Pattern: Patterns can be tricky, especially with intricate designs. Always take your time and refer to step-by-step guides or videos if you're unsure. Rushing can lead to confused designs that don’t turn out as planned.
- Forgetting to Secure Properly: As we discussed in the last section, not securing your band properly can lead to an unraveling masterpiece. Always double-check those closures!
- Skipping the Practice: Don't be afraid to make mistakes – practice is essential. The more you loom, the better you’ll get, so don’t hesitate to try out different styles and techniques!
Remember, everyone was a beginner once! Making mistakes is all part of the learning experience, and each creation is an opportunity to improve. Happy looming!
Also Read This: How to Create a Cinderella Cake with Creative Decorating Techniques
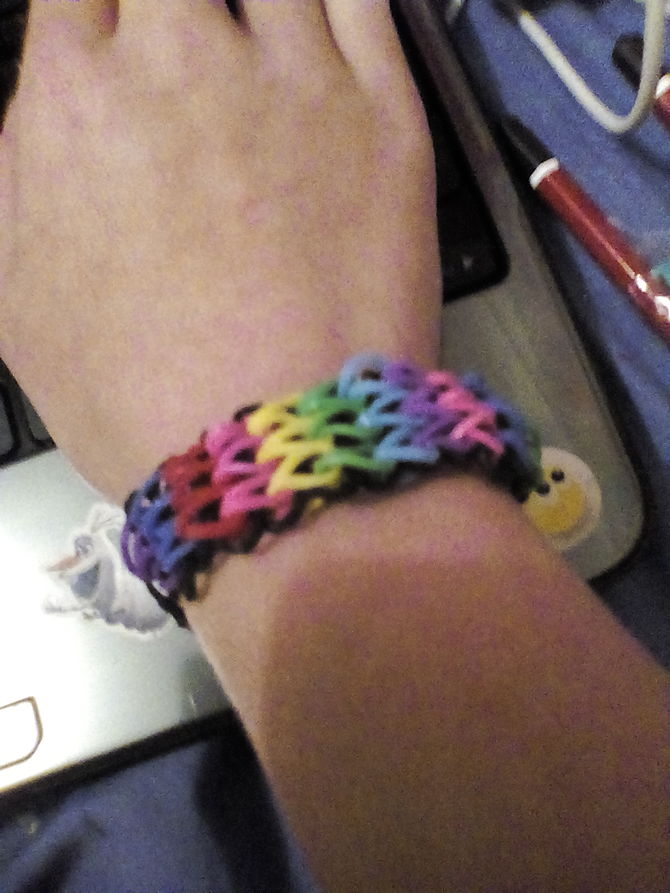
9. Conclusion: Enjoying Your Handmade Infinity Loom Band
Congratulations, crafty friend! You've successfully made your very own infinity loom band. How does it feel to create something so unique and personalized? Wearing your handmade creation is a fantastic way to express your creativity and showcase your dedication. Plus, you can mix and match it with your outfits, making it a versatile accessory for any occasion!
As you put on your infinity loom band, it's worth taking a moment to appreciate not just the beauty of your work, but also the time and effort you've invested into making it. Each twist and turn of the rubber bands reflects your creativity and patience, and that's something to be proud of! You can even turn this into a fun fashion statement by layering it with other bracelets or wristbands.
If you're feeling extra proud of your creation, why not share it with friends and family? Show off your design on social media with a little flair. Who knows? Your knack for crafting might just inspire someone else to dive into the world of loom band making!
Remember, every loom band you create builds your skill and knowledge of techniques—so don’t stop here. Experiment with different colors and patterns. As you make more infinity loom bands, you’ll develop your own style and may even create some original designs that reflect your personality. Let's face it, more loom bands mean more fun!
If you ever encounter any hiccups in your crafting journey or want to try out more advanced techniques, don't hesitate to go back to the instructions or seek out other resources. Enjoy the process, and happy looming!
10. Additional Resources and Video Tutorials
To take your infinity loom band-making skills to the next level or to find inspiration for new designs, here are some excellent resources and video tutorials to check out:
- YouTube Tutorials: There are countless YouTube channels dedicated to loom band crafting. Some recommendations are RobloxLooms and Loom Band Tutorials. They offer step-by-step guides that are perfect for visual learners!
- Online Craft Communities: Websites like Craftster and Reddit’s Loom Band Community are great places to share your projects and get advice from fellow loom enthusiasts.
- Books: Searching for some structured learning? Books like The Loom Band Bible provide comprehensive guides covering everything from beginner projects to advanced techniques.
- Instagram Hashtags: Explore hashtags like #LoomBandArt or #LoomBandTutorials on Instagram to discover vibrant designs from other crafters. You might find new ideas to inspire your next project!
With these resources at your fingertips, you’ll be able to dive deeper into the world of loom bands and continue creating beautiful pieces that reflect your style. Have fun exploring and don’t hesitate to challenge yourself with new projects. Happy crafting!
 admin
admin


