When it comes to digital images, quality and file size are two key factors that often go hand in hand. You may have noticed that some images take up a lot of space on your device or slow down your website's loading speed. This is usually because they are high in quality, which means larger file sizes. However, there’s a balance to strike. While high-quality images look great, they can be cumbersome to store and share. In this post, we’ll explore how image quality relates to file size and why it’s important to know how to reduce file sizes without compromising too much on quality.
Why Reducing Image File Size is Necessary

Reducing the size of your images can be crucial for many reasons. Here are some of the key benefits:
- Faster Website Load Times: Large image files can slow down your website, leading to longer load times. By reducing file sizes, you improve the speed and overall user experience.
- Save Storage Space: Whether you’re storing images on your computer, website, or cloud storage, large files can quickly take up space. Smaller images are easier to manage and save.
- Improved SEO: Faster websites tend to rank better in search engine results. Reducing image file sizes is a simple step that can help improve your site's SEO performance.
- Easier Sharing: Smaller images are quicker to upload and share, whether you're sending them through email, messaging apps, or social media.
By reducing image file size, you can also improve the performance of your website and applications, making them more user-friendly while also saving time and resources.
Also Read This: How to Make Money on Shutterstock: A Comprehensive Guide
Methods to Lower Image Quality for Smaller File Size

Lowering the quality of an image might sound counterintuitive, but it’s actually a very effective way to reduce its file size. There are several methods you can use to achieve this:
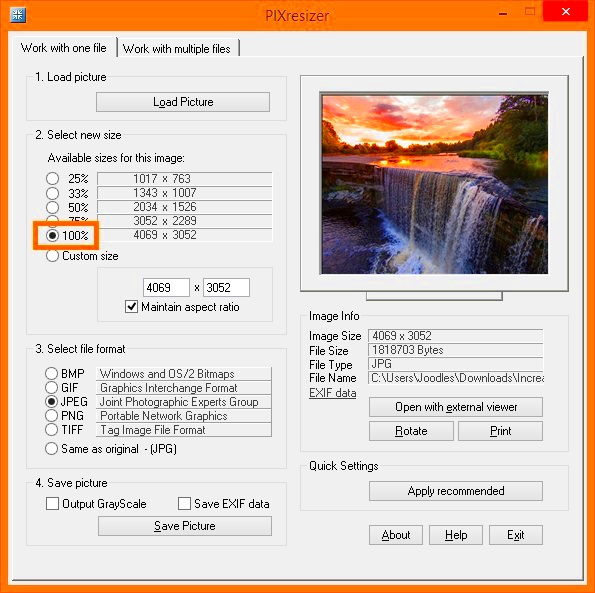
- Resizing the Image: The larger the image dimensions, the larger the file size. If you don’t need a high-resolution image, you can resize it to smaller dimensions. For example, reducing an image from 4000px to 1200px will drastically reduce its file size.
- Image Compression: Compression reduces the file size by removing unnecessary data from the image. There are two types of compression: lossless (no quality loss) and lossy (some quality loss). Lossy compression is more effective in reducing file size, but may result in slight image degradation.
- Adjusting Quality Settings: Most image editing tools allow you to adjust the quality level of an image. Lowering the quality slightly can drastically reduce the file size. It’s important to find a balance between quality and size that works for your needs.
- Changing Image Format: Different image formats (like JPEG, PNG, and WebP) have different levels of compression. JPEGs tend to have smaller file sizes for photos, while PNGs are better for images with transparency. WebP is another format that offers excellent compression with minimal quality loss.
These methods can be applied individually or together to get the best results. The key is to find the right balance that meets your specific needs, whether you’re looking to reduce file size for a website, social media, or other uses.
Also Read This: How to Create a Playlist in Dailymotion and Organize Your Videos Easily
Using Online Tools to Reduce Image File Size
If you don’t want to install software to reduce your image file size, online tools are a great alternative. They’re easy to use and can help you quickly compress and optimize your images. Here’s why online tools are so popular:
- Convenience: You don’t need to download or install anything. Simply visit a website, upload your image, and the tool will do the rest.
- Free Options: Many online tools offer free services for basic image compression and optimization, making them accessible to everyone.
- Speed: Online tools are usually fast and allow you to compress multiple images at once, saving you time compared to manual methods.
- No Technical Knowledge Required: Most online tools have a user-friendly interface that doesn’t require technical skills to use. You simply upload the image and select your desired output quality.
Some of the popular online tools include:
- TinyPNG: This tool uses smart lossy compression to reduce file sizes without compromising too much on quality.
- CompressJPEG: A tool that focuses on compressing JPEG files, offering a simple drag-and-drop feature.
- ImageOptim: Known for its clean interface and high-quality output, ImageOptim is great for Mac users.
- ILoveIMG: A versatile tool that handles image compression, resizing, and conversion all in one place.
These online tools make it easy to lower your image file size without the need for advanced software, making them ideal for users who want quick and easy solutions.
Also Read This: how to annotate an image on google docs
Impact of Image Compression on Visual Quality
While image compression is a great way to reduce file size, it can have an effect on the visual quality of your image. Depending on the method of compression used, you may notice some degradation. Here's a breakdown of how compression affects image quality:
- Lossy Compression: This type of compression removes some image data permanently, which can lead to noticeable quality loss. With high compression levels, you may see blurring, pixelation, or loss of detail. However, with moderate compression, the change in visual quality might be minimal.
- Lossless Compression: This method reduces file size without losing any image quality. While it doesn’t compress the file as much as lossy compression, it’s ideal for situations where preserving image details is crucial.
It’s important to strike the right balance between compression and quality. Here are some tips to manage this balance:
- Preview Before Saving: Most compression tools let you preview the results before finalizing the changes. Use this feature to check for any noticeable quality loss.
- Test Different Levels of Compression: Don’t just go for the highest compression. Try different levels and see how much quality loss you’re willing to accept for a smaller file size.
- Use the Right Format: JPEG is often a good choice for photos, while PNG is better for images with transparency or sharp edges. WebP is another excellent format that provides great quality at smaller file sizes.
While some loss of quality is inevitable with compression, it’s often a small price to pay for a significantly smaller file size, especially when the image is viewed on websites or mobile devices.
Also Read This: how to cancel adobe stock membership
How to Adjust Image Resolution for Smaller File Size
Resolution plays a big role in an image’s file size. Higher resolution images contain more pixels, which means they have more data and result in larger file sizes. If you’re looking to reduce the file size without sacrificing too much quality, adjusting the resolution is a simple and effective method. Here’s how to go about it:
- Understand Resolution and File Size: Resolution refers to the number of pixels in an image (width x height). Higher resolution means more pixels, which results in a larger file size. For example, an image with a resolution of 4000 x 3000 pixels will have a larger file size than one with a resolution of 1500 x 1000 pixels.
- Resize for Specific Needs: If the image is for online use, such as for a website or social media, you don’t need high resolution. Images around 1500 x 1000 pixels are often enough for most applications, reducing the file size significantly.
- Adjust the DPI (Dots Per Inch): DPI affects the quality of printed images. For web images, 72 DPI is usually sufficient. Higher DPI settings are unnecessary for digital use and can result in larger files.
Here are a few tips for adjusting resolution without sacrificing quality:
- Maintain Aspect Ratio: When resizing, make sure to maintain the aspect ratio (the relationship between the width and height) so the image doesn’t become distorted.
- Use Image Editing Software: Tools like Adobe Photoshop, GIMP, or even online editors like Canva can help you resize and adjust resolution without losing too much detail.
- Preview Changes: Always preview the image at the new resolution before saving it to ensure it still meets your quality standards.
Adjusting resolution is an effective way to reduce file size, especially when you don’t need the highest quality for digital purposes. By resizing your images to fit the intended use, you’ll be able to lower file sizes without losing too much visual detail.
Also Read This: Inside Look at Alamy Platform
Saving Different Image Formats for Smaller File Sizes
When it comes to reducing image file sizes, the format in which you save your image can have a big impact. Different formats are optimized for different types of images, so choosing the right one can help you maintain image quality while minimizing file size. Let’s take a look at the most common image formats and their characteristics:
- JPEG: This is one of the most widely used formats for photos. JPEG uses lossy compression, which means some data is discarded during compression to reduce file size. It’s great for images with many colors and gradients, but it may result in quality loss if compressed too much.
- PNG: PNG is a lossless format, meaning no image data is lost during compression. It’s perfect for images with sharp edges, transparency, or graphics like logos and icons. However, PNG files are usually larger than JPEG files, so it’s not ideal for photographs or images with lots of colors.
- WebP: WebP is a newer image format developed by Google. It provides both lossless and lossy compression, offering smaller file sizes without sacrificing too much quality. WebP is supported by most modern browsers and is a great option for websites looking to reduce load times without compromising visual quality.
- GIF: GIF is an older format mainly used for simple graphics and animations. It uses lossless compression but is limited to 256 colors, which makes it less suitable for detailed or high-resolution images.
Choosing the right format is key to reducing file size. For photos, JPEG or WebP are generally the best choices, while PNG is better for images that need transparency or fine details. Be sure to evaluate each format based on the type of image you’re working with and its intended use.
Also Read This: Step-by-Step Process for Downloading Fonts from Behance
Tips for Reducing Image File Size without Losing Quality
Reducing the size of your images without compromising their visual quality might seem like a challenge, but it’s totally achievable with the right techniques. Here are some tips to help you optimize your images effectively:
- Choose the Right Format: As mentioned earlier, selecting the appropriate format for your image is one of the easiest ways to reduce file size. JPEG and WebP are great for photographs, while PNG works well for images with transparency or sharp edges.
- Use Image Compression Tools: Compression tools like TinyPNG, ImageOptim, or Photoshop’s “Save for Web” option can help you reduce file sizes without noticeable loss in quality. These tools apply algorithms that remove unnecessary data, effectively shrinking the file size.
- Resize the Image: Reducing the physical dimensions of an image can significantly cut down its file size. If the image is too large for your needs, resize it to fit the intended display size. Don’t forget to maintain the aspect ratio to avoid distortion.
- Reduce Image Resolution: Lowering the resolution can also decrease file size, especially for web images. For most online use, 72 DPI is sufficient. Higher DPI values are generally not needed for digital platforms and only add to the file size.
- Adjust Quality Settings: Many image editing tools allow you to adjust the quality level when saving an image. By lowering the quality just a bit, you can reduce the file size without making the image look too bad. Always preview the image before finalizing the change.
- Remove Unnecessary Metadata: Some images contain metadata, such as camera settings, GPS coordinates, or other extra information that isn’t needed for the image’s final use. Removing this data can reduce file size, especially for images intended for the web.
By applying these tips, you can significantly reduce the file size of your images while keeping them looking sharp and clear. It’s all about finding the right balance between quality and file size.
Also Read This: How to Pixelate an Image for Privacy or Artistic Effects
FAQ
1. What is the best image format for reducing file size?
The best image format depends on the type of image. For photos, JPEG or WebP are ideal, as they offer good compression without significant quality loss. For images with transparency or sharp lines, PNG might be better, but it tends to have larger file sizes. WebP is a good choice for websites as it offers smaller file sizes with minimal quality reduction.
2. How can I reduce the file size without losing quality?
To reduce file size without noticeable quality loss, try using compression tools like TinyPNG, resize the image to fit the necessary dimensions, and adjust the quality settings slightly. You can also save the image in a more efficient format like WebP for better compression.
3. Does compressing an image always affect its quality?
Compression can affect image quality, especially if you use high levels of lossy compression. However, using moderate compression or lossless compression (like PNG or WebP) can reduce file size with little to no visible impact on quality. It’s all about finding the right balance.
4. How do I know if an image is too compressed?
If an image is overly compressed, you may notice visible artifacts such as blurriness, pixelation, or loss of detail, especially in areas with gradients. Always preview your image before saving to ensure the quality is still acceptable for your needs.
5. What tools can I use to compress images?
There are many online and offline tools available to compress images. Popular online tools include TinyPNG, CompressJPEG, and ILoveIMG. For more advanced editing, you can use software like Adobe Photoshop or GIMP, which also offer compression options when saving images.
Conclusion
In conclusion, reducing the file size of your images is essential for faster website loading times, efficient storage, and better performance across digital platforms. Whether you’re working with photographs, graphics, or illustrations, choosing the right method for compressing and resizing your images can make a significant difference. By understanding the relationship between image quality and file size, using online tools, and adjusting image formats and resolution, you can maintain good visual quality while optimizing file sizes for your needs. Always remember to find the right balance that works for your specific use case, whether it’s for web design, social media, or personal storage. Implementing these strategies will help you save space, improve user experience, and boost website performance.

 admin
admin


