When you’re working with images, especially for print, you’ll often come across terms like resolution and DPI. These elements play a significant role in how sharp and clear your image looks. In simple terms, DPI (dots per inch) is a measurement of image quality. The higher the DPI, the better the
What is DPI and Why Does It Matter?

DPI stands for dots per inch. It measures the number of individual dots that can be printed in a single inch of an image. Essentially, the higher the DPI, the more dots are packed into that inch, leading to greater detail and clarity in the print. DPI is crucial for ensuring your image looks crisp and professional when printed. If your
Here's why DPI matters:
- Print Quality: A higher DPI results in sharper, clearer prints.
- Image Clarity: Higher DPI means more detail in the image.
- Size Considerations: Large prints need high DPI to maintain quality.
- File Size: Images with higher DPI have larger file sizes.
For professional printing, you typically need an image to be 300 DPI. This is the standard for high-quality prints, ensuring your images are crisp and detailed.
Also Read This: How to Use 123RF for E-commerce Product Visuals
Steps to Make an Image 300 DPI Using Photo Editing Software
If you want to prepare your image for printing at 300 DPI, you’ll need to adjust the DPI setting in your photo editing software. Here’s a simple step-by-step guide to help you make that adjustment:
- Open Your Image: Start by opening the image you want to adjust in a photo editing program like Photoshop, GIMP, or others.
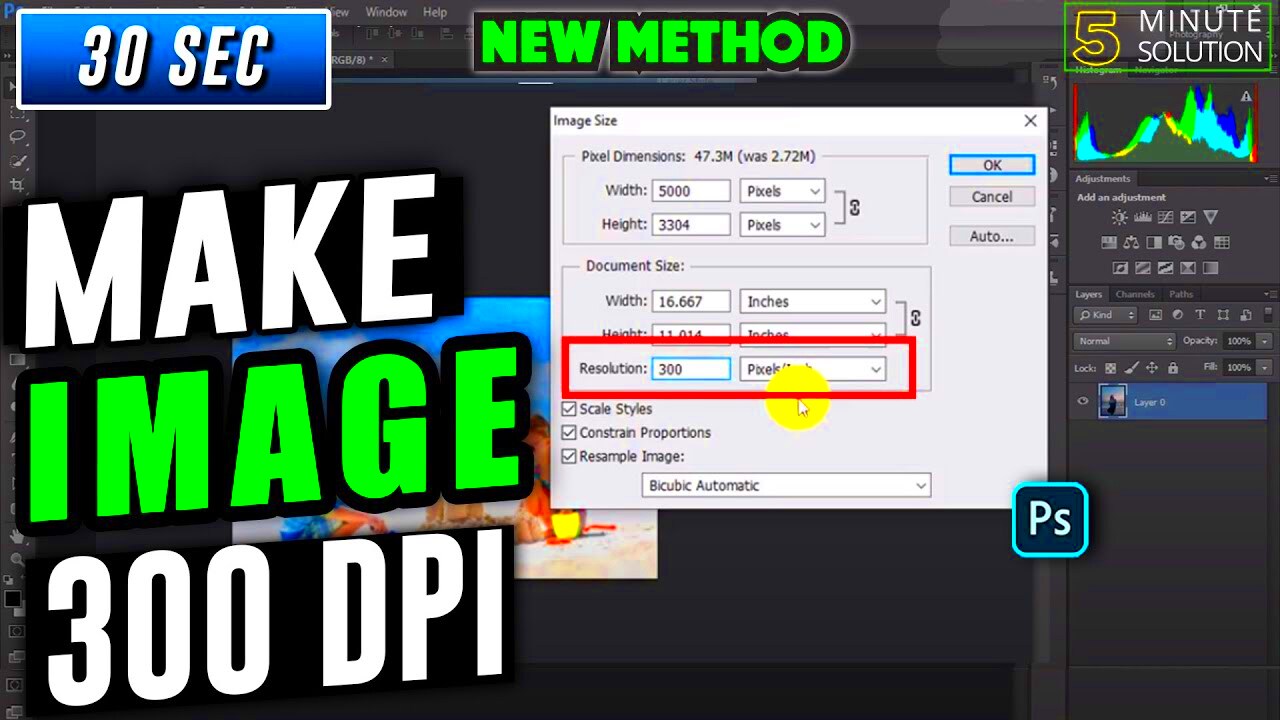
- Go to Image Settings: In Photoshop, for example, go to the 'Image' menu and select 'Image Size.' This is where you can see and adjust the DPI.
- Uncheck Resample: To avoid resampling your image (which might reduce quality), uncheck the 'Resample' option. This will allow you to change the DPI without affecting the image’s pixel dimensions.
- Change DPI to 300: In the Resolution field, change the DPI to 300. Make sure the units are set to 'Pixels/Inch.'
- Adjust Image Size if Needed: If the image is too small for your intended print size, you can adjust the dimensions to suit your needs, but be mindful that increasing dimensions too much might reduce image quality.
- Save the Image: Once you’ve set the DPI to 300, save your image in a format like TIFF or PNG to maintain quality.
Following these steps ensures your image is ready for high-quality printing, making it sharp and detailed, perfect for professional use.
Also Read This: Can You Download from iStock for Free? Exploring Legal Alternatives
Common Tools to Change Image DPI
When you need to adjust the DPI of an image, there are several tools at your disposal. Whether you're using paid software or free alternatives, each tool offers unique features to make the process easy. Let's take a look at some of the most commonly used tools for changing DPI and their key features.
- Adobe Photoshop: One of the most popular photo editing tools, Photoshop provides a simple and powerful way to change DPI. Just go to the 'Image Size' menu, adjust the resolution, and Photoshop takes care of the rest.
- GIMP: A free and open-source alternative to Photoshop, GIMP allows users to change the DPI without compromising on quality. Just like Photoshop, you can adjust the image resolution from the 'Image' menu.
- Affinity Photo: Another paid tool that's slightly more affordable than Photoshop. Affinity Photo offers an intuitive interface to adjust the DPI and other resolution settings easily.
- Paint.NET: A free image editing tool that’s user-friendly and great for basic DPI adjustments. You can change the DPI by navigating to the 'Resize' option under the 'Image' menu.
- Online Tools (like DPI Converter): If you don’t want to download software, online tools like DPI Converter let you upload your image and adjust the DPI directly on the website. These tools are convenient for quick edits.
Choosing the right tool depends on your needs, whether you're editing professionally or just making a quick change. Each tool has its advantages, so it’s helpful to experiment and find the one that works best for you.
Also Read This: Importing Adobe Stock Photos into Photoshop
When Should You Use 300 DPI for Images?
300 DPI is the gold standard for print images, and it’s essential for certain types of projects. If you're wondering when you should use 300 DPI, here’s when it’s necessary:
- Professional Prints: For printing high-quality photos, brochures, flyers, and other marketing materials, 300 DPI ensures that the final print looks sharp and detailed.
- Large Format Printing: If you're printing large posters, banners, or signs, using 300 DPI ensures your image remains crisp even when enlarged.
- Photographs: For photographs intended for magazines, books, or galleries, 300 DPI will ensure the best image quality.
- Detailed Graphics and Illustrations: When working with illustrations or detailed vector graphics, 300 DPI ensures every line and color is clear in print.
For general web use, you can use lower DPI settings (like 72 DPI), but when preparing images for print, especially professional or high-quality prints, 300 DPI is the recommended resolution. It ensures that your images are sharp, clear, and ready for any print job.
Also Read This: How Likee is Empowering Creativity and Expression in Social Media.
Things to Consider When Changing DPI
Adjusting the DPI of an image isn’t always as simple as changing a number. Here are some important considerations to keep in mind when you’re modifying the DPI of an image:
- Resizing and Quality: Changing the DPI can affect the size and quality of the image. If you increase the DPI without increasing the pixel dimensions, the image may appear smaller or lose clarity. It’s essential to maintain the correct balance.
- Resampling: When changing DPI, you might need to resample the image (increase or decrease the number of pixels). Resampling can affect image quality, so it’s best to use it cautiously. Ideally, don’t resample an image if you want to keep the original quality intact.
- Image Dimensions: Increasing DPI doesn’t always make the image bigger or better. If you have a low-resolution image and try to increase the DPI, it might result in a blurry print, even if it’s set to 300 DPI.
- File Size: Higher DPI usually leads to larger file sizes. If you’re working with limited storage space or need to send your image over the web, keep in mind that larger DPI may not be the most efficient choice.
- Purpose of the Image: Always consider the final use of the image. For web use, you don’t need to set the DPI to 300. For printing, however, 300 DPI ensures a professional output.
In conclusion, changing the DPI can be a helpful way to optimize your images, but it’s important to take these factors into account. Always make sure you’re adjusting the DPI in a way that preserves the image quality while meeting the requirements for your project.
Also Read This: Viewing Your Saved Adobe Stock Images
How to Verify if Your Image is 300 DPI
Once you’ve adjusted the DPI of your image, it’s important to check if the changes were applied correctly. Verifying the DPI ensures that your image will look sharp and clear when printed. Fortunately, checking the DPI is easy and can be done with just a few clicks using various photo editing software. Let’s walk through how to check if your image is indeed 300 DPI.
Here are some simple methods to verify the DPI of your image:
- Using Photoshop: Open your image in Photoshop, go to the 'Image' menu, and select 'Image Size.' In the dialog box that opens, look for the 'Resolution' field, where you can see if the DPI is set to 300.
- Using GIMP: Open the image in GIMP, click on 'Image' in the top menu, then select 'Scale Image.' In the window that appears, check the 'X resolution' and 'Y resolution' fields to see if they are set to 300 pixels per inch (PPI).
- Using Online Tools: There are several online tools that allow you to check your image’s DPI. Simply upload the image to the tool, and it will show you the DPI without needing to install any software.
- Windows Properties (for Windows users): Right-click on the image file, select 'Properties,' and navigate to the 'Details' tab. You should see the DPI listed under the 'Image' section if the image was saved with the correct DPI.
- Mac Preview (for Mac users): Open the image in Preview, go to 'Tools' and select 'Show Inspector.' In the 'Info' tab, check the resolution listed under 'Image.'
By using these methods, you can easily verify if your image is 300 DPI and ensure it’s ready for print quality.
Also Read This: Getting Started with Your Portfolio on Behance
FAQ
Here are some frequently asked questions related to DPI and image resolution:
- What is the difference between DPI and PPI?
DPI (dots per inch) is used in printing, while PPI (pixels per inch) refers to the resolution of an image on a digital screen. Though similar, they apply in different contexts—DPI is for print and PPI is for digital displays. - Can I increase the DPI without changing the image size?
Unfortunately, increasing the DPI without adjusting the pixel dimensions can reduce the quality of the image. You’ll need to resample the image, which could affect its clarity. - Why is 300 DPI important for printing?
300 DPI is the standard for high-quality prints, as it ensures crisp details and sharpness. Anything lower, like 72 DPI, will likely result in blurry prints. - Can I change the DPI of an image without using professional software?
Yes, there are free and online tools available to change or check the DPI of your images. Some of these tools are basic and easy to use for quick edits. - What happens if my image is too low in DPI?
If your image has a low DPI (under 300), it may appear blurry or pixelated when printed. For high-quality prints, it’s important to use images with a minimum of 300 DPI.
Conclusion
In conclusion, DPI is a critical factor when preparing images for print. Ensuring that your image is set to 300 DPI will guarantee that it looks sharp and professional in print. By using the tools and methods we've discussed, you can easily adjust and verify your image’s DPI to make sure it’s ready for any print project. Whether you're working with Photoshop, GIMP, or online tools, you now have the knowledge to ensure your images are at their best. Keep these tips in mind, and your printed images will always look crisp and clear.

 admin
admin


