Thermal imaging cameras have become essential tools in many fields, from home inspections to security and healthcare. These cameras detect infrared radiation, which is emitted by all objects based on their temperature, and convert it into an image that we can see. This technology helps us visualize heat patterns and temperature differences that aren't visible to the naked eye.
Thermal imaging has found its way into many industries, making it incredibly versatile. Whether you're a DIY enthusiast wanting to build your own camera or just curious about how it all works, understanding thermal imaging technology can open up a world of possibilities.
Understanding the Technology Behind Thermal Imaging Cameras

Thermal imaging cameras work by detecting infrared radiation, a form of electromagnetic radiation that all objects emit based on their temperature. The key technology behind these cameras involves sensors that capture infrared radiation and convert it into visible images, often called thermal or heat maps.
Here's a simple breakdown of how thermal imaging works:
- Infrared Radiation: Every object emits infrared radiation. The amount of radiation increases with temperature.
- Detection: The thermal camera's sensor detects this radiation. It doesn't need visible light to work, which is why it can see in total darkness.
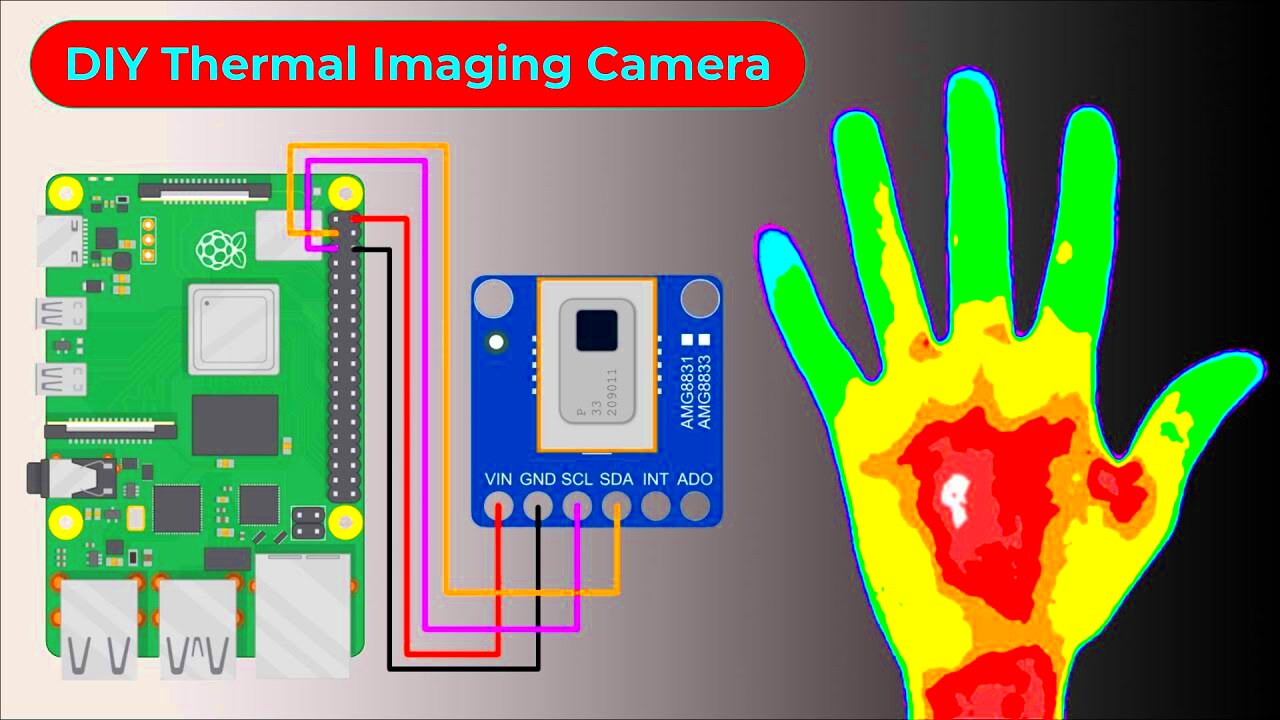
- Conversion to Images: The sensor then converts the infrared data into a digital image. The temperature differences are represented using color gradients, where hotter areas appear in red or yellow, and cooler areas are shown in blue or purple.
These images provide valuable insights, like identifying heat loss in buildings, spotting electrical problems, or monitoring human body temperature in medical applications. Understanding how this technology works is key to knowing how to build and use a thermal imaging camera effectively.
Tools and Materials You Need to Build a Thermal Imaging Camera

Building your own thermal imaging camera may seem like a daunting task, but with the right tools and materials, it can be a rewarding DIY project. Before you start, you'll need to gather the necessary components. Here's a list of the main tools and materials you’ll need to build a basic thermal camera:
- Infrared Sensor: The most important component, as it captures the infrared radiation. Look for affordable options like the FLIR Lepton module.
- Raspberry Pi or Arduino: These microcontrollers will process the data from the sensor and convert it into an image. A Raspberry Pi is popular for its power and flexibility.
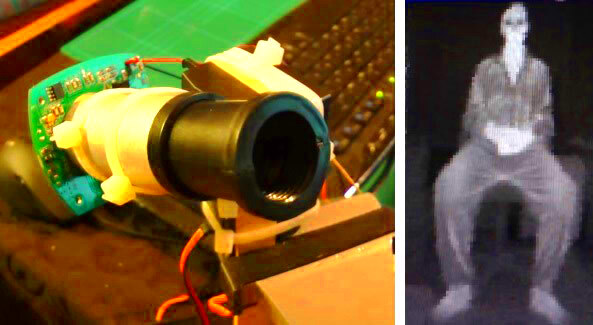
- Camera Lens: You’ll need a lens that focuses the infrared radiation onto the sensor. Some sensors come with lenses, while others may need you to buy one separately.
- Display Screen: A small display (like an LCD screen) is needed to show the thermal images in real time.
- Power Source: A portable power bank or battery pack is essential to power your camera during use.
- Wiring and Connectors: To connect all the components, you'll need some wires, connectors, and possibly a soldering kit for secure connections.
- Enclosure: A protective case to hold everything together and protect the delicate components from damage.
Once you have all these components, you’ll be ready to assemble your thermal camera. Keep in mind that this is a basic setup and advanced projects may require additional components like higher-quality sensors or more complex processors.
Step-by-Step Guide to Making a Thermal Imaging Camera

Building your own thermal imaging camera may sound complex, but breaking it down into manageable steps makes it doable. With the right tools and materials in hand, follow this simple guide to create your own DIY thermal imaging camera.
Here's a step-by-step breakdown of the process:
- Step 1: Assemble Your Tools and Materials – Gather all the necessary components mentioned earlier, including the infrared sensor, Raspberry Pi or Arduino, lens, display screen, and power source.
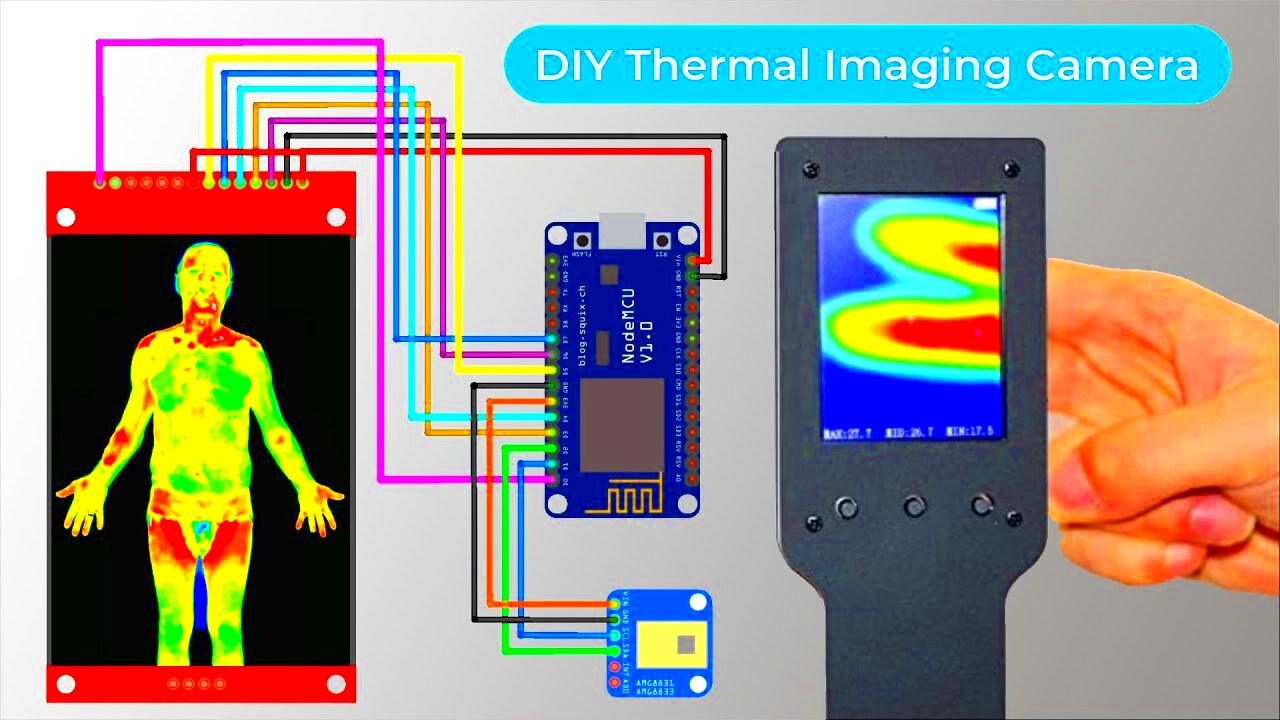
- Step 2: Connect the Infrared Sensor – Begin by attaching the infrared sensor to your Raspberry Pi or Arduino. You will need to carefully follow the wiring diagram for your specific sensor to make sure it is connected properly.
- Step 3: Set Up the Microcontroller – Install the necessary software on your Raspberry Pi or Arduino. You’ll need to set up the environment to read data from the sensor and display it on the screen. There are plenty of online tutorials that can help you configure the right software.
- Step 4: Attach the Display – Connect the display screen to your Raspberry Pi or Arduino. Make sure the screen is responsive and can show the thermal images generated by the sensor.
- Step 5: Testing the Setup – Before finalizing your setup, power up the camera and test it in different environments. You should see color variations on the screen corresponding to temperature differences.
- Step 6: Enclose the Camera – Once everything is working, place all components into a protective enclosure. This will help safeguard the internal parts and make your camera more durable and portable.
Once your camera is assembled, you can begin experimenting with it, using it to view heat signatures and improve its performance as needed!
Challenges You May Face When Building a Thermal Imaging Camera
While building a thermal imaging camera can be an exciting and rewarding project, there are a few challenges you might face along the way. Understanding these obstacles ahead of time will help you prepare for them.
Here are some common issues to keep in mind:
- Sensor Calibration: One of the trickiest parts is calibrating the infrared sensor correctly. If it's not set up properly, the images might not reflect accurate temperature readings, making troubleshooting a bit more difficult.
- Power Consumption: Thermal cameras require a lot of power, especially if you're using high-quality sensors. Keeping the power supply stable and ensuring it lasts long enough for your needs can be challenging, especially in mobile setups.
- Image Resolution: DIY thermal imaging cameras often have lower resolution compared to professional models. This means the images may not be as clear or detailed, which can affect their usefulness in some applications.
- Wiring and Connections: Incorrect wiring or loose connections can lead to malfunctions. Make sure everything is wired correctly and securely, especially when dealing with delicate components like sensors and microcontrollers.
- Component Compatibility: Ensuring that all parts work together can sometimes be a challenge. Not all sensors or microcontrollers may be compatible with each other, so research compatibility before purchasing components.
Despite these challenges, the process is definitely manageable with patience and a little know-how. Troubleshooting along the way is part of the DIY experience, and solving problems can be a rewarding part of the journey!
How Thermal Imaging Cameras Are Used in Different Industries
Thermal imaging cameras are powerful tools used in many industries for a variety of purposes. These cameras allow professionals to see heat patterns, which can help them identify issues that would otherwise go unnoticed. Let’s look at how thermal imaging is applied in different fields:
| Industry | Applications |
|---|---|
| Construction | Thermal cameras are used to identify areas of heat loss in buildings, helping to improve energy efficiency and detect insulation problems. |
| Electrical & Mechanical | Electrical engineers use thermal imaging to detect overheating wires, circuit boards, and machinery, helping to prevent failures and costly repairs. |
| Medical | In the medical field, thermal imaging is used for detecting inflammation, monitoring blood flow, and diagnosing conditions like arthritis or circulatory issues. |
| Security | Thermal imaging cameras are used for surveillance, especially in low-light conditions, as they can detect heat signatures and track intruders or monitor areas. |
| Firefighting | Firefighters use thermal cameras to see through smoke, locate hotspots, and ensure that fire areas are fully extinguished, improving safety during operations. |
These are just a few of the many industries that rely on thermal imaging technology. The ability to visualize heat patterns has revolutionized how professionals approach problem-solving and safety, making thermal cameras an invaluable tool across various sectors.
Maintaining and Troubleshooting Your DIY Thermal Imaging Camera
After you've successfully built your DIY thermal imaging camera, it's essential to keep it in good working condition. Regular maintenance will ensure that the camera performs well over time, and troubleshooting common issues can help you address problems early on before they become more serious.
Here are some tips for maintaining and troubleshooting your camera:
- Regularly Clean the Lens: Dust, fingerprints, and dirt on the lens can interfere with the camera’s ability to capture clear thermal images. Use a microfiber cloth to gently clean the lens without scratching it.
- Calibrate the Sensor Periodically: Over time, the sensor might lose its calibration, which could affect image accuracy. Check the sensor's calibration and reconfigure it if necessary to ensure the temperature readings are precise.
- Update Software: If you're using a Raspberry Pi or Arduino, make sure the software is up-to-date. Software updates can improve performance, fix bugs, and offer new features for better functionality.
- Check for Overheating: The infrared sensor can overheat if the camera is used for long periods. Ensure that there is proper ventilation and avoid using the camera in high-temperature environments for extended durations.
- Test the Power Supply: If the camera isn’t turning on or the image is fading, check the power supply. Use a multimeter to test the battery or power bank to make sure it's providing adequate power.
If you encounter any issues like poor image quality or malfunctioning components, try resetting the system, checking the connections, or consulting the user manuals for troubleshooting tips. With regular care and attention, your DIY thermal imaging camera can continue to provide useful results.
Conclusion: Is Building a Thermal Imaging Camera Worth It?
Building a thermal imaging camera is an ambitious but achievable project that can be both fun and educational. While it requires time, patience, and a bit of technical knowledge, the results can be highly rewarding. Not only do you end up with a unique, fully functional camera, but you also gain a deeper understanding of thermal imaging technology and how it works.
Whether you are using it for DIY purposes, home inspection, or simply as a learning experience, constructing your own thermal imaging camera can be a valuable skill. The cost of building one is typically lower than buying a commercial thermal camera, though the image quality may not match high-end models. However, for most DIYers and hobbyists, it offers a great balance of affordability and functionality.
Ultimately, whether building a thermal imaging camera is worth it depends on your goals and what you hope to achieve. If you're excited about learning and building, the project is definitely worthwhile. But if you need a high-resolution, professional-grade camera for critical applications, purchasing a ready-made unit might be a better choice.
Frequently Asked Questions
Here are some common questions you might have when building your own thermal imaging camera:
- What type of infrared sensor is best for DIY thermal cameras? – For DIY projects, the FLIR Lepton sensor is a popular choice because of its affordability and ease of integration with platforms like Raspberry Pi or Arduino.
- How do I improve the image resolution of my thermal camera? – Image resolution depends largely on the quality of the infrared sensor. For better resolution, you may need to invest in a higher-end sensor or a more complex setup.
- Can I use my thermal camera for professional purposes? – While DIY thermal cameras can be quite useful for home inspections and personal projects, they typically don’t offer the high precision or resolution needed for professional-grade applications. For critical work, it’s recommended to use commercial-grade thermal cameras.
- How long does it take to build a thermal imaging camera? – The time it takes to build your thermal imaging camera depends on your experience level and the complexity of your design. For a basic model, expect the process to take a few days to a week, including assembly, software setup, and testing.
- What is the cost of building a DIY thermal camera? – The cost can vary, but a basic DIY thermal camera typically costs between $100 and $250, depending on the quality of components and whether you already have some of the tools required.
If you have more questions or need help with specific aspects of your project, plenty of online forums and communities are available where you can find additional resources and support.


