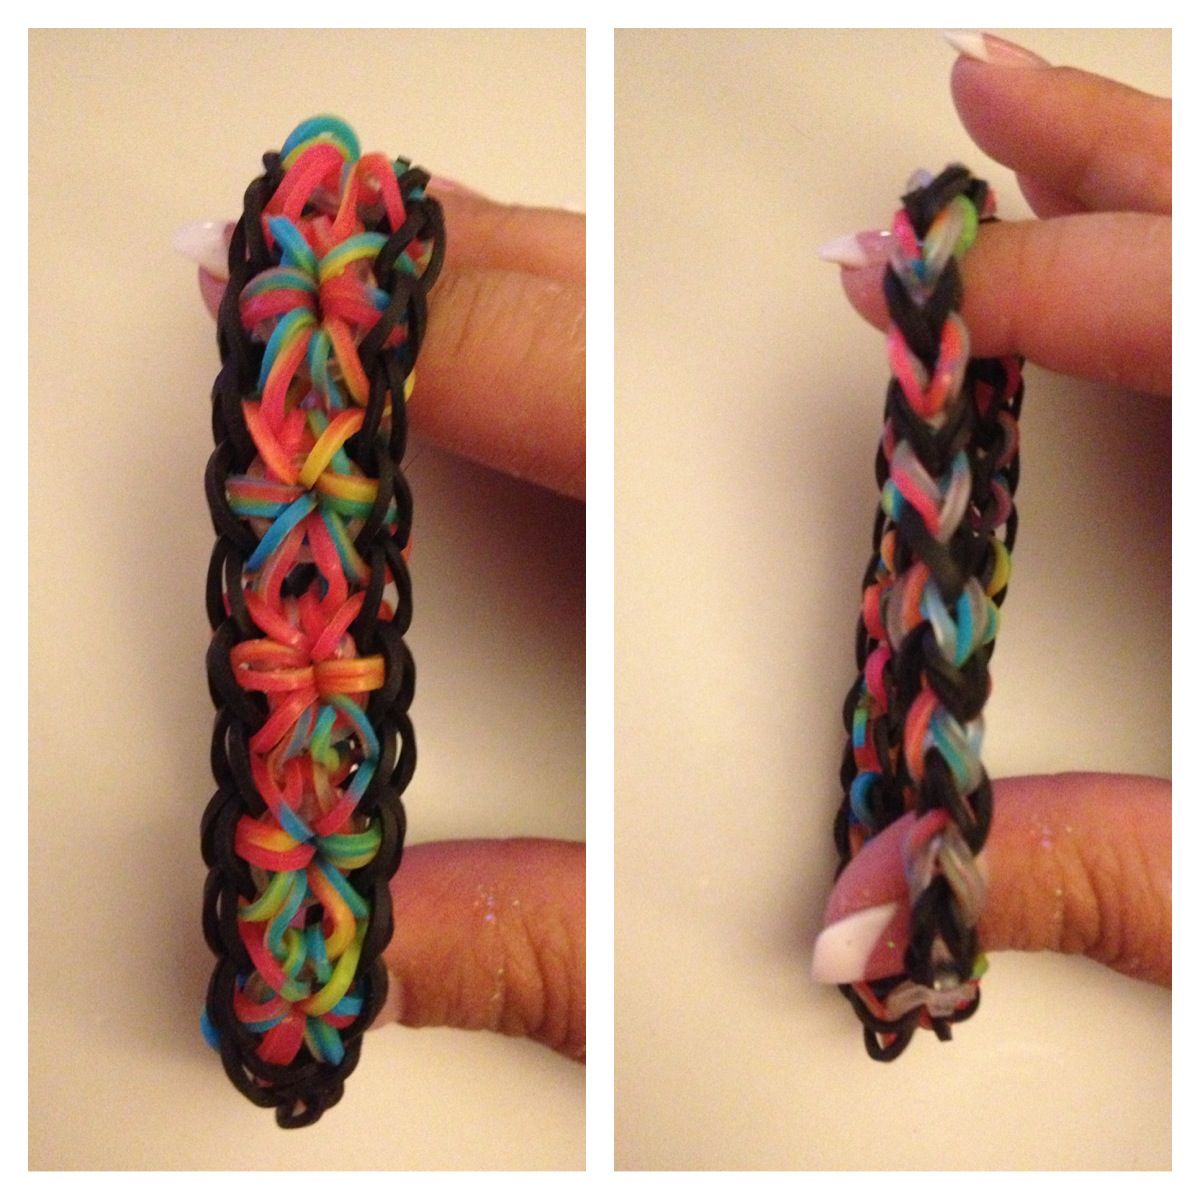
If you're looking to add a pop of color and creativity to your accessory collection, look no further than the vibrant Starburst Bracelet. This fun and colorful loom band project is perfect for beginners and seasoned crafters alike. The unique pattern resembles a burst of stars, making it not only stylish but also a great conversation starter. Plus, it’s a fantastic way to express your personality through the colors and design you choose. Ready to get started? Let's dive into the materials you'll need!
Materials Needed for Your Bracelet
Before we jump into crafting your stunning Starburst Bracelet, let’s gather the materials you'll need. Don't worry; most of these items are easily available and can be found at craft stores or online. Here’s what you’ll need:
- Loom Bands: Choose a variety of colors! Popular choices include:
- Neon colors for a bright look
- Pastels for a softer vibe
- Metallics for some sparkle
- Loom Tool: This can be a traditional loom board or a simple hook tool.
- Starter Bands: To hold your bracelet together at the beginning.
- C-Clips or S-Clips: These will secure the end of your bracelet.
- Scissors: For trimming any excess bands if needed.
Here’s a quick table summarizing the materials:
| Material | Description |
|---|---|
| Loom Bands | Colorful elastic bands used to create the bracelet. |
| Loom Tool | Used to weave the bands together (can be a board or hook). |
| Starter Bands | Initial bands to set the foundation of your bracelet. |
| C-Clips / S-Clips | Secure the finished bracelet. |
| Scissors | For any necessary trimming. |
Now that you have everything you need, you’re well on your way to creating a beautiful Starburst Bracelet! In the next sections, we will guide you through the step-by-step process of bringing your bracelet to life. So, let's keep the creativity flowing!
Also Read This: Is Dailymotion Similar to YouTube? A Comparison of Two Video Platforms
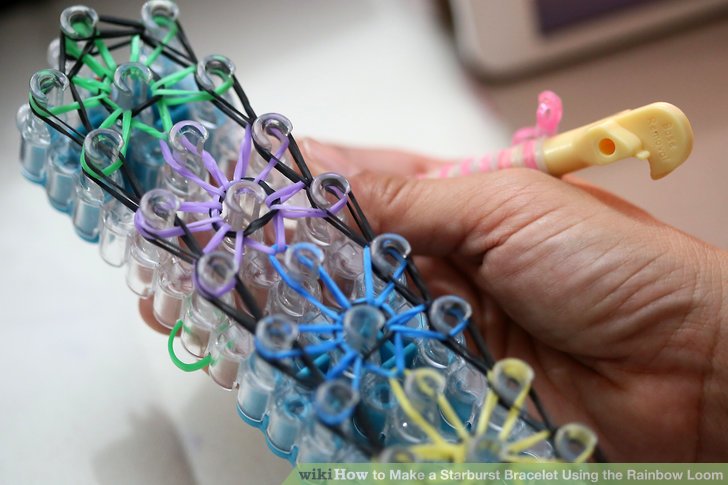
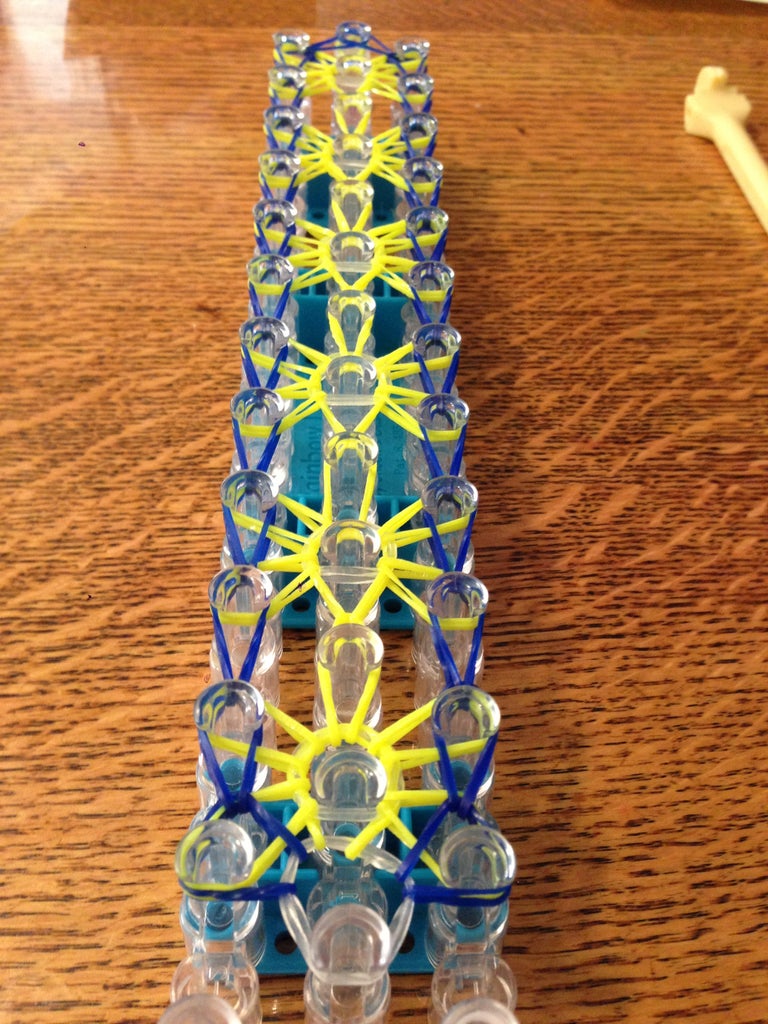
3. Step 1: Setting Up Your Loom
Alright, let’s get started with the fun part: setting up your loom! Grab your loom and make sure you have your loom bands, a hook, and a clip handy. It’s like getting ready for a mini crafting adventure!
Positioning Your Loom
Place your loom on a flat surface with the arrows facing you. This will ensure you’re working in the right direction. If you’re using a larger loom, you might find that it has a few different configurations. For the Starburst bracelet, we’ll use the “zigzag” position, which is perfect for creating intricate patterns.
Adding the End Pegs
If you’re using a Rainbow Loom or a similar type, you’ll notice that the loom comes with several pegs. For our Starburst bracelet, you’ll be focusing on the center row. Make sure to set the end pegs to hold your design in place. This step is crucial because it ensures your bands don’t slip off as you create your masterpiece!
Choosing Your Colors
Now, let’s talk about colors! One of the best parts about making loom band bracelets is selecting your colors. For a Starburst design, you might want to choose a main color for the base and a contrasting color for the accents. For example:
- Main Color: Bright Pink
- Accent Color: Neon Yellow
Feel free to mix and match colors based on your style. The more vibrant, the better!
Once your loom is set up and you’ve selected your colors, you’re ready to dive into the next step. It’s like laying the foundation of a beautiful house — you want to make sure everything is just right before you start building!
Also Read This: How to Connect TP-Link Router with PC: A Complete Guide Featured on Dailymotion
4. Step 2: Creating the First Layer of the Starburst Design
Now that your loom is all set up, let’s jump into creating the first layer of your Starburst bracelet! This is where the magic begins, and soon you’ll see your colorful creation coming to life.
Starting with the Base Bands
Take your first loom band (let’s say, a bright pink one) and stretch it from the first peg on the left to the second peg on the center row. Then, take another band and stretch it from the second peg to the third peg on the center row. Repeat this process until you reach the end of the loom. You should have a nice row of pink bands forming the base of your design!
Creating the Zigzag Pattern
Now comes the fun part! Grab your accent color (the neon yellow) and start placing bands in a zigzag pattern. For this, stretch the first yellow band from the first peg on the left to the second peg on the right. Then, connect the second peg on the left to the third peg on the center. Continue this pattern all the way up — it should look like a beautiful zigzag across your loom!
Here’s a quick breakdown of the pattern:
- 1st Peg (Left) to 2nd Peg (Center) - Bright Pink
- 2nd Peg (Left) to 3rd Peg (Right) - Neon Yellow
- 3rd Peg (Left) to 4th Peg (Center) - Bright Pink
- 4th Peg (Left) to 5th Peg (Right) - Neon Yellow
Keep alternating between your main color and your accent color until you reach the end of the loom. This will give your Starburst design its signature look!
Once you've finished this layer, take a moment to admire your handiwork! It’s amazing how a few simple bands can start creating such a vibrant pattern. Now, let’s get ready for the next step to turn this into a dazzling bracelet!
Also Read This: How to Wear Hijab Video on Dailymotion: Watch Style Tutorials
5. Step 3: Adding Additional Layers
Alright, you're doing great so far! Now it's time to add some extra flair to your Starburst bracelet. Adding additional layers not only enhances the look but also gives your bracelet that signature starry effect. Grab your loom and let's get started!
First, make sure you have your loom set up correctly. You should have your loom positioned with the arrows facing towards you. If you’re adding colors to your bracelet, now’s the time to choose your next color! Here’s how to add those layers:
- Choose Your Color: Pick a color for your next layer. You can even mix and match colors for a more vibrant look!
- Start at the Base: Begin at the bottom of your bracelet. Take one loom band and stretch it from the left peg of the first layer to the center peg. Then, take another band and stretch it from the right peg to the center peg.
- Continue Layering: Repeat the process by adding bands in the same way, crisscrossing them between the pegs. You can add two or three layers, depending on how thick you want your bracelet to be.
- Maintain Tension: While adding layers, make sure to keep the bands taut but not overly stretched. This will help maintain the shape of your bracelet.
- Check Your Pattern: Step back and take a look at your layers. Make sure they’re evenly spaced and look good. If something seems off, adjust as necessary!
Once you’re satisfied with the additional layers, it’s time to move on to the exciting part—finishing your bracelet! Make sure you have your clips or C-clips ready. You’re just a few steps away from wearing your beautiful creation!
Also Read This: Fixing Channel Bugs on Dailymotion for a Better User Experience
6. Step 4: Finishing the Bracelet
You’ve made it to the last step—congratulations! Finishing your Starburst bracelet is simple, but it’s crucial for ensuring your hard work pays off. Let’s wrap it up!
First, take a moment to admire your masterpiece. The colors, the layers—it’s all coming together beautifully! Here’s how to finish it:
- Remove the Bracelet from the Loom: Gently take your bracelet off the loom starting from the top. Be careful not to stretch the bands too much!
- Secure the Ends: Once you have it off, you'll notice that the ends might still be loose. Take your C-clip or S-clip and secure it tightly around the loose ends of the bracelet. Make sure it’s snug to avoid any bands slipping out.
- Check for Strength: Give your bracelet a gentle tug to ensure everything is secure. If any bands feel loose, you might want to add an extra clip or adjust the bands.
- Trim Excess Bands: If you have any bands sticking out, use a pair of scissors to carefully trim them. Just be cautious not to cut the main bands!
- Style It Up: Now that your bracelet is finished, it’s time to show it off! Pair it with your favorite outfits or gift it to a friend.
And there you have it—the complete guide to making a Starburst bracelet with loom bands! Enjoy your new accessory, and don’t hesitate to explore new color combinations and styles in your future projects!
Also Read This: Organize and Watch Your Favorite Videos on Dailymotion
7. Tips for Customizing Your Starburst Bracelet
Getting creative with your Starburst bracelet can turn a simple project into an expression of your personality! Here are some fun tips to help you customize your bracelet:
- Color Combinations: Play around with different color schemes! For example, try using a rainbow palette for a vibrant look or pastel shades for something softer and more delicate. You can even theme your colors based on seasons—think warm tones for autumn or icy blues for winter.
- Adding Charms: Enhance your bracelet by attaching small charms or beads. Whether it’s a cute heart, star, or even personalized initials, charms can give your bracelet a unique flair. Just make sure they complement the colors you've chosen!
- Mixing Loom Bands: Don’t hesitate to mix different types of bands. For instance, combining standard loom bands with glitter or glow-in-the-dark bands can add an unexpected twist to your bracelet. Imagine how cool it would look to have a bracelet that glows at night!
- Experimenting with Patterns: While the Starburst pattern is stunning on its own, you can merge it with other patterns you’ve learned. For example, try adding a section of fishtail or honeycomb patterns to give it a layered effect.
- Personal Touches: Consider integrating your favorite colors or symbols into the design. If you’re making bracelets for friends, you can customize each one based on their favorite colors or interests, making them a perfect and thoughtful gift.
Don’t be afraid to stray from the traditional Starburst design! The beauty of crafting with loom bands is in the endless possibilities. So, grab your supplies and let your imagination run wild!
8. Common Mistakes to Avoid
Even the most seasoned loom band enthusiasts can run into a few hiccups when making a Starburst bracelet. Here are some common mistakes to watch out for and tips on how to avoid them:
- Overstretching Bands: One of the biggest issues is overstretching your loom bands. It can lead to a loose and misshapen bracelet. To prevent this, gently pull the bands without yanking them, and always check that each band is securely placed on the loom without excessive tension.
- Incorrect Band Placement: Following the pattern accurately is crucial. If you place a band in the wrong spot, it can throw off the entire design. Double-check your placement as you go along, and if you're unsure, refer back to photos or videos of the Starburst pattern.
- Forgetting to Secure the Ends: After you finish your bracelet, don’t forget to properly secure the ends! You can use a clip, a C-clip, or even a simple knot with an extra band. Failing to do this can result in a bracelet that falls apart easily.
- Not Using Enough Bands: It might be tempting to skimp on bands to save time, but this can lead to a flimsy bracelet. Make sure you’re using enough bands throughout the process to ensure stability and a sturdy feel.
- Rushing the Process: Lastly, take your time! Rushing can lead to mistakes. Enjoy the process of creating and allow yourself to focus on each step. Remember, crafting is about the journey as much as the final product.
By avoiding these common pitfalls, you’ll be well on your way to creating beautiful, sturdy Starburst bracelets that you’ll be proud to wear or gift!
 admin
admin


