Have you ever wanted to enjoy a movie night under the stars or give an impressive presentation without spending a fortune on a projector? Well, you're in luck! This DIY guide will show you how to make a projector at home using easily accessible materials. Not only is it a fun project, but it’s also a great way to impress your friends and family. Let’s jump in and transform your viewing experience!
Materials Needed
Before diving into the creation process, it's essential to gather all the materials you’ll need. Here’s a handy list to make sure you’re fully prepared:
- Cardboard Box: A medium-sized box will be the main body of your projector.
- Magnifying Glass: This will act as your lens. A larger one will provide better results.
- Smartphone or Tablet: Your device will serve as the video source.
- Black Tape or Duct Tape: Perfect for sealing and securing parts together.
- Scissors or a Craft Knife: To cut openings in the cardboard.
- Ruler: For precise measurements.
- Black Paint or Black Paper: To line the inside of the box, minimizing light reflections.
- Small Stand or Tripod (optional): To hold your smartphone in position.
Having these materials ready will streamline the process and make it more enjoyable. You can find most of these items around your home or at a local store. Once you have everything, you’ll be on your way to creating your own projector!
Also Read This: How to Play Dailymotion Videos Without Buffering
Step-by-Step Instructions
Creating your own projector at home can be a fun and rewarding project! Follow these easy steps to make your very own DIY projector:
- Gather Your Materials:
- A cardboard box (like a shoebox)
- A magnifying glass (the larger, the better)
- Your smartphone or tablet
- Black tape or glue
- Scissors or a box cutter
- A piece of white paper or a screen
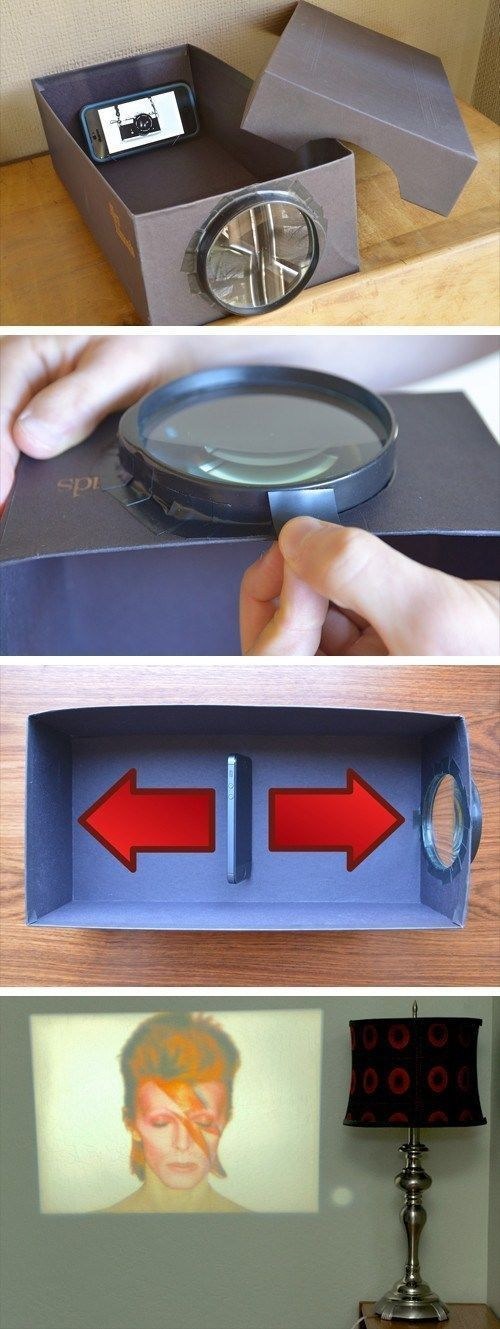
- Prepare the Box: Cut a hole at one end of the cardboard box. This hole should be just big enough to fit the magnifying glass snugly. Make sure to seal any gaps with black tape for better image quality.
- Attach the Magnifying Glass: Fit the magnifying glass into the hole you just cut, ensuring it is secure. The glass should be facing outward from the box.
- Position Your Device: Place your smartphone or tablet inside the box, positioned behind the magnifying glass. Adjust the distance from the glass to find the best focus.
- Create a Screen: On the opposite end of the box, place a piece of white paper or a portable screen for projection. You can even project onto a blank wall for a larger viewing area.
- Test It Out: Play a video on your device and turn off the lights in the room. Adjust the position of your device and the box until you achieve a clear image.
Also Read This: How to Download from Dailymotion (2019): Updated Method for Video Access
Tips for Optimal Viewing
Now that you've crafted your DIY projector, here are some tips to ensure you get the best viewing experience:
- Choose the Right Location: Find a dark room to enhance contrast and color. Avoid areas with ambient light that can wash out the image.
- Optimize the Distance: Adjust the distance between the magnifying glass and the screen. A distance of about 3-5 feet usually works well for clarity.
- Use a Stable Surface: Make sure your projector is on a stable surface to prevent shaking or blurriness during viewing.
- Adjust the Angle: The angle of projection can affect image clarity. Adjust the box so that the image is perpendicular to the screen.
- Enhance Sound: If you want better audio, consider connecting your device to speakers or using a portable Bluetooth speaker for an immersive experience.
With these steps and tips, you're all set to enjoy your homemade projector! Happy viewing!
Also Read This: How to Lose Face Fat Quickly with Expert Techniques
Common Mistakes to Avoid
When embarking on the DIY journey to create your own projector, it's essential to steer clear of some common pitfalls that can hinder your success. Let's explore these mistakes so you can enjoy a smooth project experience.
- Choosing the Wrong Lens: One of the most crucial components of your projector is the lens. Many beginners mistakenly opt for a lens that is either too weak or too powerful. A good quality magnifying glass, ideally with a 2x magnification, is often recommended. Test different lenses to see what offers the clearest image without distortion.
- Poor Light Source Selection: Using inadequate lighting can leave your projector dim and disappointing. Standard bulbs may not emit enough brightness for a large screen. Instead, consider using an LED bulb with higher lumens for sharper images and better visibility. Aim for a bulb with at least 1,000 lumens for decent results.
- Incorrect Distance Setup: The distance between the lens and the screen is critical. Beginners often set these distances incorrectly, leading to blurry or distorted images. A simple rule of thumb is to start with a distance of about 1.5 to 2 times the lens diameter and adjust as necessary.
- Ignoring Ventilation: Projectors can generate heat, and without proper ventilation, components can overheat, resulting in malfunctions. Make sure your setup allows for airflow, especially around the light source and electronics.
- Not Testing Before Final Assembly: One of the biggest mistakes is not testing your components before the final assembly. Take the time to test your lens, light source, and overall setup to ensure everything works as expected, saving you from frustration later.
Conclusion
Building your own projector at home can be an incredibly rewarding experience. Not only does it allow you to customize your viewing experience, but it also ignites your creativity and resourcefulness. By following this DIY guide and avoiding common mistakes, you can create a projector that brings your favorite movies, games, or presentations to life.
Remember, the key to success lies in patience and experimentation. Don’t hesitate to tweak your design and try different materials as you progress. Whether you're aiming for family movie nights or impromptu presentations, your homemade projector can turn any wall into a cinematic experience.
So, gather your materials, channel your inner inventor, and enjoy the process. Once you see that first image projected on the wall, all your efforts will be worth it!
 admin
admin


