If you're looking for a fun and creative project to dive into, making a paper ship is an amazing way to unleash your inner artist! It's a simple craft that can be enjoyed by kids and adults alike, requiring just a few materials and some folding techniques. Not only will you have a unique piece of art to display, but you'll also develop fine motor skills and patience along the way. So, grab your supplies and let's set sail into the exciting world of paper ship crafting!
Materials Needed for Paper Ship Making
Before you start folding and creating your paper ship, it’s essential to gather all the materials you'll need. Fortunately, this craft requires minimal supplies, making it both accessible and enjoyable. Here’s what you'll need:
- Paper: You can use any type of paper, but origami paper or lightweight cardstock works best for easy folding. Choose colors that inspire you – the ocean is your limit!
- Scissors: You’ll need these to trim your paper if you're working with larger sheets or if you want to create specific shapes.
- Ruler: For precise measurements and straight lines, especially if you want a more polished look.
- Pencil: Great for marking lines or folds before cutting or making permanent creases.
- Glue (optional): If you want your ship to be more sturdy or if you're adding decorations, a glue stick or liquid glue will be helpful.
- Decorative materials (optional): Think stickers, markers, or washi tape to personalize your ship once it’s complete!
Gathering these materials will set you on the right path for your paper ship-making journey. Once you have everything ready, you’ll be amazed at how quickly you can transform a simple piece of paper into a wonderful vessel. The process not only lets your creativity flow but also offers a satisfying sense of achievement when you see your ship come together. Ready to make waves in the crafting world? Let’s sail on to the next steps!
Also Read This: Creative Ways to Use Dailymotion for Sharing Unique Content
3. Step 1: Choosing the Right Paper
Before diving into the exciting world of paper ship making, it’s essential to choose the right kind of paper. Not all paper is created equal, and the type you select can significantly affect your ship’s performance and appearance. Here’s a quick guide to help you pick the perfect paper for your paper ship adventure!
- Weight: Aim for lightweight paper, ideally between 70-100 gsm. This weight is sturdy enough to hold its shape but light enough to float on water.
- Texture: Smooth paper is easier to fold accurately, while textured paper can add a unique look to your ship. Experiment to see what you prefer!
- Size: Standard A4 paper is perfect for beginners since it’s easy to find and handle. However, feel free to explore larger sizes if you're feeling ambitious!
- Color: While traditional paper boats are often white, colored paper can make your ship stand out. Plus, it brings a fun personality to your creation!
- Design: Printed or patterned paper can add flair to your ship. Just make sure the patterns don’t interfere with the folds.
To test your chosen paper, crumple a small piece and then smooth it out. If it retains a crease, that’s a good sign! You want paper that’s flexible yet retains its shape once folded. After you're happy with your paper selection, set it down on a clean, flat surface and get ready to start folding!
Also Read This: Step-by-Step Guide to Making a Tutu Dress Using Dailymotion Tutorials
4. Step 2: Folding the Paper Correctly
Now comes the fun part—folding! It’s crucial to follow each step carefully for your paper ship to turn out well. Here’s a simple guide to ensure your folds are crisp and accurate. Remember, practice makes perfect!
Here’s how to get started:
- Start with a Rectangle: Begin with your chosen paper oriented horizontally. Fold it in half lengthwise to create a rectangle, then unfold it to reveal a crease down the center. This crease acts as a guide for your next folds.
- Fold the Corners: Take the top two corners of the rectangle and fold them down toward the center crease, forming a triangle shape at the top. Ensure the edges align perfectly for a clean fold.
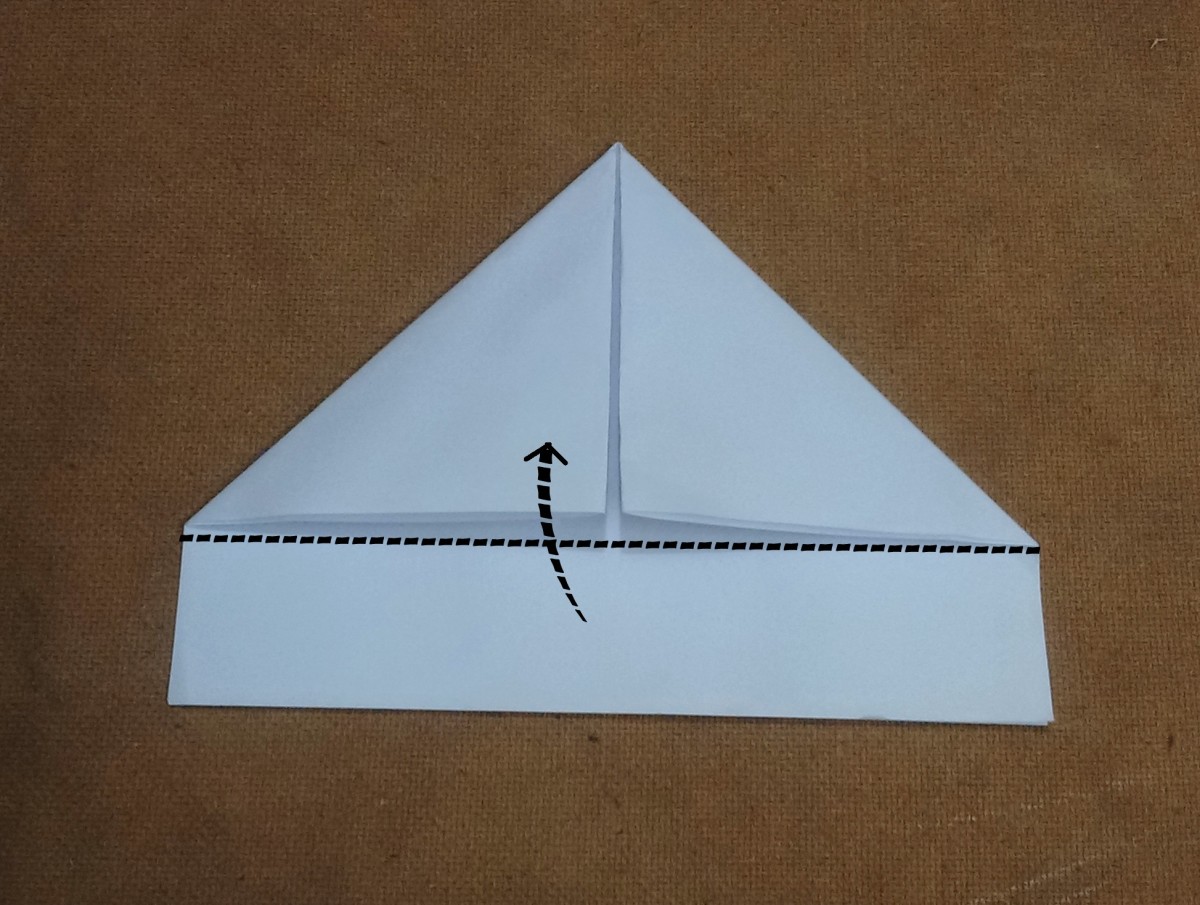
- Create the Bottom Flap: You’ll notice a rectangular flap below the triangle. Fold the bottom flap up to connect with the base of the triangle. This will be the hull of your ship!
- Form the ‘Sails’: Next, turn the paper over. You should see the triangle on the top. Fold the two outer edges of the triangle toward the center to narrow it down, creating the appearance of sails.
- Lift Up the Boat: Gently pull apart the two layers of the triangle at the base, and flatten them. This step transforms your creation into a three-dimensional ship!
- Shape Adjustments: Make necessary adjustments to ensure everything looks neat. You can also pinch and reshape the bow and stern for that perfect ship look!
And voila! You’ve just folded a paper ship! If your first attempt doesn’t go as planned, don’t worry. Folding takes practice, and every attempt will help you improve. Enjoy the process and let your creativity flow!
Also Read This: Is Wrestling Real or Fake on Dailymotion
5. Step 3: Shaping the Paper Ship
Alright, sailor! Now we’re heading into the fun part—shaping your paper into a majestic ship. You've got your basic folds down, and it’s time to give it a hull and sails! This step will really bring your ship to life.
First, let's flip that paper triangle over so the colored side is facing down. You'll want to work with the point of the triangle facing toward you. Here’s how to mold it:
- Fold Up the Bottom Points: Take the bottom corners of your triangle and fold them up toward the top point. You should create a zigzag along the bottom. This sets the foundation of your ship's hull.
- Creating the Sails: Now, let's create the sails. Take the top point of your triangle and fold it down toward the center fold. This will give you the look of a sail rising up. For a more pronounced effect, you can fold it a little past the center line.
- Fold the Sails Over: Now, take the sides of the triangle where you've created the sails and fold them towards the middle to give them more structure. You’ll see the ship really start taking shape!
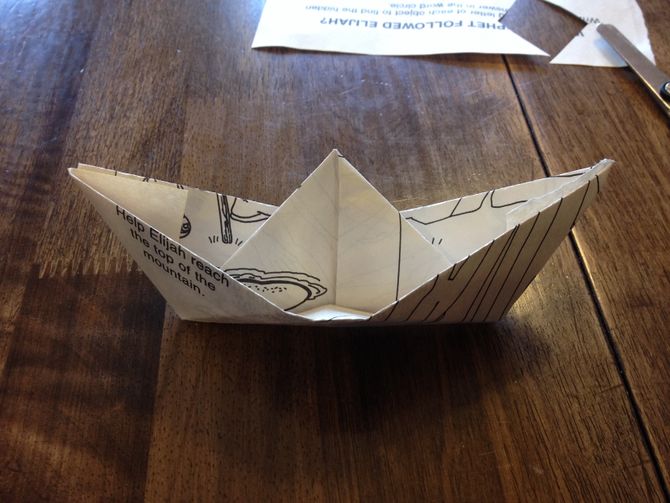
- Forming the Hull: Turn your ship upright—this is where you'll pull the two halves apart gently to form the hull. Pinch the bottom together slightly to create a better base. This pinch is crucial as it helps your ship to stand effectively on its own.
As you finalize the shape, try adjusting the form by gently tugging or squeezing the edges or the bottom to make it look more lifelike. The goal is to create a sense of flow and motion that a real ship would have. Don’t fret if it takes a few tries; practice makes perfect!
Take a step back and admire your work! How does it look? This is just the beginning. Once you've got your shape down, it’s time for the exciting part—adding details and decorations. Ready? Let’s go!
Also Read This: How to Apply BB Cream with Fingers for a Flawless Finish
6. Step 4: Adding Details and Decorations
You’ve successfully shaped your paper ship, and now it’s time to let your creativity shine! Adding details and decorations is what turns an ordinary paper ship into a unique masterpiece that can sail through your imagination.
Here’s how you can jazz up your paper ship:
- Coloring: Grab some crayons, markers, or colored pencils and get to work! You can color the sails in bright hues of red, blue, or even a rainbow pattern. Make sure to color the hull and add fun designs like stripes or waves. The possibilities are endless.
- Windows and Portholes: Use a black marker to draw small circles or squares along the sides of the hull. These will serve as windows or portholes, giving your ship that authentic nautical vibe. Feel free to get creative with different shapes!
- Flag Creation: Every ship needs a proud flag! You can easily make one from a small triangle of colored paper and attach it to a toothpick. Stick this toothpick into the top of the sail for added flair. Tailor your flag with symbols, initials, or anything you feel represents your ship.
- Accessories: Think about adding tiny paper elements like anchor cutouts or even a tiny captain’s hat. Get crafty! Maybe even a small treasure chest or a crew of paper pirates if you're feeling adventurous!
- Water Effects: To give your ship an oceanic presence, you could create waves using blue crepe paper or colored tissue paper and place them around your ship. This adds a fun three-dimensional effect.
Whew! Doesn’t it feel good to unleash your artistic side? Each detail you add tells a story, making your paper ship truly yours. Whether you’re imagining it setting sail on an uncharted ocean or docking in a peaceful bay, every addition enriches that narrative.
Once you’ve finished decorating, take a moment to appreciate your craft. Whether you decide to display your ship as a centerpiece or use it in imaginative play, every visitor will know it’s a ship made with creativity and love. Now, let’s prepare for the final touches on our crafting adventure—standby for the grand reveal! You’re doing amazing!
Also Read This: Learn the Process of Producing Twins with Dailymotion Videos
7. Step 5: Tips for Perfecting Your Paper Ship
Congratulations on reaching this exciting point in your paper ship-making journey! At this stage, you’ve likely folded your paper with care, but let’s ensure you take it to the next level. Here are some handy tips that can help you perfect your paper ship, making it not only look fabulous but also sail smoothly.
- Choose the Right Paper: Different types of paper can affect the outcome of your ship. Thin paper like origami paper is great for detailed folds, while heavier cardstock will give your ship more sturdiness. Experiment with different textures and weights!
- Ensure Sharp Creases: One of the secrets to a well-crafted paper ship is sharp creases. Use a bone folder or even the edge of a ruler to press down your folds firmly. This will hold the shape and make your ship look more polished.
- Mind the Angle: When folding, pay attention to the angles you create. For instance, making sure your bow and stern are angled correctly can greatly enhance the overall appearance. Follow your folding steps precisely!
- Decorate Before Assembling: If you want to add color or designs to your ship, do this before you fold everything together. Markers, stamps, or stickers can add personality to your creation!
- Play with Sizes: Don’t be afraid to make different sizes of ships. Varying the dimensions can add diversity to your fleet. You can even create a giant ship and a small one for fun!
- Test Sail: Once your ship is assembled, give it a test sail in water. This is a significant part of the fun! If it sinks, don't be discouraged—analyzing what went wrong can help you improve your next creation.
Take your time to refine your technique. Don’t hesitate to redo a step if something doesn’t feel right. With practice and attention to detail, your paper ship will not only look more impressive but will also carry the charm of your craftsmanship.
Also Read This: How to Make Pasta Step by Step: Video Guide on Dailymotion
8. Conclusion and Encouragement to Share Your Creations
And there you have it—a complete, easy-to-follow guide to making a stunning paper ship! We hope you’ve enjoyed every part of the process, from selecting your paper to watching your creation come to life with just a few folds.
Remember, crafting is not just about the end result but also about embracing creativity, having fun, and learning new skills along the way. Whether your ship ends up as a masterpiece or a quirky, charming little vessel, it’s essential to appreciate your effort and creativity.
We would love to see how your paper ships turned out! Don’t hesitate to share your creations on social media or with friends and family. This can inspire others to dive into the world of paper crafting!
Challenge yourself: Why not host a mini competition with friends or family to see who can create the most inventive paper ship? It could spark laughter, creativity, and possibly a new favorite pastime!
So, grab your supplies, unleash your imagination, and let the paper sailing adventures begin! Remember, every boat you make is a chance to improve and grow. Happy crafting!
Related Resources and Videos on Dailymotion
If you're eager to dive deeper into the craft of origami and specifically the art of making paper ships, Dailymotion offers a variety of valuable resources. Below are some recommended videos that can enhance your learning experience:
- Beginner’s Guide to Origami Ships: A straightforward tutorial that takes you through the basics of folding paper into a beautiful ship.
- Advanced Paper Ship Techniques: For those looking to elevate their skills, this video covers intricate designs and advanced folding methods.
- Kids Origami Ship Projects: Perfect for families! This video features fun and easy projects suitable for kids.
- Origami Circles: A Ship Journey: A creative approach that combines circle-folding techniques with ship design.
Each of these videos provides different perspectives and techniques, ensuring a comprehensive understanding of paper ship making. Here are a few additional tips for finding the best resources:
- Use specific search terms like "how to make paper ships" or "origami ship tutorial".
- Check for user ratings and comments to gauge the quality and effectiveness of the video content.
- Save several videos to your playlist for easy reference.
By exploring these Dailymotion resources, you'll have access to expert guidance and a range of styles, allowing you to perfect your paper ship-making skills. Happy folding!
 admin
admin


