Welcome to the exciting world of paper crafting! If you’ve ever thought about combining creativity with some fun, you’re in for a treat. Paper crafting is not only an enjoyable hobby, but it also allows you to explore your artistic skills. From simple origami to intricate models, the possibilities are endless. One of the coolest projects you can embark on is creating a paper machine gun that actually shoots! It might sound complex, but with the right guidance and materials, you’ll see just how easy and rewarding it can be. Let’s dive into what you will need and how to get started!
Materials Needed for Making a Paper Machine Gun
Before you get started on your paper machine gun project, it’s crucial to gather your materials. This will ensure that the process is as smooth and enjoyable as possible. Here’s what you’ll need:
- Paper: Choose cardstock or thick printer paper for durability. Regular copy paper will work too, but it may not withstand the action.
- Scissors: A good pair of scissors is essential for cutting your paper precisely. You might also consider a craft knife for finer details.
- Glue or Tape: Depending on your preference, you can use school glue, hot glue, or double-sided tape to assemble parts. Each has its advantages.
- Ruler: For measuring and ensuring straight cuts, a ruler is invaluable.
- Pencil: Use a pencil to outline your cuts and designs before you start snipping away.
- Templates: You can either print templates you find online or create your own designs. Templates will help make the crafting process more manageable.
- Rubber Bands: These are crucial for the shooting mechanism. They will provide the tension necessary to launch your paper “bullets.”
- Markers or Paint: Feel free to decorate your gun once it's assembled! Adding color will not only personalize your creation but also make it more visually appealing.
Once you have all your materials gathered, you’re ready to start crafting. Having everything in one place not only saves time but also sparks your creativity as you visualize your finished project. Remember, the key is to take your time—paper crafting requires patience and attention to detail. With a bit of practice, you’ll be shooting paper bullets in no time!
Also Read This: How Dailymotion Brings Creative and Educational Tales to Life for All Audiences
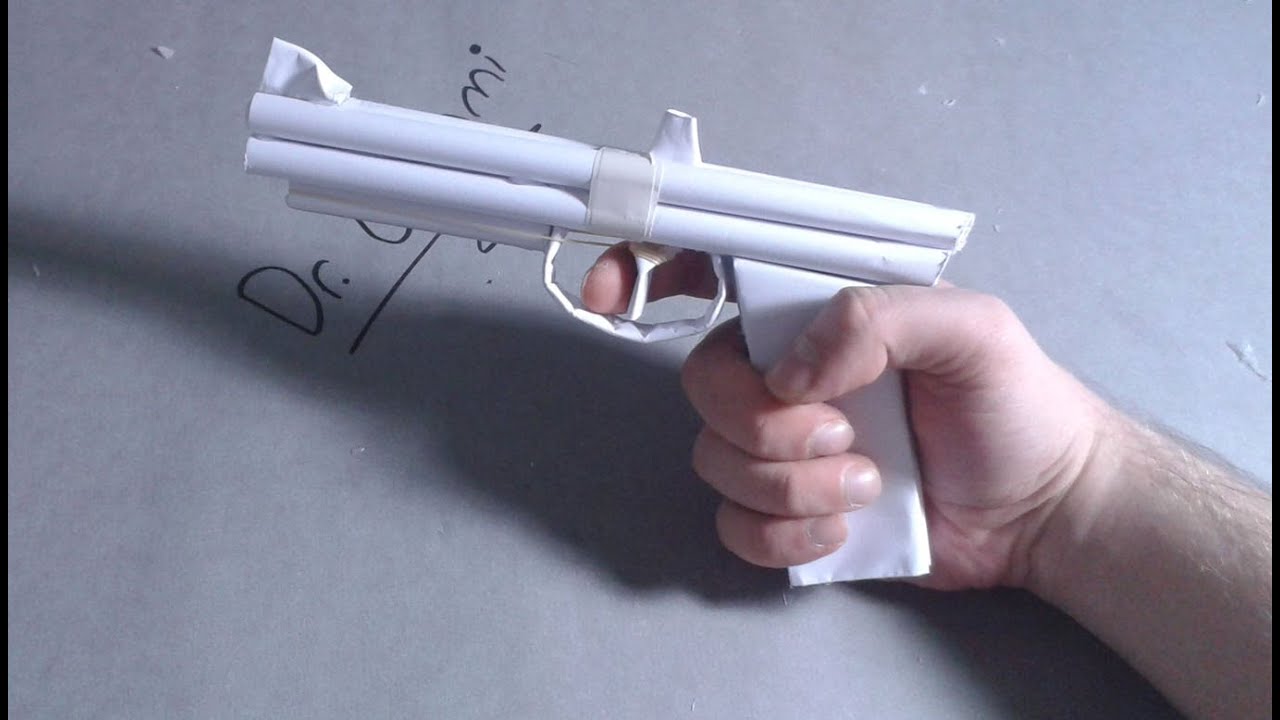
3. Step-by-Step Instructions to Create the Paper Machine Gun
Alright, let's get into the fun part—actually crafting your paper machine gun! This project is relatively simple and can be done using materials you probably have lying around the house. Here’s a step-by-step guide to help you create your very own paper machine gun.
Materials You'll Need:
- A few sheets of paper (printer paper or any sturdy paper will work)
- Scissors
- Glue or tape
- A pen or pencil for marking
- Ruler
Step 1: Prepare Your Base
Start by cutting a rectangle from your paper. A size of about 10 inches long and 3 inches wide is a good starting point for the base of your gun. This will be the main body where everything connects.
Step 2: Make the Handle
Cut another strip of paper measuring about 6 inches by 1 inch. This will act as the handle. Use your glue or tape to attach this strip vertically to one end of the rectangle. Make sure it’s secured so you can grip it well!
Step 3: Create the Barrel
Next, roll a piece of paper into a tube. It should be roughly 1.5 inches in diameter and about 8 inches long. Once you have the tube, glue or tape it securely to the front of your main body (rectangle) so that it extends outward. This is where your “bullets” will come out!
Step 4: Add the Trigger Mechanism
For the trigger, take a smaller piece of paper about 2 inches by 1 inch. Fold it in half and secure it beneath the handle on the side facing you. This will pivot when you push it, mimicking the function of a real trigger.
Step 5: Finish It Off
Now, decorate your paper machine gun! Use markers or color pencils to make it look more realistic. You could add details like a sight, a magazine, or even some cool designs. Let your creativity flow!
And there you have it! Your basic paper machine gun is now ready. Make sure to let the glue dry if you used any, and give it a good once-over to ensure everything is secure.
Also Read This: Learn English Speaking in Urdu Through Dailymotion Video Tutorials
4. How to Make It Shoot: The Mechanism Explained
Now that your paper machine gun is constructed, let’s dive into how it actually “shoots.” The shooting mechanism is simple yet effective, utilizing the flexibility and tension in the paper to propel small projectiles (like crumpled paper bits) from the barrel.
Materials for Shooting:
- Small paper balls (made by crumpling tiny pieces of paper)
- A rubber band (optional)
Step 1: Loading the Gun
To load your paper machine gun, take a small piece of paper and crumple it into a tight ball. This will serve as your ammo. Plug it into the barrel of your gun, making sure it fits snugly but can still be pushed out relatively easily.
Step 2: The Shooting Mechanism
Here's where the fun comes in! When you pull back the trigger (the smaller piece of paper), you can create tension. If you’ve used a rubber band, loop it around the back of the barrel to the trigger. When you pull the trigger down, it activates the mechanism that releases the tension, pushing the paper ball out of the barrel and sending it flying!
Step 3: Aim and Fire!
As with any shooting game, aim for your target and press the trigger! The crumpled paper ball should shoot forward. Experiment with varying the size of the paper balls or adjusting the tension for different shooting experiences.
That’s it! You now have a fully operational paper machine gun that not only looks cool but also packs a bit of fun too! Remember to play safely and responsibly, especially around friends and family.
Also Read This: Is Dailymotion Indian or Global? Understanding Its Origins and Reach
5. Tips for Customizing Your Paper Machine Gun
Now that you’ve got the basics down for crafting your paper machine gun, it's time to unleash your creativity! Customizing your paper weapon not only makes it unique but also adds to the fun of crafting. Here are some exciting tips to help you personalize your design:
- Add Color: Grab some colored markers or paints to jazz up your machine gun. You can go for a classic military look with greens and browns or get creative with bright colors and funky patterns—whatever suits your style!
- Decorative Elements: Think about adding stickers, drawings, or even tape designs to enhance the aesthetics. You could include flames, camo patterns, or even a cheeky “Bang!” label for a fun touch.
- Unique Shapes: Instead of sticking to the standard rectangular or cylindrical shapes, modify the body of your machine gun. Make it look more realistic with curves or extensions, giving it an original profile that stands out.
- Functional Modifications: If you feel adventurous, consider adding an adjustable sight or a removable magazine. These functional elements can increase engagement during playtime, making your paper gun even more fun to use.
- Personal Touch: Use your initials or a nickname to personalize your gun. A little personalization goes a long way in making your creation feel special.
Remember, the goal here is to have fun and express yourself. The more unique your design, the more pride you'll feel in your crafting skills. Plus, customizing your machine gun can be a bonding experience with friends or family. You can challenge each other to create the best-looking weapon, fostering a bit of friendly competition!
Also Read This: Does Dailymotion Pay Creators for Their Uploaded Videos?
6. Safety Precautions When Crafting Paper Weapons
While crafting your paper machine gun can be a blast, it’s essential to prioritize safety during the process. Here are some key precautions to ensure a fun and safe experience:
- Use Safe Materials: Stick to non-toxic glue and scissors. Avoid sharp cutting tools unless you're supervised by an adult to prevent any accidental injuries.
- Avoid Pointy Edges: Make sure that any parts of your paper gun don’t have sharp or dangerously pointed edges. Smooth out corners and cutouts to ensure that nobody gets hurt during play.
- Supervise Younger Crafters: If you’re crafting with kids, always keep an eye on the process. Children should not use sharp scissors or glues without adult supervision.
- Respect The 'Weapon': Remember that while your paper machine gun is a fun toy, it’s essential to respect it as a makeshift weapon. Avoid using it inappropriately or directing it at people, even in jest. Safety first!
- Check Your Space: Ensure you are crafting in a safe, clutter-free environment. This helps prevent accidents from happening, whether you’re cutting, gluing, or assembling your masterpiece.
By keeping these safety tips in mind, you can enjoy the creativity and enjoyment of crafting your paper machine gun without any hitches. And once you’re done, you can confidently show off your creation, knowing you’ve crafted it safely and responsibly!
Conclusion and Final Thoughts on Paper Crafting
In conclusion, crafting with paper is not only a fun and creative activity but also a great way to develop various skills. By building projects like a paper machine gun, you can enhance your fine motor skills and improve your attention to detail. Here are a few important takeaways about paper crafting:
- Accessible Materials: Paper crafting requires minimal tools and materials, making it an affordable hobby.
- Encourages Creativity: This craft allows for personal expression, as you can customize your designs and colors.
- Stress Relief: Engaging in crafting can be a therapeutic escape from daily stresses.
- Great for All Ages: Whether you're a child or an adult, paper crafting can be enjoyed by anyone.
When working on your paper machine gun or any other project, remember these key tips:
- Start with simple designs to build confidence.
- Follow the instructions carefully to ensure your model functions correctly.
- Don’t hesitate to make modifications and add your personal touch.
Ultimately, paper crafting is a fulfilling activity that combines artistry and engineering. As you develop your skills, you may find new passions within the paper crafting community, opening doors to more complex and exciting projects. So gather your supplies, unleash your imagination, and enjoy the process of creating something unique!
 admin
admin


