Welcome to the wonderful world of DIY crafts! Today, we’re diving into a fun and creative project that’s perfect for all ages: making a paper elephant! 🐘 Whether you’re looking to keep your little ones entertained, add a handmade touch to your home, or even create a playful gift, this craft is a delightful choice. With just a few materials and some simple steps, you’ll have your very own adorable paper elephant in no time. Let’s roll up our sleeves and get started!
Materials Needed for Your Paper Elephant
Before we begin crafting, let’s gather our supplies. Here’s a handy list of everything you'll need to create your paper elephant:
- Colored Paper: You can opt for gray, pink, or any color you like. Construction paper or cardstock works great!
- Scissors: A pair of sharp scissors will be essential for cutting out the shapes.
- Glue: Use glue sticks or liquid glue to hold your elephant together.
- Markers or Crayons: These are perfect for adding details like eyes, ears, and patterns.
- Pencil: To trace your shapes before cutting.
- Template (optional): You can create your own template, or find one online to make the process easier.
- Additional Decorations (optional): Stickers, googly eyes, or glitter for extra flair!
Once you have gathered all your materials, you're ready to begin your crafting adventure! Having everything organized will help the process go smoothly, and it’s always exciting to see each new element come together as you create your paper elephant. Remember, there’s no right or wrong way to do this — your paper elephant can look however you want it to! So, grab those scissors, find a comfortable spot, and let’s unleash our creativity!
Also Read This: The Magical Moments of A Walt Disney Christmas on Dailymotion
3. Step-by-Step Instructions for Making a Paper Elephant
Creating a paper elephant is a fun and engaging craft that anyone can do! All you need are a few basic supplies, a creative mindset, and a bit of time. Let’s dive into the step-by-step process:
What You'll Need:
- Colored paper (gray, pink, or any colors you like)
- Scissors
- Glue stick or tape
- Markers or crayons for decoration
- Pencil
- Optional: googly eyes or stickers for added flair
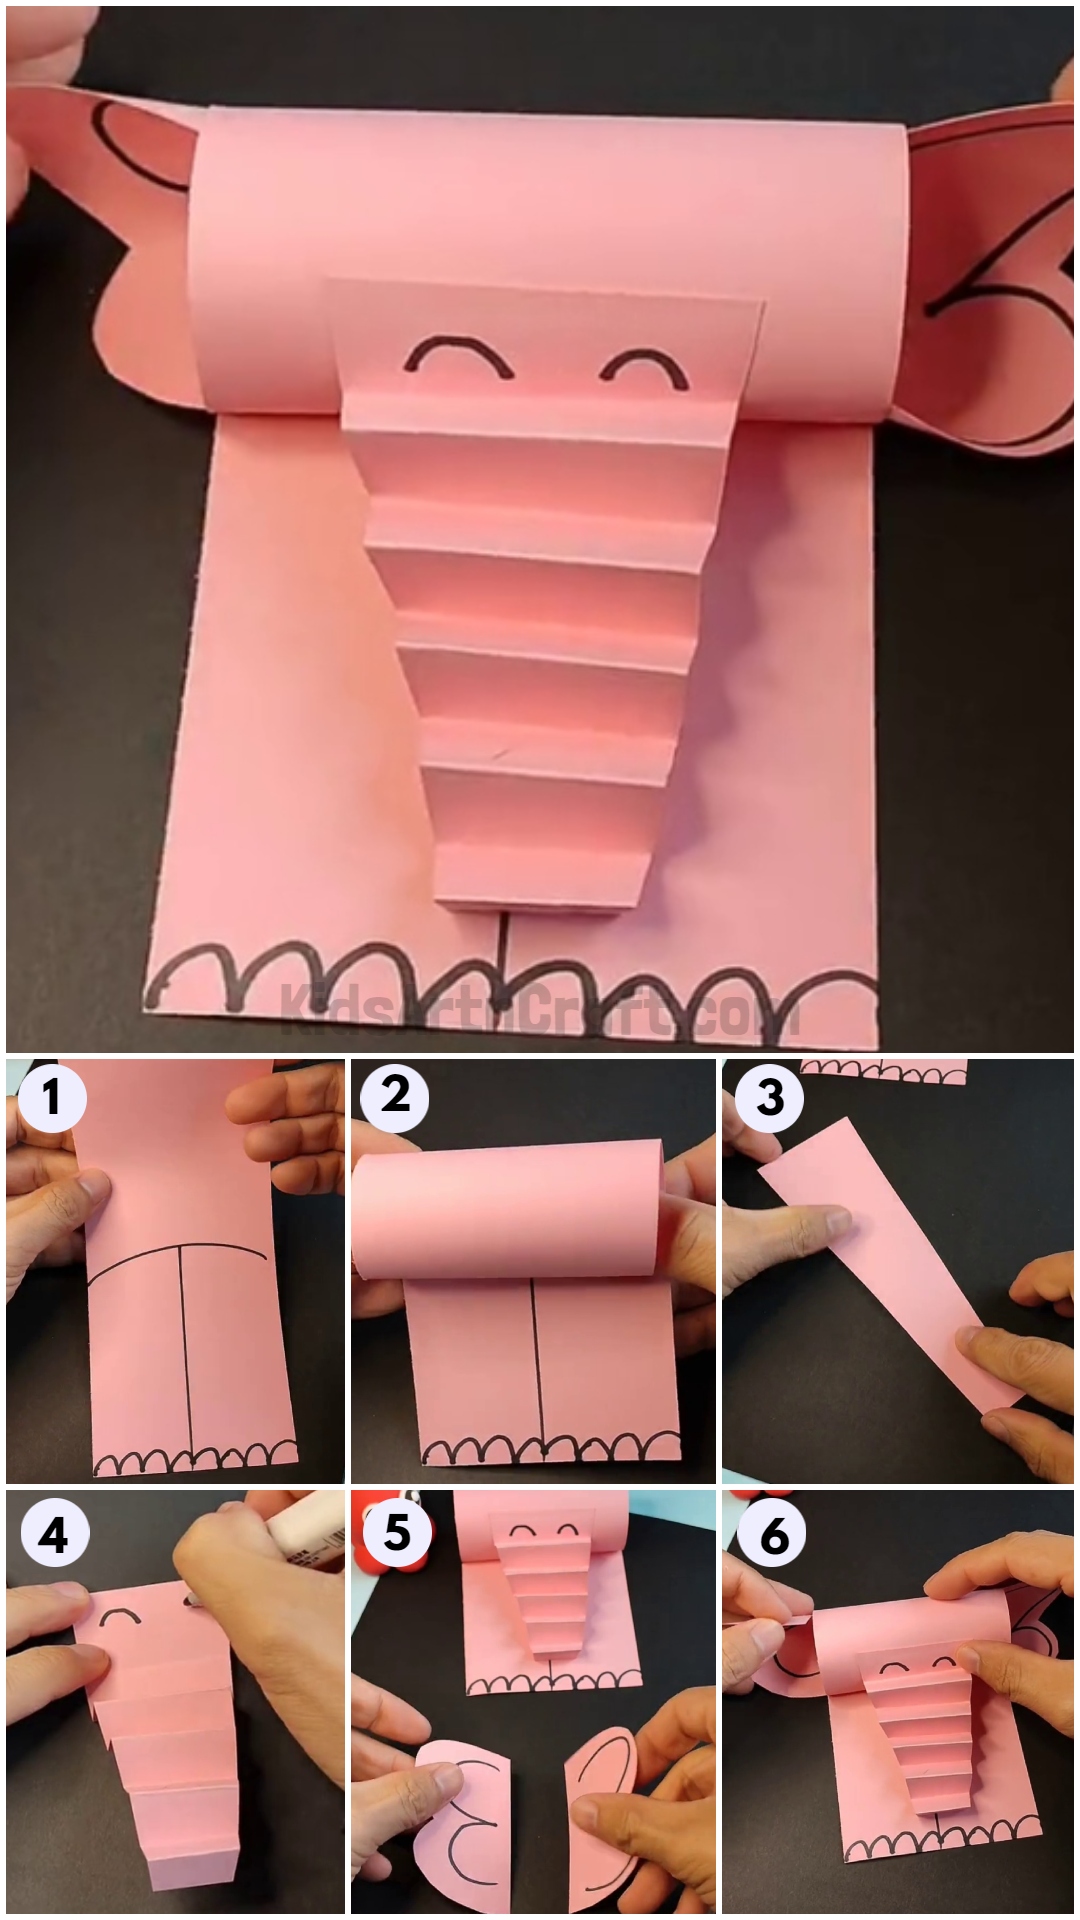
Step 1: Cut Out the Elephant Parts
Start by cutting out the shapes for your elephant. You’ll need:
- 1 large oval for the body
- 1 smaller oval for the head
- 2 large ears (these can be big circles or large ovals)
- 1 trunk shape (a long rectangle that curves at one end)
- 4 legs (rectangles can work well for this)
Use your pencil to trace these shapes on your colored paper before cutting, ensuring they are the right sizes! Don’t worry about making them perfect—each elephant can have its own unique character!
Step 2: Assemble Your Elephant
Now it's time to glue everything together. Start with the body:
- Attach the legs to the bottom of the large oval body.
- Next, glue the head to one end of the body, angling it slightly upward.
- Position the trunk in such a way that it looks natural, and attach it to the head.
- Glue the ears to the sides of the head.
Step 3: Add Features
Using your markers or crayons, add details like eyes, nostrils, and toenails. This is where you can get really creative! If you have googly eyes, stick those on for an extra fun touch.
Step 4: Final Touches
Consider adding patterns or designs to your elephant with colored pencils or stickers. You might want to give your elephant fun accessories, like a paper crown or a vibrant scarf. The possibilities are endless!
Once you've finished decorating, make sure everything is securely glued down. And there you have it—your very own paper elephant!
Also Read This: Is Dailymotion Legal in Australia – Understanding Local Regulations
4. Tips for Personalizing Your Paper Elephant
Now that you know how to make a basic paper elephant, why not take it a step further and personalize your creation? Adding personal touches can make your craft even more special. Here are some tips to get you started:
1. Choose Your Color Palette:
While elephants are commonly gray, they can be any color you want! Consider using vibrant hues to create a whimsical, fantasy-style elephant. Pastel shades, patterns, or even a rainbow palette can make your elephant stand out.
2. Add Fun Patterns:
- Polka dots
- Stripes
- Stars or hearts
Use washi tape or stickers to incorporate patterns without needing to draw by hand!
3. Customize the Eyes:
Your elephant’s expression can be completely unique based on its eyes! Googly eyes add charm, but coloring in the eyes with different styles (like big cartoonish eyes or sleepy ones) can set the mood.
4. Create a Scene:
Instead of just making the elephant alone, why not create a background scene? A jungle theme, a birthday party, or a safari vibe can enhance your paper elephant. Use simple elements like trees, other animals, or even a paper sun!
5. Use Textiles:
If you're feeling adventurous, you can add fabric elements such as beads, buttons, or even small pieces of leftover material. This adds a tactile dimension to your paper craft and makes it more visually interesting.
6. Name Your Elephant:
Give your paper elephant a fun name! This adds personality, and you can even write its name on its trunk or somewhere on the body. It could be a conversation starter for kids or a loving gesture for your creations at home.
Personalizing your paper elephant is all about expressing yourself. Let your imagination run wild, and enjoy the process of crafting something that’s truly one-of-a-kind!
Also Read This: What Is Inside Gaming? Exploring the Gaming Content Available on Dailymotion
5. Creative Ways to Display Your Paper Elephant
Now that you've crafted your cute paper elephant, the next step is to find the perfect way to showcase your masterpiece! Here are some creative display ideas to consider:
- Framed Artwork: Consider framing your paper elephant. Use a shadow box frame to give it depth, and add some colorful backgrounds or decorations to make it pop!
- Table Centerpiece: Create a delightful centerpiece for your dining or coffee table. Arrange multiple paper elephants of different sizes and colors for a whimsical display that will surely catch the eye of your guests.
- Wall Art: Adorn your wall with a collection of paper elephants. You can create a mural effect by sticking them directly to the wall or mounting them on canvas. Experiment with various sizes and colors to craft a playful scene!
- Mobile: How about making a paper elephant mobile? Hang your elephants from a hoop or a wooden branch, using fishing line to give the illusion that they’re floating. This adds movement and a touch of fun to your room.
- Gift Toppers: Personalize your gifts by using smaller paper elephants as unique gift toppers. They will add charm and a personal touch that recipients will remember!
Feel free to get imaginative with your display! Whether you want a bold statement piece for your room or something subtle, showcasing your paper elephant can be a fun project in itself. Remember, the presentation is all about reflecting your personality and creativity!
6. Conclusion and Encouragement to Try More Paper Crafts
Congratulations on your delightful paper elephant creation! We hope you had as much fun making it as we did sharing the process with you. Remember, crafting is not just about the final product, but the joy of the journey along the way.
As you wrap up this project, we encourage you to dive deeper into the world of paper crafts. Here are a few suggestions to spark your creativity:
- Origami: Why not try folding intricate shapes like cranes, flowers, or even complex models? It's a fantastic practice for honing your skills!
- Paper Mache: Get messy and explore paper mache! You can create sculptures, masks, and even decorative bowls. Just remember to have fun and be creative!
- Card Making: Use your skills to design greeting cards for friends and family. Handmade cards add a personal touch that everyone appreciates!
- Scrapbooking: Combine your paper crafts into a scrapbook. Document memories with embellishments, photos, and, of course, your handcrafted papers!
Crafting is a fantastic way to express your creativity and unwind. So, whether you hang your paper elephant with pride, give it to a friend, or attempt a new paper project, just remember to enjoy the process. Each craft you try adds a new layer to your skills and creativity!
Happy crafting, and we can't wait to see what you'll create next!
 admin
admin


