Welcome to the world of Adobe Stock Libraries! If you're a creative professional, you know how integral it is to organize your assets efficiently. Adobe Stock Libraries allow you to manage your creative resources in one central location, making it easier to access and utilize high-quality stock images, videos, templates, and more. In this post, we'll explore what
Benefits of Using Libraries in Adobe Stock
Now that you’re familiar with what Adobe Stock Libraries are, let's dive into some of the standout benefits they offer. Utilizing these libraries can truly transform the way you approach your creative work. Here are some key advantages:
- Streamlined Workflow: With Adobe Stock Libraries, all your selected assets are just a click away. No more wasted time searching through endless folders or files—everything you need is neatly organized and easily accessible.
- Collaboration Made Easy: If you’re working with a team, Adobe Stock Libraries allow for seamless collaboration. You can share your library with others, enabling your team to access and utilize the same assets without duplicating efforts. This promotes consistency in branding and design.
- Versatility Across Adobe Apps: Whether you're using Photoshop, Illustrator, or InDesign, your Adobe Stock Library syncs with all these applications. This means you can drag and drop assets directly into your projects, regardless of the software you're using. It saves time and enhances your efficiency.
- Resource Management: Managing multiple projects can be overwhelming, but Adobe Stock Libraries simplify this. You can create specific libraries for different projects or clients, so you know exactly where to find the resources when you need them.
- Curated Collections: Adobe Stock allows you to curate your own collections. This feature is incredibly useful when you have a specific theme or project in mind. You can gather similar assets together to ensure consistency in style and messaging.
- Quick Revisions: When you're making changes or updates to a project, having all your assets conveniently located allows for quick revisions. Change an image, a graphic, or a video asset without the hassle of hunting it down.
- Access to High-Quality Content: Adobe Stock is known for its extensive library of high-quality images and videos. When you use Adobe Stock Libraries, you have quick access to professionally curated stock content that can elevate your projects.
In conclusion, the benefits of utilizing libraries within Adobe Stock are clear. They not only enhance your workflow but also promote collaboration, resource management, and consistent quality in your projects. Whether you're a freelancer handling multiple clients or part of a larger team, Adobe Stock Libraries can be a game-changer for your creative processes.
Also Read This: The Best AI Logo Designer: A Comprehensive Guide
3. Step-by-Step Guide to Creating a New Library
Creating a new library in Adobe Stock is a breeze! Whether you’re a seasoned designer or a newbie, this simple guide will help you set up your library in no time. Just follow these steps:
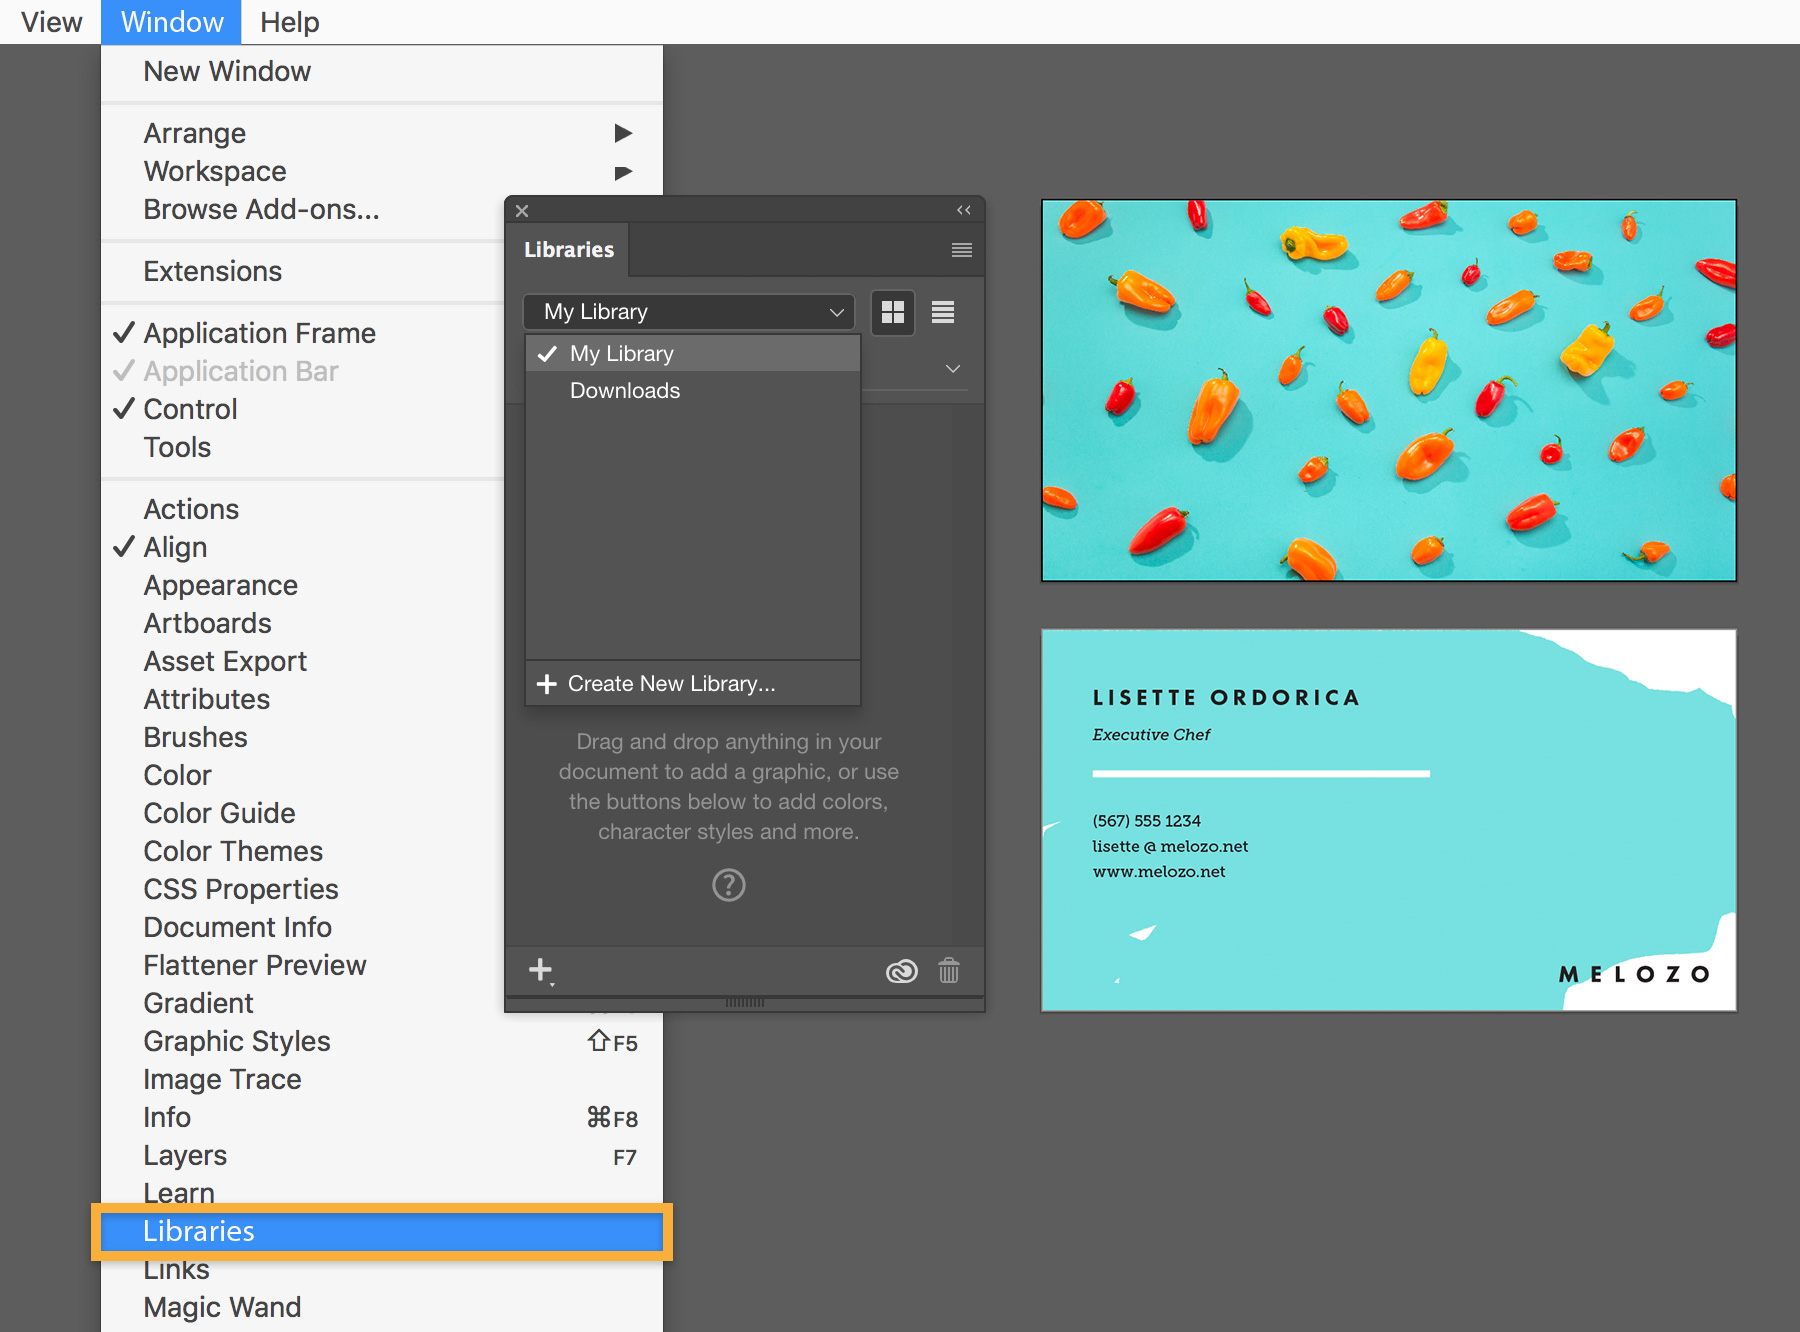
- Open Adobe Creative Cloud: First things first, launch the Creative Cloud application on your computer. You can find it in your applications folder, or simply search for it!
- Navigate to the Libraries Tab: Once you’re in Creative Cloud, look for the sidebar on the left. There, you’ll see a tab labeled 'Libraries.' Click on it!
- Create a New Library: In the Libraries panel, you’ll see a plus icon (+) or an option that says 'Create New Library.' Click that to start the fun!
- Name Your Library: A pop-up will appear asking you to name your new library. Choose a name that reflects its purpose (like 'Design Projects' or 'Marketing Material') so you can easily remember what it's for!
- Set Library Preferences: You can adjust settings like visibility (public or private) based on whether you want to share your library with others or keep it to yourself.
- Hit Confirm: After naming and configuring your library, click 'Create.' And voila! Your new library is now live and ready for action.
And that’s it! You’ve just created a new library. Wasn’t that easy? Next, let's dive into how to make the most of your library by adding assets!
Also Read This: Alamy Alternative: Exploring Other Stock Photography Platform
4. Adding Assets to Your Library
Now that you have your library set up, it’s time to give it some life! Adding assets to your library is where the magic happens. Here’s how you can do it:
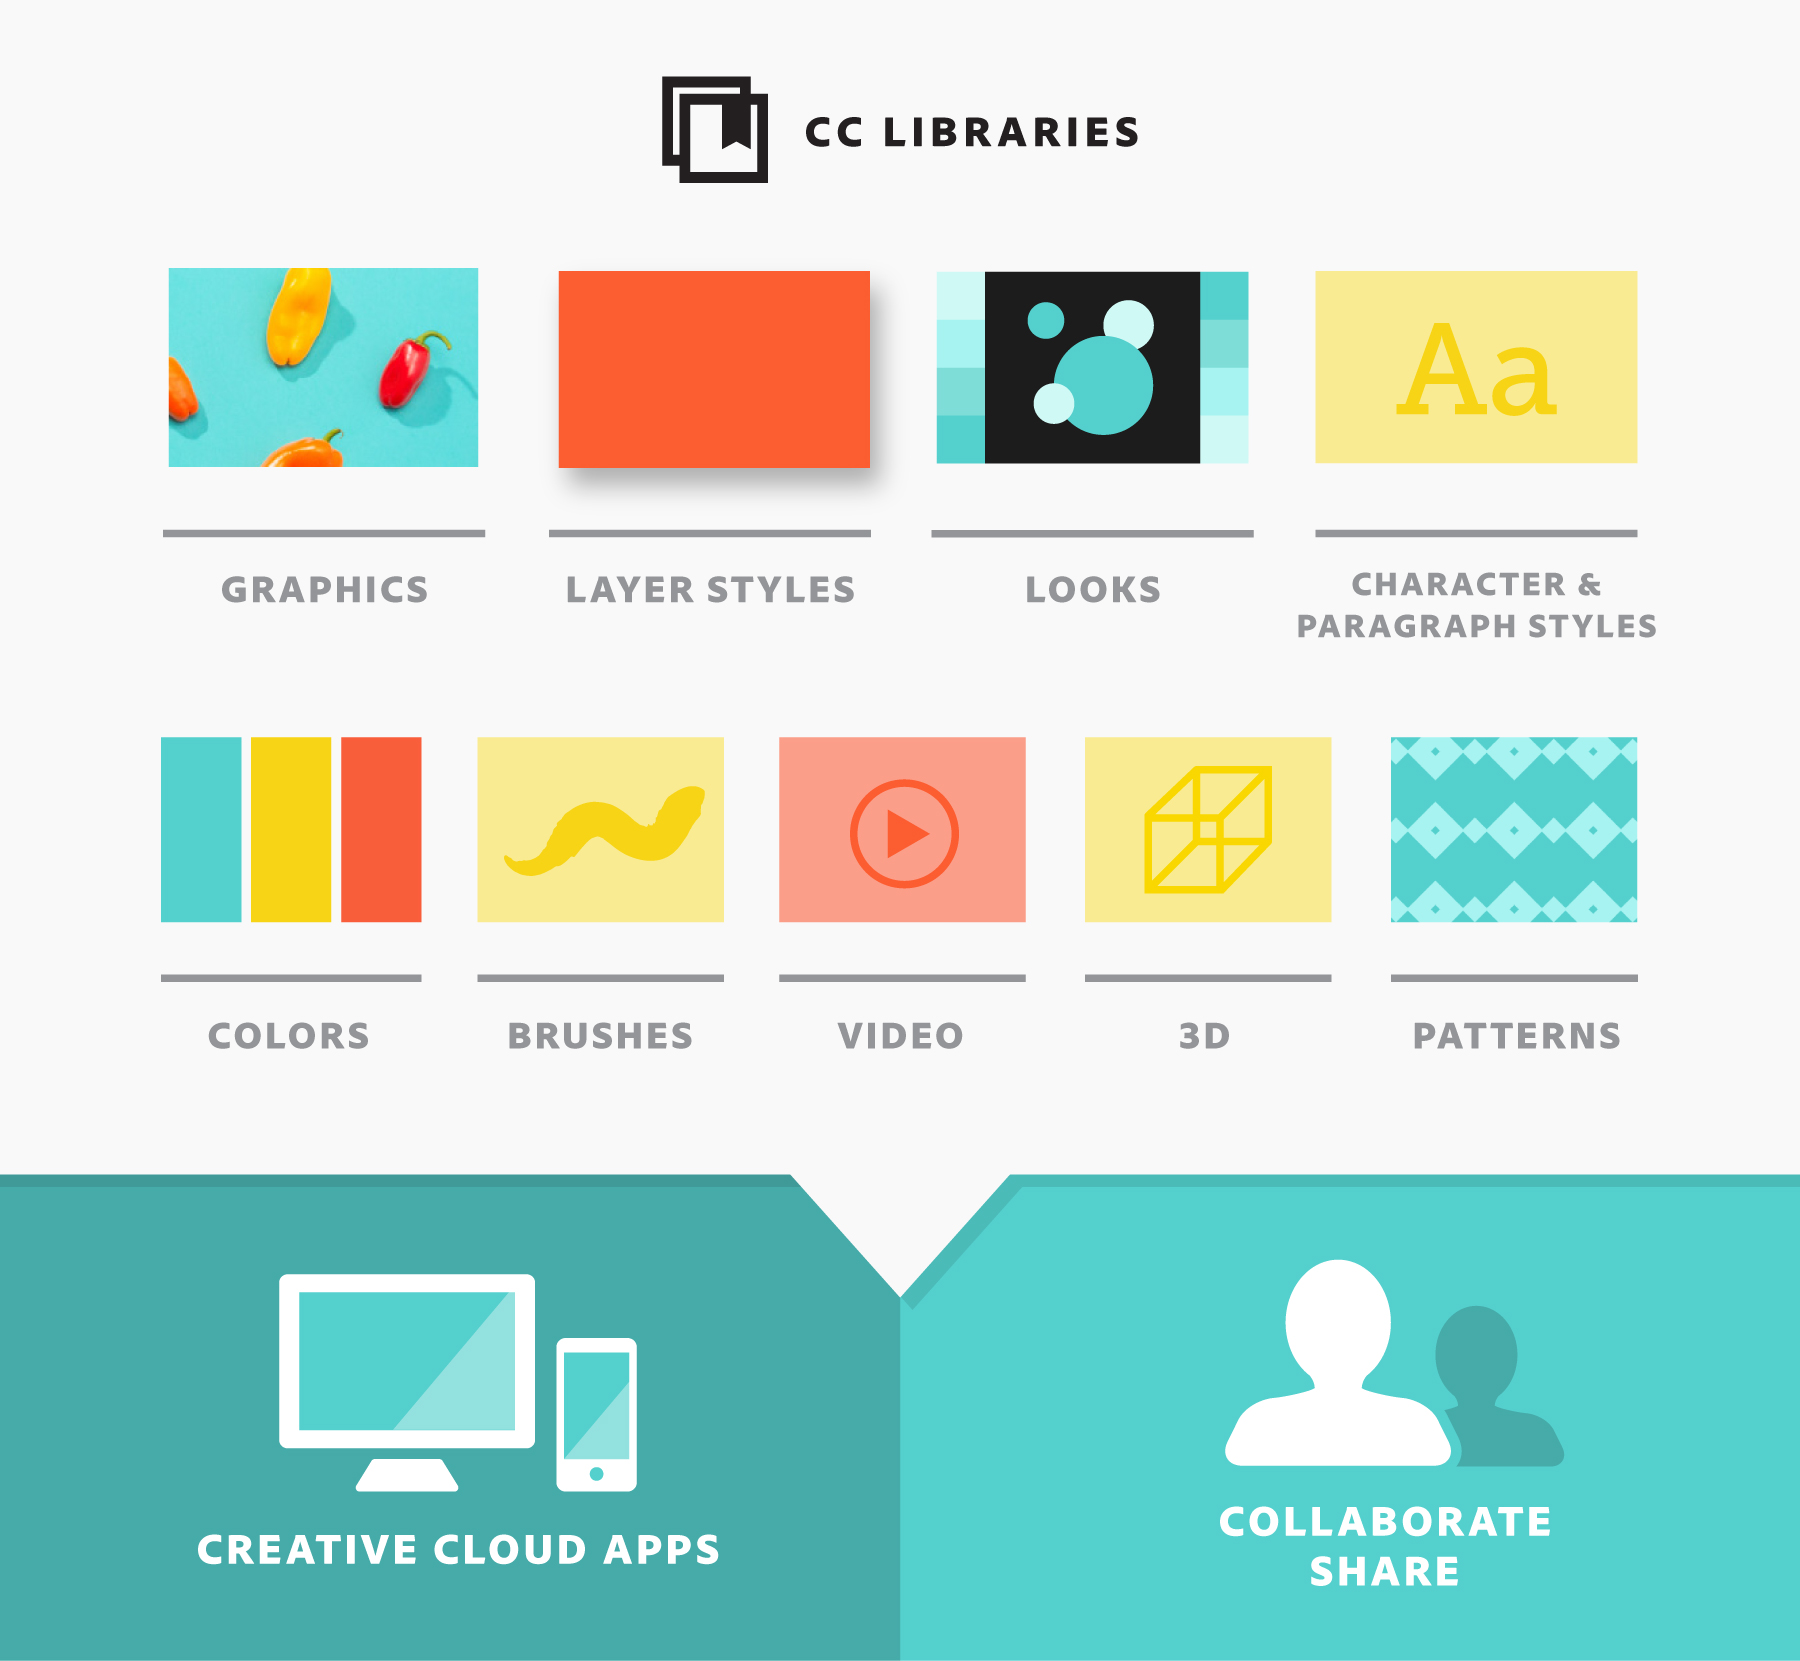
- Browse Adobe Stock: Start by heading over to the Adobe Stock website. You can search for images, videos, templates, or 3D assets. Use keywords that match what you’re looking for!
- Select Your Assets: Once you find something you love, click on the asset to get a closer look. Adobe Stock provides previews, and you can see if it’s the right fit for your project.
- Add to Library: Look for the 'Add to Library' button, usually located near the asset preview. Select your newly created library from the drop-down menu before adding the asset.
- Use the Creative Cloud Toolbar: If you're working within an Adobe application (like Photoshop or Illustrator), you can also add assets directly from the Creative Cloud Libraries. Simply drag and drop your desired assets from Adobe Stock into your library!
- Organize Your Assets: As you add more assets, consider organizing them with tags, color codes, or folders within your library. This helps you quickly find what you need later!
- Download for Use: When you want to use an asset, simply go to your library, select it, and download it to your desktop or integrate it directly into your project.
Adding assets to your library is quick and easy, ensuring you have everything you need at your fingertips. Now you’re ready to personalize your library and start creating amazing designs! Happy designing!
Also Read This: What is the Ideal Size for a YouTube Thumbnail
5. Organizing Your Library for Better Efficiency
When it comes to managing your Adobe Stock library, organization is key. An efficient library not only saves you time but also helps you maintain focus on your projects. So, how do we go about organizing this treasure trove of visual content? Let’s dive in!
Create Folders and Subfolders: Just like a physical library, digital organization makes it easier to find what you need. Start by creating broad categories based on your projects, styles, or types of content. For instance:
- Projects: You might have separate folders for marketing, print materials, digital ads, etc.
- Types of Content: Organize by photos, vectors, videos, or templates. This way, you instantly know where to look when you need a specific format.
- Themes: Group similar images or videos together. For example, nature themes could have subfolders for landscapes, wildlife, and botanical illustrations.
Tagging and Keywords: Many creatives overlook the power of tagging their assets. Adding relevant keywords to your images will make searching a breeze!
Imagine you’re in a rush and need a vibrant floral image. Instead of flipping through folders, a quick search with the tag "floral" pulls exactly what you need in seconds. Use tags that describe not just the subject, but also the mood, color palette, and purpose of the image.
Consistency is Key: Establish a naming convention for your files that you can stick with over time. For example, you could follow a format like "ProjectName_Description_Date." This will help ensure that your assets are easy to locate and that you don’t mistakenly upload duplicates.
Don’t forget to regularly review and purge your library! If you stumble upon files you no longer use or need, delete them. A cleaner library means less clutter and improved efficiency.
Also Read This: Increasing Image Rating in BSG
6. Tips for Managing and Sharing Your Adobe Stock Library
Managing and sharing your Adobe Stock library efficiently can elevate your workflow, especially if you're collaborating with a team. So, let’s cover some practical tips that can make your experience smoother.
Shared Libraries: If you work with a team, take advantage of Adobe Creative Cloud’s shared libraries feature. This allows you to collaborate in real-time, making it easier to keep everyone updated with the same assets. Just create a shared library and invite your team members. They’ll have access to the same resources, reducing the risk of using outdated materials.
Regular Syncing: Don’t forget to regularly sync your library. Syncing keeps your assets up-to-date across all devices and ensures that everyone on your team has the latest versions. It's as simple as clicking the sync button — a small task that saves a lot of hassle down the line!
Using Collections: Collections in Adobe Stock help you organize favorite assets within your library. Think of it as a curated playlist of your best visuals. You can create collections for specific projects or themes, making it easy to access your go-to assets swiftly. Plus, you can share these collections with others if they need access to similar resources.
Version Control: When you’re working on a project and making adjustments, consider saving versions of your assets. This way, if a particular image or design isn’t working out as planned, you can easily revert to a previous iteration without losing your progress. Simply use version numbers in your file names or folders.
Use Comments: Encourage team members to leave comments or notes on shared assets within Creative Cloud. This can be particularly useful for feedback, suggestions, or reminders on certain visuals. You can avoid confusion and ensure everyone is on the same page!
By implementing these management and sharing tips, you’ll find that not only is your workflow smoother, but it also fosters collaboration and creativity within your team. So roll up your sleeves, get organized, and shine in your creative endeavors!
Also Read This: How to Create 1×1 Images
7. Common Issues and Troubleshooting
When creating a new library in Adobe Stock, you might encounter a few hiccups along the way. No need to panic! Let's dive into some common issues and troubleshooting tips that can help you smoothly navigate through the process.
1. Library Not Syncing Properly: One of the frustrating issues can be the library not syncing with your Adobe Creative Cloud. If this happens, try the following:
- Check your internet connection: A stable connection is essential for syncing.
- Log out and back in: Sometimes, a simple log out followed by logging back in can refresh the sync.
- Update your Adobe apps: Ensure you are using the latest versions of your Adobe apps, as bugs in older versions can prevent proper functionality.
2. Unable to Add Assets: If you're struggling to add assets to your library, consider these solutions:
- Check file formats: Make sure the files you're trying to add are supported formats.
- Restart the app: Sometimes, a fresh start is all you need.
- Permissions check: Ensure that you have the necessary permissions for the files you want to add.
3. Design Assets Not Appearing in Library: If you've added design assets but they're not showing up, try the following:
- Refresh your library: Click the refresh button or toggle between libraries to reload.
- Recheck the library settings: Make sure you're viewing the correct library.
4. Performance Issues: Creative Cloud apps can sometimes feel sluggish. Here are tips to speed things up:
- Regularly clear your cache: A cluttered cache can slow down performance.
- Close unnecessary tabs and applications: The fewer resources your system has to manage, the smoother your experience will be.
- Check system requirements: Ensure your computer meets Adobe's recommended specifications.
By keeping these troubleshooting tips in mind, you can effectively overcome many common issues associated with creating a new library in Adobe Stock. If problems persist, consider visiting the Adobe Support community for additional help or reaching out to Adobe’s customer support.
8. Conclusion and Additional Resources
Creating a new library in Adobe Stock can be a game changer for your workflow, allowing you to effectively manage and organize your creative assets. By leveraging libraries, you not only save time but also streamline collaborations with coworkers, ensuring that everyone is on the same page regarding design resources.
As we've discussed throughout this post, the key steps involve:
- Setting up your Adobe Creative Cloud account.
- Understanding the features of Adobe Stock.
- Learning to upload and categorize your assets efficiently.
But remember, encountering issues is part of the learning curve. With the troubleshooting tips provided, you should be well-equipped to handle any bumps along the road.
For further exploration, consider checking out the following resources:
- Adobe Stock Help Center: A comprehensive resource for troubleshooting and features.
- Adobe Community Forums: Engage with other Adobe users to share tips and solutions.
- Creative Bloq: Stay updated with tips and tricks related to Adobe tools and design trends.
By embracing these tools and continuously learning, you’re on the way to elevating your creative projects to new heights. Happy designing!
 admin
admin


