Have you ever scrolled through LinkedIn and come across an engaging carousel post? These interactive presentations can be a game-changer for showcasing your ideas, products, or services. A LinkedIn carousel allows you to upload multiple images or documents in a single post, letting viewers swipe through them. This format not only catches the eye but also encourages more profound engagement with your content. In this guide, we'll explore how to create your own
Why Use Carousels on LinkedIn?

Carousels are more than just a flashy way to present information; they serve several practical purposes that can enhance your LinkedIn strategy. Here are some reasons why you should consider using carousels:
- Increased Engagement: Carousel posts encourage users to interact with your content. As viewers swipe through the slides, they spend more time on your post, increasing the likelihood of likes, comments, and shares.
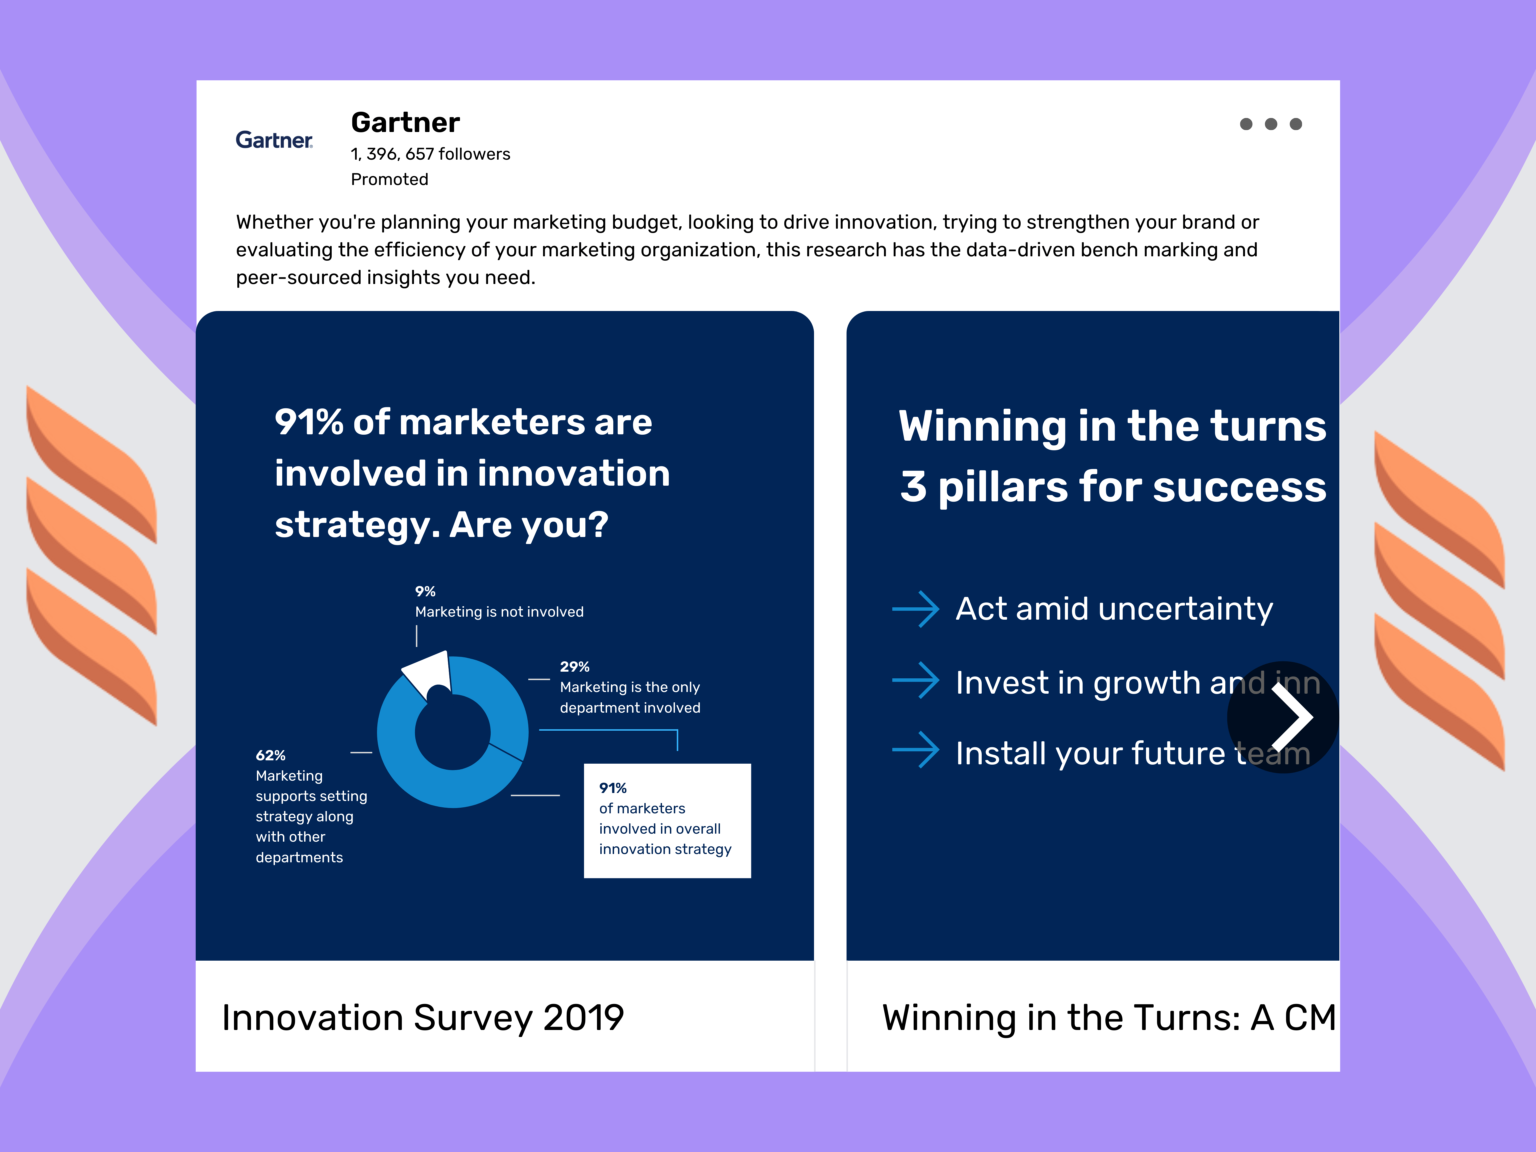
- Visual Appeal: A well-designed carousel can be visually striking, capturing attention better than standard text posts. Using images, infographics, and graphics can help convey your message more effectively.
- Storytelling: Carousels allow you to tell a story or present information in a logical sequence. This format is perfect for case studies, tutorials, or showcasing a product's features step-by-step.
- Highlighting Expertise: By sharing valuable insights or industry knowledge through carousels, you position yourself as a thought leader in your niche. This can attract more connections and business opportunities.
- Easy to Share: Carousel posts can be easily shared by your network, extending your reach. When someone shares your post, it can go beyond your immediate connections and attract a wider audience.
Additionally, carousels can be used for various content types, such as:
| Content Type | Description |
|---|---|
| Infographics | Visual representations of data or information, great for quick comprehension. |
| Tutorials | Step-by-step guides that help your audience understand a process. |
| Showcase Products | Highlight the features and benefits of your products in a captivating way. |
| Testimonials | Share positive feedback from your clients through quotes or case studies. |
In summary, using carousels on LinkedIn can significantly amplify your content strategy. They make your posts more interactive, visually appealing, and informative, ultimately driving better engagement and visibility on the platform. So, are you ready to create your first carousel? Let’s dive deeper into how to do just that!
Also Read This: Do I Need a Picture of Me on LinkedIn Reddit: A Discussion on the Importance of Profile Photos
3. Preparing Your Content for the Carousel
Creating an engaging LinkedIn carousel starts long before you dive into design. The first step is to prepare your content. Think of your carousel as a storytelling medium—each slide should contribute to the narrative you want to share. Here’s how to effectively prepare your content:
- Define Your Message: What do you want your audience to learn or feel? Start with a clear objective. For instance, if you’re sharing marketing tips, your goal might be to educate your audience on best practices.
- Outline Your Slides: Create a rough outline of what each slide will cover. Aim for a compelling introduction, informative middle sections, and a strong conclusion. For example:
- Slide 1: Introduction to Marketing Tips
- Slide 2: Tip 1 - Know Your Audience
- Slide 3: Tip 2 - Use High-Quality Visuals
- Slide 4: Conclusion and Call to Action
- Use Engaging Visuals: Visuals can significantly enhance your message. Think about images, icons, or infographics that will complement your text. Using consistent colors and fonts can make your carousel more appealing.
- Craft Captivating Copy: Keep your text concise and engaging. Use bullet points or short sentences to make it easy to digest. For example, instead of writing a long paragraph for Tip 1, you could break it down into:
- Identify your target demographic.
- Analyze their behaviors and preferences.
- Include a Call to Action: Don’t forget to encourage your viewers to engage with your content! Whether it’s asking them to comment, share, or visit your website, a clear call to action can boost interaction.
By taking the time to prepare your content, you ensure that your carousel is not only visually appealing but also informative and engaging. Now, let’s move on to the tools that can help bring your creative vision to life!
Also Read This: How to Stop LinkedIn Premium Subscription: A Quick and Easy Process
4. Step 1: Choosing the Right Tools for Design
Once your content is ready, the next step is to select the right design tools. With so many options available, it can be overwhelming to choose. Here are some popular tools that cater to different needs and skill levels:
- Canva: A favorite among professionals and beginners alike, Canva offers user-friendly templates specifically for LinkedIn carousels. You can customize sizes, choose from a vast library of graphics, and collaborate with team members. Plus, it's free for basic use!
- Adobe Spark: If you’re looking for more advanced features, Adobe Spark is a fantastic choice. It allows for greater customization and has a range of templates designed for social media. It’s perfect for those who have some design experience under their belt.
- PowerPoint: Believe it or not, PowerPoint can be a powerful tool for creating carousels! You can design each slide and then save them as images. This option is great if you’re already familiar with the interface.
- Visme: This tool is excellent for crafting visual stories. Visme offers a plethora of templates, stock photos, and icons, making it easy to create dynamic and eye-catching carousels.
- Piktochart: If your carousel requires more data visualization, Piktochart is your go-to tool. It allows you to create infographics and data-driven visuals, which can be really engaging for your audience.
When choosing your tool, consider your design skills, the complexity of your carousel, and how much time you want to invest. Each of these tools has its strengths, so pick one that feels right for you and your project.
Now that you have your content and tools lined up, you’re well on your way to creating a fantastic LinkedIn carousel that will captivate your audience!
Also Read This: Should You Connect with Recruiters on LinkedIn? The Benefits and Risks
5. Step 2: Designing Your Carousel Slides
Alright, now that you've got your content mapped out, it’s time for the fun part: designing your carousel slides! This is where your creativity can really shine. Remember, the goal is to grab attention and keep your audience engaged. Here are some tips to help you create stunning slides:
- Choose a Consistent Theme: Stick to a color palette and font style that aligns with your brand. This will create a cohesive feel throughout your carousel.
- Use High-Quality Images: Incorporate eye-catching visuals. Websites like Unsplash and Pexels offer free, high-quality images that can elevate your design.
- Limit Text: Keep text minimal and readable. Aim for a maximum of 6-8 words per slide. Use bullet points to make it easier to digest.
- Incorporate Branding: Ensure your logo appears on each slide. This reinforces brand recognition.
- Call to Action (CTA): End with a strong CTA. Encourage viewers to take the next step, whether it’s visiting your website or commenting on the post.
Now, let’s talk about tools. You can use software like Canva or Adobe Spark to create your slides. They offer templates specifically for LinkedIn carousels, which can save you time and effort. Here's a quick breakdown of how to get started with Canva:
- Sign up for a free account on Canva.
- Select “Custom Dimensions” and set it to 1080 x 1080 pixels for a perfect square.
- Choose a template or start with a blank canvas.
- Add your content, using the design tips mentioned above.
Once you’re satisfied with your design, download the slides in PDF format. This is essential for uploading to LinkedIn as a carousel post. Remember, each slide should tell a piece of your story, creating a narrative flow throughout your carousel!
Also Read This: How to Request Recommendations on LinkedIn to Boost Your Profile
6. Step 3: Uploading Your Carousel to LinkedIn
Now that your slides are beautifully designed, it’s time to upload your carousel to LinkedIn! This step is crucial, as it’s where your hard work will be showcased to your audience. Follow these simple steps to get your carousel live:
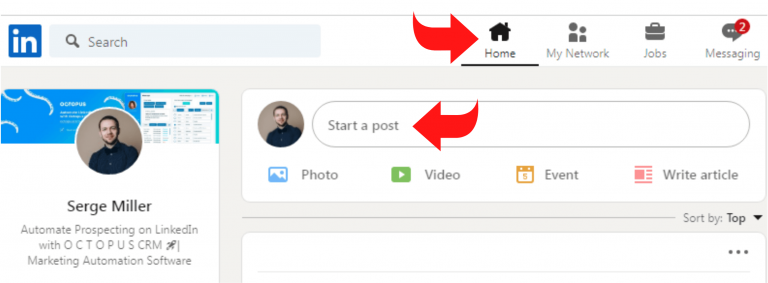
- Log into LinkedIn: Go to your LinkedIn profile or your company page.
- Create a New Post: Click on the start a post section at the top of your feed.
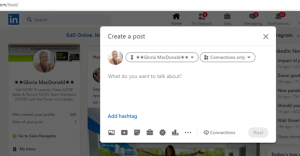
- Select the Document Icon: Look for the document icon (it looks like a piece of paper) in the post options. Click on it.
- Upload Your PDF: Choose the PDF file you downloaded from Canva. LinkedIn will process it and prepare it for display.
- Add a Caption: Write a compelling caption that encourages engagement. Ask a question or invite comments to boost interactions!
- Tag Relevant People: If applicable, tag collaborators or relevant brands to increase reach.
- Hit Post: Once everything looks good, click the post button. Congratulations, you’ve just shared your first LinkedIn carousel!
After uploading, monitor the engagement on your post. Respond to comments and engage with viewers to create a community around your content. Remember, consistency is key—keep creating and sharing more carousels to establish your presence on LinkedIn!
Also Read This: How to Invite People to LinkedIn: Sending Connection Requests
7. Step 4: Optimizing Your Carousel for Engagement
Once you've created your LinkedIn carousel, the next crucial step is to optimize it for maximum engagement. You want your audience to not just scroll through your content but to interact with it, share it, and even comment. Here’s how to make that happen:
1. Eye-Catching Cover Slide: Start strong with an engaging cover slide. Use vibrant colors, bold fonts, and a clear title that captures attention. Think of it as your book cover – it needs to entice viewers to dive deeper. For instance, if your carousel is about “5 Tips for Effective Networking,” ensure the title stands out and is easy to read.
2. Consistent Branding: Maintain visual consistency throughout your carousel. Use the same color scheme, font styles, and imagery that align with your brand. This not only makes your content recognizable but also reinforces your brand identity. For example, if your brand colors are blue and white, stick to those shades in all your slides.
3. Clear and Concise Text: Keep your text brief and to the point. Use bullet points or numbered lists to break down information. This makes it easier for your audience to digest the content quickly. Remember, LinkedIn users often skim, so clarity is key!
- Use short, impactful sentences.
- Aim for a maximum of 3-4 points per slide.
- Incorporate relevant images or icons to complement the text.
4. Engaging Call-to-Action (CTA): End your carousel with a strong CTA. Encourage viewers to comment, share their thoughts, or check out your website for more information. Phrasing like “What’s your experience with networking?” invites interaction and boosts engagement.
5. Use Hashtags Wisely: When posting your carousel on LinkedIn, don’t forget to add relevant hashtags. This increases the visibility of your post to users who follow those specific tags. Aim for a mix of popular and niche hashtags, like #NetworkingTips and #ProfessionalDevelopment.
By paying attention to these details, you can significantly enhance the likelihood that your carousel will resonate with your audience. Engagement doesn't happen by chance; it's crafted thoughtfully!
8. Analyzing the Performance of Your Carousel
After your LinkedIn carousel has been live for a while, it’s time to dive into the performance metrics. Understanding how your audience interacts with your content is vital for refining your future carousels. Here’s how to analyze the performance effectively:
1. Check Impressions and Reach: Start with the basics—how many people saw your carousel? Impressions tell you how often your content appeared in feeds, while reach indicates the number of unique users who viewed it. This helps gauge initial interest.
2. Engagement Metrics: Look beyond views to see how people interacted with your carousel. Key metrics include:
| Metric | What It Indicates |
|---|---|
| Likes | General approval and interest. |
| Comments | Encourages discussion and shows deeper engagement. |
| Shares | Indicates content value and reach expansion. |
3. Click-Through Rate (CTR): If your carousel includes links, monitor the CTR to see how many viewers clicked on your links. A high CTR suggests that your content successfully encouraged users to take action. For instance, if you linked to a blog post, analyze how many viewers followed through.
4. Audience Insights: Use LinkedIn’s analytics tools to gather insights about who engages with your carousel. Are they industry professionals, job seekers, or influencers? Understanding your audience demographics helps tailor future content that resonates better.
5. A/B Testing: For future carousels, consider A/B testing different designs or content styles. Create two versions of a carousel and share them with similar audiences. Analyze which design garners more engagement to refine your strategy.
By regularly analyzing your carousel's performance and adapting your strategies, you'll continuously improve your content and boost engagement on LinkedIn. Remember, each piece of content is a learning opportunity!
 admin
admin


