Have you ever watched a kite soaring high in the sky and felt that sense of awe? Making your own kite is not only a fun craft project but also a fantastic way to connect with nature. Whether you're a child at heart or a parent looking for a creative activity, kite making is an enjoyable endeavor. In this guide, we'll walk you through the basics of crafting your very own kite, so you can experience the joy of watching it dance in the wind. Let’s get started!
Materials Needed for Kite Construction
Before diving into the kite-making process, it’s crucial to gather all the necessary materials. Having everything ready will ensure a smoother and more enjoyable experience. Here’s a simple list of what you’ll need:
- Paper or Plastic: Traditional kites use lightweight paper, but plastic (like a trash bag) can also work. You can choose colorful designs to make your kite eye-catching!
- Kite Frame: Bamboo sticks or flexible plastic rods are popular choices for the skeleton of the kite. These need to be light but sturdy enough to support your design.
- String: Strong kite string or twine is a must for flying your creation. Make sure it’s durable to withstand the pull when your kite is soaring high.
- Adhesive: A good quality glue or tape, like duct tape, is essential for attaching the paper or plastic to the frame securely.
- Scissors: Sharp scissors will help you cut the materials to the right size and shape.
- Ruler and Pencil: Use these for measuring and marking where you’ll cut your materials, ensuring precision in your measurements.
- Decorative Items (optional): Get creative! You can use markers, stickers, or even paint to personalize your kite and make it uniquely yours.
Now that you have your materials gathered, you’re all set to begin the fun part—constructing your kite! Just remember, the best part of this project is the chance to express your creativity, so don’t be afraid to mix and match colors and designs. Happy crafting!
Also Read This: How to Watch Explicit Content on Dailymotion Safely
3. Step 1: Choosing the Right Design
When it comes to making a kite, the first step is all about the design. This is where your creativity can really shine, and it’s also the foundation of your kite’s functionality. There are countless designs to choose from, but let’s break it down into a few popular styles:
- Diamond Kites: These are classic and super easy to make. Their simple shape and structure make them great for beginners.
- Box Kites: These are a bit more complex but can be incredibly fun to fly. They catch the wind beautifully due to their three-dimensional shape.
- Delta Kites: Resembling a triangle, delta kites are great for high flying and are known for their ability to handle a variety of wind conditions.
- Stunt Kites: If you’re looking for some excitement, consider making a stunt kite. These take a little more skill to fly, but they can perform tricks and acrobatics.
Once you’ve settled on a design, it’s important to also consider the size of your kite. A larger kite can achieve more lift, but it might be more challenging to handle, especially in stronger winds. On the other hand, a smaller kite is easier to manage, making it ideal for kids or beginners.
Tip: Making a sketch of your kite design can be incredibly helpful. This will allow you to visualize the shape and get a sense of how the pieces will fit together. Don’t hesitate to incorporate your own personal flair, such as color patterns or themes!
Lastly, think about the materials you’d like to use. Common choices include:
- Paper: Lightweight and easy to work with, but best used for smaller kites.
- Plastic: Durable and weather-resistant, it's great for a variety of conditions.
- Fabric: For a more advanced kite, fabric can be a beautiful option that’s also quite strong.
Remember, there are no strict rules in kite designing, so let your imagination take off! Once you have your design locked in, you’re ready to gather your materials and cut them out in the next step.
Also Read This: How to Watch Dailymotion on LG TV for Seamless Streaming
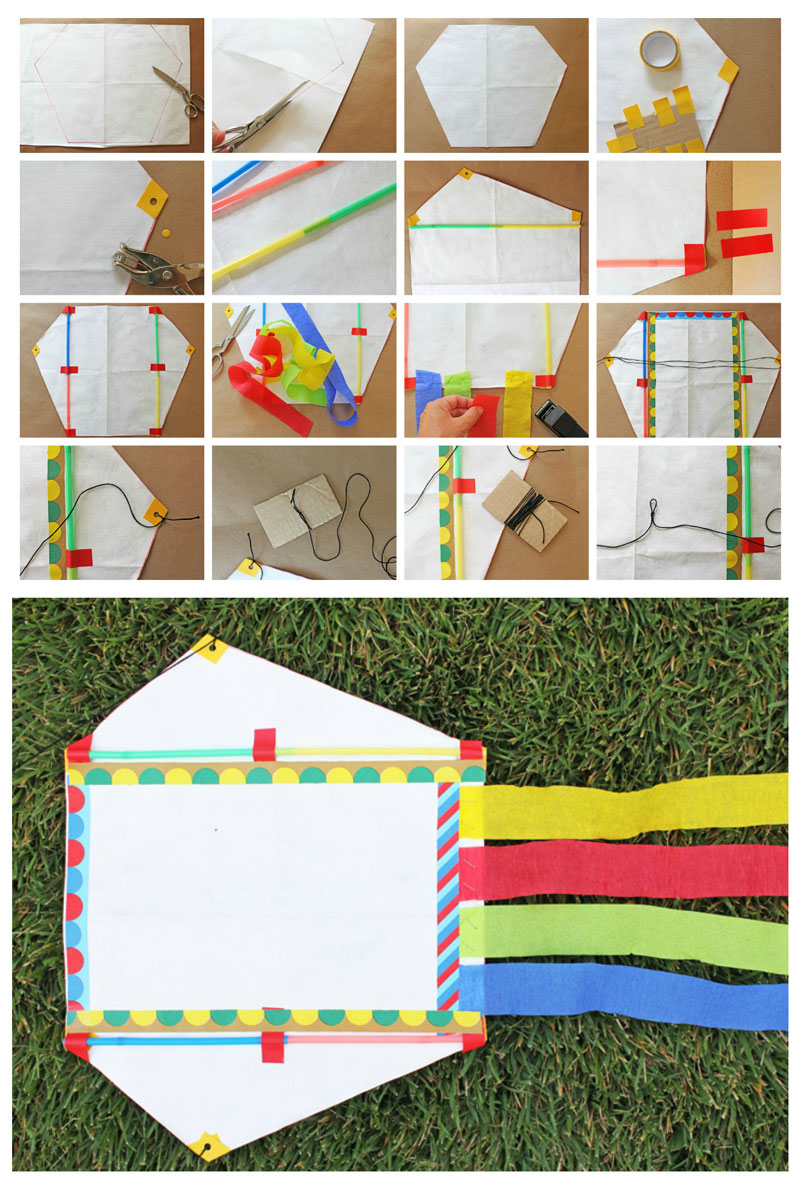
4. Step 2: Cutting the Materials
Now that you have your design settled, it’s time for the fun part: cutting your materials! This step is essential as you’ll be shaping the components that will ultimately take flight. So, let’s outline what you’ll need and how to go about cutting everything out:
Materials Needed:
- Your chosen kite design (with measurements).
- Scissors or a craft knife.
- A cutting mat (if using a craft knife).
- Ruler or straight edge.
- Pencil for marking the material.
Here’s how to proceed:
- Measure Carefully: Using your design sketch, measure each part of the kite on your chosen material. Be sure to take your time with this step—accuracy is key!
- Mark the Material: Use a pencil to lightly outline the shapes. This will serve as your guide when you start cutting.
- Cut Out the Shapes: Carefully cut along your outlines. If you’re using fabric or thicker materials, a craft knife may give you cleaner edges. Just make sure to always follow safety precautions.
- Trim for Fit: Once you’ve cut out all your pieces, lay them out to ensure they fit together as intended. You might need to make minor adjustments for them to align perfectly.
Pro Tip: If you’re making a larger kite, you might find it easier to cut the materials in stages rather than attempting to tackle everything at once. This keeps the project manageable and allows for careful measurement.
Cutting the materials can be tedious, but it’s also where the vision of your kite starts to become a reality. Take pride in your craftsmanship! Once you have all your pieces cut out, you’ll be ready to assemble your kite, and that’s when the real magic happens.
Also Read This: Learn to Fold Origami Flowers: Easy Tutorials on Dailymotion
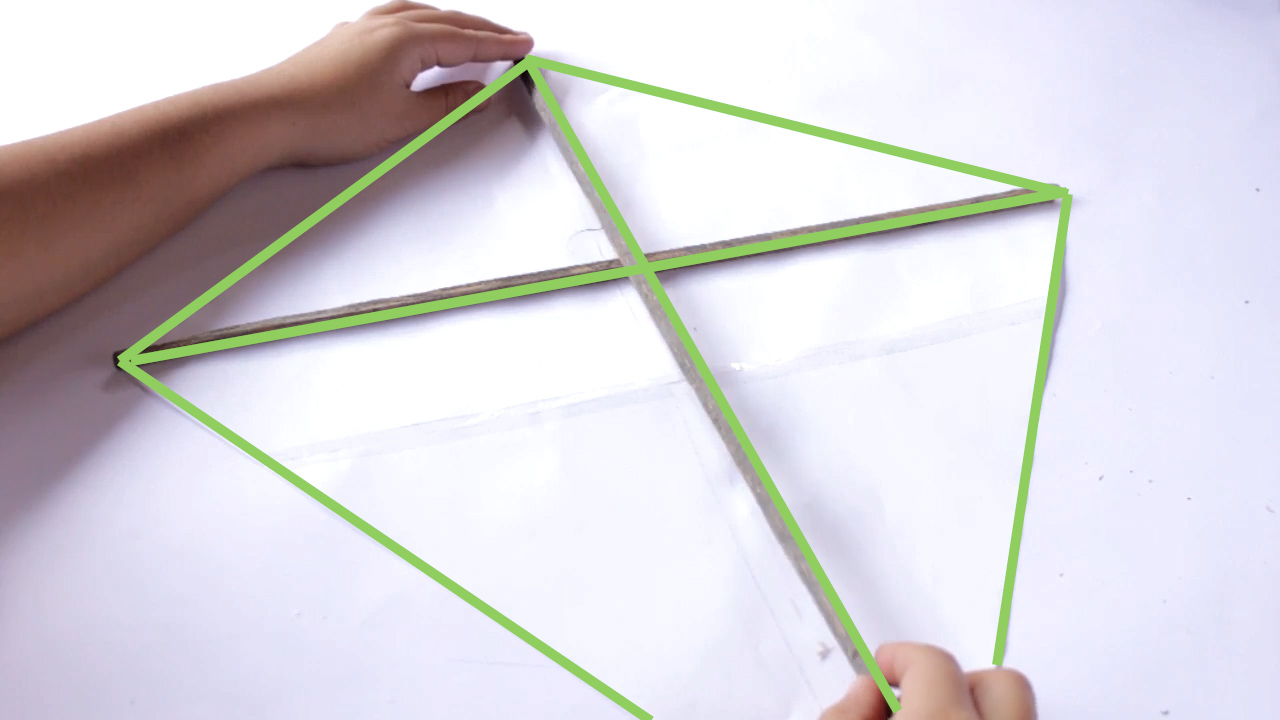
5. Step 3: Assembling the Kite Frame
Now that you have all your materials ready, it’s time to get our hands dirty and put together the kite frame! This part is essential because the frame will determine how strong and stable your kite is when it’s up in the sky. Don't worry; it’s easier than it sounds and can even be a fun project to do with friends or family!
Here’s a step-by-step breakdown of the assembly process:
- Lay Out the Frame Pieces: Start by laying out your bamboo or dowel rods on a flat surface. Make sure they are the correct lengths according to your design. You should have two long pieces for the spine and cross spar, and any additional supports depending on your kite design.
- Join the Spars: Use your string or glue to bind the cross spar to the spine. It’s essential to position the cross spar about one-third of the way down the length of the spine. This positioning helps give your kite stability in the air.
- Secure the Joints: If you’re using glue, let it dry completely before moving on. If not, use string to tightly bind the joints. Make several wraps around each joint to ensure they are secure. This will help prevent any wobbling or breaking when the kite gets lifted by the wind.
- Check for Stability: Hold your framed kite upright and gently shake it to make sure everything holds together. You want to ensure the spine is straight and the cross spar is level.
And voila! Your kite frame is complete. It should feel strong and sturdy in your hands. Don’t rush through this step; a well-assembled kite frame will make all the difference when you finally take it out for a flight!
Also Read This: How to Make a Side French Braid: Dailymotions Simple Braiding Tutorial
6. Step 4: Attaching the Sail
Great job on assembling your kite frame! Now let’s move on to the most colorful and fun part—attaching the sail. This is where you can really let your creativity shine! The sail is the fabric that gives your kite its shape and vibrant look, so let’s make it count!
Follow these simple steps to attach the sail to your kite frame:
- Choose Your Sail Material: You can use lightweight fabrics like plastic, nylon, or even paper. Just make sure it’s durable and can withstand wind. If you’re feeling adventurous, try decorating your material with markers or paint before you cut it!
- Cut the Sail Fabric: Measure your frame and cut the fabric accordingly. You want to leave some excess material around the edges to make binding easier. Ideally, you should have a rectangular or diamond shape that complements your frame size.
- Fold and Tape: Start folding the edges of the sail fabric over the frame. Use adhesive tape or glue to secure the fabric to the frame tightly. Make sure the sail is taut but not overly stretched, as this can rip the fabric.
- Reinforce the Edges: For extra durability, consider adding more tape along the edges where the sail meets the frame. This extra support will be beneficial when the kite is airborne.
Once you’ve attached the sail, step back and admire your work! This is the moment where your kite starts to take its final shape. Don’t forget to check that the sail is well secured and that there are no loose edges that might flap in the wind.
In the next steps, we’ll talk about adding the tail and making your kite ready for flight, but for now, give yourself a pat on the back! You’re one step closer to soaring in the sky.
Also Read This: Learn to Make Handmade Baskets: Easy Videos on Dailymotion
7. Step 5: Adding the Tail
Now that your kite’s frame and sail are ready, it’s time to focus on the tail! The tail is a vital part of a kite as it helps to stabilize it during flight, ensuring it doesn’t spin uncontrollably or dive towards the ground. Don’t worry; adding a tail is super simple, and it offers a chance to get creative!
What You'll Need:
- Lightweight material (like ribbon, string, or fabric)
- Scissors
- Stronger adhesive or tape (if needed)
Steps to Add the Tail:
- Select the length of your tail. A good rule of thumb is to make it about 5 to 10 times the width of your kite. This length can vary based on your kite’s design and size.
- Cut your chosen material to the desired length. Feel free to mix and match materials for a more colorful look! For instance, you can attach several pieces of ribbon or fabric at intervals along the tail.
- Attach the tail to the bottom of your kite’s frame. Depending on your frame, you might need to use a bit of tape or glue to secure it well. Ensure that it’s centered and that it hangs freely without any twists.
Once your tail is in place, give it a little shake. You want to confirm that it flows freely without any obstructions. This tail will flutter in the wind and help keep your kite stable in the air!
Also Read This: Elegant Dining: Eating Rice with a Fork and Knife Made Simple
8. Step 6: Finalizing the Kite for Flight
Congratulations on making it this far! Now that your kite has its sail and tail, it’s time to finalize everything for flight. This step will ensure that your kite is ready to soar through the skies with ease.
Conduct a Quick Inspection:
- Check the frame: Make sure your frame is sturdy and that there are no loose connections. If you used glue, give it some time to fully set.
- Inspect the sail: Look for any tears or loose ends that may catch the wind adversely. If you find anything, use tape to patch it up.
- Examine the tail: Ensure that the tail is attached securely and that it is properly aligned.
Attach the Bridle:
The bridle is a crucial component that allows you to control your kite. It's usually made from a piece of string attached to various points of your kite and is tied to the flying line. Here’s how to attach it:
- Cut a length of string (a few feet long should do). You’ll need to tie it to the frame at two points that are opposite to each other, forming a small triangle with the tail.
- Secure the middle of the string to the spine of your kite, ensuring it’s taut.
- Test the tension: The bridle should be tight enough to hold its shape but not so tight that it distorts the kite’s frame.
Prepare for Launch:
Now that everything is in order, grab your flying line and head to an open area, preferably where there is plenty of space and minimal obstacles. To launch:
- Choose a day with light to moderate wind; too strong winds can damage your kite.
- Hold the kite against the wind at an angle.
- Start to let out the line while slowly releasing the kite. You can also have a friend help hold the kite while you walk backward to gain altitude.
And voilà! You’ve finalized your kite and are ready to see it take to the skies. Remember to enjoy the process and don’t get discouraged if it takes a few tries to get it just right. Happy flying!
Also Read This: How to Create a Gmail Account Without a Phone Number: Quick Guide on Dailymotion
9. Tips for Successful Kite Flying
So you've built your kite, and you're ready to take it to the skies! But before you unleash your masterpiece into the wind, here are some insider tips to ensure you have a successful and enjoyable kite-flying experience:
- Pick the Right Day: Wind conditions are crucial for successful kite flying. A moderately breezy day (around 10-20 mph) is ideal. Avoid flying on days with gusty winds or during thunderstorms.
- Choose a Suitable Location: Look for a wide-open space free from trees, power lines, and other obstacles. Parks, fields, and beaches are great spots for kite flying.
- Check Your Kite: Before launching, inspect your kite to ensure everything is intact. Check for tears, tight knots, and that the frame is secure. A little pre-flight check can save you from a tangled mess in the air!
- Understand Wind Direction: Watch how the wind moves through the grass and trees. Face the kite into the wind before you launch. If possible, have a helper hold the kite while you take a few steps back.
- Practice the Launch: Start with the wind at your back and let out some line. Hold the kite at the tail and let it catch the breeze. A gentle toss upward can help it soar into the sky.
- Find the Right Tension: While flying, keep a steady tension on your line. Too much slack and your kite will dive; too tight and it could snap. Play with the tension to find what works best for your kite.
- Learn to Control It: Adjust the angle of your line to help maneuver your kite. Pull the line to ascend, and let it out to descend. Practice makes perfect!
- Have Fun with Tricks: Once you’re comfortable flying, try some fun tricks! Loops, dives, and rolling are great ways to show off your kite skills.
Remember, even the most experienced kite flyers have bad days occasionally. If your kite crashes or behaves unexpectedly, stay calm and enjoy the learning experience. With each flight, you’ll get better at understanding how to control your kite and adapt to conditions!
10. Conclusion: Enjoy Your DIY Kite Adventure
Congratulations on not only building your kite but also on gearing up for some fantastic outdoor fun! Making a DIY kite can be a rewarding project filled with creativity, patience, and a little bit of science.
Embrace the joy of getting your kite in the air, feeling the wind tugging at the line, and watching it dance across the sky. It's a simple pleasure that can bring joy not just to you, but also to friends and family who may join you in this delightful endeavor.
As a quick recap:
- Build your kite with care—crafting it with love ensures it will fly well!
- Choose the right conditions and location to maximize your flying experience.
- Practice makes perfect; don't be discouraged by setbacks or crashes!
- Soar high, explore the skies, and let your creativity take flight!
Your DIY kite flying adventures are just beginning. Share your experiences, and inspire others to join in on the fun! Whether you’re young or just young at heart, the skies are waiting for you. Happy flying!
 admin
admin


