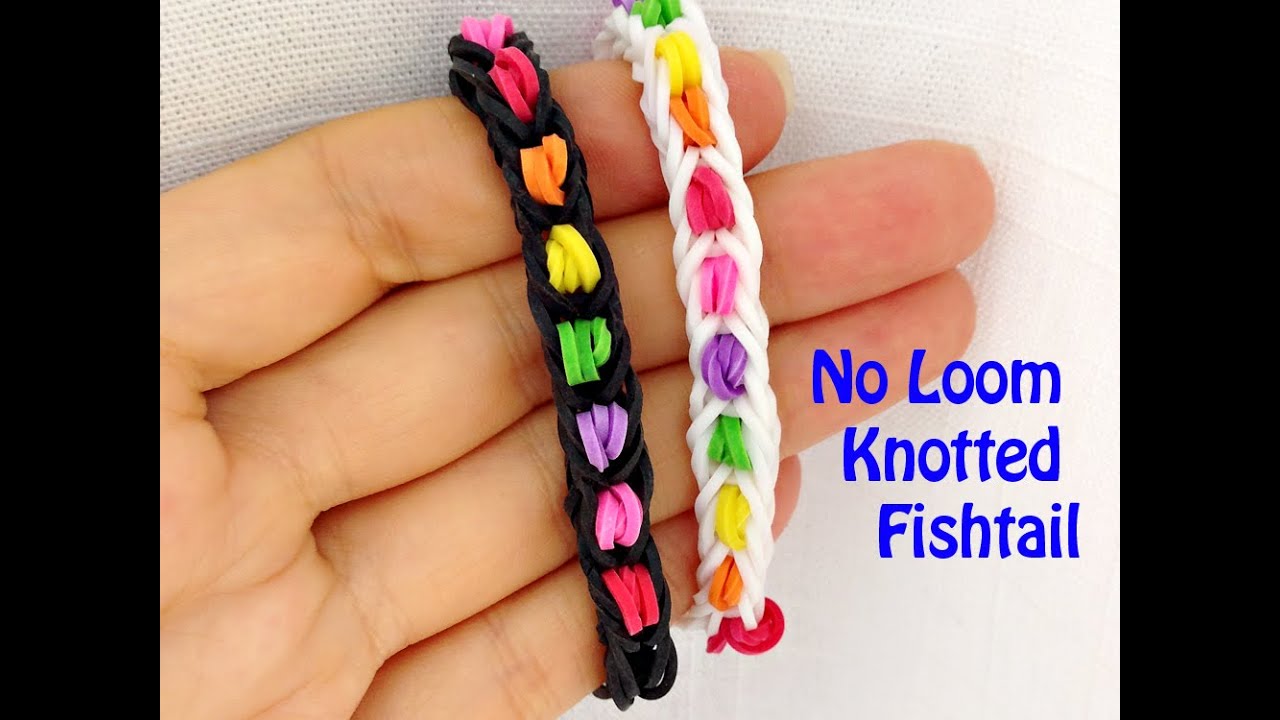
Hey there! If you’re looking to get crafty and make something fun, then you’ve stumbled upon the right place. Fishtail loom bands are not just a cool accessory; they’re a fantastic way to express your creativity! These colorful bracelets are made using a simple weaving technique that even kids can master. Whether you want to make them for yourself, as gifts, or to trade with friends, making fishtail loom bands is a delightful activity that can bring a smile to anyone's face. Let’s dive into what you’ll need to get started!
Materials Needed for Fishtail Loom Bands
Before you start creating your fishtail loom band, you'll want to gather all the essential materials. Having everything ready will make the process smoother and more enjoyable. Here’s a handy list of what you’ll need:
- Loom Band Kit: Most kits come with a loom and a variety of rubber bands in different colors.
- Loom: You can use a traditional loom board or just your fingers if you prefer a more hands-on approach!
- Hook Tool: This is a small tool that helps pull and position the bands. It’s super helpful for crafting your design!
- Rubber Bands: You'll need plenty of these. Choose vibrant colors to make your fishtail loom band pop!
- Clip or S-Clips: These are used to secure the ends of your band once it's finished.
- Scissors (optional): If you want to trim any excess bands or tidy up your design.
Now that you know what materials you need, it’s time to get excited! You can find these supplies in craft stores, online, or even in your own home. Consider getting a variety of colors to create patterns or even themed bracelets for holidays! The fun part is mixing and matching to see what unique designs you can come up with. Ready to start weaving? Let’s move on to the next steps!
Also Read This: How to Sign Up for Dailymotion Quick Registration Steps
3. Setting Up Your Loom for Fishtail Band Creation
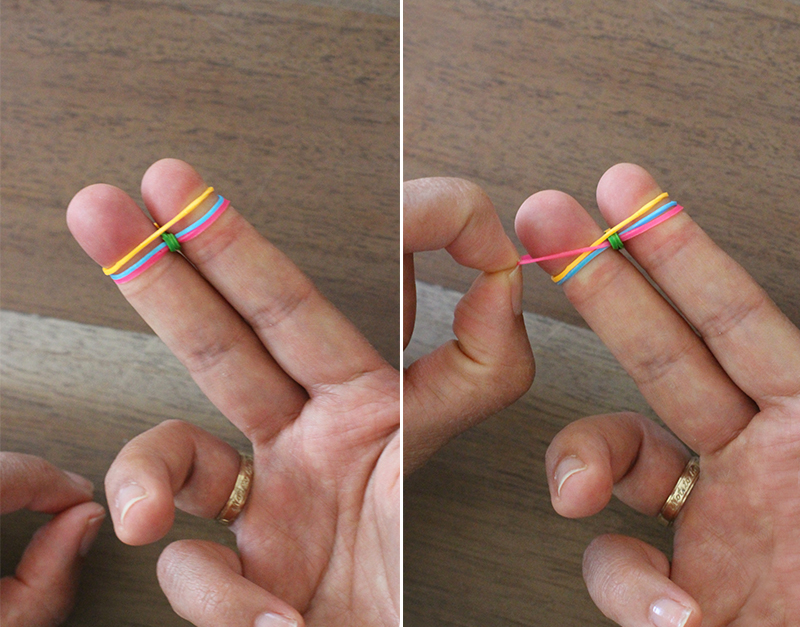
Alright, let’s get your loom ready! This part is super important because it sets the foundation for your fishtail band. Grab your loom and a few supplies. You will need:
- Your loom (with pins in a straight line)
- Some colorful rubber bands
- A hook (preferably the one that came with your loom)
- A clip for finishing touches
First, position your loom. You want to make sure it’s facing you with the open end of the pins pointing away. This is where the magic happens!
Next, you need to set the pins. For a fishtail band, the loom should be set up in a staggered position. This means your pins should alternate between being closer together and spaced out. Think of it as a zigzag pattern! This setup is crucial for creating that signature fishtail look.
Now, let’s get started with the actual band setup:
- Place your first rubber band: Start by taking your first rubber band and stretching it from the first pin on the left to the second pin on the right. This creates your base layer.
- Add more bands: Continue adding bands, always crossing from left to right, and then right to left. You can use two colors to create a fun pattern!
- Check the tension: Make sure your bands aren’t too tight; they should have a little give. You don’t want them to snap while you’re working!
Once you have a good number of bands on the loom (around 5-7 layers), you’re all set to start weaving. Take a moment to admire your colorful setup—this is where the fun begins!
Also Read This: How to Watch Sensitive Content on Dailymotion Safely
4. Step-by-Step Instructions for Making a Fishtail Loom Band
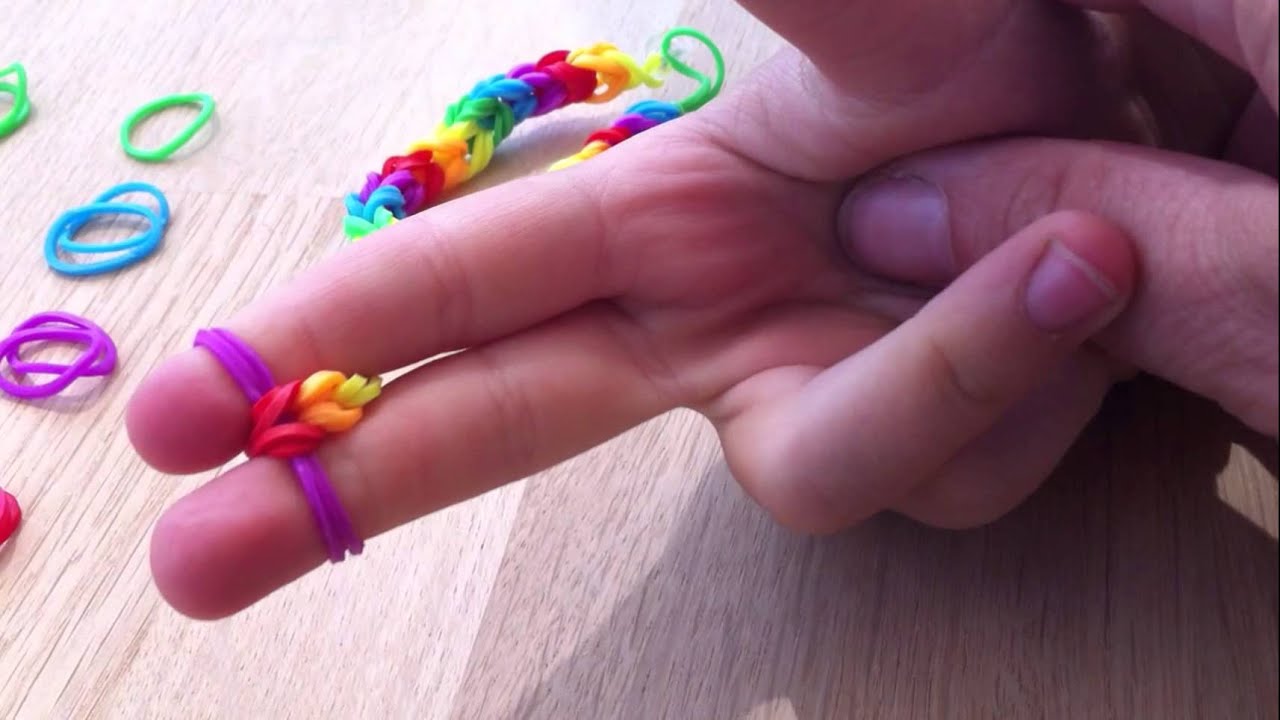
Now that your loom is ready, let’s dive into the step-by-step process of creating your fishtail loom band. Get your hook ready; you’re going to need it!
- Pick up the first band: Using your hook, grab the bottom rubber band on the first pin (the one closest to the base). This is where your fishtail starts!
- Bring it around: Pull that bottom band over the pin and onto the next pin in the direction of the fishtail (left to right, if you started from the left). This is the first step in connecting the bands.
- Repeat: Move to the next pin and grab the bottom band again. Pull it over the pin and to the next one. Keep doing this until you reach the end of your loom.
As you work, you’ll notice a beautiful fishtail pattern starting to form! Don’t rush; take your time to ensure each band is securely placed. If you see any bands twisted, gently untwist them to keep everything neat.
Once you’ve reached the last pin, it’s time to finish your fishtail band:
- Secure the end: Take the last band on the final pin and pull it over to the side, just like you did before. This will keep your design intact.
- Attach the clip: Use your clip to secure the end of your band. You’ll want to make sure everything is snug so your creation doesn’t unravel.
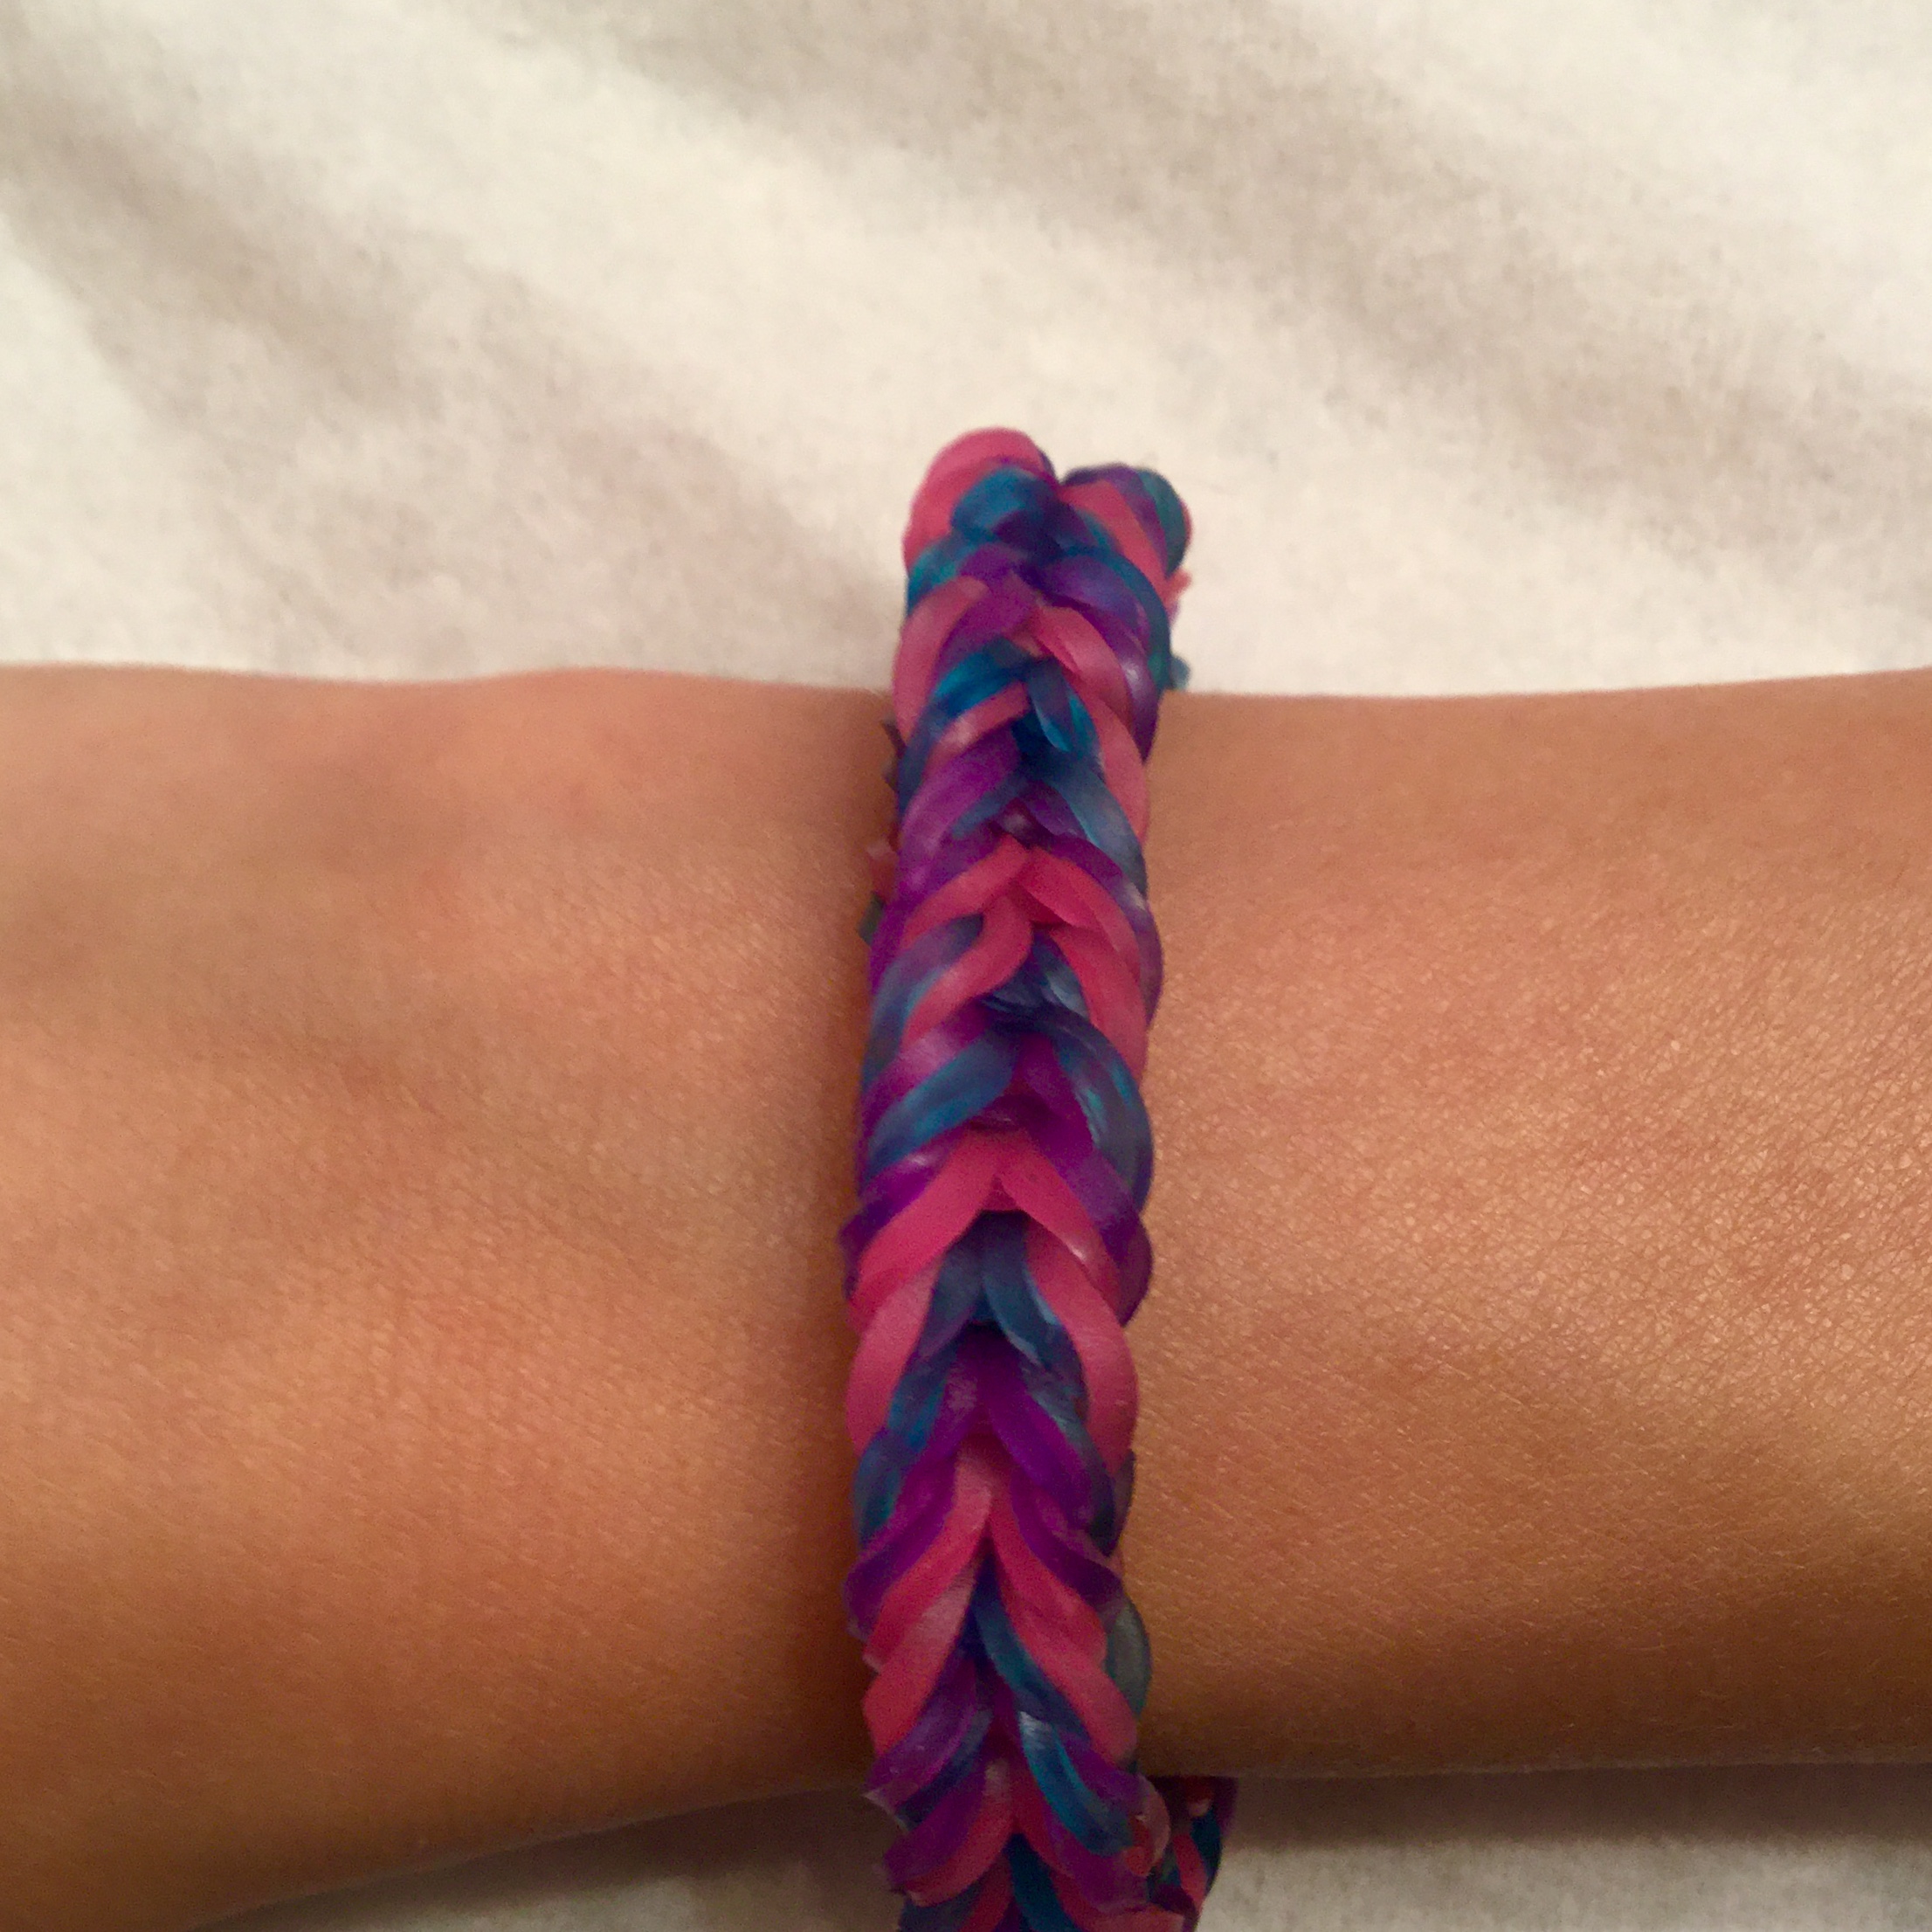
Voilà! You’ve made your fishtail loom band! Take a moment to appreciate your handiwork. You can wear it or even gift it to a friend. With a bit of practice, you’ll be making these in no time!
Also Read This: Understanding Security Concerns of Dailymotion’s Non-HTTPS Status
5. Common Mistakes to Avoid When Making Fishtail Loom Bands
Making fishtail loom bands can be a fun and rewarding activity, but it's easy to trip up! Here are some common mistakes you might encounter, along with tips to avoid them:
- Using Too Many or Too Few Bands: One mistake is not using the right number of bands. If you use too few, your fishtail might be too loose, while too many could make it overly tight. Aim for an even number of bands to keep your design consistent.
- Incorrect Tension: Maintaining even tension on each band is crucial. If some bands are too tight and others too loose, your finished product may warp. Practice applying consistent pressure as you weave!
- Skipping Steps: It can be easy to get carried away and skip steps, especially when you're excited about your design. Always take your time and make sure you follow each step closely. If you miss a step, you might have to backtrack, which is no fun.
- Wrong Color Order: Color patterns can make or break your design. If you’re aiming for a specific look, plan your colors in advance. A quick sketch or a simple color guide can help keep you on track!
- Not Securing the Ends: If you neglect to secure the ends properly, your loom band can unravel. Always double-check your closure and consider using a clip or an additional band to keep everything snug.
By being aware of these common pitfalls, you can ensure that your fishtail loom band turns out beautifully every time. Happy crafting!
Also Read This: How to Make Donuts Recipe in Urdu: Step-by-Step Guide on Dailymotion
6. Creative Variations of the Fishtail Loom Band
Once you've mastered the classic fishtail loom band, the creative possibilities are endless! Here are some fun variations to try out:
- Double Fishtail: This variation adds more depth to the design. Instead of weaving one band at a time, you use two bands, creating a thicker and more intricate look. It's perfect for making bold statements!
- Rainbow Fishtail: Who doesn’t love a splash of color? Use a variety of colored bands to create a vibrant rainbow effect. Alternate colors in a pattern or go wild and let them mix randomly for a playful design.
- Beaded Fishtail: Add some bling to your creation! Incorporate beads into your fishtail loom band for a unique texture and shine. Just slide a bead onto the band before you start weaving, and it’ll create a stunning effect.
- Glow-in-the-Dark Fishtail: For a fun twist, use glow-in-the-dark bands. These are great for night-time adventures or just to add a cool factor to your accessories.
- Chunky Fishtail: Want something bold? Use larger bands or multiple strands of bands to create a chunky fishtail loom band. This style is eye-catching and can serve as a statement piece!
Experimenting with these variations can lead to new designs and styles that showcase your creativity. Don’t be afraid to mix and match techniques—you might just invent the next big trend in loom bands!
Also Read This: How Coca-Cola Is Produced – A Dailymotion Documentary Overview
7. How to Care for and Store Your Loom Bands
So, you've crafted some amazing loom bands and want to make sure they last as long as possible. Caring for your loom bands is just as important as making them! Here are some simple tips to keep your creations looking vibrant and fresh:
- Keep them dry: Moisture can cause loom bands to degrade or lose their elasticity. Store them in a cool, dry place away from direct sunlight.
- Avoid extreme temperatures: Heat can cause your bands to melt or warp. Make sure your storage area is not too hot or cold.
- Use airtight containers: To prevent dust and dirt from settling on your bands, consider using airtight containers. This will also keep them organized!
- Separate colors: If you have multiple colors, store them separately to avoid mixing. You can use small bags or compartments within your container.
- Check for wear: Regularly inspect your bands for signs of wear and tear. If you notice any bands that are stretched out or losing color, consider recycling them into new projects!
By following these simple guidelines, your loom bands will remain in excellent shape, ready for you to show off or use in your next crafting adventure!
8. Conclusion and Encouragement to Explore More Loom Band Designs
Congratulations on mastering the art of making fishtail loom bands! This journey has not only been a fun creative outlet but also a wonderful way to express yourself. As you wrap up this guide, remember that the world of loom band designs is vast and full of possibilities.
Don't stop with just the fishtail! Here are a few suggestions to keep your creativity flowing:
- Rainbow Loom Patterns: Dive into intricate patterns like the Dragon Scale or Starburst to challenge yourself.
- Accessorize: Use your bands to create unique accessories like bracelets, necklaces, and even charms!
- Collaborate: Invite friends to join in on the fun! Crafting together can lead to new ideas and bonding over a shared hobby.
- Online Tutorials: YouTube is a treasure trove of loom band tutorials. Find inspiration from other crafters and try their designs!
Remember, the key to enjoying loom band crafting is to experiment and have fun. Don’t be afraid to put your own spin on designs or even create something entirely new. Each band you make is a step towards developing your unique style. Happy looming!
 admin
admin


