Creating a bootable USB drive is a useful skill, especially when you're looking to install an operating system or run software directly from the USB. A bootable USB allows you to start your computer from the USB device, bypassing the need to use an existing operating system. This process is often required for installing new operating systems like Windows, Linux, or even running system repair tools. The key to making a bootable USB is using an ISO image, which is a file containing the full data of an operating system or application. In this guide, we'll walk you through everything you need to know about creating a bootable USB with an ISO image.
What You Need to Make a Bootable USB
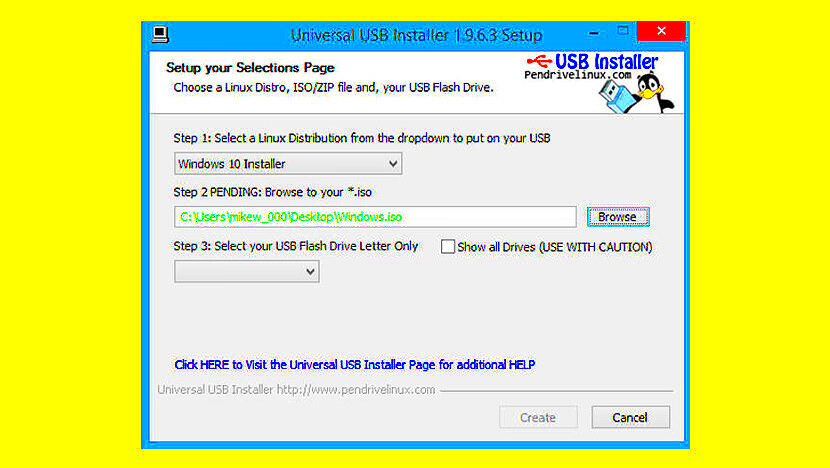
Before you start the process, it's important to gather a few essential items. Having everything ready will make the task easier and faster. Here's what you need:
- USB Drive: A USB drive with at least 8 GB of free space. Make sure it’s empty or that you have backed up any important data, as the process will erase everything on it.
- ISO File: The ISO image of the operating system or software you want to install. This file contains all the necessary data for creating the bootable USB.
- Computer: A working computer with an internet connection to download the required software and ISO file.
- Software Tool: A tool like Rufus, Etcher, or the built-in Disk Utility on macOS will help transfer the ISO to the USB drive. Choose the one you're most comfortable with.
Once you have these items, you're ready to start the process of creating your bootable USB. It's best to ensure your USB drive is formatted properly and that your computer is ready to boot from external devices.
Also Read This: How to Make Crepe Paper Flowers Easy Crafting Ideas on Dailymotion
Step by Step Guide to Create a Bootable USB
Creating a bootable USB is a straightforward process, but it’s important to follow each step carefully. Here’s a simple, step-by-step guide to help you:
- Format Your USB Drive: Start by inserting your USB drive into your computer. Open your computer’s file explorer or disk management tool and format the USB drive. This is important to ensure there are no errors when copying the ISO file to the USB.
- Download the ISO File: Next, you’ll need to download the ISO image for the operating system or software you want to install. You can find these files on official websites. Make sure the file you download is compatible with your computer.
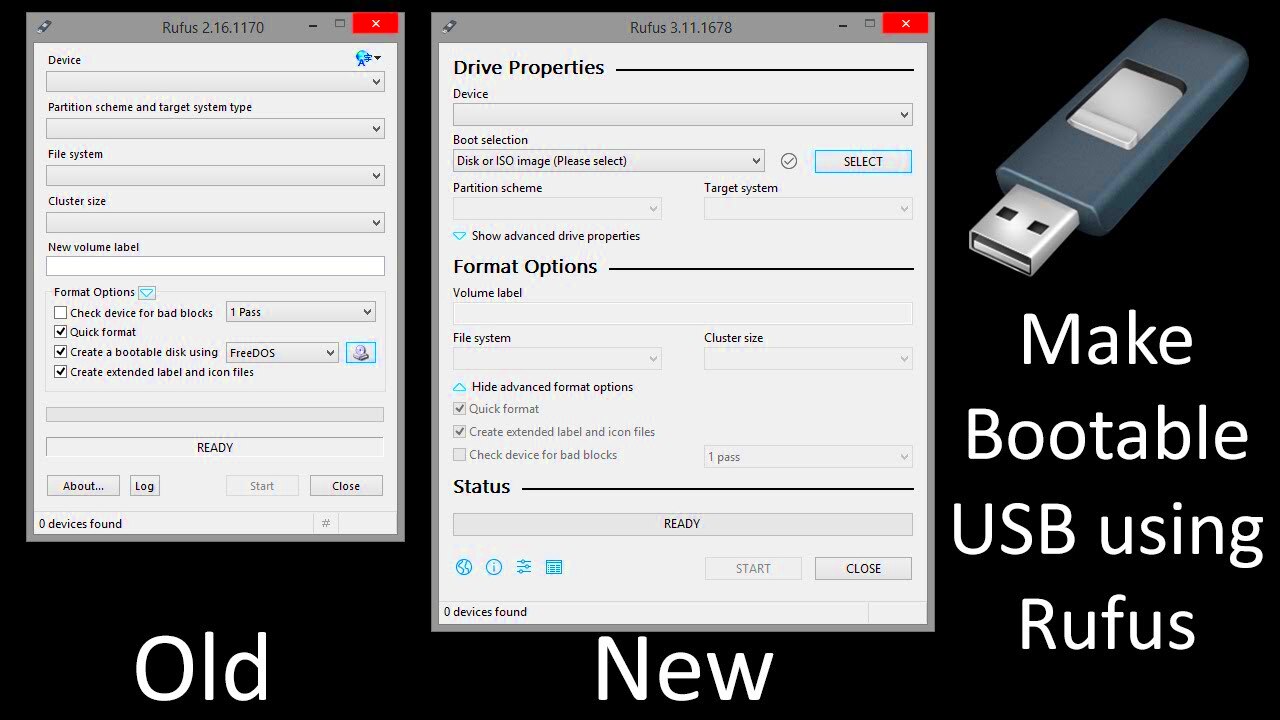
- Choose a Software Tool: There are several tools available to help you create a bootable USB. For Windows, we recommend using Rufus, which is simple to use and effective. For macOS, you can use Disk Utility or Etcher. Download and install the software on your computer.
- Select the ISO File and USB Drive: Open your chosen software and select the ISO file you downloaded. Also, make sure to choose your USB drive as the destination where the ISO will be copied.
- Start the Process: Once everything is set, click the "Start" or "Create" button in the software. The process may take several minutes, depending on the size of the ISO and the speed of your USB drive.
- Check for Errors: After the process is complete, safely eject your USB drive and test it by rebooting your computer. Enter the boot menu (usually by pressing a key like F12 during startup) and select the USB drive. If the bootable USB works, you’re ready to install the operating system or use the software.
By following these steps, you’ll have a fully functional bootable USB ready for installation or other tasks. It’s a simple process once you get the hang of it, and it can save you time when setting up a new system or running recovery tools.
Also Read This: How to Open a JPEG Image on an iPhone for Easy Viewing
How to Choose the Right ISO File for Bootable USB
Choosing the correct ISO file is crucial when creating a bootable USB, as the wrong file can lead to installation issues or even data loss. The ISO file contains the entire setup for an operating system, such as Windows, Linux, or even utility tools. Here's how to choose the right ISO for your needs:
- Version Compatibility: Make sure the ISO file you choose is compatible with your computer’s hardware and your desired operating system. For example, if you're installing Windows, check whether you need a 32-bit or 64-bit version.
- Official Sources: Always download ISO files from official websites to ensure you’re getting a legitimate and unaltered version. For Windows, you can get ISO files from the Microsoft website. For Linux, sites like Ubuntu or Fedora offer ISO downloads.
- Correct Architecture: Confirm that the ISO matches your system architecture (32-bit or 64-bit). If you're unsure, most modern systems use 64-bit, but it’s always good to double-check.
- Purpose: If you're using the bootable USB for system repair, make sure the ISO file is for recovery tools or a live system. For installing a new operating system, download the installation ISO for the OS you want to install.
By carefully choosing the right ISO file, you can ensure a smooth installation or troubleshooting process. It’s always best to read the instructions on the official site to understand which version suits your system's needs.
Also Read This: How to Wrap Text Around an Image in Canva
Formatting the USB Drive Before Creating the Bootable USB
Formatting your USB drive is an important step in creating a bootable USB. It prepares the USB for receiving the ISO image, ensuring that it’s clean and ready to function correctly. Here’s how to format your USB drive properly:
- Back Up Your Data: Formatting will erase all data on the USB drive. Be sure to back up any important files before you begin.
- Insert the USB Drive: Plug the USB drive into your computer. It should appear in your file explorer or disk management tool.
- Open Disk Management (Windows): On Windows, you can use Disk Management to format the drive. Right-click on the start menu, select 'Disk Management', and locate your USB drive. Right-click on it and select 'Format'.
- Choose the Right File System: For a bootable USB, select the NTFS (for Windows OS) or FAT32 (for most Linux distributions). FAT32 is the more universal file system, but NTFS is suitable for larger Windows ISO files.
- Quick Format: Select the ‘Quick Format’ option. This option is faster and still effectively prepares your drive for bootable use.
- Label the Drive: You can give the drive a name (e.g., “Bootable USB”), but this step is optional.
- Click Format: Once everything is set, click 'OK' or 'Format' to begin the process. When finished, the drive will be ready for the next steps.
After formatting, your USB drive will be clean, and you can move on to transferring the ISO file onto it. Make sure the USB drive is large enough to hold the ISO file—typically, 8 GB or more is required.
Also Read This: Boost Your Dailymotion Views for Greater Exposure
Using Software Tools to Create the Bootable USB
Using the right software tool is a key part of the bootable USB creation process. These tools transfer the ISO image onto the USB drive, making it bootable. There are several popular options to choose from, depending on your operating system. Here's how to use some of the best-known tools:
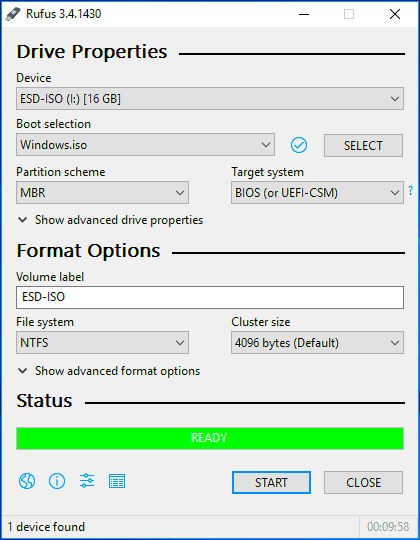
- Rufus (Windows): Rufus is a lightweight and user-friendly tool for creating bootable USB drives. It supports a wide range of operating systems and is often used for Windows installations. Here’s how to use it:
- Download and launch Rufus from the official website.
- Insert your USB drive and select it in the "Device" dropdown.
- Click "Select" and choose the ISO file you want to use.
- Leave the default settings as is, unless you need to adjust the partition scheme or file system.
- Click "Start" to begin the process. Rufus will format the drive and copy the ISO file.
- Etcher (Windows/macOS/Linux): Etcher is another popular tool known for its simplicity. Here’s how to use it:
- Download Etcher from the official website.
- Open the application and click "Flash from file" to select your ISO.
- Choose your USB drive and click "Flash!" to start the process.
- Disk Utility (macOS): macOS users can use Disk Utility to create a bootable USB. Follow these steps:
- Open Disk Utility and select your USB drive from the list.
- Click "Erase" to format the drive (choose Mac OS Extended (Journaled) as the file format).
- Once formatted, use the Terminal to copy the ISO onto the drive using the 'dd' command.
These tools make the process easy and fast. After the software has completed transferring the ISO file to the USB drive, you can safely eject the USB drive. It’s now ready to be used as a bootable device.
Also Read This: Best Techniques to Wrap Text Around an Image in Canva
Testing Your Bootable USB Drive
After creating your bootable USB drive, it’s crucial to test it to ensure it works correctly. Testing helps confirm that the USB is ready for installation or troubleshooting without any issues. Here’s how to test your bootable USB drive:
- Insert the USB Drive: Plug the bootable USB into the USB port of your computer. Make sure it’s securely connected.
- Restart Your Computer: Power off your computer and then power it back on. Immediately press the key (such as F12, ESC, or F2) to access the boot menu. The key to open the boot menu depends on your computer’s manufacturer.
- Select the USB Drive: Once in the boot menu, select the USB drive from the list of bootable devices. It might appear as the brand name of the drive or something like "USB HDD" or "Removable Disk."
- Check for Boot: If your computer boots up from the USB drive, you should see the installation screen or system recovery options, depending on what the ISO file is designed for. If the system doesn’t boot, it could mean there was an issue during the creation process.
If the USB doesn’t boot, don’t worry—there are several steps you can take to troubleshoot. In most cases, the issue is due to either incorrect settings in the BIOS, a corrupt ISO file, or an improperly formatted USB drive.
Once you confirm the USB works, you’re ready to install your operating system or run recovery tools. Always make sure to back up important data before starting any installation process.
Also Read This: DIY Nail Art Techniques at Home with Dailymotion Video Guides
Troubleshooting Common Issues with Bootable USB Creation
Creating a bootable USB is usually straightforward, but sometimes problems can arise. If you encounter issues during the process, here are some common problems and how to resolve them:
- USB Drive Not Detected: If your USB drive isn’t showing up as a boot option, check the following:
- Ensure the USB drive is properly connected.
- Try using a different USB port, preferably one directly on your computer (avoid USB hubs).
- Verify that the USB drive is correctly formatted and contains the ISO file.
- Bootable USB Not Starting: If the USB doesn’t boot up, try these solutions:
- Check the boot order in the BIOS and make sure the USB drive is set as the first boot device.
- Re-create the bootable USB using a different tool or a different ISO file, in case the current one is corrupted.
- Error During Installation: Sometimes, you might see errors while trying to install from the USB. To fix this:
- Reformat the USB drive and try again.
- Check that the ISO file is not corrupted by downloading it from an official source again.
- USB Drive Is Too Small: If the ISO file is too large for the USB drive, use a drive with more storage (at least 8 GB, preferably 16 GB or more).
- Invalid ISO Image: Sometimes, an incorrectly downloaded ISO file may be the problem. Re-download the ISO from the official website to ensure you have the correct file.
By identifying and addressing these common issues, you can quickly fix the problem and successfully create your bootable USB. Troubleshooting can be frustrating, but patience and attention to detail are key to resolving the issues.
Also Read This: Enhance Your YouTube Shorts with Creative Effects
FAQ
Here are answers to some frequently asked questions about creating a bootable USB:
- What is an ISO file? An ISO file is a disk image that contains an exact copy of the content of a CD, DVD, or operating system. It’s used to create bootable media, like a USB drive.
- Can I use any USB drive to make a bootable USB? You can use most USB drives, but it’s recommended to use a USB drive with at least 8 GB of storage for large ISO files. Make sure the USB drive is not damaged.
- How long does it take to create a bootable USB? The process typically takes between 10-30 minutes, depending on the speed of your USB drive and the size of the ISO file.
- Can I make a bootable USB on a Mac? Yes, you can create a bootable USB on a Mac using tools like Disk Utility or third-party applications like Etcher.
- Why is my USB drive not booting? There could be several reasons, such as an incorrect boot order in BIOS, a corrupted ISO file, or a problem with the USB formatting. Ensure the ISO is correctly transferred and that the USB is set as the first boot device in BIOS.
- Can I create a bootable USB for Linux? Yes, you can create a bootable USB for Linux using the same methods as for Windows. Tools like Rufus and Etcher work for both operating systems.
- Do I need to format the USB drive before making it bootable? Yes, formatting the USB drive ensures it’s clean and free from any data that could interfere with the bootable image transfer process.
If you have more questions or run into issues, feel free to consult the official support pages of the tools you’re using or look up additional troubleshooting steps. Creating a bootable USB can be easy once you get the hang of it!
Conclusion
Creating a bootable USB drive is a useful and straightforward process, whether you're looking to install an operating system, run recovery tools, or troubleshoot a system. By following the proper steps—selecting the right ISO file, formatting your USB drive, and using the correct software tools—you can quickly turn a regular USB into a bootable device. Always ensure you test your bootable USB drive to confirm it works as expected. If you encounter issues, troubleshooting is typically simple with a few adjustments in settings or software. Once you have successfully created your bootable USB, it will be ready to use whenever you need it, making it an invaluable tool for system installations, repairs, and more. By keeping these tips in mind, you can confidently create bootable USB drives and avoid common pitfalls during the process.
 admin
admin


