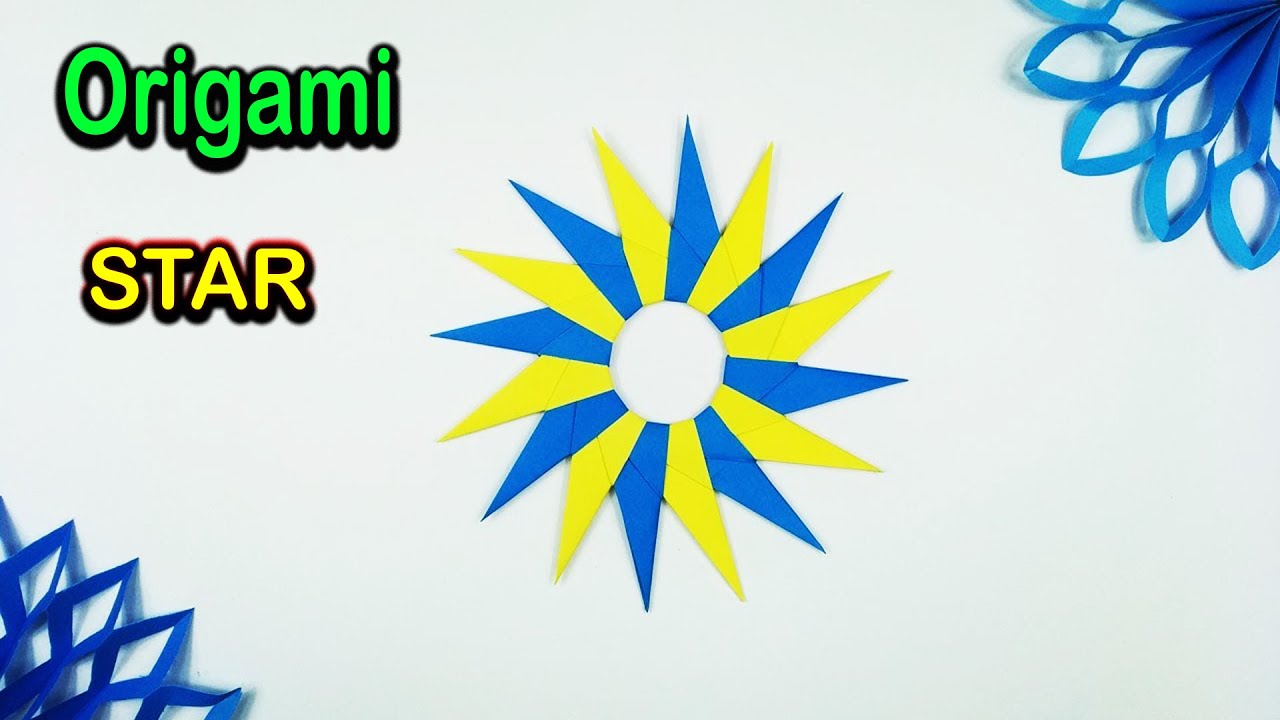
Ninja stars, or shurikens, are fascinating weapons that have captured the imagination of many. These iconic tools, often associated with ninjas in popular culture, are not just for throwing; they represent a blend of art and precision. Crafting a 16-pointed ninja star can be a rewarding project that combines creativity and skill. Whether you're looking to impress friends or simply enjoy a unique craft, this guide will walk you through the process step by step. Let's dive into the world of ninja stars!
Materials Needed for Crafting a 16-Pointed Ninja Star
Before we get our hands dirty, let’s gather all the materials you’ll need to create your very own 16-pointed ninja star. Having everything on hand will make the crafting process smoother and more enjoyable.
- Cardstock or Lightweight Plastic: This will serve as the main body of your ninja star. Cardstock is easy to cut and gives a good balance of weight and durability.
- Scissors or a Craft Knife: For precise cutting, especially around the intricate points of the star.
- Ruler: To measure and ensure that all your points are symmetrical.
- Pencil: For marking out your design before cutting. A mechanical pencil can give you finer lines.
- Protractor: This helps in measuring angles accurately, ensuring the points are evenly distributed.
- Glue or Tape: Depending on your preferred method of assembly, you’ll need either strong adhesive or tape to hold the pieces together.
- Decorative Materials (Optional): If you want to add a personal touch, consider markers, stickers, or washi tape to decorate your ninja star.
Once you have everything ready, you’ll be set to embark on an exciting crafting adventure. Remember, take your time with each step, and don’t hesitate to make adjustments as needed. Crafting is all about expressing yourself, so have fun with it!
Also Read This: The Best Approach to Download and Save Content Legally on Dailymotion
3. Step 1: Preparing Your Materials

Before we dive into the exciting world of crafting a 16-pointed ninja star, let’s make sure you have everything you need. The right materials will set the foundation for a perfect throw! Here's what you'll need:
- Origami Paper: Choose a square piece of origami paper. The standard size is 15x15 cm, but you can go bigger if you want a larger ninja star.
- Scissors: While traditional origami doesn’t require cutting, having scissors handy can help if you want to trim your paper to the perfect size.
- Bone Folder or Ruler: This will help you create crisp folds. If you don’t have a bone folder, the edge of a ruler will work just fine!
- Flat Surface: Ensure you have a clean, flat workspace to avoid distractions and keep everything organized.
- Pencil (Optional): If you want to mark your folds lightly before committing, a pencil can be useful.
Once you have your materials ready, take a moment to choose your paper color or pattern. Bright colors can make your ninja star look striking, while a traditional black or dark blue might give it that classic stealthy vibe. Remember, the choice is yours! Now that you’ve gathered everything, it’s time to move on to the folding techniques.
Also Read This: Don’t Breathe 2 Online Free on Dailymotion: How to Watch
4. Step 2: Folding Techniques Explained
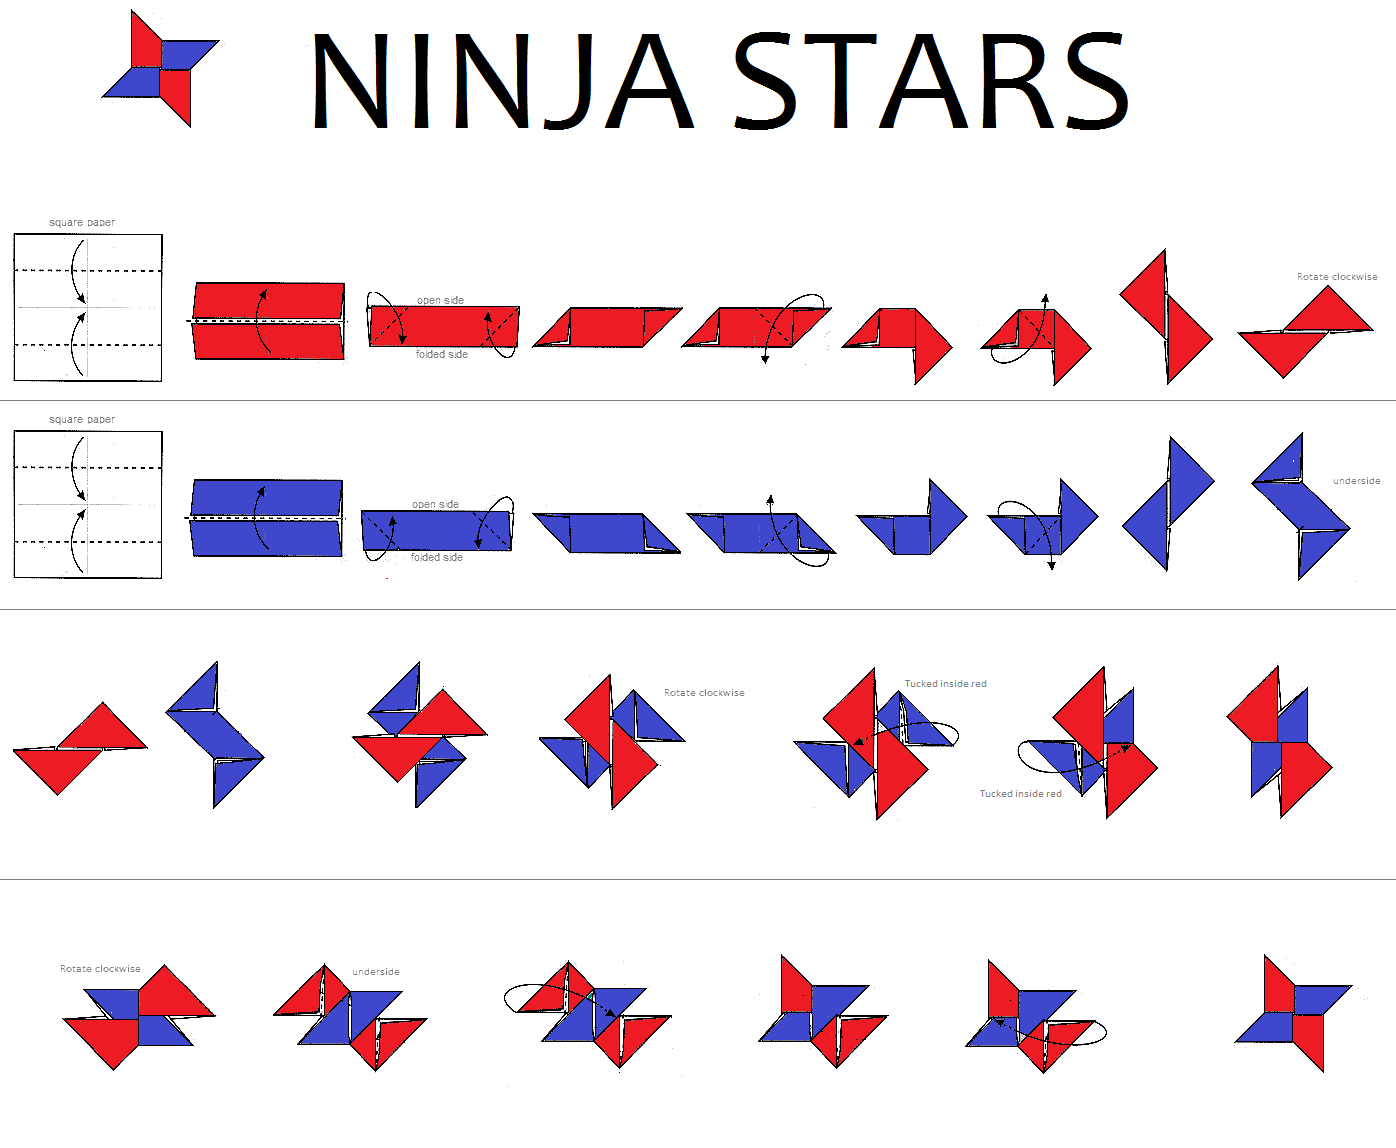
Now that your materials are prepped, let’s get into the fun part: folding! The technique for making a 16-pointed ninja star involves several precise folds, so let’s break it down step by step. Don’t worry; I’ll guide you through it!
1. Start with a Square: Place your origami paper with a colored side facing down. If both sides are colored, either side works!
2. Diagonal Folds: Fold the paper in half diagonally, forming a triangle. Unfold it, then fold it in the opposite diagonal. You should see a crease in the shape of an “X” on your paper.
3. Horizontal and Vertical Folds: Next, fold the paper in half horizontally and then vertically, creating a plus sign shape (+). Make sure to unfold these as well—you’ll need those creases for guidance later!
4. Create the Base Triangles: With the creases in place, fold each corner of the square into the center where all the creases intersect. This should give you a smaller square with the points meeting in the middle.
5. Fold the Points: Now, take each corner of your new smaller square and fold it towards the center, forming smaller triangles. This step helps shape the star into its iconic points!
6. Layering the Points: Repeat the folding technique with another piece of origami paper. After you finish, you’ll have two sets of points. You can alternate the colors for added flair!
7. Assemble the Star: Now, take one of your folded pieces, and carefully layer the second on top, aligning them so the points interlock. You may need to adjust gently to ensure they fit snugly together.
With these folding techniques, you’re well on your way to creating a stunning 16-pointed ninja star! Remember, practice makes perfect. If your first star doesn’t turn out exactly as you envisioned, don’t be discouraged. Keep folding, and soon enough, you’ll be a ninja star crafting pro!
Also Read This: How to Shape Your Eyebrows at Home on Dailymotion
5. Step 3: Assembling the Ninja Star
Alright, ninjas, it’s time to put your pieces together! This is where your hard work starts to take shape, and you’ll see your ninja star come to life. Follow these steps carefully, and soon you’ll have a beautifully crafted 16-pointed ninja star.
First, gather all your cut pieces. You should have:
- 8 triangular pieces (these are your primary points)
- 8 smaller triangular pieces (for the inner structure)
- Strong adhesive or tape (to hold everything together)
Now, let’s get to assembling:
- Start with the Primary Points: Take one of your larger triangular pieces and lay it flat on your work surface. This will be the foundation of your ninja star.
- Add the Smaller Triangles: Take one of the smaller triangles and position it at the edge of the larger triangle, ensuring the points are aligned. Apply your adhesive generously to secure it in place.
- Repeat the Process: Continue adding the smaller triangles to each edge of the larger triangle. You’ll want to do this for all 8 of your larger triangles. Make sure they’re all uniformly attached and secure.
- Connect the Points: Once all the smaller triangles are attached to the larger ones, it’s time to start connecting these larger triangles together. Take two of the larger triangles and press their edges together so they form one point of the star. Again, use your adhesive here.
- Complete the Star: Keep adding larger triangles until all points of the ninja star are connected. You should see a beautiful 16-pointed star taking shape. Make sure everything is aligned correctly!
- Let it Dry: After everything is assembled, allow your ninja star to dry completely. This might take a few hours, depending on the adhesive you used. Be patient; good things come to those who wait!
And voila! You’ve successfully assembled your ninja star. But before you start showing it off, let’s move on to the final touches!
Also Read This: Mastering Cricket Shots with Step-by-Step Videos on Dailymotion
6. Step 4: Final Touches and Decoration
Your ninja star is nearly complete! Now it’s time to add those final touches that will make it truly unique. This step is all about personalization and creativity, so let’s dive in!
Here are some ideas to consider:
- Painting: Use acrylic paint to give your ninja star a fresh look. You can opt for classic black or go wild with vibrant colors. Consider using a stencil for patterns!
- Adding Designs: If you’re feeling artistic, grab some markers or paint pens. You can add intricate designs, symbols, or even your name to make it one-of-a-kind.
- Finishing Touches: Once your paint is dry, consider applying a clear sealant to protect your artwork. This will give your ninja star a glossy finish and help it withstand the elements.
- Making it Shine: You might want to add some glitter or metallic paint to certain areas for an extra pop. Imagine a shiny star glimmering in the light!
Don’t forget to check the edges and make sure everything is smooth. You want your ninja star to not only look good but feel good in your hands. If any edges are sharp or uneven, use some sandpaper to smooth them out.
Finally, take a step back and admire your work! You’ve gone from raw materials to a fully assembled and beautifully decorated ninja star. Whether you plan to display it, use it for practice, or gift it to a friend, you can be proud of your creation!
So, are you ready to unleash your inner ninja? Grab your star, and let the adventures begin!
Also Read This: How to Download Videos from Dailymotion on Mobile Devices
7. Tips for Successful Crafting
Creating a 16-pointed ninja star, or shuriken, can be an exciting project that combines skill and artistry. To help you achieve the best results, I’ve compiled some handy tips that will guide you through the crafting process smoothly.
1. Choose the Right Material: When it comes to crafting your ninja star, the material you select is crucial. Aluminum sheet metal is a popular choice because it's lightweight yet durable. Alternatively, you can use cardboard for a practice version. Always start with something manageable!
2. Keep Your Tools Sharp: Dull tools can lead to frustration and mistakes. Ensure that your scissors, utility knife, or cutting tools are sharp. This will help you make clean cuts and precise angles, which are essential for a well-crafted star.
3. Measure Twice, Cut Once: This old adage holds true in crafting. Before you cut your material, double-check your measurements. Accuracy is key in ensuring that each point of the star is equal, which will affect its overall balance and functionality.
4. Practice Your Folding Technique: If you're working with paper or softer materials, practice your folding technique. A consistent fold will enhance the appearance and accuracy of your star. Use a straight edge or ruler to help make your folds as precise as possible.
5. Use a Template: If you're unsure about your design, don’t hesitate to create or print a template. This will act as a guide, making it easier to achieve symmetrical points. Simply trace around it before cutting!
6. Take Your Time: Crafting a ninja star isn’t a race. Enjoy the process and don’t rush through steps. Taking your time will ensure that you enjoy the craft and that the final product meets your expectations.
7. Test Your Star: Once you've finished, it's a good idea to test your ninja star in a safe environment. Toss it at a target (like cardboard) to get a feel for how it flies. This can also help you identify any adjustments needed for better performance.
By following these tips, you’ll set yourself up for success and create a ninja star that’s not only functional but also visually impressive!
8. Safety Precautions When Handling Ninja Stars
While crafting a ninja star can be a thrilling endeavor, it’s important to prioritize safety. Here are some essential precautions to keep in mind to ensure a safe crafting experience:
- Work in a Safe Environment: Choose a well-lit and uncluttered workspace. Make sure you have enough room to move around and that any sharp tools are within reach but not in a place where they could easily cause harm.
- Wear Protective Gear: Consider wearing safety glasses to protect your eyes, especially when cutting materials. If you’re using a utility knife, wearing cut-resistant gloves can help prevent accidental injuries.
- Keep Tools Away from Children: If you’re crafting at home, make sure that all tools and materials are stored safely out of reach from children and pets. Ninja stars, even when not in use, can be dangerous.
- Be Mindful of Sharp Edges: After cutting your ninja star, be cautious of the sharp edges. Handle it carefully to avoid cuts. If you’re working with metal, file down any particularly sharp points once you’re done crafting.
- Use a Safe Practice Target: When testing your ninja star, use a target that is safe and appropriate. Avoid practicing on hard surfaces or near windows, people, or pets. A cardboard box filled with old clothes can be an excellent choice!
- Store Properly: Once you’ve completed your ninja star, store it safely in a designated container or sheath. This not only protects the star but also prevents accidental injuries.
By adhering to these safety precautions, you can enjoy the crafting process without unnecessary risks. Safety is key, so keep these tips in mind and have fun creating your 16-pointed ninja star!
 admin
admin


