When preparing images for printing, one of the most important factors to consider is the PPI (Pixels Per Inch). Understanding PPI is key to ensuring that your printed image comes out looking sharp and clear. If the PPI is too low, the image might appear pixelated, affecting its overall quality. On the other hand, a high PPI can provide stunning, detailed prints that capture every pixel. This guide will help you understand the significance of PPI in the printing process and how to optimize your images for the best print quality possible.
What is PPI and Why It Matters for Printing

PPI stands for Pixels Per Inch, which refers to the number of pixels contained within each inch of an image. It is a measure of image resolution, indicating how much detail is packed into the
When an image has a high PPI, there are more pixels in each inch, leading to sharper prints. Conversely, a low PPI means fewer pixels, which can result in blurry or pixelated prints. Understanding PPI helps ensure that your image is at the right resolution for your print size, so the details are crisp and clear.
Here’s why PPI matters for printing:
- High PPI: Produces sharp, detailed prints with vibrant colors.
- Low PPI: Can result in blurry or pixelated prints, losing detail.
- Optimal PPI: Balances quality and file size for the best print output.
Also Read This: Getting Night Shots with an AI Image Generator
How to Calculate the PPI of an Image

Calculating the PPI of an image is relatively simple. The PPI is determined by dividing the image's resolution (in pixels) by the physical dimensions of the
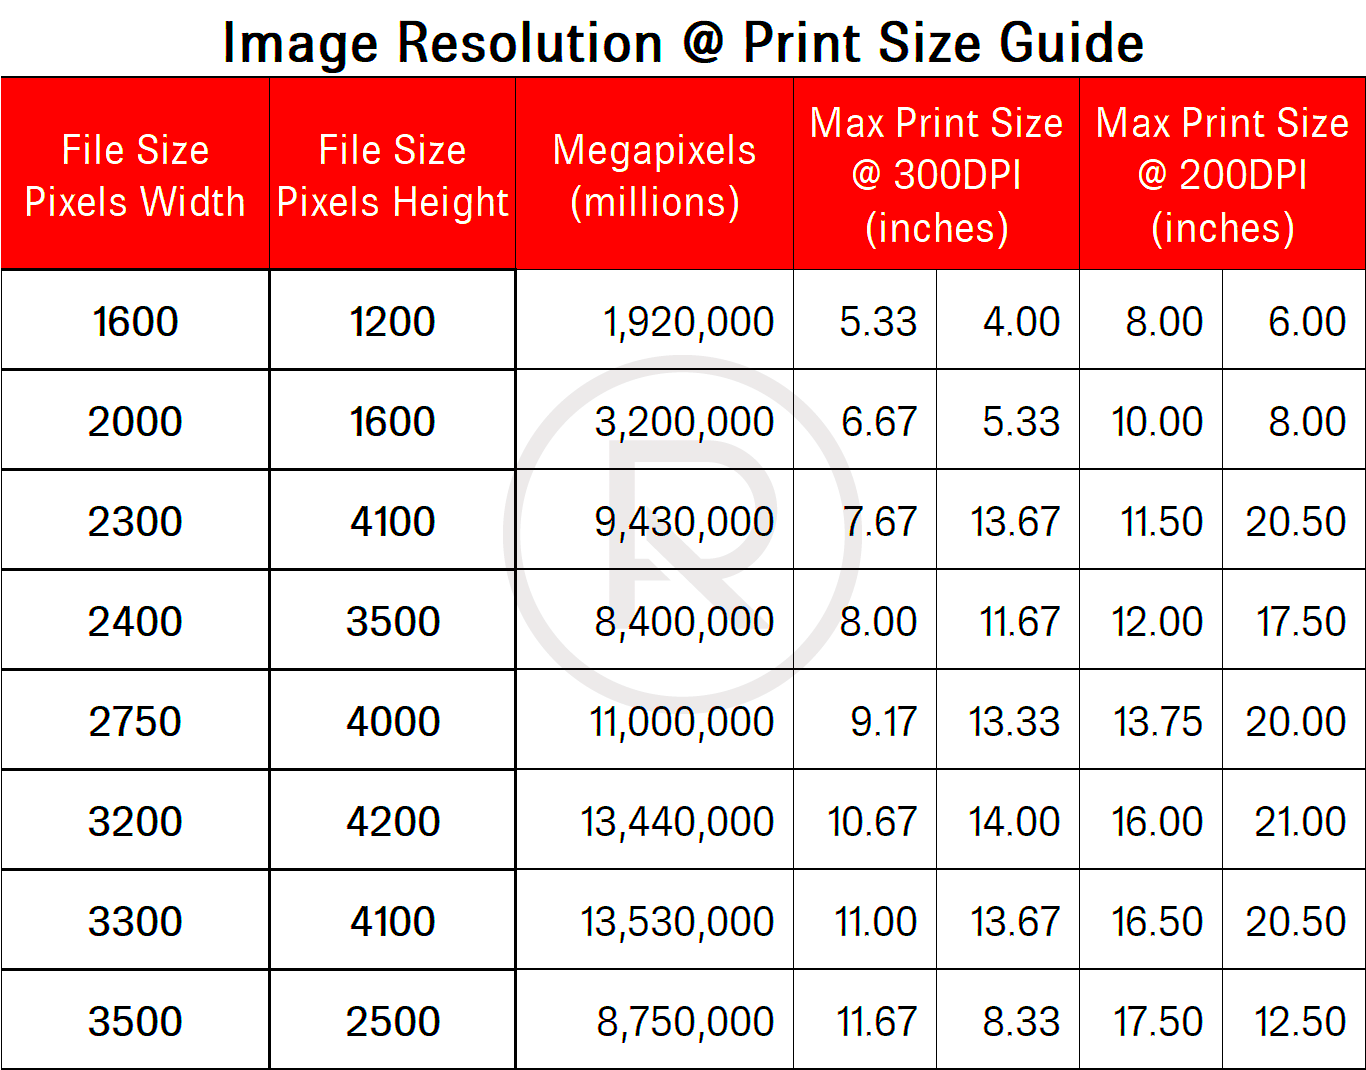
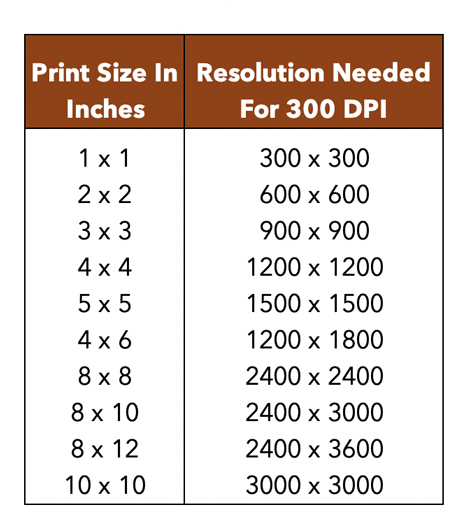
- First, check the image's resolution, which is typically provided as width and height in pixels (e.g., 3000px by 2400px).
- Next, measure or decide on the print size (in inches). For example, if you're printing an image to be 10 inches wide by 8 inches tall, the dimensions are 10" by 8".
- To calculate the PPI, divide the resolution (in pixels) by the print size (in inches). For example:
Resolution (pixels) Print Size (inches) PPI Calculation 3000px 10 inches 3000 ÷ 10 = 300 PPI 2400px 8 inches 2400 ÷ 8 = 300 PPI
In this example, the PPI of the image is 300, which is ideal for high-quality prints. Generally, for good print quality, you should aim for at least 300 PPI, especially for photos and detailed graphics.
Also Read This: Maximizing Sales on Shutterstock: Strategies for Optimizing Your Portfolio Performance
Determining the Ideal PPI for Different Print Sizes

When it comes to printing, choosing the right PPI is crucial for ensuring the best quality. The ideal PPI for an image depends on the size of the print. Larger prints can often get away with a lower PPI, while smaller prints demand a higher PPI for sharpness. Knowing how to adjust your PPI for various print sizes ensures that your images look clear and vibrant on paper, whether you're printing a poster or a business card.
Here’s a general guideline for determining the right PPI based on the print size:
- Small Prints (4” x 6” to 5” x 7”): Aim for at least 300 PPI to maintain sharp details.
- Medium Prints (8” x 10” to 11” x 14”): A PPI between 200 and 300 is ideal for good quality prints.
- Large Prints (16” x 20” and above): A PPI between 150 and 200 is usually sufficient for clear prints, though larger prints viewed from a distance can get away with lower PPI.
It’s important to note that the PPI doesn’t always need to be the same for every project. For example, a billboard or large poster that is viewed from a distance doesn’t require a high PPI, while small photographs and detailed artwork do. Always consider the viewing distance when choosing the PPI for a print.
If you’re unsure of the optimal PPI for your project, there are plenty of online calculators and guidelines that can help you determine the best settings for your specific needs.
Also Read This: Using Image Herbicide Effectively
Common Mistakes to Avoid When Working with PPI
Working with PPI can be tricky, especially if you’re new to the concept. A few common mistakes can easily result in poor print quality, such as blurry or pixelated images. Understanding and avoiding these pitfalls is essential for ensuring your prints look their best.
Here are some of the most common mistakes to watch out for when working with PPI:
- Not Checking PPI Before Printing: One of the biggest mistakes is not checking your image’s PPI before sending it to print. Always check the PPI to make sure it’s high enough for the desired print size.
- Using Low-Resolution Images: Low-resolution images might look fine on screen but can appear pixelated when printed. Always start with the highest resolution image possible.
- Scaling Images Without Adjusting PPI: If you increase the size of an image without adjusting the PPI, you risk reducing the image quality. Always adjust both the resolution and PPI to maintain clarity.
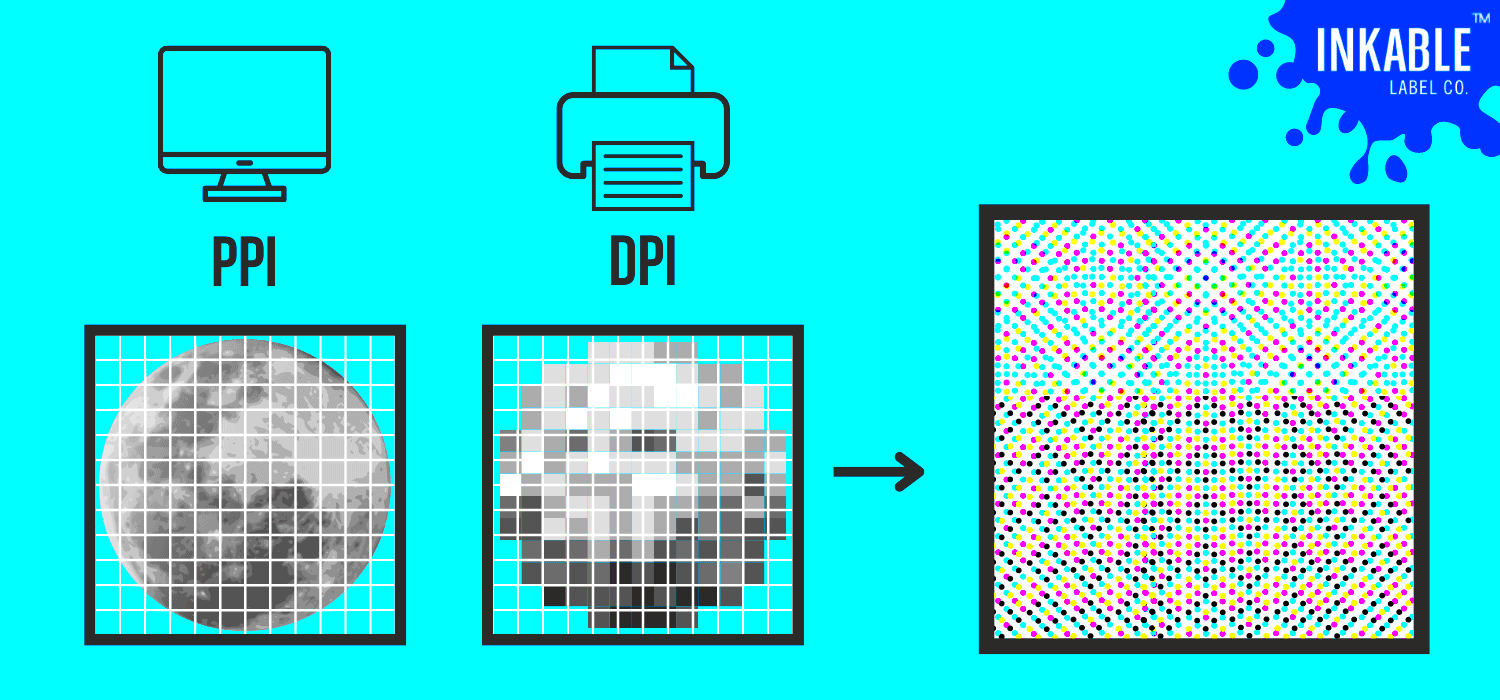
- Confusing PPI with DPI: PPI refers to the resolution of the image, while DPI (dots per inch) refers to the printer’s resolution. Don’t confuse the two, as they affect print quality in different ways.
Avoiding these common mistakes will help you produce high-quality prints every time. By carefully checking your image resolution and adjusting the PPI according to your print size, you can ensure that your prints come out sharp and clear, no matter the project.
Also Read This: Mastering Storyblocks for Your Creative Projects
Tools to Help You Check Image PPI
Fortunately, checking the PPI of your images doesn’t have to be a complicated process. There are several tools and software available that can help you easily calculate and verify the PPI of your images, ensuring they’re ready for high-quality printing.
Here are some tools that can help you check and adjust the PPI of your images:
- Adobe Photoshop: Photoshop is one of the most popular tools for checking and adjusting PPI. Simply open the image, go to "Image" and then "Image Size" to see and adjust the PPI.
- GIMP (Free Software): GIMP is a free, open-source alternative to Photoshop. You can check and adjust PPI by going to "Image" and selecting "Scale Image." GIMP is a great option for those on a budget.
- Online PPI Calculators: Websites like PPI Calculator and Pixel Calculator allow you to input the resolution and print size of your image to calculate the PPI automatically.
- Preview (Mac Users): On macOS, you can open the image in Preview, go to "Tools" and select "Show Inspector," which will provide the image's PPI details.
These tools make it easier to check and adjust your images’ PPI before you start printing. Whether you’re a professional or just starting with print design, having the right tools can make all the difference in the quality of your printed materials.
Also Read This: How to Flip Images in Figma
How PPI Affects Image Clarity and Detail in Prints
The PPI (Pixels Per Inch) of an image has a significant impact on its clarity and detail when printed. The higher the PPI, the more pixels are packed into each inch, which results in sharper, more detailed prints. If the PPI is too low, the image may appear pixelated, blurry, or lack the crisp details that are essential for high-quality prints.
Here’s a breakdown of how PPI affects image clarity:
- High PPI: With a high PPI (300 or above), the image will appear clear and crisp when printed, even up close. This is especially important for photos, detailed artwork, and documents where precision is key.
- Low PPI: A lower PPI (150 or below) can result in blurry prints, as the image lacks enough pixels to retain sharpness. This is often noticeable when viewed up close or for images with fine details.
For example, printing an image with 72 PPI will result in a visible drop in quality, as the pixels are too spread out. On the other hand, an image at 300 PPI will look much more polished, even in large print sizes. It’s always a good idea to check your image’s PPI before printing, especially if you’re looking for professional results.
To summarize:
| PPI Range | Quality of Print |
|---|---|
| 300 PPI and above | High quality, clear, sharp prints |
| 150-200 PPI | Good quality, acceptable for large prints |
| Below 150 PPI | Low quality, likely pixelated or blurry prints |
Also Read This: How to Crop an Image in Paint
Optimizing Your Images for the Best Print Quality
Optimizing your images for printing ensures they come out looking their best, with sharp details, vibrant colors, and no pixelation. Proper optimization is especially important for large prints, detailed artwork, and photographs, where clarity is essential.
Here are some tips to optimize your images for the best print quality:
- Choose the Right Resolution: Start by ensuring your image has a high resolution. For most prints, aim for 300 PPI, which is ideal for most image types.
- Check Image Dimensions: The dimensions of your image (in pixels) should match the print size. Use an image resizer tool to adjust the image size if necessary, but avoid enlarging a low-resolution image as it may cause pixelation.
- Adjust Color Mode: Make sure your image is in CMYK color mode for printing, as RGB is best suited for digital screens. CMYK ensures the colors will print accurately.
- Use Lossless File Formats: Save your images in high-quality, lossless formats like TIFF or PNG. These formats maintain the image quality without compression that could degrade the print quality.
Additionally, always do a test print on a small scale to check how the image looks in physical form. This way, you can adjust the PPI or resolution if needed before committing to a large print job. Taking these extra steps ensures that your print project will turn out as intended with no unexpected surprises.
Also Read This: Editing Dailymotion Videos in iMovie – A Step-by-Step Guide
FAQ about PPI and Print Quality
Understanding PPI and print quality can be a bit overwhelming at first, but once you grasp the basics, you’ll be able to confidently create prints that look amazing. Here are some frequently asked questions to help clarify any doubts:
- What is the ideal PPI for printing photos?
For photo prints, 300 PPI is generally considered the optimal resolution for sharp, clear prints. This ensures that fine details and textures are preserved. - Can I use a lower PPI for large prints?
Yes, for larger prints like posters or banners that will be viewed from a distance, a lower PPI (150-200) can still deliver good quality. The larger the print, the less noticeable a lower PPI becomes. - What happens if my image has a low PPI?
If your image has a low PPI (below 150), it may appear pixelated, blurry, or soft when printed, especially for smaller prints or detailed images. - Can I increase the PPI of an image?
While you can technically increase the PPI in image editing software, it won’t add new detail to the image. If the original resolution is low, increasing the PPI will not improve the quality and may result in a blurry print. - What is the difference between PPI and DPI?
PPI refers to the resolution of the image, while DPI (Dots Per Inch) refers to the resolution of the printer. Both affect print quality, but PPI deals with the image itself, and DPI deals with how the printer prints the image.
By understanding these common questions, you can better navigate the world of image resolution and printing. Knowing the ins and outs of PPI will help ensure that every print job turns out just the way you envision it.
Conclusion on Understanding PPI for Better Printing
Understanding PPI (Pixels Per Inch) is crucial for achieving high-quality prints. It directly affects the clarity, sharpness, and overall appearance of your images when they transition from screen to paper. By selecting the appropriate PPI for your print size and project, you can avoid common printing pitfalls like pixelation or blurriness. Whether you’re printing small photos or large posters, ensuring your images have the right resolution will help preserve fine details and produce professional results.
Remember, the optimal PPI for most print projects is 300 for detailed images and photos, but larger prints may benefit from a lower PPI. It's always a good idea to test your images before committing to large-scale prints. By using tools and software to check and adjust PPI, you can take control of the quality of your prints and ensure they match your expectations. Whether you're a professional or a hobbyist, understanding PPI gives you the ability to create beautiful, high-quality printed materials.

 admin
admin


