In the world of design, visuals are everything! Whether you’re crafting a stunning presentation, designing a marketing flyer, or working on a website, integrating the right stock photos can elevate your work significantly. Adobe software provides a seamless way to insert stock images, making your creative process smoother. In this guide, we’ll walk you through the steps to insert stock photos into Adobe applications and give you tips on choosing the best images for your project.
Choosing the Right Stock Photo

Selecting an appropriate stock photo is crucial for your design project. The right image can convey your message, evoke emotions, and enhance overall audience engagement. Here are some key factors to consider when picking your stock photos:
- Relevance: Ensure the photo aligns with the theme and message of your project. For instance, if you’re creating a blog post about outdoor activities, look for images that reflect that lifestyle, such as hiking, camping, or scenic nature shots.
- Quality: Go for high-resolution images. A blurry or pixelated photo can detract from your design. Stock images from reputable sources usually meet these standards.
- Style: Maintain a consistent aesthetic across your project. If you’re aiming for a modern look, use sleek and minimalist images. For a rustic feel, opt for warmer, earthy tones.
- Color Palette: Think about how the stock photo’s colors work with your existing design. Utilize color-scheme tools to find images that harmonize or complement your color palette.
- Licensing: Always check the licensing terms of any stock photo. Make sure you can use the image for your intended purpose, whether it’s personal, commercial, or editorial.
Once you’ve weighed these factors, you’ll be better equipped to choose stock photos that not only enhance your design but also resonate with your audience. Happy hunting for the perfect image!
Also Read This: Darkening an Image in Photopea
Preparing Your Adobe Document

Before diving into the fun part of adding stock photos, it's essential to prepare your Adobe document properly. This step sets the stage for a seamless integration of images into your design. Here’s what you should do:
- Choose the Right Document Settings: When you start a new project, consider the dimensions and resolution. For example, if you're designing for print, you'll typically want at least 300 DPI. For digital formats, 72 DPI is often sufficient.
- Select the Right Color Mode: Depending on your end goal, choose between RGB for digital designs and CMYK for print. You can find this option in the new document dialog box.
- Create a Layer for Your Images: Layers in Adobe applications help keep different elements organized. To maintain clarity, create a separate layer for your stock photo imagery. You can do this by clicking on the “Layer” menu, then selecting “New Layer.”
- Save Your Document: Don’t forget to save your progress! Choose the right format for your needs, such as PSD for ongoing work or JPEG/PNG for completed projects.
Taking these initial steps will help ensure that your stock photos integrate beautifully into your design. Plus, it makes the entire process smoother and more efficient!
Also Read This: Using Adobe Stock Logos Effectively
Inserting Stock Photos in Adobe Photoshop
Now that your document is all set up, it’s time to add those eye-catching stock photos! Photoshop makes this process super easy. Here’s how you can get started:
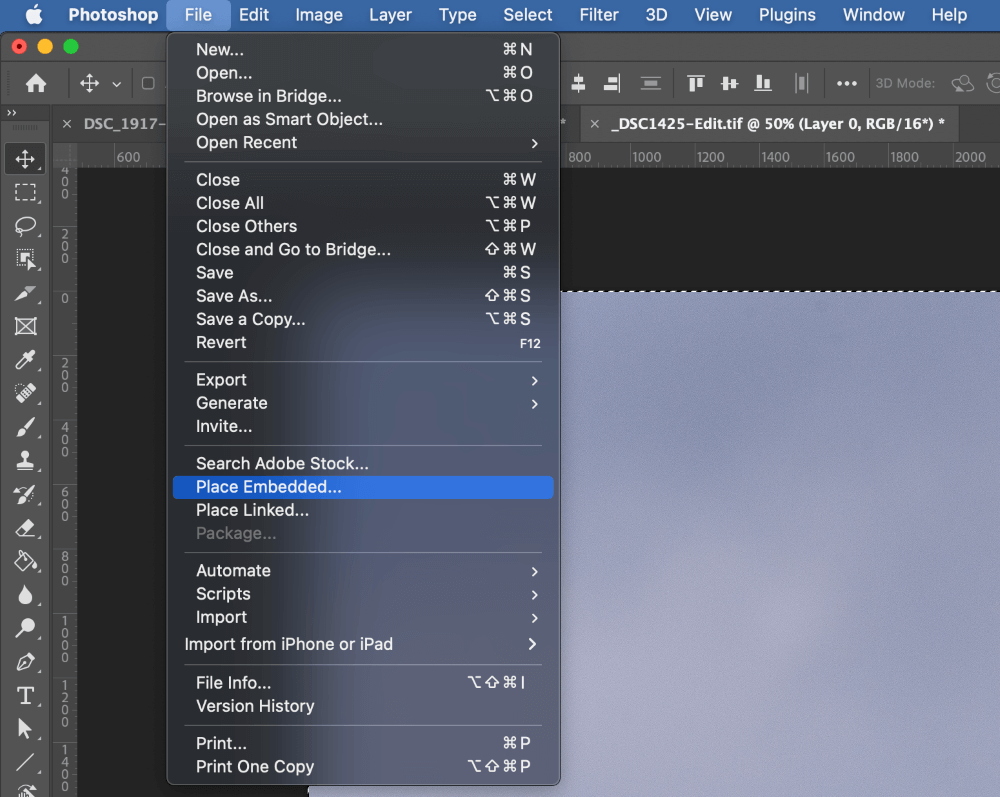
- Go to the “File” Menu: Open your Adobe Photoshop and navigate to the "File" menu located in the upper left corner.
- Select “Place Embedded” or “Place Linked”: Choose “Place Embedded” if you want to include the image in your document and keep it as part of the PSD file. Opt for “Place Linked” to keep the size smaller and linked to an external file.
- Locate the Stock Photo: A file browser will pop up. Navigate to the location of your stock photo and click “Open.”
- Resize and Position: Once the photo is inserted, you can resize it by dragging the corners while holding the Shift key to maintain the proportions. Position it exactly where you want it within your design.
- Finalize the Placement: Press “Enter” or “Return” to place the image. You can always adjust it later by selecting the layer in the Layers Panel.
And just like that, you’ve inserted a stunning stock photo into your Adobe Photoshop project! Enjoy experimenting with different images and see how they enhance your design.
Also Read This: How to Replace an Image in After Effects
Inserting Stock Photos in Adobe Illustrator
Adobe Illustrator is a fantastic tool for creating vector graphics, and sometimes, you might want to spice up your designs with some stock photos. Let's walk through the process of inserting stock photos into Illustrator with ease!
First things first, you need to have your stock photo ready. You can either purchase a photo from a stock photo website or download a free one from a site that offers royalty-free images.
Here’s a simple step-by-step guide to get you started:
- Open Your Document: Launch Adobe Illustrator and open your project or create a new document.
- Placing the Image: Go to the top menu and click on File, then select Place... This will allow you to browse your computer for the stock photo you want to use.
- Select the File: Once you find your desired image, select it and click Place.
- Positioning the Image: After placement, click on your document where you want the image to appear or click and drag to define the size of your image.
- Adjusting the Image: Use the selection tool to move, resize, or rotate your photo as per your design needs.
And that’s it! You’ve successfully inserted a stock photo into your Illustrator project. Remember, you can also manipulate the photo using the various Illustrator tools to blend it seamlessly with your vector graphics.
Also Read This: How to Cancel Your Depositphotos Subscription
Inserting Stock Photos in Adobe InDesign
When it comes to laying out beautifully designed pages, Adobe InDesign is the go-to tool for many designers. Inserting stock photos into your InDesign layouts can elevate your design projects significantly. Let’s break it down.
Much like Illustrator, the process is simple and straightforward. Here’s how to incorporate stock photos into your InDesign documents:
- Open Your Project: Launch Adobe InDesign and open your existing document or create a new file.
- Access the Place Command: Navigate to File in the menu and choose Place... or simply use the shortcut Ctrl + D (Windows) or Cmd + D (Mac).
- Select Your Image: In the dialog box that appears, locate your stock photo and select it. Click Open to insert it.
- Image Placement: You can either click directly on your page to place the image at its original size or click and drag to place it at a custom size.
- Fine-tuning: To adjust the position or size, simply click on the image with the selection tool and modify as needed.
One cool feature of InDesign is its ability to create frames for your images. If you want to ensure your stock photo fits perfectly in your layout, consider creating a frame first and then inserting your image into that frame.
And there you have it! Inserting stock photos in Adobe InDesign is just as easy as in Illustrator, making your layout look stunning with minimal effort.
Also Read This: Recording Tools and Software Used by Popular YouTubers
7. Editing and Enhancing Stock Photos
Once you’ve inserted stock photos into your Adobe project, the fun doesn't stop there! Editing and enhancing these images can elevate your design and can give them a personal touch. Here are some handy tips to get started:
- Use Adjustment Layers: Instead of applying changes directly to your stock photo, utilize adjustment layers. This allows for non-destructive editing. You can adjust brightness, contrast, saturation, or even apply filters without permanently changing the original image.
- Crop and Resize: Sometimes, stock photos need a little refining. Use the crop tool to focus on the most compelling part of the image. Resizing can help fit the photo into your layout more naturally.
- Apply Filters: Adobe offers a variety of filters that can alter the mood of your image dramatically. Whether you want something vintage or sleek, experimenting with different filters can help create the perfect vibe.
- Add Textures: Layering textures over your stock photo can create depth. Consider using a subtle grain or a light bokeh effect to add sophistication.
- Adjust Color Balance: Don’t be afraid to dive into the color settings. You might want to warm up an image or cool it down to match your project's overall color scheme better.
- Consider Layer Styles: Using layer styles like drop shadows or bevels can help your images pop, especially when placed over backgrounds that need differentiation.
Overall, don’t shy away from exploring Adobe’s powerful editing tools. With patience and creativity, you can transform a simple stock photo into a captivating element of your design.
8. Conclusion
Incorporating stock photos into your Adobe projects doesn’t have to be daunting! We've covered everything from finding the right images to editing them to fit your unique style. Remember, stock photos can be a great starting point that you can personalize to fit your vision.
As a quick recap:
- Choose stock photos that resonate with your aesthetic.
- Utilize Adobe’s features for seamless insertion and editing.
- Enhance your images to add depth and character.
By following these steps, you’ll create visually stunning projects while streamlining your workflow. Stock photos are an incredible resource if used wisely and creatively. So, go ahead—dive into Adobe, explore the vast world of stock photography, and watch your designs come to life!
 admin
admin


