Flattening an image in Photoshop is an important step in editing and finalizing your design. Whether you're preparing an image for web use or printing, flattening helps to streamline your file and make it easier to save or share. In simple terms, flattening means combining all the layers of your design into a single background layer. This makes the
In this guide, we’ll walk you through what it means to flatten an image, why it's necessary, and how you can do it effectively in Photoshop. By the end, you’ll understand when and why to flatten images as part of your editing workflow.
What Does Flattening an Image Mean in Photoshop?

Flattening an image in Photoshop is the process of merging all the visible layers into a single background layer. Photoshop files are typically made up of multiple layers, such as adjustment layers, text, and images. Each of these layers can be individually edited and adjusted. However, once you’re done editing and ready to finalize your image, it’s often useful to combine these layers into one.
Here’s a quick breakdown of what happens when you flatten an image:
- Combining Layers: All the visible layers are merged into a single layer.
- Reducing File Size: Flattening the image reduces its file size, making it easier to store or share.
- Preserving Edits: Once the image is flattened, all your edits are locked into the file and can’t be undone without the original layers.
Flattening is often done at the end of your editing process, but it’s important to keep in mind that once you flatten the image, you lose the ability to make changes to individual layers unless you save a separate copy with layers intact.
Also Read This: Mastering the Art of Looping Specific Parts of a Dailymotion Video
Why Should You Flatten Images in Photoshop?

There are several reasons why flattening an image in Photoshop can be beneficial. Whether you're working with a complex design or simply looking to save a file for a specific use, flattening can make your workflow much easier. Here are a few key reasons why flattening is important:
- Smaller File Size: Flattening reduces the size of your image, making it quicker to upload, share, and store. This is especially important for web images where loading time is crucial.
- Fewer Compatibility Issues: Some programs or platforms may have trouble handling files with multiple layers. Flattening ensures that your image can be opened anywhere without problems.
- Prepares for Printing: Flattening ensures that all layers are preserved exactly as they appear, so when you print your image, you won’t encounter any issues with transparency or missing elements.
- Finalizing Edits: Flattening an image signifies that you’re done with all your editing. It locks in your changes and eliminates the need to keep multiple layers that are no longer needed.
While flattening is great for final outputs, keep in mind that it’s irreversible once you save the file, so it’s a good idea to save a copy of your work with the layers intact if you want to make future adjustments.
Also Read This: Guidelines for Submitting iPhone Photos to 123RF
Step-by-Step Guide on How to Flatten an Image in Photoshop

Flattening an image in Photoshop is a quick and easy process that can be done in just a few simple steps. Whether you're a beginner or experienced user, this step-by-step guide will help you flatten your images with confidence.
Here’s how you can flatten an image in Photoshop:
- Open Your Image: Start by opening your image in Photoshop. Make sure all your layers are ready for flattening.
- Check for Hidden Layers: Before flattening, make sure there are no hidden layers or invisible elements that you might need later. You can toggle the visibility of layers in the Layers panel.
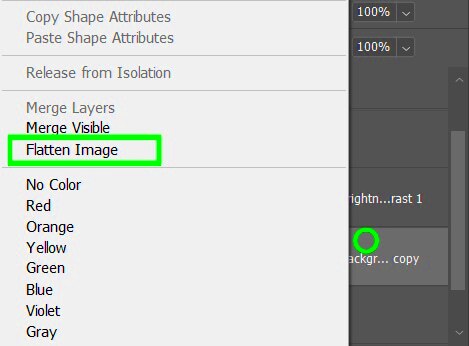
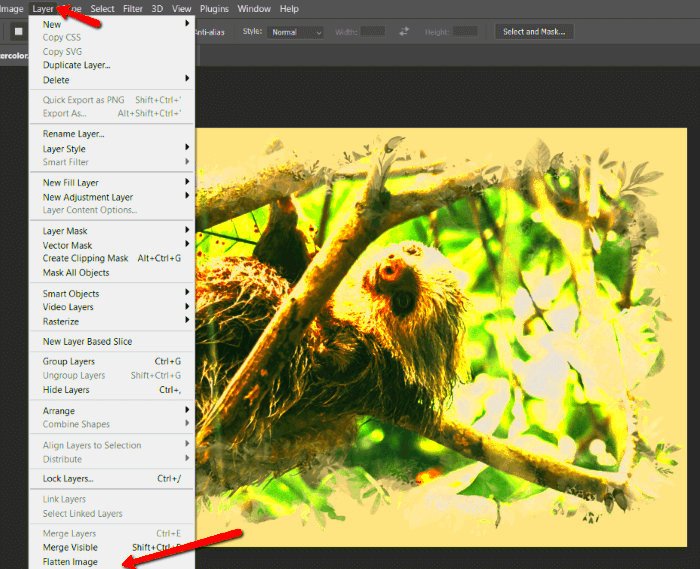
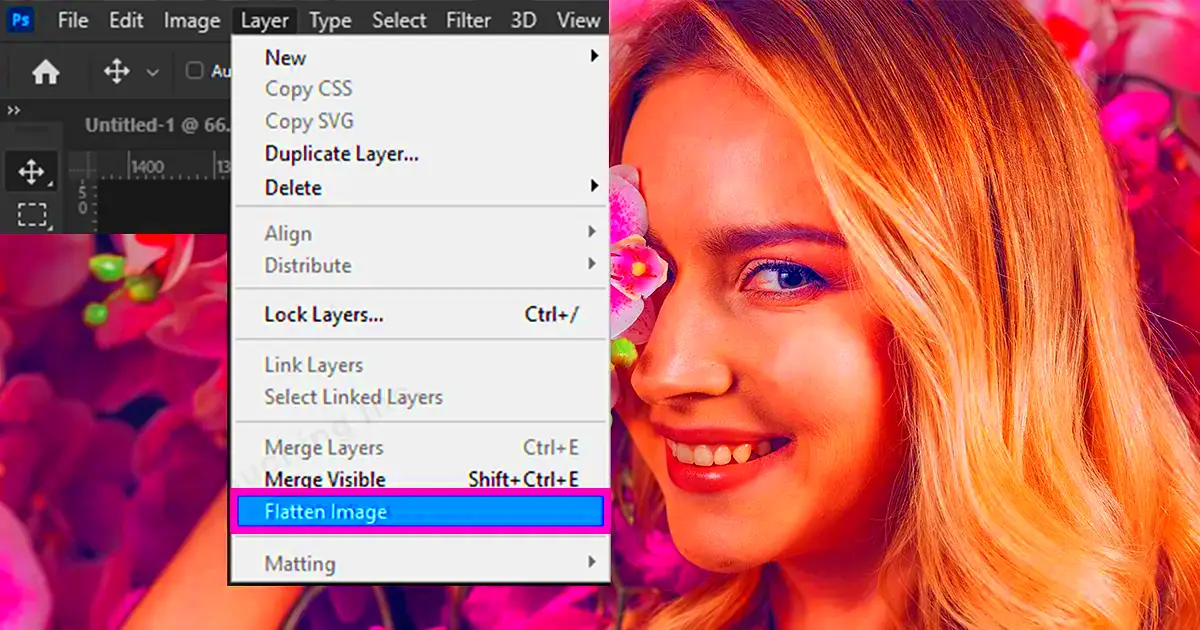
- Go to the Layers Menu: In the top menu, click on “Layer.” From the dropdown, select “Flatten Image.”
- Confirm Flattening: Once you click “Flatten Image,” all your visible layers will merge into a single background layer. Photoshop will automatically remove any empty or hidden layers.
- Save Your Image: After flattening, save your image as a new file. This will ensure you have both the layered and flattened versions for future use.
It’s that simple! By following these steps, you’ll be able to flatten your image in Photoshop quickly and easily. Just remember to save your work with layers intact if you need to make changes later.
Also Read This: See How to Post on Shutterstock
Common Issues When Flattening Images and How to Avoid Them
While flattening an image in Photoshop is usually straightforward, some common issues can arise. Here are a few problems you might encounter and tips on how to avoid them:
- Losing Layer Information: Once you flatten an image, you can’t access the individual layers anymore. To avoid this, always save a separate copy of your file with layers intact before flattening.
- Unwanted Transparency: Flattening can sometimes lead to unwanted transparent areas, especially if you have a layer with transparency. To avoid this, ensure that all your layers are fully visible before flattening.
- Saving the Wrong File Format: If you save a flattened image in a format that doesn’t support transparency (like JPEG), you might lose details. To avoid this, save your flattened image in a suitable format such as PNG or TIFF if transparency is not an issue.
- Flattening Too Soon: Flattening too early in your editing process can prevent you from making further adjustments. Always make sure you’re finished with all your edits before flattening your image.
By being aware of these common issues and taking precautions, you can ensure a smoother flattening process without unexpected problems.
Also Read This: How to Change Text Color in Behance Customizing the Look of Your Project Descriptions
How to Save a Flattened Image in Photoshop
After flattening your image, you’ll want to save it in the right file format to ensure it looks great and functions as needed. Saving a flattened image properly is crucial for both web and print uses. Here’s a guide on how to do it:
Follow these steps to save a flattened image in Photoshop:
- Choose the Save Option: Once you’ve flattened your image, go to the “File” menu and select “Save As.” This ensures you don’t overwrite your original layered file.
- Select the File Format: Choose a format that suits your needs:
- JPEG: Ideal for web use due to its small file size. However, JPEG doesn’t support transparency.
- PNG: Great for web use when you need transparency. It maintains high-quality details and is lossless.
- TIFF: Best for high-quality prints. TIFF supports multiple layers but can be large in file size.
- Adjust Quality Settings: If you’re saving in JPEG format, make sure to adjust the quality settings. A higher quality setting will give you better image clarity but also result in a larger file size.
- Save Your File: After adjusting the settings, choose a destination folder and click “Save.” You now have a flattened image that’s ready to use or share.
Remember, if you want to keep the original layered version, make sure to save it as a PSD or TIFF before flattening the image. This way, you can always go back and make changes if needed.
Also Read This: Tried and Tested Shutterstock Image Downloader Without Watermark
Tips for Working with Flattened Images
Once you’ve flattened your image in Photoshop, it’s important to know how to handle it properly to avoid issues later. Flattened images are great for finalizing designs, but you can still work with them in various ways. Here are some tips for making the most of flattened images:
- Use Adjustment Layers Sparingly: After flattening, you can still apply adjustment layers (like Brightness/Contrast or Hue/Saturation) to tweak your image. However, be mindful that you won't be able to adjust specific elements as easily as you could with individual layers.
- Resizing the Image: Flattened images can be resized without worrying about layers shifting. But be careful when resizing; extreme changes might result in a loss of quality. Always work with the highest resolution possible to maintain the best image clarity.
- Avoid Over-editing: Since you’ve already merged all the layers, over-editing a flattened image can sometimes make the edits appear unnatural. Apply subtle edits to maintain the integrity of your image.
- Keep Backup Copies: It's always a good idea to keep backup copies of your original layered file. If you need to revisit your design or make major changes, it’s easier to do so with the layered version rather than trying to work with a flattened file.
- Check for Transparency: If your flattened image has transparent areas, make sure to save it in a format that supports transparency, like PNG. Otherwise, you risk losing the transparent effect when viewed in other programs.
By following these tips, you’ll ensure that your flattened images remain useful in your projects and maintain their quality over time.
Also Read This: Mastering the Art of Applying Stick Foundation for a Flawless Finish
FAQ: Frequently Asked Questions About Flattening Images in Photoshop
Flattening images can seem straightforward, but there are often a lot of questions surrounding the process. Here are some frequently asked questions and answers to help you understand it better:
- Can I flatten an image without losing quality? Yes, flattening does not affect the image quality, but it will combine all layers into one. If you flatten the image too early, you might lose the ability to edit individual components later, so it’s good to save a copy with layers intact before flattening.
- What happens if I accidentally flatten an image? If you flatten the image and haven’t saved a copy with layers intact, you can’t undo the process easily. To avoid this, always save a layered version before flattening the image, so you can make adjustments if needed.
- How do I preserve transparency after flattening? To keep transparency in your image after flattening, make sure to save it in a format that supports transparency, such as PNG. Formats like JPEG do not support transparency.
- Can I add layers back to a flattened image? Once an image is flattened, you cannot add new layers directly to the flattened file without starting over. However, you can still add new elements or edits by creating a new layer above the flattened image in your Photoshop project.
- Is flattening an image necessary before printing? Flattening is often a good idea before printing, as it ensures that the image will appear as you intended. All edits are merged, and you won’t have issues with missing elements or layers.
These answers should help clear up any confusion about the flattening process. If you have more questions, feel free to explore Photoshop’s help resources or consult online forums for additional insights.
Conclusion: Mastering Image Flattening in Photoshop
Flattening images in Photoshop is a simple yet powerful technique that every Photoshop user should understand. Whether you’re creating content for the web, preparing an image for print, or simplifying your file for storage, flattening helps streamline your workflow and reduce potential errors.
Here’s a quick recap of the key points:
- Flattening merges all visible layers into one single background layer, reducing file size and simplifying your design.
- Always save a copy of your work with layers intact before flattening, as the process is irreversible.
- Flattened images can still be edited with adjustment layers, but they lack the flexibility of layered files.
- Choosing the right file format when saving a flattened image ensures that you maintain image quality and transparency as needed.
By mastering the flattening process, you’ll ensure that your final images are well-suited for their intended use, whether online or in print. Remember to always work with high-resolution images and save backups of your layered files to give you the most flexibility in your projects.
Now that you understand the importance of flattening images in Photoshop, you can confidently apply this technique to streamline your workflow and produce polished, professional images.


