GIMP is a powerful tool for editing images, but it’s not uncommon to face a few bumps along the way. Whether you’re dealing with blurry photos, color inaccuracies, or unexpected layer issues, these challenges can disrupt your creative flow. Thankfully, most of these problems have straightforward solutions that anyone can follow.
Here are some common image issues users experience in GIMP:
- Blurry or pixelated images
- Colors appearing dull or incorrect
- Layers not behaving as expected
- Exporting problems like poor quality or unsupported formats
- Slow performance during complex edits
In this guide, we’ll walk you through practical fixes for these issues, starting with blurry images and ending with tips on resolving color problems. Let’s dive in!
How to Handle Blurry Images in GIMP

A blurry image can be frustrating, especially if it’s a key part of your project. Fortunately, GIMP offers several tools to sharpen and refine your images, making them crisp and clear. Follow these steps to fix blurry images:
- Use the Sharpen Tool:
- Go to Filters > Enhance > Sharpen (Unsharp Mask).
- Adjust the settings for Radius, Amount, and Threshold until you achieve the desired sharpness.
- Apply High Pass Filter:
- Duplicate the image layer.
- Apply a High Pass filter through Filters > Enhance > High Pass.
- Set the duplicated layer’s blend mode to Overlay or Soft Light.
- Resize Images Properly:
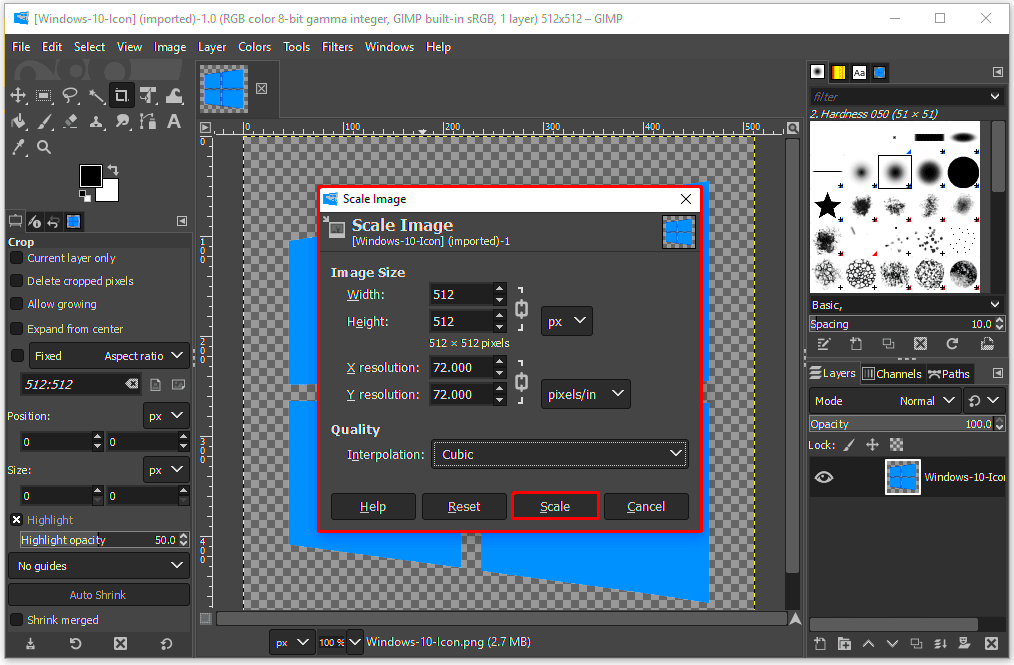
Scaling images without maintaining proportions can also lead to blurriness. Use Image > Scale Image and ensure the resolution is appropriate.
By using these methods, you can significantly improve the clarity of your images and make them more visually appealing.
Also Read This: How to Change Background in Adobe Photoshop 7.0
Fixing Color Problems with GIMP Tools

If your images look too dark, overly bright, or have off-putting colors, GIMP has tools to adjust and correct these issues. Here’s how you can fix common color problems:
- Adjust Brightness and Contrast:
- Navigate to Colors > Brightness-Contrast.
- Use the sliders to fine-tune the brightness and contrast until the image looks balanced.
- Use Color Balance:
- Go to Colors > Color Balance.
- Adjust the shadows, midtones, and highlights to correct any color cast.
- Try Auto Tools:
- Select Colors > Auto and choose options like White Balance or Color Enhance.
- These automatic tools can quickly fix minor color issues with a single click.
- Use the Curves Tool:
- Go to Colors > Curves.
- Adjust the curve to make precise changes to the overall tone and color.
With these tools, you can ensure your images have vibrant and accurate colors, making them stand out in any project.
Also Read This: A Guide on How to Choose the Best Thumbnail for LinkedIn Video
Ways to Resolve Layer Visibility Issues

Layer visibility issues in GIMP can be frustrating, especially when you’re working on complex projects with multiple layers. If you can’t see certain elements in your project, it’s usually due to a hidden layer or incorrect layer settings. Fortunately, there are simple fixes to restore visibility and get your layers working properly.
Here’s how you can address layer visibility issues:
- Check Layer Visibility:
Each layer in GIMP has an eye icon next to it in the Layers panel. If the eye is missing, that layer is hidden. Simply click the empty space to reveal it again.
- Ensure Correct Layer Order:
If you can’t see a layer even when it’s visible, it might be hidden behind other layers. Use the Layers panel to drag and reorder layers to ensure the important layers are on top.
- Check Layer Opacity:
Sometimes, a layer might be visible but very faint due to low opacity. In the Layers panel, check the opacity slider and increase it if necessary.
- Fix Layer Masking:
If you’re using a layer mask, it may be causing visibility issues. Check the mask and ensure it’s correctly applied. If needed, disable the mask temporarily to troubleshoot the visibility problem.
- Enable All Layers:
If you’re working with multiple layers, ensure no layers are locked or hidden. You can unlock or reveal all layers by right-clicking and selecting the appropriate options in the Layers panel.
By following these simple steps, you can quickly resolve any layer visibility issues and continue editing your project with ease.
Also Read This: How to Slice Images on Cricut for Craft Projects
Dealing with Exporting Errors in GIMP
Exporting errors can be one of the most annoying issues to face when using GIMP. Whether the image doesn’t export in the correct format, the quality drops, or you receive error messages, it can halt your progress. Luckily, there are common fixes that can help resolve these exporting problems.
Here’s how you can handle exporting errors:
- Check File Format Compatibility:
GIMP supports a wide range of file formats, but not all are suitable for every type of image. Make sure you're exporting to a format that supports your image's features (e.g., layers, transparency).
- Reduce Image Size:
If your image is too large, it might cause exporting errors. Try resizing the image or reducing its resolution by going to Image > Scale Image to make it easier to export.
- Flatten Image Before Exporting:
If you have multiple layers and want to export a flattened version, go to Image > Flatten Image to combine the layers into one before exporting. This can help with file size and format compatibility.
- Check for Open Files or Plugins:
Sometimes, exporting issues occur because other files or plugins are still running in GIMP. Close unnecessary files or disable problematic plugins before exporting.
- Use the Right Compression Settings:
If you’re exporting in formats like PNG or JPEG, be mindful of the compression settings. Too much compression can cause quality loss or errors. Check the export options and adjust the compression level for the best balance.
By following these steps, you can avoid common exporting errors and ensure that your final image is exactly what you want.
Also Read This: How to Apply Foundation Step-by-Step for Beginners
Improving Slow Performance While Editing in GIMP
Editing in GIMP can sometimes feel sluggish, especially when you’re working on large images or using resource-heavy tools. Slow performance can frustrate your workflow, but there are a few ways to optimize GIMP’s performance and get back to working efficiently.
Here’s how you can improve GIMP’s performance while editing:
- Reduce Image Size:
If you’re working with very high-resolution images, try resizing them. Go to Image > Scale Image to reduce the resolution without losing too much detail.
- Disable Unnecessary Plugins:
Plugins can significantly slow down GIMP’s performance, especially if you have many installed. Disable or remove any plugins you aren’t using by going to Edit > Preferences > Plugins.
- Increase Virtual Memory Allocation:
If GIMP is running out of memory, you can adjust the virtual memory settings. Go to Edit > Preferences > System Resources and increase the memory allocation for GIMP to improve performance.
- Use Simple Brushes and Tools:
Heavy brushes and complex tools can slow down GIMP, especially on large projects. Try switching to simpler brushes and use basic tools for faster editing.
- Close Other Programs:
If your computer is running too many programs in the background, it can slow down GIMP. Close any unnecessary applications to free up resources for GIMP.
- Enable GPU Acceleration:
If your system supports it, enabling GPU acceleration can significantly improve GIMP’s performance. You can find this option under Edit > Preferences > Performance.
By following these tips, you can improve GIMP’s performance and make your editing process smoother and faster.
Also Read This: How to Create a Dollhouse with This Simple Craft Tutorial
Frequently Asked Questions about Image Issues in GIMP
When using GIMP, it’s common to encounter a few questions or challenges. To help clear up some of the confusion, here are answers to some frequently asked questions about image issues that users often face in GIMP.
- Why are my images blurry in GIMP?
Blurry images in GIMP are often caused by improper scaling or insufficient resolution. You can sharpen the image using the Unsharp Mask or adjust the resolution before scaling the image to prevent blurriness.
- How do I fix color distortion in GIMP?
Color distortion can occur due to incorrect settings or layers. To correct this, use the Color Balance tool or Brightness-Contrast adjustment. You can also check for any color profiles that might be affecting the image and adjust accordingly.
- Why can’t I see my layers in GIMP?
If you can’t see your layers, ensure they are not hidden (check the eye icon in the Layers panel), the opacity isn’t set too low, and that the layers are stacked in the correct order. Sometimes, layer masks can also cause visibility issues.
- What do I do if my exported image is low quality?
Low-quality exports often result from excessive compression or using the wrong file format. For better quality, try exporting to a lossless format like PNG, or adjust the compression settings when exporting to JPEG.
- How can I improve GIMP's performance on large projects?
If GIMP is running slow, try reducing the image size or increasing memory allocation in the preferences. Disabling unnecessary plugins and ensuring that you close other applications will also help speed up GIMP.
If you have any other issues not covered here, the GIMP community forums and help pages are great resources for finding solutions.
Conclusion
By understanding common image issues in GIMP and utilizing the right tools and techniques, you can troubleshoot and resolve problems quickly. Whether it’s dealing with blurry images, color distortion, layer visibility, or performance issues, GIMP offers solutions to keep your workflow smooth. With these tips in hand, you’ll be able to work more efficiently and get the results you want from your editing projects.


