DPI, or Dots Per Inch, is a measurement used to describe the resolution of an image, specifically for printing. When you’re preparing an image for print, knowing its DPI is crucial to ensuring the final output has the sharpness and clarity you want. If the DPI is too low, the
For optimal print quality, a DPI of at least 300 is usually recommended. This ensures that the image maintains clarity and sharpness even when enlarged. Understanding DPI helps you choose the right images for your print projects and avoid issues like poor quality prints.
How to Check Image DPI on iPhone Using Built-In Tools

Apple's iPhone doesn't offer a direct built-in tool to check DPI. However, there are some tricks to estimate or indirectly find out the DPI of an image on your iPhone. One method is by examining the image resolution and print size. Here's how you can do it:
- Open the Photos app: Go to your Photos app and select the image you want to check.
- Tap on the info icon: While viewing the image, swipe up or tap the info icon (i) to display basic details about the image.
- Examine resolution: Note the resolution (width x height) of the image in pixels. For example, a 3000x2000 pixel image.
- Estimate DPI: To estimate DPI, divide the resolution by the intended print size. For instance, a 3000-pixel width for an 8-inch wide print would give you roughly 375 DPI (3000 / 8 = 375).
While this isn't an exact DPI measurement, it can give you a rough idea of the quality of an image for printing.
Also Read This: How to Stretch an Image on iPhone Without Distortion
Using Third-Party Apps to Find Image DPI on iPhone

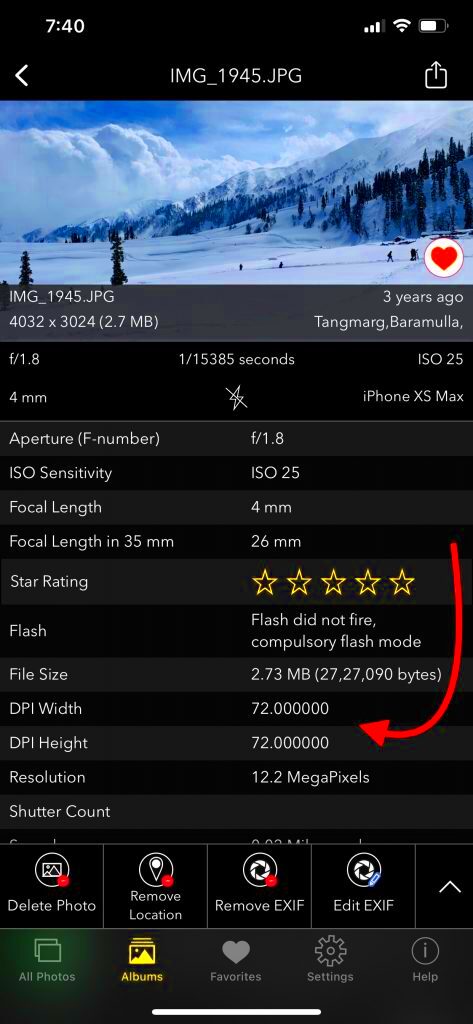
If you want more precision, third-party apps are the way to go. These apps allow you to check the exact DPI of an image without any guesswork. Here are some popular apps that can help you:
- Exif Metadata Viewer: This app displays detailed metadata for your photos, including DPI information. Simply upload your image, and the app will show you the resolution and DPI.
- Image Size App: Image Size is another app that helps you measure and adjust the resolution of your images. It allows you to check the DPI by adjusting the size of the image in inches while maintaining the resolution.
- Photo Investigator: This app lets you view the metadata of any image, including DPI. It's a simple tool that provides details like resolution, file size, and DPI in a clear and concise format.
By using these apps, you can get an accurate reading of your image's DPI and decide if any adjustments are needed for your print project. Most of these apps are user-friendly, making it easy for even beginners to get precise measurements.
Also Read This: Cropping Images in Inkscape: An Easy Guide
Understanding the Role of DPI in Printing High-Quality Images
DPI (Dots Per Inch) plays a vital role when it comes to printing high-quality images. It determines the level of detail and sharpness that appears in a printed image. Higher DPI results in a sharper image, while a lower DPI can cause the image to appear pixelated or blurry. The standard DPI for high-quality prints is generally 300 DPI, which is considered ideal for clear, crisp prints, especially for things like brochures, posters, and photographs.
Here’s how DPI affects your printed image:
- Resolution: The higher the DPI, the greater the image resolution. This means more dots are packed into every inch of the image, leading to finer details and smoother transitions.
- Size Matters: If you increase the print size without adjusting the DPI, the image may lose quality and look blurry. Keeping DPI consistent while resizing is key to maintaining print quality.
- Print Clarity: At 300 DPI, most printers can produce excellent clarity, suitable for almost all types of prints. Lower DPIs, such as 72 DPI (common for web use), often result in grainy images when printed.
When preparing an image for print, always consider its DPI and resolution. This ensures that your printouts turn out looking as clear and professional as you want them to. It’s especially crucial if you plan to print large-scale images, as the image can easily lose detail without enough DPI.
Also Read This: how to delete adobe stock background iphone
Adjusting DPI Settings on Your iPhone for Better Print Quality
While iPhones don’t have a direct setting to change the DPI of an image, you can adjust image resolution and size to improve the print quality. By manipulating the image resolution, you can optimize it for printing at the best DPI possible. Here’s how you can adjust your iPhone settings for better print results:
- Use the right photo resolution: When taking photos, choose the highest resolution option available on your iPhone. This ensures that your images have enough pixels to print at a high DPI.
- Resize images manually: If you need to adjust the size of an image for printing, apps like Image Size or Pixelmator can help. You can set the exact print size and resolution needed for your project.
- Crop to focus: Sometimes, cropping an image to focus on specific details can help improve its clarity. This may also reduce the need for higher DPI, as you’re working with a smaller image area.
- Export images in high quality: When exporting images for printing, always choose the highest quality option. This minimizes any loss of detail that might occur during export.
By adjusting these settings, you can ensure that the images on your iPhone are print-ready, with the right resolution and DPI to make them sharp and clear.
Also Read This: Here Is Your Ultimate Guide to Download Facebook Reel Video
Common Issues with DPI on iPhone and How to Fix Them
Even though the iPhone is a powerful tool for capturing and editing images, you may encounter some common DPI-related issues. Let’s take a look at these challenges and how to solve them:
- Low DPI for Print: If you’re trying to print an image, but the DPI is too low, the result can be blurry or pixelated. The solution is to either take higher-resolution photos or resize the image using a third-party app to increase DPI.
- Image Compression: When you save or share images, some apps may automatically compress them, which reduces both resolution and DPI. To avoid this, always save your photos in the highest quality possible, and avoid excessive compression.
- Incorrect Print Size: Sometimes, images may appear sharp on your iPhone, but when printed, they lose quality due to the wrong print size. Always ensure the image dimensions are appropriate for printing at the correct DPI. For example, a 3000x2000 pixel image at 8x10 inches will give you approximately 300 DPI, ideal for high-quality printing.
- Limited DPI Checking Options: Unlike desktop computers, iPhones don't provide a detailed DPI reading. This can make it difficult to check DPI directly. You can work around this by using third-party apps or by manually calculating the DPI based on the image resolution and print size.
By keeping these tips in mind and using the right tools, you can overcome DPI-related issues on your iPhone and ensure your images are ready for print. Whether you need to resize, adjust resolution, or choose the right apps, a little attention to DPI will help you get the results you need.
Also Read This: How to Import Images from Fujifilm Instax to MacBook
Tips for Optimizing Images for Printing on iPhone
When preparing an image for printing from your iPhone, there are several steps you can take to ensure the highest quality output. Whether you’re printing photos for personal use or creating professional projects, optimizing the image beforehand is key to getting the best results. Here are some tips to help you prepare your images:
- Use the highest resolution settings: When capturing photos with your iPhone, always select the highest resolution option. This ensures that the image has plenty of pixels for printing, which is crucial for clarity and detail.
- Crop the image to focus on key areas: Cropping unnecessary parts of the image can help improve its composition and make the most out of the available resolution. Focus on the important details to enhance the final print quality.
- Adjust the lighting and colors: Proper lighting is essential for creating a high-quality image. If the photo looks too dark or washed out, you can adjust brightness and contrast directly on your iPhone or using photo editing apps like Adobe Lightroom or Snapseed.
- Resize and maintain proportions: Resizing images to fit a specific print size is important. Make sure the image maintains its aspect ratio to avoid distortion. Apps like Image Size or Pixelmator can help you resize while preserving quality.
- Use professional editing apps: Apps like VSCO, Adobe Photoshop Express, or Lightroom offer advanced editing tools that let you adjust the DPI, sharpness, and clarity of your photos, making them more print-ready.
By following these tips, you can ensure that the images on your iPhone are optimized for the best print results, with sharp details and vibrant colors.
Also Read This: Citing Images in PowerPoint Presentations
Conclusion
Optimizing images for print on your iPhone is essential if you want to achieve high-quality results. While DPI plays a critical role in determining how sharp and detailed your printed image will be, taking the time to adjust your image’s resolution, size, and composition will ensure it’s print-ready. Using third-party apps for resizing, cropping, and DPI checking will make the process easier and more accurate. Whether you're printing photos for personal use or creating professional prints, these tips will help you get the best possible outcome from your iPhone images.
FAQ
- What is the ideal DPI for print quality? The ideal DPI for high-quality prints is generally 300 DPI. This provides a sharp, detailed print, suitable for photos, posters, and other printed materials.
- Can I adjust the DPI of a photo on my iPhone? While iPhones don’t have a built-in DPI adjustment feature, you can use third-party apps to resize and adjust the resolution of your images to achieve a higher DPI.
- How do I know if an image is print-ready? To determine if an image is print-ready, check its resolution and DPI. If the image has a resolution of at least 300 DPI at the desired print size, it should print well.
- Can I print directly from my iPhone? Yes, you can print directly from your iPhone using AirPrint-compatible printers or apps that support wireless printing.
- What are the best apps for photo editing and DPI adjustment on iPhone? Some of the best apps for photo editing and DPI adjustment include Adobe Lightroom, Pixelmator, and Exif Metadata Viewer. These apps let you adjust DPI, resolution, and other important print settings.

 admin
admin


