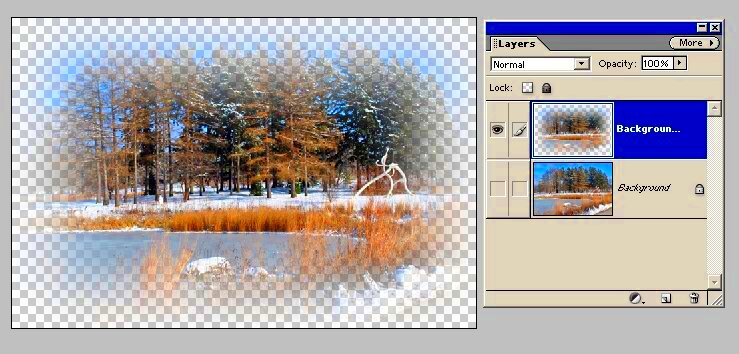
Fading the edges of an image is a popular technique used in graphic design and photo editing to create a smooth, soft transition between the image and the background. This effect draws attention to the central part of the
Why Fade Image Edges?

Fading image edges is not just about aesthetics—this technique serves multiple purposes depending on the project. Here are a few reasons why you might want to fade the edges of an image:
- Focus Attention: By softening the edges, you naturally draw more focus to the center of the image where the subject or key elements are located.
- Softens Harsh Borders: If your image has strong, defined borders that might feel too harsh or distracting, fading the edges helps to soften the transition between the subject and the background.
- Creates a Dreamy, Artistic Look: A subtle fade adds a creative or ethereal feel, especially when paired with other effects like blur or lighting adjustments.
- Seamless Integration with Backgrounds: Images with faded edges blend more easily with different background colors or textures, making them more versatile for various designs.
In short, fading the edges can elevate your image by making it appear more polished and artistically pleasing, while also enhancing its visual storytelling.
Also Read This: How to Sell on Shutterstock: A Step-by-Step Guide for Photographers
Step-by-Step Guide to Fading Image Edges in Photoshop

Now that we know why fading edges can enhance an image, let’s break down how you can achieve this effect in Photoshop. It’s a simple process that can be done in a few straightforward steps.
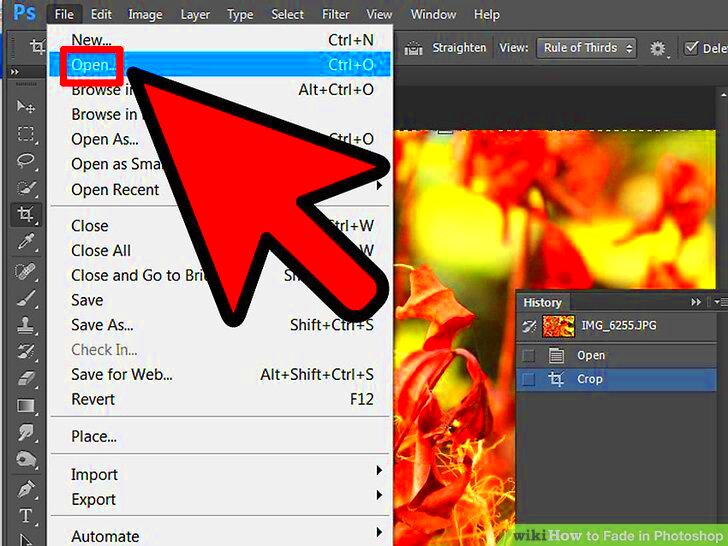
- Open Your Image: Start by opening your image in Photoshop.
- Create a New Layer: In the Layers panel, click the “New Layer” button to create a fresh layer where you’ll apply the fade effect.
- Select the Gradient Tool: From the tool menu on the left, select the Gradient Tool. In the options bar, choose a gradient that fades from black to transparent.
- Apply the Gradient: Click and drag on the new layer, starting from the area where you want the fade effect to begin (usually the center) and ending at the edges of the image.
- Adjust Layer Blending Mode: Set the layer’s blending mode to “Soft Light” or “Overlay” to help the gradient blend seamlessly with the image beneath.
- Refine the Effect: If needed, use the “Opacity” slider in the Layers panel to adjust the strength of the fade effect. You can also use a layer mask to make more subtle adjustments to specific parts of the image.
Once you’re satisfied with the fade effect, save your image and you’re done! This simple method can give your photos a polished, professional look with just a few clicks.
Also Read This: Essential Strategies for Avoiding Copyright Issues on YouTube
Using Layer Masks for Edge Fading

Layer masks are one of the most powerful tools in Photoshop when it comes to non-destructive editing. They allow you to hide or reveal parts of a layer without permanently altering the original image. This makes them perfect for fading edges, as you can gradually blend the image into the background while maintaining full control over the fade effect.
Here’s how to use layer masks for edge fading:
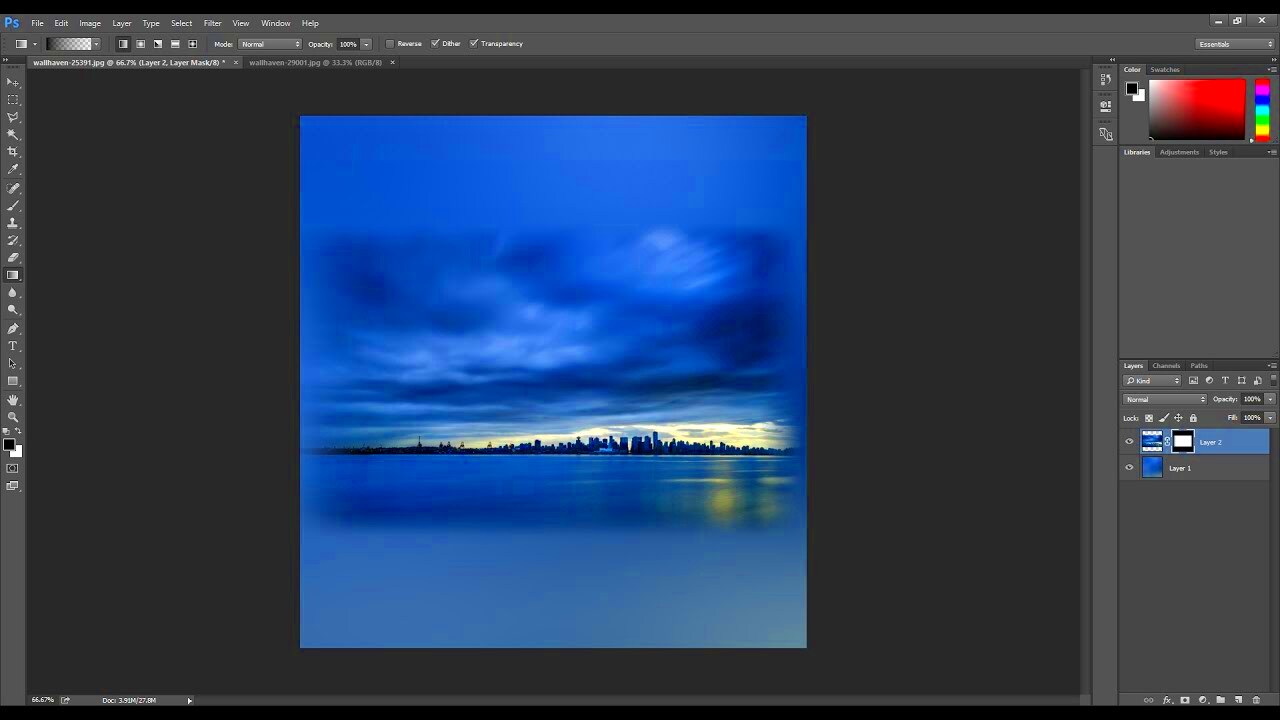
- Create a New Layer Mask: First, make sure your image is on its own layer. Then, click the “Add Layer Mask” button at the bottom of the Layers panel.
- Select the Gradient Tool: Choose the Gradient Tool from the toolbar. In the options bar, select the gradient that fades from black to white. The black area of the gradient will mask the image, while the white area will keep the image visible.
- Apply the Gradient on the Mask: With the layer mask selected, click and drag the gradient tool across the image. Start from the area where you want the image to remain fully visible (usually the center) and drag toward the edges. This will create a smooth fade from full visibility to complete transparency.
- Fine-Tune the Fade: You can adjust the gradient's direction or length to control how the fade appears. For a smoother transition, try adding multiple gradients or experimenting with the opacity levels of the gradient itself.
Using layer masks allows for a lot of flexibility and precision in creating a fade effect. You can always go back and adjust the mask without damaging the original image, which is a huge advantage when fine-tuning your design.
Also Read This: How to Convert Slides to Digital Images for Archiving
Adjusting the Opacity for a Subtle Fade Effect
Sometimes, you don’t need a dramatic fade effect. Instead, you may want a subtle transition that gently blends the edges of the image into the background. Adjusting the opacity of the layer is an easy way to create a soft, almost invisible fade. This method works well for images where you want the fading effect to be subtle yet effective.
Here's how you can adjust the opacity for a subtle fade effect:
- Open Your Image in Photoshop: Start by opening the image you want to edit in Photoshop.
- Duplicate the Image Layer: To keep things non-destructive, duplicate the image layer by right-clicking the layer in the Layers panel and selecting “Duplicate Layer.”
- Add a Layer Mask: Add a layer mask to the duplicated layer. This will allow you to adjust the fade without changing the original layer.
- Use a Gradient on the Mask: Select the Gradient Tool and choose a black-to-white gradient. Drag it from the center of the image toward the edges to create a smooth fade.
- Adjust the Opacity of the Layer: Select the layer (not the mask) and lower the opacity in the Layers panel. A lower opacity will make the fade even more subtle and less noticeable, giving the image a softer transition to the background.
This technique works well when you need a fade effect that doesn’t overpower the image. It’s perfect for blending the edges of an image into a background or when you want the image to subtly fade out without losing detail at the center.
Also Read This: How to Make an Image Not Reverse Searchable for Enhanced Privacy
Applying Gradient Tool to Fade Edges Smoothly
The Gradient Tool is one of the most effective and widely used methods for creating smooth, natural-looking fades in Photoshop. By blending colors from one tone to another, it can create seamless transitions that gently fade the edges of your image. This tool is ideal for those who want a smooth, even fade that doesn’t draw too much attention to itself, but still enhances the overall look of the image.
Here’s how to apply the Gradient Tool for edge fading:
- Open Your Image: Begin by opening the image in Photoshop that you want to apply the fade effect to.
- Select the Gradient Tool: From the toolbar on the left, select the Gradient Tool. In the top menu bar, click the gradient preview to open the Gradient Editor. Choose the gradient that fades from black to transparent. Black will represent the areas you want to mask, and transparency will fade the image into the background.
- Create a New Layer: For non-destructive editing, it’s best to apply the gradient on a new layer. To do this, click the “New Layer” button at the bottom of the Layers panel.
- Apply the Gradient: With the new layer selected, click and drag the gradient tool from the center of the image outwards toward the edges. The closer you start your gradient to the center, the softer and more gradual the fade will be.
- Refine the Effect: If the fade is too strong or too weak, you can adjust the gradient's direction, length, or opacity. Play around with different gradient types (such as radial or linear) to get the perfect look for your image.
Using the Gradient Tool gives you total control over how the fade appears, making it easy to achieve a smooth and subtle transition. Whether you want a sharp, dramatic fade or a soft, almost invisible one, this tool is versatile enough to handle it all.
Also Read This: How to Download Audio from YouTube on Mac
Tips for Perfecting the Fade Effect
Perfecting the fade effect is all about achieving a smooth, natural transition between the image and its background. Whether you’re fading the edges for artistic purposes or to create a more subtle blend, a few simple tips can take your fade from good to great. Here are some tricks to help you refine your fade effect:
- Use Soft Gradients: To ensure the fade looks smooth, choose a soft gradient from black to transparent. Harsh gradients can create noticeable lines or unwanted edges, so a subtle gradient works best for a seamless transition.
- Experiment with Opacity: Adjusting the opacity of the gradient or layer mask can help make the fade more natural. For a subtle fade, use lower opacity settings. You can always refine this later if it’s too strong.
- Try Multiple Layers: If a single gradient doesn’t give you the effect you want, don’t hesitate to use multiple layers. Layering different gradients at varying opacities allows for a more complex and nuanced fade.
- Masking for Precision: Use a layer mask for more control over the fade. This way, you can easily refine specific areas and even erase parts of the mask if the fade doesn’t blend as smoothly as you want.
- Pay Attention to Composition: Make sure the faded edges complement the composition of the image. Ensure the fade doesn’t draw attention away from the focal point, but rather enhances it by directing the viewer’s eye toward the center of the image.
These tips will help you create a more polished and professional fade effect. Remember, subtlety is key—too much fading can distract from the subject. With the right adjustments, you can achieve a flawless fade that enhances your image.
Also Read This: Modi’s Moments Redux: A Guide on How to Watch the BBC Modi Documentary
Common Mistakes to Avoid When Fading Edges
While fading edges is a simple process, it’s easy to make a few mistakes along the way. Understanding what to avoid can help you achieve a cleaner, more polished look. Here are some common mistakes to watch out for when fading edges in Photoshop:
- Using Harsh Gradients: One of the most common mistakes is using a gradient that’s too harsh. A sharp transition from fully visible to fully transparent can create noticeable lines or “banding.” Always opt for soft gradients to ensure a smooth, seamless fade.
- Overdoing the Fade: It’s easy to get carried away and make the fade too strong, which can result in an unnatural or overexposed look. Instead, aim for a subtle fade that gently blends with the background.
- Forgetting to Use Layer Masks: Layer masks are incredibly helpful for refining your fade. Without them, you may end up permanently altering your image or struggling to fine-tune the fade. Always use masks for non-destructive editing.
- Not Checking the Image Resolution: If you’re working with a low-resolution image, fading edges can sometimes make the image look pixelated or blurry. Ensure your image has a high enough resolution to handle the fade without sacrificing quality.
- Ignoring the Image Composition: A faded edge is meant to enhance the image, not distract from the subject. Be mindful of how the fade interacts with the composition and focal point. If the fade is too prominent, it could draw attention away from the main subject.
By avoiding these common mistakes, you can ensure that your edge fading looks professional and enhances your image rather than detracting from it. Take the time to fine-tune the details for the best results!
Also Read This: Can I Use My iStock Photos on Facebook?
FAQ
1. How do I fade the edges of an image without using the gradient tool?
You can fade the edges using layer masks. Simply create a new layer, add a layer mask, and use a soft brush or gradient to gradually hide parts of the image. This method offers more control and flexibility than using the gradient tool alone.
2. What if I want the edges to fade more sharply?
If you want a sharper fade, you can adjust the gradient’s contrast or use a harder brush on the layer mask. However, keep in mind that sharp transitions may look less natural, so balance it with a softer fade for the best effect.
3. Can I apply the fade effect to a part of the image only?
Yes! With layer masks, you can selectively apply the fade effect to specific areas of the image. Simply paint with black or white on the layer mask to control where the fade starts and ends, giving you more precision in the fading process.
4. Does fading edges work on any type of image?
Fading edges can work on most images, but it works best on images with a central focus or portrait-style photos. For complex images or those with detailed edges, the fade may look unnatural or distracting if not applied carefully.
5. Can I undo the fade effect if I don’t like how it looks?
Yes! Since layer masks are non-destructive, you can always refine, hide, or remove the mask entirely if you don’t like the fade effect. Photoshop allows for full flexibility and control, so don’t be afraid to experiment!
Conclusion
Fading the edges of an image in Photoshop is a simple yet powerful technique that can enhance the visual appeal of your photos and designs. Whether you want to focus attention on the center of the image, create a seamless blend with a background, or add an artistic touch, the fade effect can help you achieve your goals. By mastering tools like gradients, layer masks, and opacity adjustments, you can create smooth, professional fades that elevate your images. Remember, subtlety is key for a natural-looking fade, and with practice, you'll be able to refine the effect to suit your unique style.


