Are you looking to showcase your stunning photography to a wider audience? Behance is a fantastic platform to display your creative work, and if you're using Lightroom, exporting your photos to Behance can be a breeze. This guide will walk you through all the steps—from preparing your images in Lightroom to finding the right settings for export, ensuring that your photos look their best when shared. Let's dive in!
Step 1: Prepare Your Photos in Lightroom
Before you hit that export button, it's important to make sure your photos are polished and ready for display. Preparing your images in Lightroom can greatly impact how they are perceived on Behance. Here’s a simple checklist to help you get started:
- Editing Your Photos: Begin by applying any necessary edits. Use the Basic panel to adjust exposure, contrast, highlights, shadows, whites, and blacks. Enhance colors by experimenting with HSL (Hue, Saturation, Luminance).
- Crop and Straighten: Make sure your composition is spot-on. Use the Crop Overlay tool to trim any distractions and to ensure the horizon line is straight.
- Run Spot Removal: Clear up any blemishes or distractions in your image using the Spot Removal tool to maintain a clean look.
- Add Vignetting: Consider adding a subtle vignette for focus on your subject. You can do this in the Effects panel.
- Export Settings: Choose the appropriate file format. JPEG is the most common for web use!
Once your photos are edited and ready, you’ll be set to export them to Behance. Ensure that each image captures your artistic vision—because, remember, presentation is key!
Also Read This: How to Film YouTube Videos with Your iPhone
Step 2: Export Photos from Lightroom
Exporting your photos from Lightroom to showcase on Behance is a super straightforward process. Follow these easy steps to ensure your images look stunning and are perfectly formatted for your audience.
- Open Your Catalog: Start by selecting the photos you want to export. You can find them in the Library module of Lightroom.
- Select Your Photos: Click on the images you wish to export. If you want to select multiple photos, hold down the Ctrl key (or Cmd on Mac) while clicking each image.
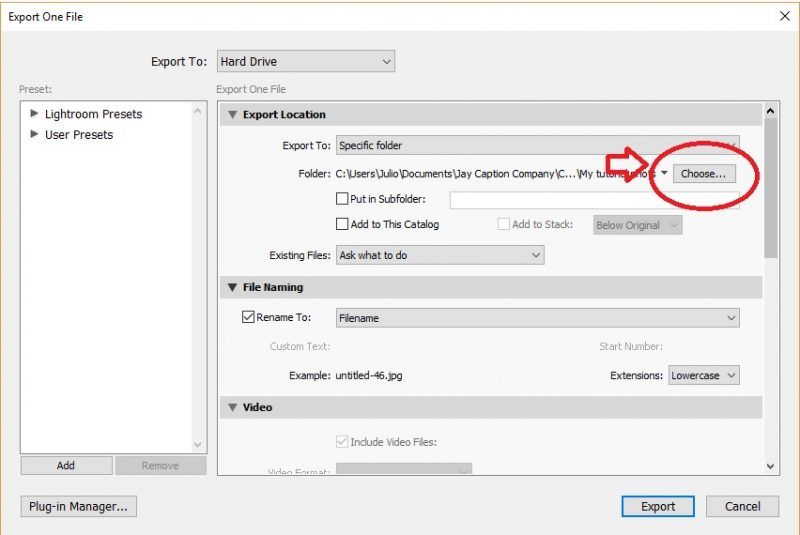
- Open the Export Dialog: Go to the top menu and click on File > Export. This will open the Export dialog box where you can customize your settings.
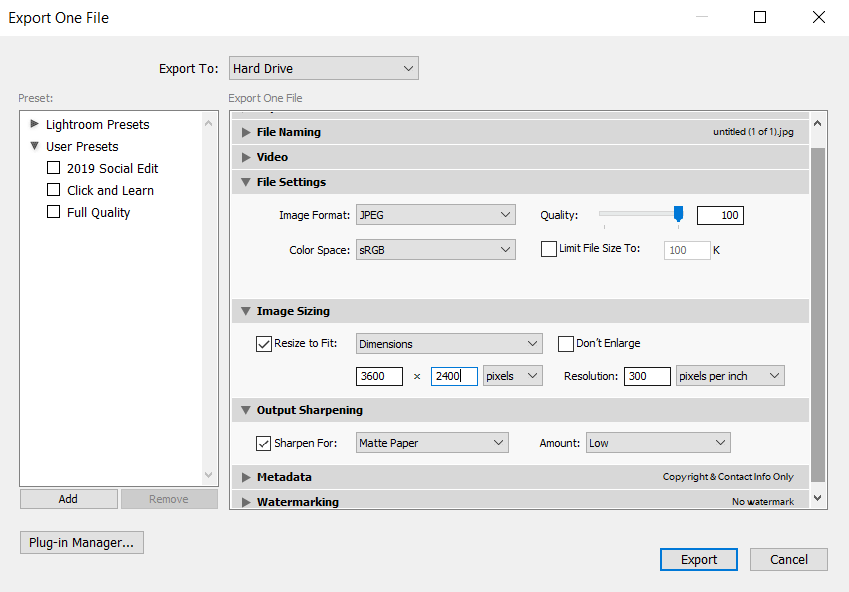
Now, let’s configure the export settings:
| Setting | Recommended Options |
|---|---|
| File Format | JPEG |
| Quality | 80-100 (higher quality for Behance) |
| Color Space | sRGB |
| Image Sizing | Long Edge: 1400 pixels (ideal for web display) |
Once you’ve set all your preferences, choose the destination folder where you want to save your exported files, and hit the Export button. Voila! Your photos are ready to dazzle on Behance!
Also Read This: Understanding Earnings at Adobe Stock
Step 3: Create a Behance Account
Now that you have your stunning images ready, it’s time to create a Behance account so you can showcase your work! Let’s navigate through this simple process together.
- Visit the Behance Website: Go to Behance.net. The homepage is welcoming and user-friendly, making it easy to get started!
- Click on Join: Look for the Join button at the top right corner. It’s hard to miss.
- Select Your Registration Method: You can either register using your Adobe ID, Google account, or sign up with your email. Choose whichever is most convenient for you.
Once you’ve chosen your registration method, follow the prompts to create your account:
- Fill in your details (name, email, etc.) as required.
- Create a unique username that reflects your style or brand.
- Don’t forget to set a strong password to keep your account secure!
After you’ve completed your registration, confirm your email address via the link Behance sends you. And that’s it! You're all set to start showcasing your photography talents on this vibrant platform. Exciting, right?
Also Read This: how do you put edible images on cakes
Step 4: Upload Your Photos to Behance

Once you've curated and exported your Lightroom photos, it’s time to move on to the exciting part: uploading them to Behance! If you're unsure about the steps, don't worry; I'll break it down for you.
First, log into your Behance account. If you haven’t created one yet, it's super easy—just follow the prompts to sign up. Once you’re in, look for the big, green “Create a Project” button; this is your launchpad!
Next, you'll be directed to a new project page. Here’s where the fun starts:
- Select Your Files: Click on the “Upload Files” option. Navigate to the folder where you saved your exported Lightroom photos. You can upload multiple images at once by holding down the “Ctrl” (or “Command” on Mac) key while selecting them.
- Add Titles and Descriptions: After your images have uploaded, it’s helpful to give each one a title or a description. This step is crucial as it provides context for viewers; they’ll appreciate understanding your creative process!
- Arranging Images: Drag and drop your images to rearrange them in the order you prefer. A well-structured layout makes your project more visually appealing.
- Preview Your Project: Before finalizing, hit the “Preview” button to see how it looks. You’d be surprised how much a simple glance can reveal about the overall presentation.
Once you’re satisfied, click on “Save”. Congratulations, your photos are now uploaded to Behance!
Also Read This: How to View Only My Licenses on Adobe Stock
Step 5: Optimize Your Project for Visibility
Now that your photos are on Behance, you’ll want to make sure they stand out! The platform is buzzing with amazing creatives, so a little optimization can go a long way in attracting viewers to your project. Here’s how:
1. Craft an Engaging Title: Your project title is the first thing people see. Make it catchy and relevant to your photography theme. Don’t forget to include keywords that resonate with your genre.
2. Use Tags Wisely: Behance allows you to add tags to your project. Opt for tags that accurately describe your work. Think of terms that potential fans or clients might search for; for example, "landscape photography," "portraiture," or "photo editing."
3. Write a Compelling Description: Provide a well-written description that tells the story behind your photographs. Share your inspiration, the techniques you used, or the challenges you faced. A good narrative can captivate your audience.
4. Share on Social Media: Don’t keep your wonderful creation to yourself! Share it across your social media platforms. Tag Behance and use appropriate hashtags to increase visibility.
5. Engage with the Community: Behance is not just about showcasing; it's about connecting. Like, comment, and give feedback on other projects. The more you engage, the more likely people will return the favor.
Remember, it’s all about creating a welcoming and prompt experience for viewers, and these steps will help elevate your project on Behance!
How to Export Lightroom Photos to Behance and Showcase Your Photography Work
If you're looking to showcase your photography work to a wider audience, Behance is an excellent platform to display your talent. Integrating your photos from Adobe Lightroom can streamline this process. Here’s a step-by-step guide to help you export your photos from Lightroom and share them on Behance effectively.
Step 1: Prepare Your Photos in Lightroom
Before exporting, ensure that your images are edited, polished, and ready for presentation. Here’s how to get them ready:
- Make necessary adjustments using Lightroom’s editing tools.
- Consider cropping your images to make them more visually appealing.
- Ensure the images reflect your photography style and brand.
Step 2: Exporting Photos from Lightroom
Once your images are ready, you’ll need to export them:
- Select the photos you wish to export.
- Click on File in the top menu and select Export.
- In the export dialog, set the following parameters:
| Setting | Recommended Option |
|---|---|
| File Type | .JPEG |
| Quality | 80-100% |
| Resize to Fit | Long Edge (1200 pixels) |
| Output Sharpening | Standard |
After setting the options, click Export. Your images will be saved to the designated folder.
Step 3: Uploading to Behance
Now that your photos are exported, follow these steps to upload them to Behance:
- Sign in to your Behance account.
- Click on the Create a Project button.
- Drag and drop your exported images into the project area.
- Add titles, descriptions, and tags to each image to enhance visibility.
- Once everything is set, click Publish to showcase your work.
By following these steps, you can effortlessly export your Lightroom photos to Behance, allowing you to reach a broader audience and engage with photography enthusiasts around the world.
Conclusion
Exporting your Lightroom photos to Behance not only highlights your photography skills but also opens up opportunities for networking and feedback within a creative community.
 admin
admin


