Editing videos on your iPad can be an exciting and creative process! Whether you’re a beginner or looking to enhance your skills, the iPad offers user-friendly tools that make editing accessible. With its touch screen and portability, you can edit on the go, making it perfect for content creators who want to produce high-quality videos without being tethered to a computer. Let’s dive into the basics of getting started with video editing on your iPad!
Choosing the Right Video Editing Apps for iPad
When it comes to video editing on your iPad, the right app can make all the difference. Here are a few popular options:
- iMovie: This is Apple’s own app and is perfect for beginners. It provides a seamless interface with simple drag-and-drop features. You can easily trim clips, add transitions, and insert music.
- Adobe Premiere Rush: Ideal for those familiar with Adobe’s interface, this app offers powerful editing tools. You can create professional-looking videos with just a few taps and share them directly to social media.
- LumaFusion: For more advanced users, LumaFusion is like having a full-fledged video editing suite right on your iPad. It supports multi-track editing, keyframing, and offers a wide range of audio and video effects.
- KineMaster: This app is great for both beginners and pros, featuring layers for video, images, and effects. It also has a user-friendly interface that allows for precise control over your edits.
Here are some factors to consider when choosing the right app:
- User Interface: Make sure the app is intuitive and easy to navigate. You don’t want to waste time figuring out where everything is.
- Features: Look for features that align with your editing needs. For instance, if you need advanced effects or multi-track audio, choose an app that offers these capabilities.
- Export Options: Check how the app handles export. You want to ensure it allows you to save your videos in high quality and share them easily on platforms like YouTube or Instagram.
- Cost: Some apps are free, while others come with a subscription or one-time fee. Decide what fits your budget and needs.
Taking the time to choose the right video editing app can significantly enhance your workflow and final product. So, consider downloading a few to test them out before committing to one. Happy editing!
Also Read This: Is Bally's on YouTube TV? Everything You Need to Know About Sports Channel Access
3. Importing Videos from YouTube to Your iPad
So, you’ve got your iPad ready, and you’re excited to start editing your YouTube videos. The first step is to get those videos onto your device. Here’s how you can do it in just a few simple steps!
First off, you'll need to use a reliable app to import videos. One popular option is Documents by Readdle. This app acts like a file manager and web browser combined, making it easy to download videos directly to your iPad. Here’s a quick guide:
- Download Documents by Readdle: Head to the App Store and install the app.
- Open the app: Launch Documents, and you’ll see a web browser icon.
- Find your video: Go to YouTube and search for the video you want to download.
- Copy the link: Tap on the share icon and select ‘Copy Link’.
- Use a downloader: In the app’s browser, search for a YouTube video downloader. Sites like y2mate.com or savefrom.net are good options.
- Paste your link: In the downloader site, paste your YouTube link and select your desired video quality.
- Download: Hit the download button, and once it’s done, you can find the video in your Files section of the app.
Once you have your video imported, you’re ready to start editing! Just remember to check copyright permissions and ensure you have the right to download and edit the content. Now, let’s dive into some basic editing techniques to make your videos pop!
Also Read This: Step-by-Step Guide to Adding a YouTube Link to Your TikTok Profile
4. Basic Editing Techniques for YouTube Videos
Editing videos on your iPad can be a breeze, especially with intuitive apps like iMovie or LumaFusion. Let’s go over some basic techniques that will help you enhance your videos swiftly.
Here are some essential editing techniques to get you started:
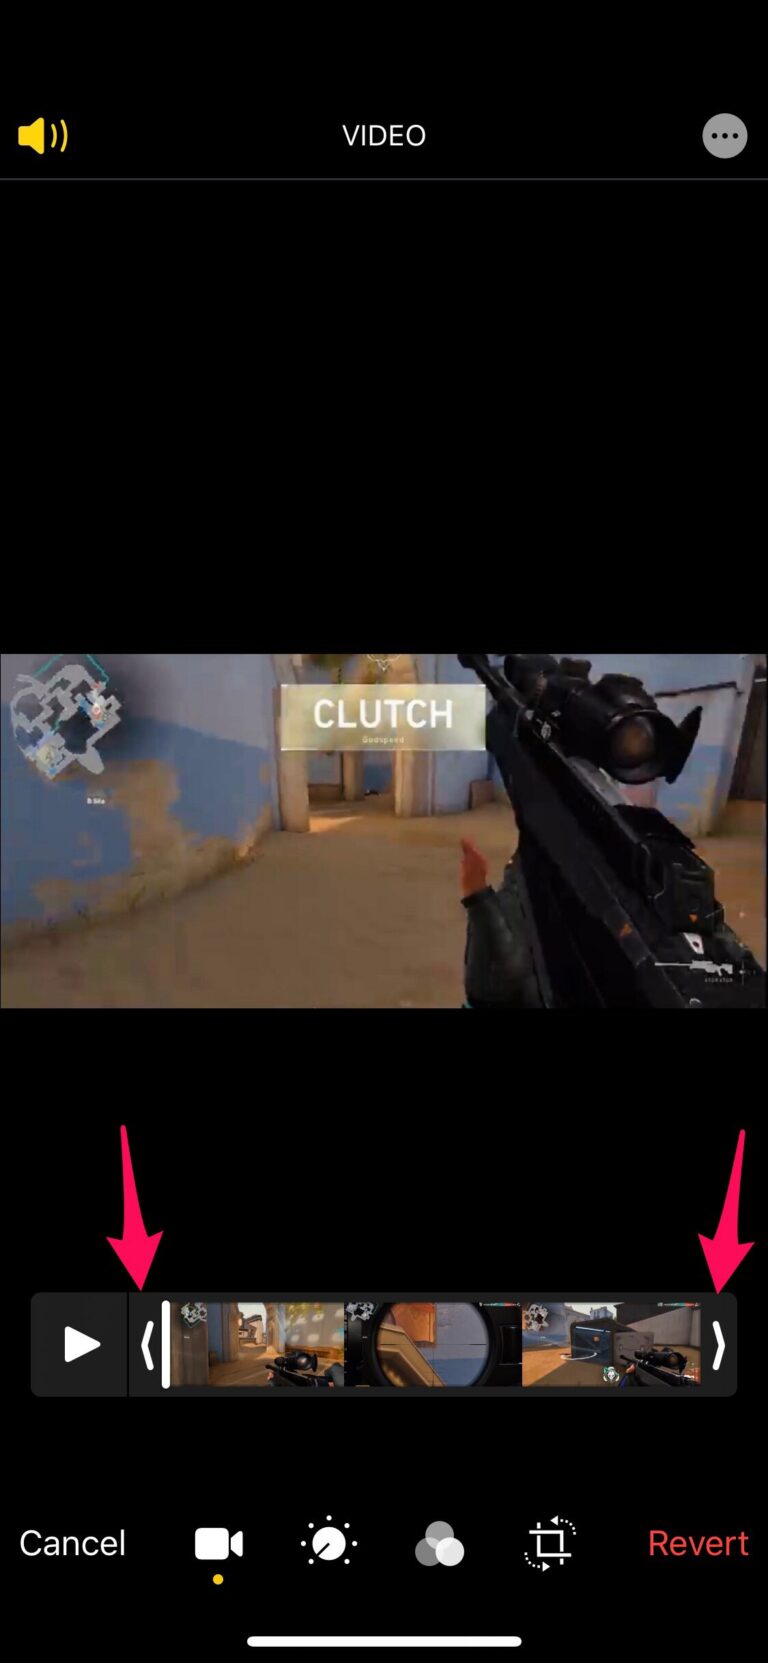
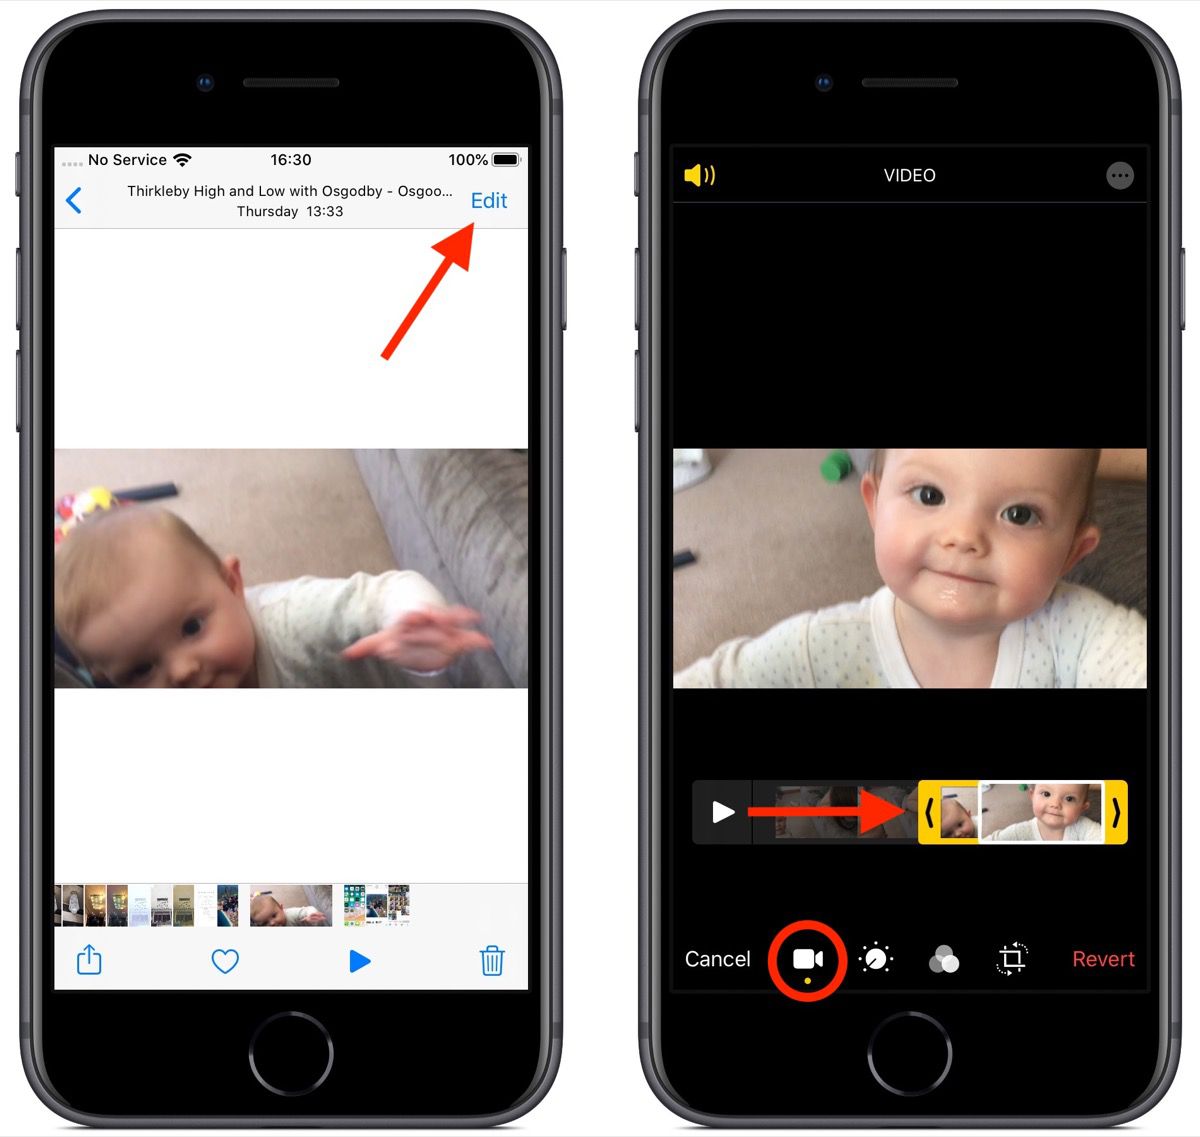
- Trimming Clips: Start by trimming out any unnecessary footage. In iMovie, simply drag the edges of your clip to shorten it.
- Adding Transitions: Smooth out your edits with transitions. Use simple fades or wipes to make your video flow better.
- Inserting Text: Add titles or captions to make important information stand out. Choose clear fonts and contrasting colors for visibility.
- Adjusting Audio Levels: Ensure your audio is balanced. Lower background music while someone is speaking to keep viewers engaged.
- Using Filters: Apply filters to give your video a consistent look. Different apps offer various styles, so experiment to find what fits your video best!
Don’t forget to preview your edits regularly! Watching your video as you make changes will help you catch anything that feels off. Once you’re satisfied, export your video directly from the editing app to your Camera Roll or upload it directly to YouTube!
Editing isn’t just about cutting and splicing; it’s about telling a story. So let your creativity shine, and remember to have fun with it!
Also Read This: Can You Make Money Reposting Videos on YouTube? Understanding the Rules
5. Adding Effects and Transitions
When you’re editing your YouTube videos on an iPad, one of the best ways to make your content pop is by adding effects and transitions. These tools can enhance your storytelling and keep your audience engaged. Let’s break it down into simple steps!
Choosing the Right App
First things first, you need a robust video editing app. Some popular choices include:
- iMovie: A user-friendly app that’s perfect for beginners.
- LumaFusion: A more advanced option with professional-grade features.
- Filmmaker Pro: Great for those looking to add unique effects easily.
Applying Effects
Once you have your app, it’s time to dive into the fun part—adding effects! Here’s how:
- Select the clip where you want to add an effect.
- Look for the effects menu, usually represented by a star or effects icon.
- Choose from options like filters, color corrections, or animations.
- Adjust the intensity to match the mood of your video.
Adding Transitions
Transitions are crucial for creating smooth shifts between scenes. To do this:
- Tap the space between two clips.
- Find the transitions menu, often denoted by a line or square icon.
- Select from various transitions like fade, slide, or dissolve.
- Preview your selected transition to see how it flows.
Remember, while effects and transitions are fun, less is often more. Use them strategically to enhance your narrative without overwhelming your audience!
Also Read This: Turning Off Captions on YouTube TV: A Quick Guide
6. Incorporating Music and Sound Effects
Sound is a vital component of your videos—they can elevate the overall production quality and make your content more engaging. Let’s dive into how to incorporate music and sound effects seamlessly!
Finding the Right Background Music
Choosing appropriate music can set the tone for your video. Here’s where to find great tracks:
- Royalty-Free Music Libraries: Websites like Bensound and Epidemic Sound offer great background music.
- YouTube Audio Library: A fantastic resource with free tracks you can use in your videos.
Adding Music to Your Video
Now that you have your tracks, let’s add music to your video:
- Open your video project in the editing app.
- Navigate to the audio or music section.
- Import the chosen track from your library or files.
- Adjust the audio levels so that it complements your video without overpowering your voice.
Incorporating Sound Effects
Sound effects can add a layer of professionalism and fun. To add them:
- Browse sound effects libraries in your editing app or use external sources.
- Drag and drop the sound effects onto the timeline where they fit best.
- Adjust the volume and timing for the perfect sync.
Lastly, always remember to check copyright laws when using music and sound effects. By choosing the right sounds, you not only enhance your video but also create a memorable experience for your viewers. Now, you’re ready to edit like a pro!
Also Read This: How to Screen Record YouTube Videos with Sound: Easy Steps
7. Exporting and Uploading Your Edited Video to YouTube
Once you've finished editing your video on your iPad, the next exciting step is exporting and uploading it to YouTube. This process is quite straightforward, but let's break it down to ensure you don’t miss anything!
Step 1: Export Your Video
After editing, look for the export or share button, usually represented by an icon of an arrow pointing up or a square with an arrow. Tap on it and select your desired video quality. Higher resolutions like 1080p or 4K will look fantastic, but they can take longer to upload. Choose what fits your needs!
Step 2: Choose the Right Format
Most editing apps will automatically select a format compatible with YouTube, like MP4. If you're prompted, stick with MP4 for the best compatibility and quality.
Step 3: Upload to YouTube
Now, you’re ready to upload! If you’re using the YouTube app on your iPad, you can tap the camera icon (the "+" sign) to add your video. Select the video you've just exported, and it will start the upload process.
Step 4: Fill in Video Details
- Title: Make it catchy and relevant to attract viewers.
- Description: Provide a summary of what the video covers. Include links or calls to action if necessary.
- Tags: Use relevant keywords to help your video be discovered.
Step 5: Thumbnails and Settings
Choose an eye-catching thumbnail from the video or upload a custom image. Don't forget to adjust privacy settings: you can choose from public, unlisted, or private, depending on who you want to see your video.
Step 6: Publish!
Once everything looks good, hit the “Publish” button! Congratulations, your video is now live for the world to see! You can share the link with friends, family, and on social media to maximize its reach.
8. Troubleshooting Common Editing Issues
Editing can be a creative process, but it’s not without its hiccups. Here are some common issues you might encounter while editing videos on your iPad and how to troubleshoot them:
1. App Crashes or Freezes
If your editing app crashes, try restarting the app. If that doesn't help, reboot your iPad. Ensure you have the latest version of the app installed, as updates often fix bugs!
2. Video Quality Issues
Sometimes, the video might look pixelated or blurry in the editor. Ensure you’ve imported high-resolution footage. If you're editing a video shot in high quality, but it appears low quality, check your project settings and confirm you’re editing in the correct resolution.
3. Audio Sync Problems
If your audio and video aren’t in sync, try adjusting the audio track within the editing timeline. Most apps allow you to drag audio clips left or right to align them properly. If you’re having persistent issues, consider re-importing the audio file.
4. Exporting Errors
If you encounter issues during export, ensure you have enough storage on your iPad. Clear out unnecessary files or apps to free up space. Also, check your Wi-Fi connection if uploading directly to YouTube fails.
5. Understanding App Limitations
Every app has its quirks and limitations. Familiarize yourself with the specific capabilities and restrictions of your editing app. Look up FAQs or user forums for solutions to unique problems!
With these tips, you should be well-equipped to tackle any editing issues that come your way. Happy editing!
 admin
admin


