How to Edit Text on Shutterstock Image: A Tutorial
By: HD Stock Images
November 22, 2023
125621
Introduction
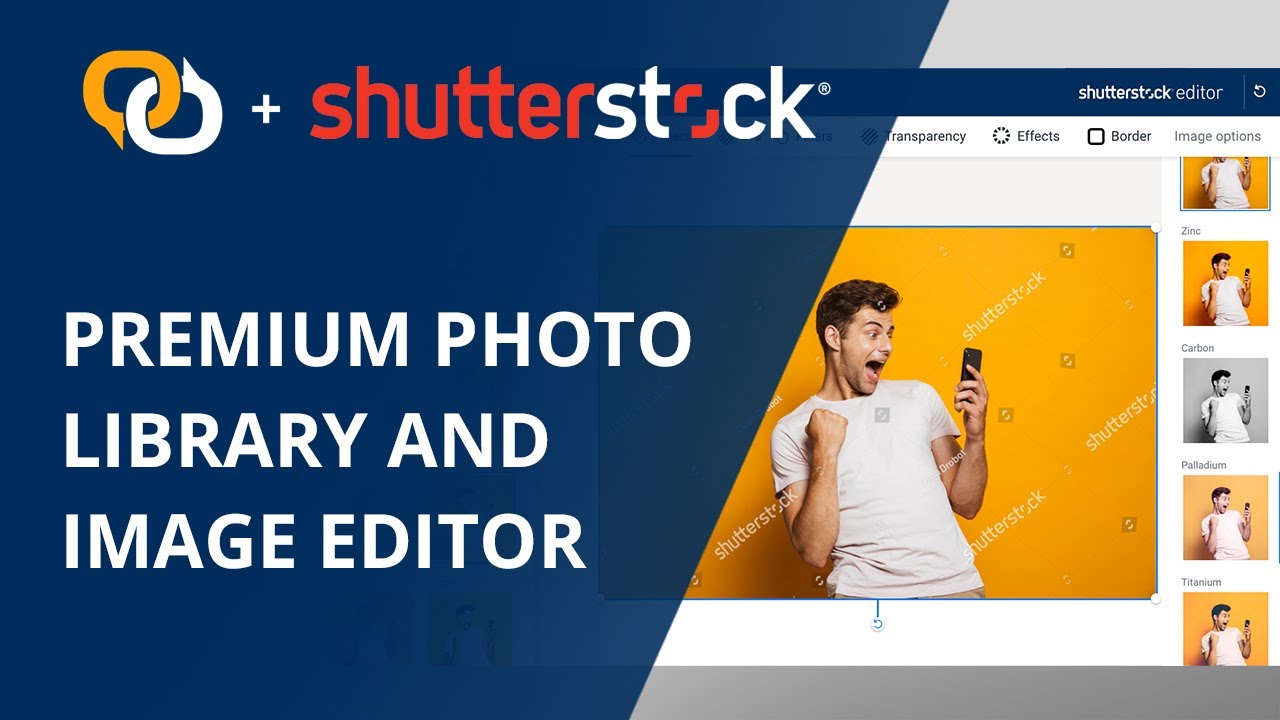
Shutterstock offers a powerful suite of tools for image editing, allowing users to customize and enhance stock images to suit their specific needs. Let's delve into the key aspects of Shutterstock's image editing capabilities.
Features and Tools Overview
Shutterstock's image editing interface provides a user-friendly experience with an array of features. Users can access tools for cropping, resizing, and, importantly, editing text. The text editing feature enables you to add, modify, and customize text elements seamlessly.
Text Customization Options
When it comes to editing text on Shutterstock images, users can enjoy a wide range of customization options. These include:
Font Selection: Choose from a diverse collection of fonts to align with your project's aesthetic.
Size Adjustment: Easily resize text to fit the desired proportions on the image.
Color Palette: Explore a palette of colors to make your text visually striking.
Step-by-Step Editing Process
Let's outline a basic step-by-step process for editing text on Shutterstock images:
Access the Text Editing Tool: Locate the text editing tool within the Shutterstock platform.
Select and Modify Text: Easily select existing text elements and make modifications as needed.
Add New Text: Insert new text with options for font, size, and color customization.
Adjust Position and Orientation: Move and rotate text elements to achieve the desired placement.
Apply Special Effects: Enhance your text with effects, gradients, and shadows for a creative touch.
Compatibility and Export Options
Shutterstock's image editing tools are designed for seamless compatibility across various platforms and devices. Once you've perfected your text edits, easily export your customized images in different formats, ensuring versatility in your creative projects.
Stay Tuned for Advanced Techniques
This is just the beginning of your journey into Shutterstock's image editing capabilities. In upcoming sections, we'll explore advanced techniques, troubleshooting tips, and ways to elevate your creative projects through text customization.
Embarking on the journey of editing text on Shutterstock images is an exciting venture. In this step-by-step tutorial, we'll guide you through the intricacies of transforming stock images with personalized text elements.
1. Accessing the Text Editing Tool
To kickstart your text editing journey, log in to your Shutterstock account and navigate to the image you want to customize. Look for the intuitive text editing tool, often located in the toolbar or a designated editing menu. Click on it to enter the text editing interface.
2. Selecting and Modifying Text
Once inside the text editing interface, hover over existing text elements on the image. Click on the desired text to select it, enabling you to make modifications. Use this opportunity to tweak the font style, size, and color to align with your creative vision.
3. Adding New Text
For those looking to infuse their images with fresh text, the process is straightforward. Locate the 'Add Text' option in the toolbar or menu, and a text box will appear on your image. Here, you can type your desired text and explore formatting options such as font, size, and color.
4. Adjusting Text Position and Orientation
Precision is key when perfecting the placement of your text. Click and drag the text box to reposition it on the image. Additionally, easily adjust the orientation by selecting the text box and using rotation handles until you achieve the desired angle.
5. Applying Special Effects
Enhance the visual impact of your text by delving into special effects. Experiment with gradients, shadows, and other effects available in the editing menu. These features add depth and creativity to your text elements, making them stand out on the image.
6. Save and Export Your Edited Image
Once you've perfected your text edits, ensure to save your progress. Most platforms offer a 'Save' or 'Apply Changes' option. After saving, explore the export options to download your customized image in the desired format, ready for use in your creative projects.
Mastering the Art of Text Editing
Congratulations! You've completed the basic steps of editing text on Shutterstock images. Stay tuned for advanced techniques and tips to truly master the art of text customization in our upcoming sections.
Unlocking the potential of text editing on Shutterstock images begins with accessing the dedicated text editing tool. This fundamental step sets the stage for your creative journey. Follow these detailed instructions to seamlessly navigate to the text editing feature:
Login to Your Shutterstock Account: Start by logging in to your Shutterstock account. If you don't have an account, you'll need to sign up to gain access to the full suite of editing tools.
Select Your Image: Navigate to the image you wish to edit. Whether it's a captivating photograph or a dynamic illustration, ensure you have the image open in the editor.
Locate the Text Editing Tool: Look for the text editing tool icon in the toolbar or menu. It's often represented by a letter 'T' or a similar symbol, indicating the presence of text customization features.
Enter Text Editing Mode: Click on the text editing tool to enter the text editing mode. This action activates the interface, allowing you to interact with existing text elements or add new text to your image.
Explore Additional Options: Familiarize yourself with the additional options within the text editing interface. These may include font selection, size adjustments, color palettes, and other formatting tools.
By following these steps, you'll seamlessly access the text editing tool on Shutterstock, setting the foundation for transforming your images with personalized and impactful text elements. Remember to explore the diverse possibilities that text customization offers, and don't hesitate to experiment with different styles to bring your creative vision to life.
Once you've accessed the text editing tool on Shutterstock, the next crucial step is selecting and modifying text elements within your chosen image. This process allows you to tailor existing text to better suit your creative vision. Here's a detailed guide on how to master the selection and modification of text:
Hover Over Existing Text: Position your cursor over the text element you wish to modify. This action triggers the text to be highlighted, indicating it is ready for editing.
Click to Select: Click on the highlighted text to select it. This enables you to access a range of modification options, including font changes, size adjustments, and color alterations.
Modify Font Style: Experiment with different font styles to find the one that best complements your image. Bold, italic, and underline options may also be available, providing additional customization possibilities.
Adjust Text Size: Easily resize the selected text by using the sizing handles. Ensure the text maintains proper proportions within the image for a polished and professional look.
Change Text Color: Explore the color palette to change the text color. Opt for a hue that enhances readability and harmonizes with the overall color scheme of the image.
Undo and Redo Modifications: Most editing interfaces offer an undo/redo functionality. Utilize these options to experiment with different modifications, knowing you can easily revert to previous states if needed.
By following these steps, you gain mastery over the selection and modification of text elements on Shutterstock. This proficiency empowers you to fine-tune existing text to align with your creative goals, ensuring your images convey the intended message with precision and impact.
Unlocking the full creative potential of your Shutterstock images involves the addition of new text elements. Whether you're looking to convey a message, insert a call-to-action, or simply enhance visual appeal, here's a detailed guide on how to seamlessly add new text to your images:
Locate the 'Add Text' Option: Within the text editing interface, look for the 'Add Text' option. This is typically represented by a button or icon that prompts the creation of a new text box on your image.
Click to Create a Text Box: Click on the 'Add Text' option to initiate the creation of a new text box. This action prompts a text box to appear on your image, ready for your input.
Type Your Desired Text: Within the newly created text box, type the text you want to add to your image. This is where you can get creative with headlines, captions, or any textual elements that enhance the narrative of your visual content.
Explore Formatting Options: Once you've added your text, delve into the formatting options available. Experiment with different fonts, adjust the size to fit your design, and choose a color that complements the overall aesthetic of your image.
Position the Text Box: Click and drag the text box to the desired location on your image. Precision in placement ensures your new text seamlessly integrates with the visual composition.
Resize and Rotate: Use the sizing handles to resize the text box as needed. Additionally, if you want to add a dynamic touch, leverage rotation handles to adjust the orientation of your newly added text.
By following these steps, you empower yourself to enhance your Shutterstock images with fresh, personalized text. Adding new text opens up a world of creative possibilities, allowing you to tailor your visuals to specific themes, messages, or branding elements for a truly impactful and customized result.
Perfecting the placement and orientation of text on your Shutterstock images is essential for achieving a polished and visually appealing result. Follow these detailed steps to master the art of adjusting text position and orientation:
Select the Text Box: Begin by selecting the text box containing the text you want to reposition or rotate. Click on the text box to activate the editing handles.
Move the Text Box: Click and drag the text box to the desired location on your image. Precise positioning is crucial for ensuring the text complements the overall composition and does not interfere with other elements.
Resize the Text Box: Use the sizing handles to adjust the dimensions of the text box. This allows you to fine-tune the size of the text and its impact on the visual balance of the image.
Rotate the Text: To add a dynamic or creative angle to your text, leverage the rotation handles. Click and drag these handles to rotate the text box, providing flexibility in the orientation of your added text.
Align with Visual Elements: Consider the visual elements in your image, such as focal points or lines, and align your text accordingly. This enhances the overall harmony and ensures your text integrates seamlessly into the composition.
Use Grids or Guidelines: Some editing interfaces offer grids or guidelines that aid in precise positioning. Take advantage of these tools to achieve pixel-perfect alignment and orientation.
By mastering the adjustment of text position and orientation, you elevate the professionalism of your Shutterstock images. Whether you're aiming for a clean and structured layout or a more dynamic and artistic presentation, these techniques empower you to achieve your desired visual impact with ease.
Transforming your Shutterstock images goes beyond basic text placement—applying special effects can add flair and creativity to your textual elements. Here's a comprehensive guide on how to infuse your text with special effects for a visually striking result:
Access the Effects Menu: Look for the effects menu within the text editing interface. This may be represented by icons such as a magic wand or a stylized 'fx.'
Explore Gradient Options: Gradients can add depth and dimension to your text. Experiment with different gradient styles, choosing colors that complement the overall theme of your image.
Add Shadows for Depth: Incorporating shadows beneath your text can create a sense of depth and make the text pop. Adjust the shadow intensity and direction to achieve the desired effect.
Experiment with Textures: Some editing platforms offer texture overlays for text. Apply subtle textures to your text for a unique and tactile appearance that enhances visual interest.
Try Out Glow and Blur: A gentle glow or a subtle blur effect around your text can add a dreamy or ethereal quality. Adjust the intensity of these effects to strike the right balance with your overall design.
Utilize Opacity Settings: Adjusting the opacity of your text allows you to create a translucent or faded effect. This is particularly useful for overlaying text on complex or vibrant backgrounds.
Enhancing your text with special effects not only makes it visually appealing but also adds a layer of sophistication to your Shutterstock images. Remember, moderation is key, so experiment with different effects and find the combination that best complements your overall design aesthetic.
Effect
Description
Gradient
Creates a smooth transition between two or more colors, adding depth to your text.
Shadow
Introduces a shadow beneath the text, providing a three-dimensional effect.
Texture Overlay
Applies a textured layer to the text, enhancing its visual and tactile appeal.
Glow
Adds a soft glow around the text, creating a luminous and captivating effect.
Opacity
Adjusts the transparency of the text, allowing for subtle or bold appearances.
While navigating the creative process of editing text on Shutterstock images, users may encounter common challenges. Being aware of potential issues and knowing how to troubleshoot them ensures a smoother and more enjoyable editing experience. Let's explore these challenges and provide solutions:
Font Rendering Issues: If the selected font doesn't display correctly, ensure that the font is installed on your device. If the issue persists, consider choosing a different font that is compatible with the editing platform.
Text Box Alignment: Misalignment of text boxes can disrupt the visual flow. Use alignment tools within the text editing interface to ensure consistent spacing and positioning.
Color Discrepancies: If the chosen text color doesn't appear as expected, double-check the color settings and ensure there are no conflicting background colors or textures affecting visibility.
Unexpected Text Distortion: In some cases, resizing text may lead to distortion. To avoid this, maintain aspect ratios or consider using a different font size for better clarity.
Export Quality: When downloading the edited image, verify the export settings to ensure optimal quality. Low-resolution exports may result in pixelation or blurriness.
Browser Compatibility: If you're using a web-based editing platform, ensure your browser is up-to-date and compatible. Some features may not function correctly on outdated browsers.
Troubleshooting Tips
Issue
Solution
Font Rendering Issues
Install the required font or choose a compatible alternative.
Text Box Alignment
Utilize alignment tools to ensure consistent spacing and positioning.
Color Discrepancies
Check color settings and resolve any conflicts with background colors.
Unexpected Text Distortion
Maintain aspect ratios during resizing or consider using a different font size.
Export Quality
Verify export settings to ensure high-resolution output.
Browser Compatibility
Ensure your browser is up-to-date for optimal functionality.
By addressing these common challenges and utilizing the provided troubleshooting tips, users can navigate potential obstacles with confidence, ensuring a seamless and enjoyable text editing experience on Shutterstock.
Explore the frequently asked questions about editing text on Shutterstock images to enhance your understanding and streamline your creative process:
Q: Can I edit text on any image on Shutterstock?
A: While many images on Shutterstock allow text editing, it depends on the image's licensing and permissions. Check the image details and licensing information to ensure you have the right to modify text.
Q: Are there limitations on the length of text I can add?
A: In most cases, there are no strict limitations on text length. However, consider the overall design and visual balance, as excessively long text may impact the image's aesthetic.
Q: How do I change the font of existing text?
A: Select the text you wish to modify, and within the text editing interface, explore the font options. Choose a different font from the available selection to update the text's appearance.
Q: Can I collaborate with others on text editing within Shutterstock?
A: Shutterstock primarily focuses on individual user accounts. If collaboration is essential, consider sharing the edited image file with collaborators, as direct collaborative editing features may be limited.
Q: What should I do if my edited text looks pixelated after export?
A: Ensure you export the image in a high-resolution format to maintain text clarity. If pixelation persists, consider resizing the text within the optimal dimensions or choosing a different font size.
These frequently asked questions provide valuable insights into common queries related to text editing on Shutterstock. If you have additional questions or specific concerns, refer to Shutterstock's help documentation or support resources for further assistance.
Conclusion
Congratulations on completing this tutorial on how to edit text on Shutterstock images! We've explored the essential steps, from accessing the text editing tool to applying special effects and troubleshooting common challenges. As you continue your creative journey, keep in mind the following key takeaways:
Personalization is Power: Editing text allows you to infuse your Shutterstock images with a personal touch, making them uniquely yours.
Experiment and Explore: Don't hesitate to experiment with different fonts, colors, and effects. The more you explore, the more you'll discover your preferred style.
Precision Matters: Pay attention to details such as text alignment, size, and orientation. Precise adjustments contribute to a polished and professional final result.
Troubleshooting is Normal: Encountering challenges is part of the creative process. Refer to the troubleshooting tips provided to overcome common issues with confidence.
Collaborate and Share: If collaboration is crucial, consider sharing the final edited image with others, as Shutterstock primarily caters to individual user accounts.
Remember, the ability to edit text on Shutterstock opens up a world of creative possibilities, allowing you to elevate your projects and communicate your message effectively. Keep honing your skills, stay curious, and enjoy the journey of transforming stock images into personalized works of art!
About Author
admin
Making up design and coding is fun. Nothings bring me more pleasure than making something out of nothing. Even when the results are far from my ideal expectations. I find the whole ceremony of creativity completely enthralling. Stock Photography expert.
 admin
admin