YouTube captions, often referred to as subtitles, play a crucial role in making videos accessible to a broader audience. They provide a textual representation of the spoken content, allowing viewers who are deaf or hard of hearing to enjoy the material just like anyone else. Moreover, captions can also help non-native speakers understand the dialogue better. But did you know that editing these captions can significantly enhance their accuracy and effectiveness? Let's dive into the world of YouTube captions and discover how to fine-tune them for maximum impact.
Why Accessibility Matters
Accessibility is about ensuring that everyone, regardless of their abilities or disabilities, can access and benefit from content. When it comes to YouTube, captions serve a vital purpose. Here are some compelling reasons why accessibility matters:
- Inclusivity: By providing captions, you're welcoming a diverse audience, including those who are deaf or hard of hearing, non-native speakers, and individuals in sound-sensitive environments.
- Enhanced Comprehension: Captions can aid understanding, especially in educational content where complex ideas are discussed. They allow viewers to read while they listen.
- SEO Benefits: Search engines can index captions, potentially improving your video’s visibility. More accessible videos can reach a larger audience, driving up views and engagement.
- Legal Compliance: Many countries have regulations requiring accessibility in public content. Ensuring your videos are captioned helps you stay in line with these laws.
- Improved User Experience: Viewers appreciate the option to follow along with captions, especially in noisy environments or when the audio quality is poor.
In essence, when you prioritize accessibility in your YouTube videos, you’re not just following best practices; you’re fostering a more inclusive digital space for everyone. Let's explore how to effectively edit those captions!
Also Read This: Adding Image Textures in Blender for Realistic Designs
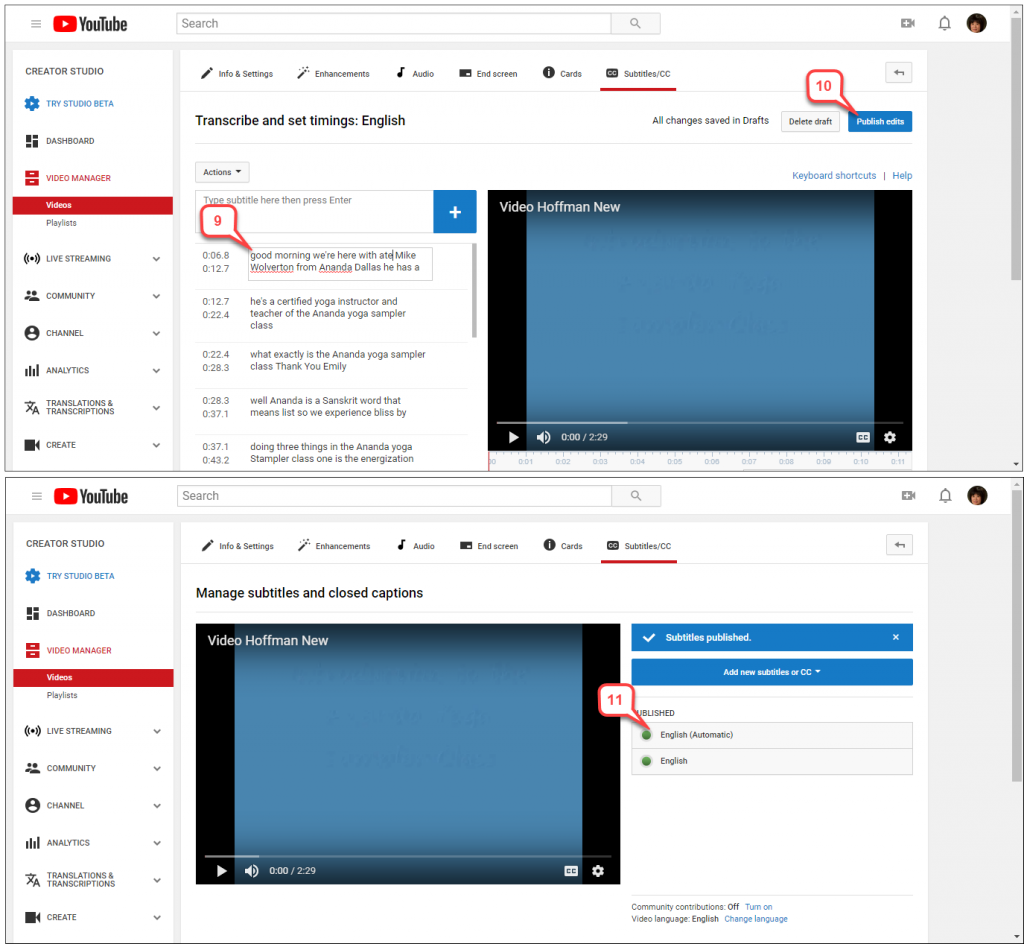
3. Steps to Access Your YouTube Video's Captions
Accessing your YouTube video's captions is a straightforward process, but it’s crucial for ensuring your content is accessible to everyone. Here’s how you can do it:
- Log in to YouTube Studio: Start by logging into your YouTube account and navigating to YouTube Studio. This is where all the magic happens!
- Select Your Video: In the left sidebar, click on Content. You’ll see a list of all your uploaded videos. Find and click on the video for which you want to edit captions.
- Go to Subtitles: Once you’re in the video details, look for the Subtitles option in the left sidebar. This will bring up the caption settings for your selected video.
- Choose Your Language: If your video has multiple language options, select the language of the captions you wish to edit.
- Edit Captions: You'll see a list of generated captions. Click on the pencil icon next to the caption track you want to edit. This opens the text editor where you can make your changes.
And just like that, you’re ready to enhance your captions for better accessibility!
Also Read This: Rotating an Image in Snipping Tool: Easy Steps
4. Editing Captions for Clarity and Accuracy
Once you've accessed your captions, it’s time to dive into editing them for clarity and accuracy. This step is essential because clear captions not only improve accessibility but also enhance viewer engagement. Here’s how to do it:
- Listen and Read: Play back your video and read the existing captions. Ensure they match what is being said. If you notice discrepancies, highlight them for correction.
- Use Simple Language: Aim for clarity. Avoid jargon or overly complex phrases. For example, instead of saying "utilize," use "use."
- Break Long Sentences: If a caption runs too long, break it into shorter, more digestible phrases. This makes it easier for viewers to follow along.
- Include Relevant Sound Descriptions: If there are important sounds (like laughter, music, or sound effects), be sure to describe them in the captions. For example, “(upbeat music playing)” adds context for viewers who are hearing-impaired.
- Review for Typos: Make sure to proofread your captions. Typos can confuse viewers and detract from the professionalism of your content.
By focusing on clarity and accuracy, you’re not just editing captions; you’re making your content more inclusive and engaging for all viewers!
Also Read This: Are iStock Photos Royalty Free
5. Using YouTube's Captioning Tools Effectively
YouTube offers a range of captioning tools designed to make the process of adding, editing, and managing captions easier for creators. Let’s dive into some effective ways to utilize these tools:
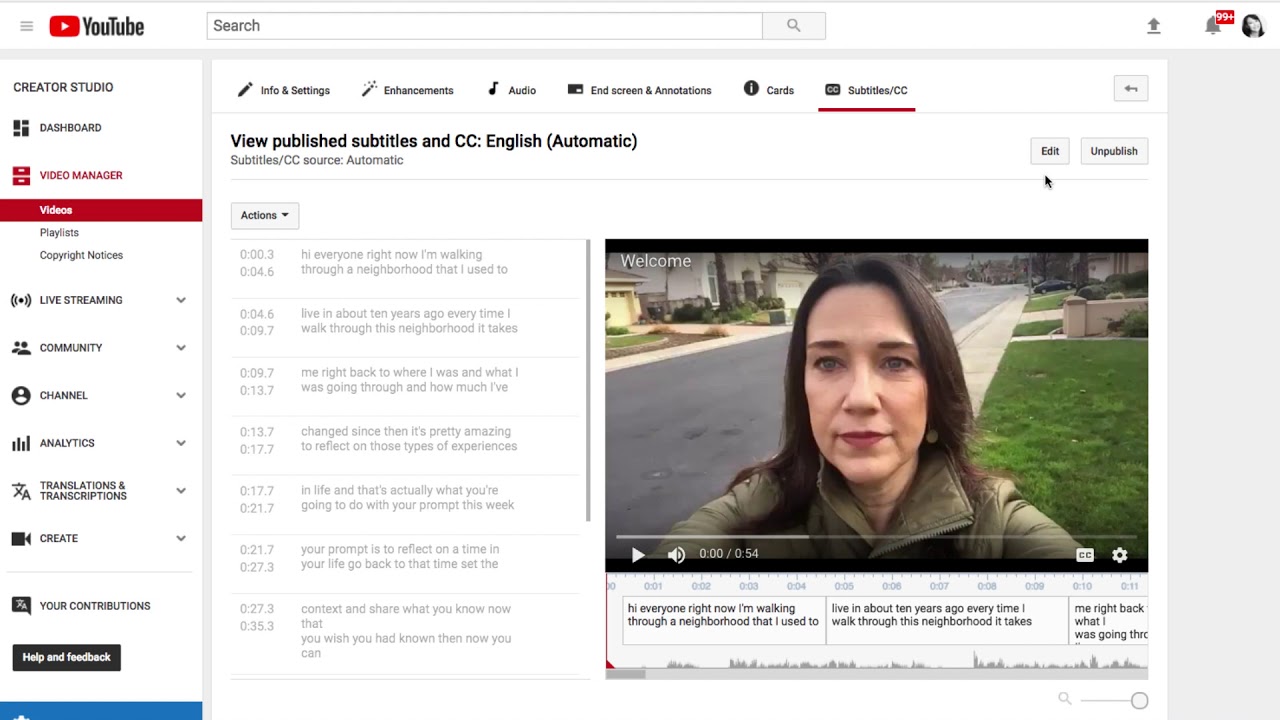
- Auto-Generated Captions: YouTube automatically generates captions for your videos using speech recognition technology. While this is a great starting point, it’s crucial to review these captions for accuracy, as the software can misinterpret words. Try listening to your video while comparing it to the captions to catch any errors.
- Manual Editing: To edit captions, navigate to the YouTube Studio. Click on ‘Subtitles’ from the left menu, select your video, and you can manually adjust the auto-generated text. This ensures that your captions are not only accurate but also match your intended message.
- Time-Coding: One feature that stands out is the ability to adjust the timing of captions. If a caption appears too quickly or lingers too long, you can shift it for a better viewing experience. This is particularly helpful for videos with fast dialogue.
- Adding Additional Languages: YouTube allows you to add captions in multiple languages. This is especially important for reaching a broader audience. Just select ‘Add Language’ and follow the same editing procedures.
By effectively utilizing these tools, creators can enhance the accessibility of their videos, making them enjoyable for everyone.
Also Read This: Tips for You to Get Thumbnail from YouTube Video Quickly and Easily
6. Best Practices for Creating Accessible Captions
Creating accessible captions isn’t just about transcribing speech; it’s about ensuring that your content is understandable and inclusive for all viewers. Here are some best practices to keep in mind:
- Keep It Concise: Aim for brevity. Captions should be succinct and convey the essence of the spoken words without overwhelming the viewer. Ideally, limit each caption to two lines.
- Use Simple Language: Avoid jargon and complex phrases. Captions should be easy to read and understand, especially for non-native speakers. For example, instead of saying “utilize,” you might say “use.”
- Include Non-Speech Elements: Captions should also convey non-verbal sounds, such as [music playing] or [laughter]. This helps viewers understand the context better.
- Choose the Right Font Size and Color: Ensure the text is large enough to read comfortably. Use contrasting colors against the background to improve visibility. White text on a dark background is often a good choice.
- Test for Readability: Before finalizing captions, watch your video as if you were a viewer. Make sure that the timing, visibility, and accuracy of the captions enhance the overall experience.
By following these practices, you’ll not only enhance the accessibility of your videos but also create a more engaging and inclusive experience for all your viewers.
How to Edit Captions in YouTube Videos for Improved Accessibility
Editing captions in YouTube videos is crucial for making your content accessible to a wider audience, including those who are deaf or hard of hearing. Properly edited captions not only enhance understanding but also improve viewer engagement and retention. Below are the steps to efficiently edit captions on your YouTube videos:
1. Access Your YouTube Studio:
Log in to your YouTube account and navigate to your YouTube Studio.
2. Select the Video:
Choose the video for which you want to edit the captions from your video list.
3. Navigate to Subtitles:
On the left sidebar, click on "Subtitles." Here you will see the available subtitle tracks for your video.
4. Edit Captions:
- Choose the language of the captions you want to edit.
- Click on the "Edit" button next to the caption track.
- Make your changes in the text box; you can directly modify the text for clarity or accuracy.
5. Time Adjustments:
If you need to adjust the timing of the captions, simply drag the edges of the caption boxes to sync them accurately with the video.
6. Save Changes:
Once you are satisfied with the edits, click "Save changes" to apply them to your video.
Benefits of Editing Captions:
| Benefit | Description |
|---|---|
| Increased Accessibility | Makes your content available to more viewers. |
| Improved SEO | Captions can help improve your video’s search rankings. |
| Enhanced Engagement | Viewers are more likely to watch your video in its entirety. |
In conclusion, editing captions in YouTube videos is a straightforward yet impactful way to enhance accessibility. By following the steps outlined above, you can ensure your content reaches a broader audience effectively.
Further Resources:
 admin
admin


