Adobe Stock is a fantastic resource for designers, marketers, and anyone in need of high-quality images. With a vast library that boasts millions of photos, videos, and templates, it’s the perfect platform to find the visual elements that can elevate your projects. When paired with Photoshop, Adobe’s powerful image editing software, you can easily customize and enhance these stock images to better fit your unique vision. This combination allows you to create stunning visuals that stand out!
Whether you're working on a marketing campaign, designing a website, or crafting a presentation, the synergy of Adobe Stock and Photoshop can save you time and significantly improve the quality of your work. In this post, we’ll delve into how you can effectively edit Adobe Stock images in Photoshop, exploring the tools and techniques that make your designs shine.
Understanding Licensing for Adobe Stock Images
Before diving into editing Adobe Stock images, it’s crucial to understand the licensing that comes with them. Adobe Stock offers a range of licensing options, each catering to different needs. Here’s a closer look at the two primary types of licenses:
- Standard License: This license covers most traditional uses, such as website graphics, promotional materials, and social media posts. With a Standard License, you can use the image for:
- Web and mobile applications
- Print materials (up to 500,000 copies)
- Presentations and internal use
- Enhanced License: If your project demands broader permissions, the Enhanced License is the way to go. This includes:
- No copy limits (you can use it for unlimited reproductions)
- Incorporating the image into merchandise or items for resale
- The ability to use the image for digital advertising, such as ads on social media or web banners
Understanding the difference between these licenses is incredibly important because using an image beyond its licensed scope can lead to legal issues. Always check the specific license terms for each image you plan to use.
Furthermore, here are a few critical points to consider regarding licensing:
| Aspect | Standard License | Enhanced License |
|---|---|---|
| Usage Cap | 500,000 copies | Unlimited |
| Merchandising | No | Yes |
| Digital Ads | Limited | Full rights |
Remember, if you're unsure about the licensing for an image, Adobe Stock provides clear guidelines and customer support to help you navigate these waters. Proper licensing not only protects you but also supports the artists and photographers who create these fantastic visuals.
In summary, before you start editing those amazing Adobe Stock images in Photoshop, take a moment to verify their licensing to ensure you're using them legally and ethically. Happy editing!
Also Read This: How to Upscale MidJourney Images for Print
3. Downloading Your Adobe Stock Image
Before you can dive into editing, the first step is to download your Adobe Stock image. It’s a relatively straightforward process, but let's walk through the steps to ensure you get it right.
Once you’ve found the perfect image on the Adobe Stock website, you’ll typically see options for purchasing it. Here’s how you can download your selected image:
- Search and Select: Use the search bar to find your desired image or browse through categories. Click on the image thumbnail to view it in detail.
- Choose your License: Click on the "License" button. If you're a subscriber, you can download it directly; otherwise, you'll need to purchase a license.
- Download the Image: Click on the download button after licensing. You can usually select the file type and size. For most editing purposes, a high-resolution JPEG or PNG works best.
- Check the License Agreement: Make sure to review the license terms. Understanding what you can and cannot do with the image is crucial to avoid legal issues down the line.
Once you hit that download button, your image will be ready to go—saved directly to your computer. Double-check your downloads folder to ensure the file is there.
And remember, Adobe often gives you options for downloading your assets to multiple devices or in different file formats. Choose the one that suits your project best!
Also Read This: Understanding Adobe Stock Splits Over the Years
4. Opening Adobe Stock Images in Photoshop
Now that you have your image safely stored on your computer, it’s time to open it in Adobe Photoshop and start the editing magic! Here’s how you can do that:
- Launch Photoshop: Open your Adobe Photoshop application. Make sure you’re running the latest version to take advantage of all the updated features.
- Open the Image: You can simply drag and drop your downloaded image file directly into the Photoshop workspace. Alternatively, go to the top menu and click File > Open..., then browse to find your file and select it.
- Check File Format: Ensure your file opens properly. If you downloaded a PSD file, Photoshop should open it without any issues. For JPEGs or PNGs, it might take a moment, especially if they are high-resolution.
- Set Up Your Workspace: Once opened, take a moment to arrange your workspace to maximize your editing. You can customize palettes, brushes, and more to suit your workflow.
It's also a good idea to duplicate the original layer right away. Just in case you want to revert to the original image, you can easily do this by right-clicking on the layer in the layers panel and selecting Duplicate Layer. It’s always wise to keep your original source intact!
Once your image is open in Photoshop, you’re ready to start exploring all the fantastic tools and features at your disposal. From basic corrections to complex manipulations, the possibilities are endless. So grab your creative hat, and let’s get editing!
Also Read This: how do i get 10 free adobe stock images
5. Basic Editing Techniques for Adobe Stock Images
Getting started with Adobe Stock images can be a breeze, especially if you know some basic editing techniques in Photoshop. Whether you're enhancing a stock photo for a personal project or creating a polished advertisement, having a good grasp of these basics can significantly improve your workflow and outcomes.
Crop and Straighten: One of the first steps in editing is often cropping the image. This helps to improve the composition by cutting out unnecessary elements. To crop in Photoshop:
- Select the Crop Tool from the toolbar.
- Click and drag to select the area you want to keep.
- Adjust the corners to refine your selection, and press ENTER to confirm.
If your image is slightly tilted, the Crop Tool can also help you straighten it. You'll find a straightening option within the Crop Tool settings that allows you to draw a line along the horizon.
Adjusting Brightness and Contrast: Stock images may not always fit your desired mood or branding. Adjusting the brightness and contrast can enhance the visual appeal:
- Go to Image > Adjustments > Brightness/Contrast.
- Move the sliders until the image looks just right. A good rule of thumb is to find a balance where details are visible without losing highlights or shadows.
Color Correction: Color is everything in photography. Sometimes, stock images need a little nudge to match your intended palette. For basic color adjustments:
- Navigate to Image > Adjustments > Hue/Saturation.
- Adjust the sliders for hue, saturation, and lightness until your image feels vibrant and aligned with your vision.
Sharpening the Image: To give your stock image that final touch, sharpening can help enhance details.
- Go to Filter > Sharpen > Unsharp Mask.
- Play with the amount, radius, and threshold until you achieve the desired sharpness without introducing noise.
By mastering these basic techniques, you'll not only save time but also enhance the quality of your images efficiently. As you get more comfortable with these methods, you may find yourself diving into more advanced techniques seamlessly.
Also Read This: “How Are You Doing?” Image Collection
6. Advanced Editing Tips for Enhanced Image Quality
Once you've sorted out the basics, it’s time to push your editing skills to the next level! Advanced editing techniques in Photoshop can add a professional touch to your Adobe Stock images, making them truly stand out in a competitive market.
Utilizing Layers: Layers are an absolute game-changer in Photoshop. Instead of making destructive edits, consider using layers to keep your adjustments non-destructive:
- Create a new layer for each adjustment you make (e.g., brightness, contrast, color correction).
- This allows you to go back and tweak any changes without affecting the original image.
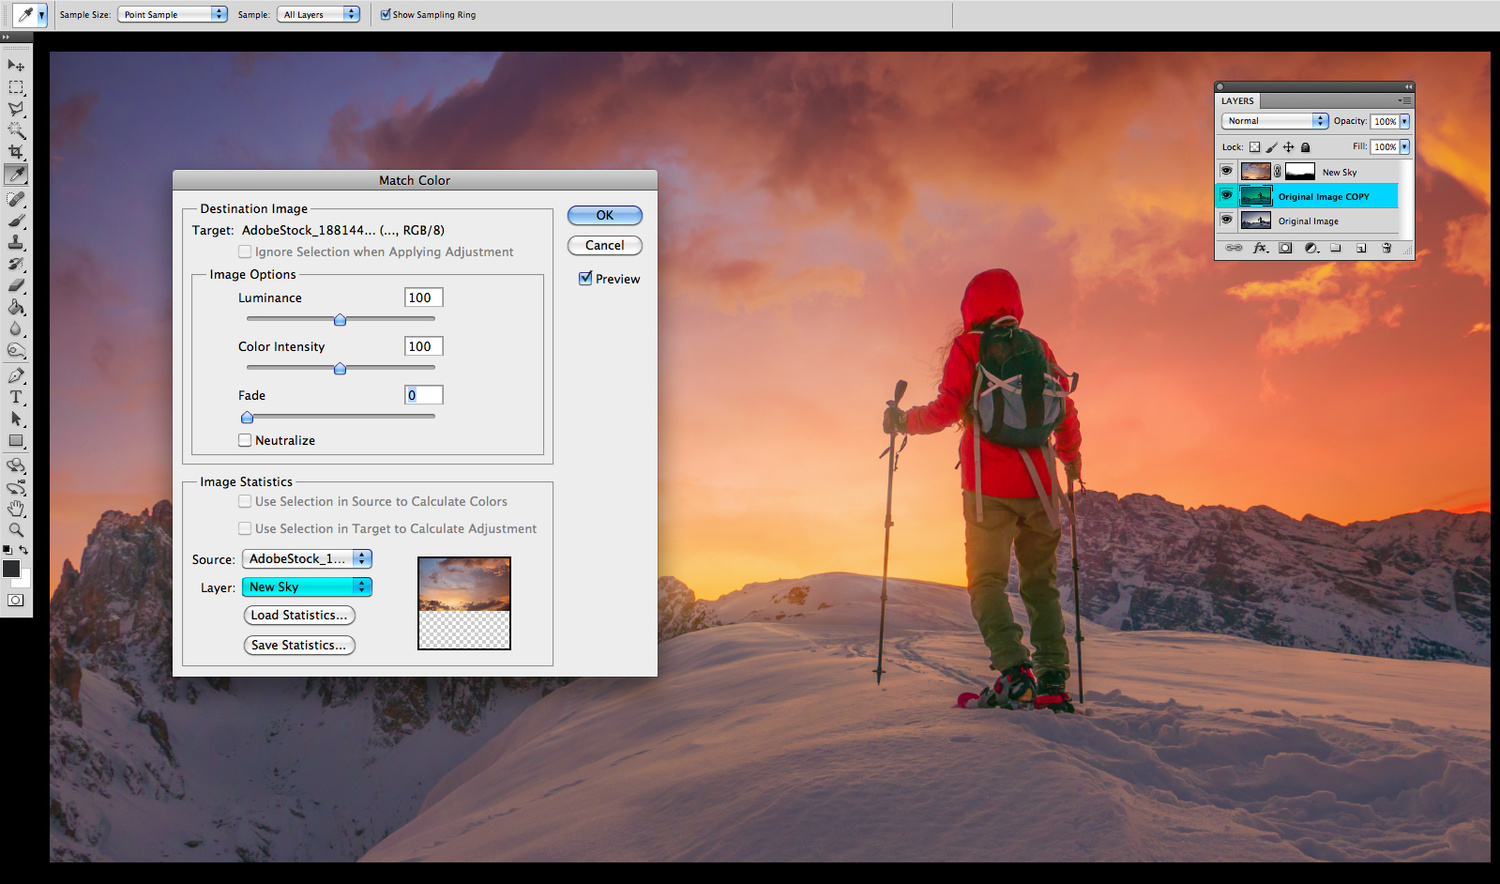
Color Grading: Achieving a specific mood can sometimes be enhanced through color grading. This technique involves adjusting the overall tone and color of the image:
- Use the Color Lookup adjustment layer to apply different color grading presets.
- You can also manually modify the color balance and curves for a custom look.
Removing Unwanted Elements: Sometimes, a stock image has distractions that can detract from its beauty. The Clone Stamp Tool and Healing Brush can be vital here:
- Select the Healing Brush Tool, adjust the brush size, and paint over the areas you wish to correct.
- Use the Clone Stamp Tool for areas that need a bit more precision.
Creating Vignettes: A subtle vignette can draw the viewer’s eye to the subject of your image:
- Create a new layer, use the Elliptical Marquee Tool to select the area you want to keep lit, and invert the selection.
- Then, fill the selection with a solid color such as black or a soft gradient and adjust the opacity.
Implementing these advanced techniques can significantly enhance your stock images and elevate your creative projects. Remember, the key is to experiment with various tools and settings until you achieve the look you want!
Also Read This: Real Designers Share Honest Reviews and Feedback About VectorStock
7. Exporting and Saving Your Edited Images
Once you’ve poured your creativity into editing your Adobe Stock images in Photoshop, the last step is to export and save those visual masterpieces. It’s an essential part of the process that ensures your images are ready for use in projects, whether they are for digital marketing, websites, or even printed materials. Here’s how to do it smoothly!
Firstly, after you’ve made all the adjustments—color corrections, cropping, or applying filters—it's time to save your work. In Photoshop, click on File in the top menu. You will see several options, but the important one for exporting is Export. This option allows you to choose from various formats, depending on how you plan to use the image.
- JPEG: Great for web use. This format supports a range of color depths and allows you to save high-quality images at manageable file sizes.
- PNG: Ideal for images that require transparency, making it perfect for logos and overlays.
- TIFF: Great choice for print quality. TIFF files retain high image quality and support large files with rich details.
- PSD: If you want to save your working file with all the layers intact for future editing, save it as a PSD.
After selecting the appropriate format, you’ll encounter some export settings. Make sure to adjust the quality settings to meet your needs. For instance, if you are exporting a JPEG for web use, aim for a balance between quality and file size, typically around 70-80% quality. Here’s a simple table illustrating the ideal settings for different usages:
| Usage | Format | Quality Setting |
|---|---|---|
| Web | JPEG | 70-80% |
| TIFF | 100% | |
| Overlay/Logo | PNG | 85-95% |
Once everything looks good, select the destination folder where you’d like to save the images. It’s a good idea to keep your edited images organized in a specific folder, ideally named after the project or type of imagery.
After you click Save, you should see your edited images ready to be used right away. Congratulations on reaching the final stage!
Also Read This: How Adobe Stock Licensing Works for Users
8. Best Practices for Using Adobe Stock Images
When it comes to incorporating Adobe Stock images into your projects, a few best practices can help you make the most out of your visuals. These guidelines not only enhance your creative process but also ensure that you’re using stock images ethically and effectively.
- Understand Licensing: Always take the time to review the licensing agreements that come with Adobe Stock images. This will help you understand where and how you can use the images without breaching any terms. Adobe offers both Standard and Extended licenses, so choose according to your project needs.
- Choose High-Quality Images: Select images that are sharp, well-composed, and relevant to your content. Avoid pixelated or low-resolution files, as they can lessen the professionalism of your project.
- Customize and Personalize: Don’t just settle for the stock image as-is. Make the image your own! Use Photoshop to tweak colors, apply filters, or add elements to ensure that it aligns with your brand’s aesthetic.
- Combine Stock Images: Sometimes, using multiple stock images can create a unique composition. Layer images, apply blending modes, and experiment with opacity to craft something genuinely original.
- Stay Updated: Adobe Stock regularly updates its library with fresh content. Keep an eye on new trends and seasonal materials that can add a contemporary feel to your work.
By following these practices, you ensure that you’re not just using stock images—you’re enhancing your projects in creative and responsible ways. Happy editing and designing!
Conclusion and Additional Resources
In conclusion, editing Adobe Stock images in Photoshop allows you to create stunning visuals tailored to your specific needs. With the combination of Adobe Stock's vast library and Photoshop's powerful editing tools, you can enhance your projects effortlessly. Remember to explore various techniques and styles to find what works best for your creative vision.
To further enhance your skills in editing Adobe Stock images, consider the following resources:
- Adobe Help Center: A comprehensive resource for tutorials and guides on using Photoshop features effectively.
- Creative Cloud Learning: Access a variety of courses on Adobe products, including Photoshop. Many are tailored specifically to photo editing.
- YouTube Tutorials: Channels dedicated to Photoshop often feature step-by-step guides on editing stock images. Some popular ones include:
- PHLEARN
- Piximperfect
- Blue Lightning TV
- Online Communities: Join forums like Adobe’s community or Reddit’s r/Photoshop to ask questions, share work, and receive feedback from fellow creatives.
By utilizing these resources, you can refine your editing skills, ensuring that each Adobe Stock image can be transformed into a unique masterpiece that captures your audience's attention.
 admin
admin


