Welcome to our step-by-step guide on drawing eyes! Eyes are often considered the windows to the soul, and when it comes to sketching, getting them right can elevate your artwork significantly. Whether you're a beginner or looking to refine your skills, this guide is designed to take you through the essentials of eye drawing. By understanding the structure and features of the eye, you’ll be able to add depth and emotion to your portraits. Grab your sketchpad and let’s dive into this exciting journey!
Understanding Eye Anatomy
Before you put pencil to paper, it’s crucial to have a solid grasp of eye anatomy. This knowledge will help you draw eyes that look realistic and lively. Let's break down the main parts of the eye you should familiarize yourself with:
- Iris: The colorful part of the eye, which controls the size of the pupil. Its texture and details will give life to your drawing.
- Pupil: The black dot in the middle of the iris. It reacts to light—constricting in bright light and dilating in darkness.
- Sclera: The white part of the eye. Adding subtle shading in this area can enhance realism.
- Eyebrow: While not part of the eye directly, eyebrows frame the eyes and can convey expression.
- Lids: Upper and lower eyelids protect the eye and add depth to your drawings.
Now, let’s examine each part more closely:
Iris
The iris is often the focal point of the eye. Its color varies significantly from person to person, ranging from deep brown to bright blue or green. To draw the iris effectively, pay attention to its texture and patterns. Use a mix of shading techniques to create a lifelike appearance. Remember that light reflects off the iris, so it’s essential to include highlights for realism.
Pupil
The pupils may seem simple to draw, but their effect on the overall eye is profound. They can change size based on lighting or emotion, giving your drawing added expression. Make sure to draw them symmetrically and consider their interaction with the iris. Once again, adding highlights can enhance their appearance.
Sclera
Don't forget the sclera! Although it’s typically white, it can appear slightly colorful or shadowed due to blood vessels or lighting conditions. When shading this area, avoid making it too stark; a light gray or soft touch of color can create a more realistic look.
Eyebrow
Eyebrows play a significant role in conveying emotions. From surprise to anger, the angle and thickness of the eyebrows can dramatically change the expression. Spend some time studying different eyebrow shapes and practice drawing them. They should complement the eye in terms of position and thickness.
Lids
The eyelids have a delicate structure that affects the overall shape of the eye. Pay attention to how they curve and fold—these details are essential for achieving lifelike eyes. A common mistake is to draw the eyelids flat; instead, give them a slight curve to imitate their natural contour. Adding subtle shading can also create depth in this area.
By understanding these anatomical features, you'll be well-equipped to draw realistic eyes. Next, we'll explore how to put this knowledge into practice with actual sketches. Are you ready to take your drawing skills to the next level?
Also Read This: How to Watch Age-Restricted Videos on Dailymotion
Necessary Tools and Materials for Drawing
Before you dive into the exciting world of sketching eyes, it's essential to gather the right tools and materials. Trust me, having the appropriate supplies will make your drawing experience smoother, and it will help you achieve the best results. Here’s a rundown of what you’ll need:
- Pencils: A range of pencils (from 2H to 6B) is crucial. The harder pencils (like 2H) are great for light lines, while the softer ones (like 6B) are perfect for darker, more defined lines.
- Erasers: Both a standard eraser and a kneaded eraser will serve you well. The kneaded eraser is particularly useful for gentle corrections and highlights.
- Blending Stumps: These are handy for smooth shading and blending, allowing you to create a more realistic look.
- Sketch Pad: Choose a good quality sketch pad with a texture that suits your style. A heavier paper will stand up better to erasing and blending.
- Reference Images: Having a variety of reference images on hand can help you understand the details and subtleties of the eyes you want to draw.
- Charcoal or Colored Pencils (optional): If you want to add some flair to your sketches, colored pencils or charcoal can help you experiment with different styles.
Once you’ve gathered these essential tools, you’ll feel more prepared to start sketching. Remember, while having good materials can make a difference, practice and patience are key to improving your drawing skills. So, don’t hesitate to try different tools and see what works best for you!
Also Read This: How to Download Dailymotion Videos on Mobile
Basic Techniques for Sketching Eyes
Now that you have your tools ready, let's get into the fun part: the actual sketching! Drawing eyes can be challenging, but with a few basic techniques, you'll be well on your way to creating stunning and expressive drawings. Here are some fundamental techniques to keep in mind:
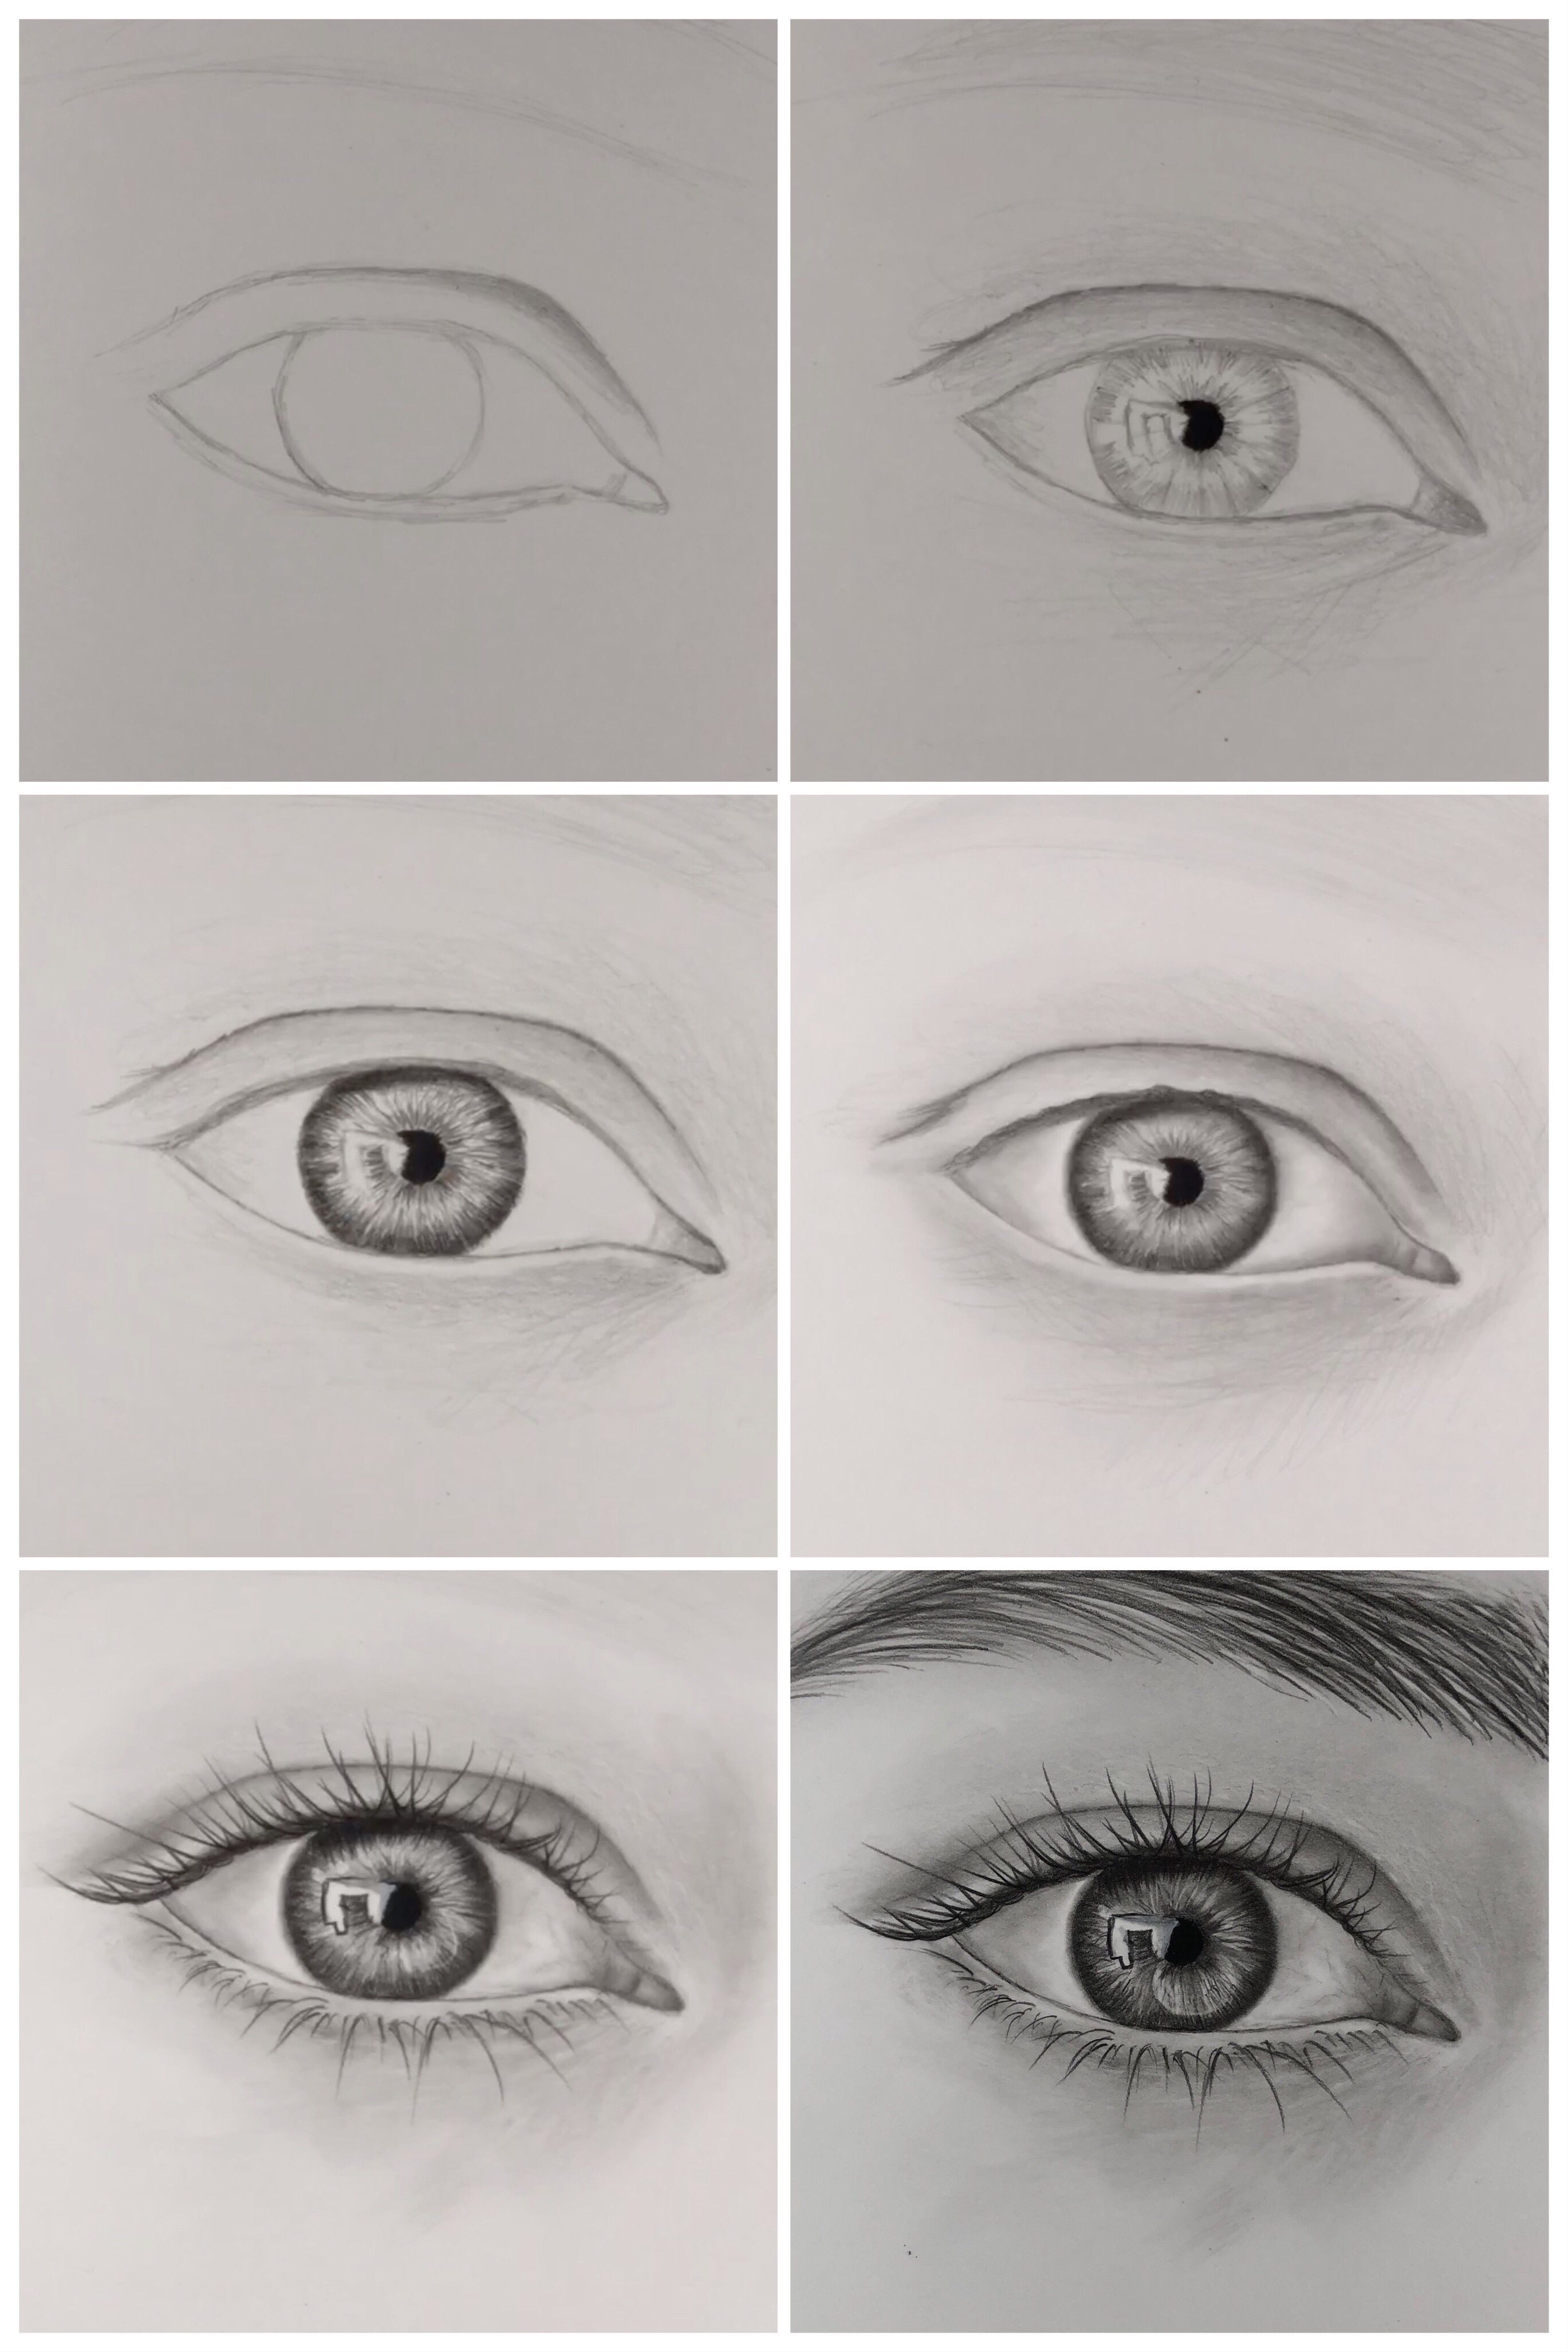
- Start with Basic Shapes: Begin by outlining the basic shape of the eye. Eyes can be roughly divided into an almond shape. Sketch a gentle curve for the top lid and a slightly curved line for the bottom lid. Don't worry about details yet; just focus on getting the proportion right.
- Add the Iris and Pupil: Inside the eye shape, draw a circle for the iris and a smaller circle for the pupil. Make sure the pupil is centered in the iris. This stage is crucial for giving the eye life!
- Shape the Eyelids: Define the eyelids more clearly by adding thickness. The upper lid typically casts a shadow over the iris, so you want to add some curvature and depth here.
- Include Eyelashes: Eyelashes can add a lot of character to your drawing. Use quick, feathery strokes to represent both the upper and lower lashes, making sure to vary the length and direction for a natural look.
- Add Highlights: The shine in the eye is what makes it come alive. You can leave a small white spot when shading the iris to depict a light source. Alternatively, you can gently lift graphite with your kneaded eraser to create this effect.
- Shading and Texture: Use your blending stump to softly shade the iris and the surrounding areas of the eye. Pay attention to where shadows fall, as this will enhance the realism of your drawing.
With these techniques under your belt, practice is essential. Spend time sketching different eye shapes, expressions, and angles. Remember, the more you practice, the better you will become. Enjoy the process, and don’t hesitate to express your creativity!
Also Read This: Integrating YouTube and Dailymotion with Sync Features
5. Creating Realistic Eye Shapes
When it comes to drawing realistic eyes, the shape is everything. Think of it as the foundation of your entire artwork. In this section, we'll explore how to create eye shapes that convey depth and emotion. Here’s a step-by-step approach:
- Sketch the Basic Outline: Begin with a simple almond shape. The eye isn't a perfect oval; it has curves that can feel soft or sharp depending on the expression. Lightly sketch this shape with a pencil.
- Define the Eyelids: Add the upper and lower eyelids. The upper eyelid usually has a more pronounced curve, while the lower eyelid is more subtle. Make sure the eyelids are thicker if you want a more dramatic look.
- Consider the Eye Position: Remember that the eyes aren’t just on the same horizontal plane; they often have a slight tilt. Adjust your drawing to reflect this, as it adds a natural touch to your composition.
- Add the Iris and Pupil: Draw a circle within the almond shape to create the iris. The pupil should be a smaller circle, centered or slightly off-center depending on where you're looking. Make sure to leave some space between the iris and the eyelids for a natural look.
- Vary the Shape: Not all eyes are created equal! Experiment with different shapes by adjusting the height and width of the almond shape. Remember, thin and long eyes can convey elegance, while wider, more rounded eyes express innocence.
Once you have your basic eye shape, you can refine it further. Don’t hesitate to modify the sketch until it suits your aesthetic. Remember, practice makes perfect! The more you draw, the better you'll understand the nuances of eye shapes. You’ll soon develop your unique style that brings character and life to your drawings.
Also Read This: How to Publish a Video on Dailymotion with Step-by-Step Help
6. Adding Details: Eyelashes and Eyebrows
Now that we have the foundation of the eye shape laid out, it’s time to focus on the details that truly bring eyes to life: the eyelashes and eyebrows. These little features can dramatically affect the expression and overall character of your drawing.
Adding Eyelashes:
Eyelashes frame the eye and can convey a lot of personality. Here’s how to add them effectively:
- Use Light Strokes: For a natural look, use light and feathery strokes. Eyelashes aren't solid lines; they taper and vary in length and thickness.
- Direction Matters: Pay attention to the direction lashes grow. Most of them curve upwards in the outer corners, while some can be straight or even fall downwards in the inner corners.
- Layering: Start with a base layer of eyelashes and then add a few longer ones on top for depth. This layering technique helps to create a more three-dimensional appearance.
- Consider the Style: Decide if your character has long, flowing lashes or short, stubby ones. Long lashes can suggest femininity or allure, while shorter lashes can indicate a more youthful or neutral look.
Defining Eyebrows:
Eyebrows play an essential role in expressing emotions and framing the face. Here’s how to craft them:
- Choose the Shape: Eyebrows come in various shapes – arched, straight, or rounded. The choice depends on the character's personality. Arched eyebrows, for instance, can convey surprise or skepticism.
- Thickness and Length: Play with the thickness of the eyebrows. Thick brows can give a bold look, while thin ones can appear elegant. Remember to keep the length proportionate to the eye.
- Sketch Hair Strands: Just like eyelashes, eyebrows consist of individual hair strands. Use light strokes to mimic hair texture, making sure to follow the natural growth pattern.
Once you’ve added eyelashes and eyebrows, step back and evaluate your work. You might find spots to enhance or refine. With these details, your eyes will not only look realistic but also carry emotion and character.
Keep practicing, and soon you'll find your unique flair in drawing eyes that captivate and tell a story!
Also Read This: How to Make Crochet Bags Video: Step-by-Step Tutorial on Dailymotion
7. Shading Techniques for Realistic Depth
Shading is an essential part of creating depth and realism in your eye drawings. When you look at a real eye, you'll notice that it isn't just a flat surface; it has *shadows and highlights that give it dimension. Here are some techniques to help you achieve that realistic look:
- Start with a Base Layer: Begin your shading by using a light pencil (like a 2H) to create a base layer. This should be a soft gradient that follows the natural curve of the eye.
- Observe Light and Shadow: Look closely at how light falls on the eye. Notice where the shadows are (in the corners and under the brow) and where the highlights are (on the surface of the eyeball). Use this observation to guide your shading.
- Build Up Layers Graciously: Gradually build up your darker shades using a softer pencil (like a 4B or 6B). Make sure to blend well to avoid harsh lines. Tools like blending stumps or even your finger can help create smooth transitions.
- Use Cross-Hatching: If you’re looking for more texture, consider using cross-hatching. This technique involves layering lines in different directions to create depth. It’s especially effective for adding detail to the iris and under the eyelid.
- Add Highlights Wisely: Don’t forget the highlights! You can leave some areas white or lightly erase parts of your shading to bring the glint of light back into the eye. Highlights are what ultimately bring the eye to life.
Practice these techniques regularly, and remember that shading is all about subtlety. Too much pressure can make it look unnatural, so take it easy, and build up slowly. With patience, your eye drawings will progress from good to astonishing!
Also Read This: Hand Embroidery Stitches: Step-by-Step Guide on Dailymotion
8. Popular Dailymotion Tutorials for Eye Drawing
If you're looking to sharpen your skills in drawing eyes, Dailymotion has a treasure trove of tutorials that can help. Here are some that you definitely shouldn’t miss:
- Basic Eye Drawing Tutorial: Ideal for beginners, this tutorial walks you through the basic shapes and structures of an eye. It’s great for those just starting out, as it breaks things down into easy-to-follow steps.
- Advanced Shading Techniques: Dive deeper into shading with this advanced tutorial. It explores various techniques to add depth and realism, perfect for artists ready to take their eye-drawing skills to the next level.
- Realistic Anime Eyes: Have a love for anime? This tutorial will help you understand how to create those stunningly expressive eyes that are a hallmark of the genre, blending realism with stylization.
- Watercolor Eye Drawing: For those who enjoy mixed media, this tutorial combines drawing with watercolor techniques. Learn to add an ethereal quality to your eye drawings that's sure to stand out.
Searching for these tutorials on Dailymotion is easy—simply use the search bar and type in the titles. Each video often includes tips, tricks, and insights from experienced artists, making them a valuable resource for learners at any stage. Happy drawing!
Also Read This: How to Do Splits on Dailymotion: Step-by-Step Flexibility Guide
9. Common Mistakes and How to Avoid Them
When it comes to drawing eyes, even seasoned artists can stumble. It's gratifying to capture the vibrancy and emotion in a well-drawn eye, but there are common pitfalls we often fall into. Let's explore these mistakes and how you can sidestep them on your artistic journey!
- Neglecting the Eyelid Structure: One of the biggest mistakes beginners make is ignoring the eyelids. The eyelids aren't just decorative; they play a crucial role in giving the eye shape and depth. Make sure to define them clearly, as they can drastically change the expression of the eye!
- Incorrect Proportions: Sometimes, we can lose track of proportions, especially when we get excited about the details. A common issue is making the iris too large or small compared to the rest of the eye. Remember, the iris typically occupies about one-third of the eye—the more you practice, the better you’ll get at judging these proportions!
- Overdoing Details: While detailing is important, overdoing it can take away from the overall effect. Instead of making every tiny mark, focus on the essential features that define eye shape and emotion. Use shading and highlights strategically to create depth without cluttering your work.
- Forgetting Reflections: Eyes are reflective surfaces that capture a whole world in their gaze. Not including highlights or reflections can make your eyes look flat. Spend time adding subtle, reflective details to give your drawing that lively spark!
- Inconsistent Light Source: Understanding where your light source is coming from is crucial. If you shade one eye differently from the other, it can create a jarring effect. Always be mindful of the light direction and maintain consistency throughout your drawing.
To avoid these common mistakes, remember to take frequent breaks to step back and evaluate your work. This distance gives you a fresh perspective and helps you see issues you might otherwise miss. Keep practicing, and don’t be afraid to experiment!
Also Read This: How to Watch Home and Away on Dailymotion Complete Viewing Guide
10. Final Touches and Refining Your Drawing
You're almost there! After tackling the basics of eye drawing, it’s time to refine your work and add those all-important final touches. These details can elevate your drawing from good to great, making your eyes come alive on the page.
Here are some tips to help you add those final flourishes:
- Blend for Smoothness: Take a blending stump or your finger (if you're using pencil) to smooth out harsh lines in your shading. A gentle blend can give your drawing a soft transition, making it look more realistic.
- Add Highlights: Highlights are what make eyes sparkle and create an engaging focal point. Use an eraser or a white gel pen to add tiny, bright spots where the light hits the eye. Pay attention to the shape and placement—this can dramatically enhance the expression!
- Refine Eyelashes: Eyelashes should look natural and have varying lengths. Instead of just drawing straight lines, try making them curve slightly. A little variety goes a long way in making your drawing more lifelike!
- Check Your Overall Composition: Before you finalize everything, step back and check how the eyes fit into the entire face or sketch. Make any adjustments needed, like altering the angle or adding more shading to harmonize with the surroundings.
Finally, don’t forget to sign your work! Adding your signature not only marks it as yours but also gives you a sense of accomplishment.
With practice and attention to detail, your eye-drawing skills will improve dramatically. Now, step away for a moment, give yourself a pat on the back, and get ready to tackle your next artistic endeavor!
Conclusion and Encouragement to Practice
In conclusion, mastering the art of drawing eyes is both an exciting and challenging* journey. With the techniques outlined in this guide, you now have the tools to create expressive and captivating eyes that bring your sketches to life.
Remember, practice is key! Here are some tips to help you improve:
- Draw Daily: Set aside time each day to sketch eyes, experimenting with different styles and techniques.
- Study References: Use photographs or real-life observations as references to understand the intricate details of eye anatomy.
- Apply Feedback: Share your work with peers or online communities to receive constructive feedback.
- Stay Patient: Progress takes time, so don’t get discouraged by initial results—growth comes with dedication.
Additionally, consider creating a sketchbook dedicated to eye studies. This will allow you to track your progress and explore various techniques.
By following these steps and consistently practicing, you'll see significant improvement in your drawing skills. Enjoy the process, and let your creativity shine through! Remember, every artist was once a beginner, so embrace each sketch as a valuable part of your artistic journey.
 admin
admin


