Drawing a turkey can be a fun and creative project, especially when preparing for Thanksgiving or just enjoying seasonal art. Whether you're a beginner or an experienced artist, this step-by-step guide will help you sketch a turkey with ease. From drawing simple shapes to adding detailed feathers, this tutorial will cover everything you need to create a realistic turkey drawing. So, grab your pencils, and let’s get started!
Gathering Materials for Your Turkey Drawing
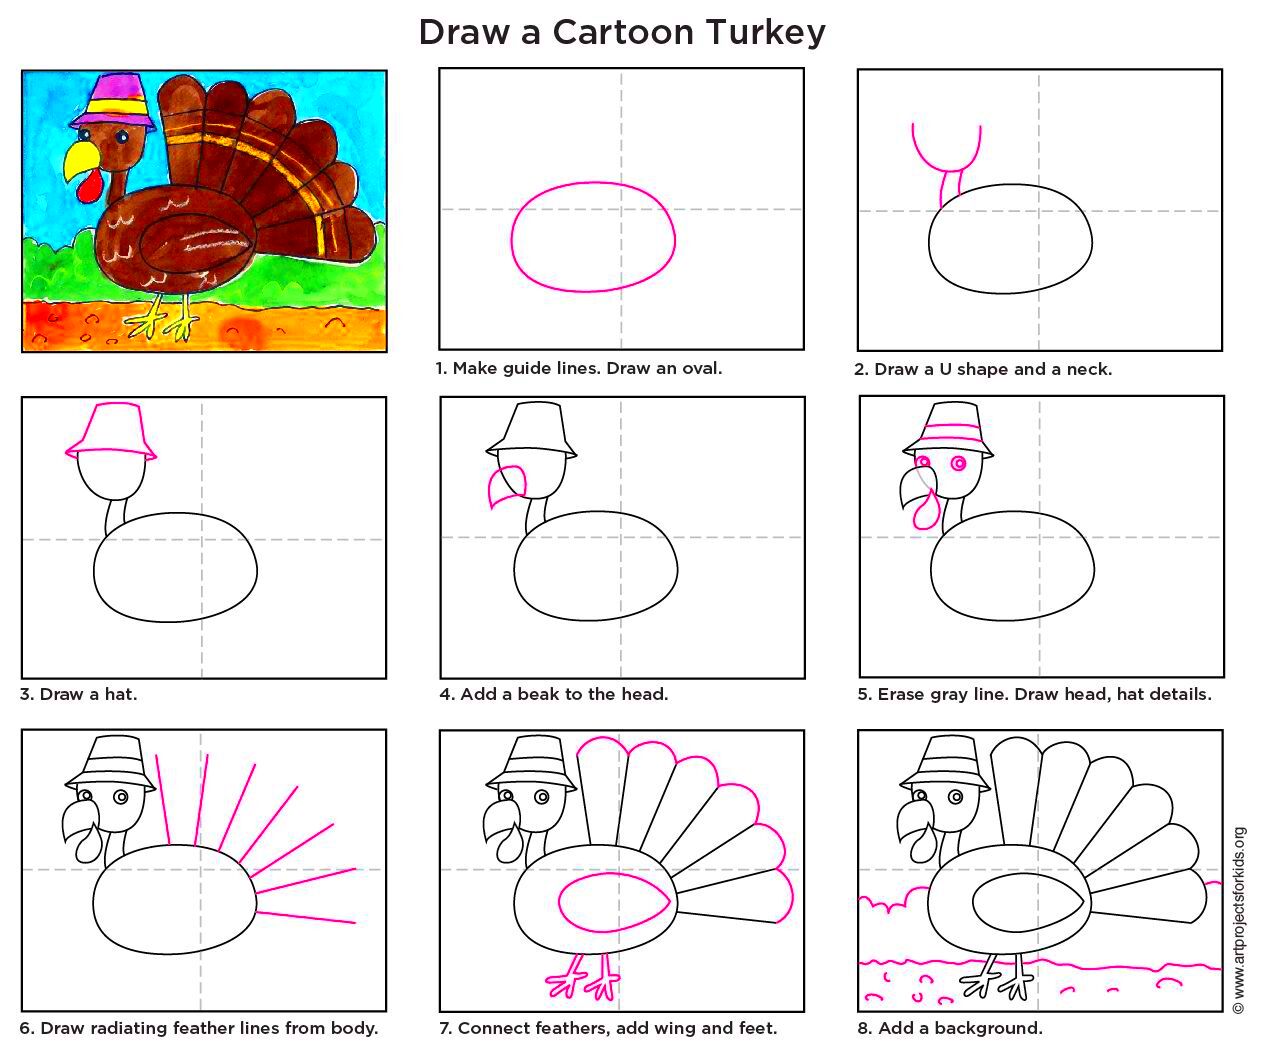
Before you begin, it's important to have the right materials. Here’s a list of basic supplies you’ll need to draw a turkey:
- Pencil: A standard pencil (preferably HB or 2B) is perfect for sketching your turkey outline.
- Eraser: You'll need an eraser for adjustments and to clean up mistakes.
- Paper: Use regular sketching paper, or you can go for a thicker type if you plan to color it later.
- Colored Pencils or Markers: If you want to add color to your turkey, colored pencils or markers will help you achieve vibrant results.
- Fine Tip Pen: For outlining and adding details, a fine-tip pen or marker works great.
With these tools, you’ll be ready to bring your turkey to life on paper. If you're feeling adventurous, you can also use watercolors or crayons to add a unique touch to your drawing.
Starting with the Turkey's Body Shape
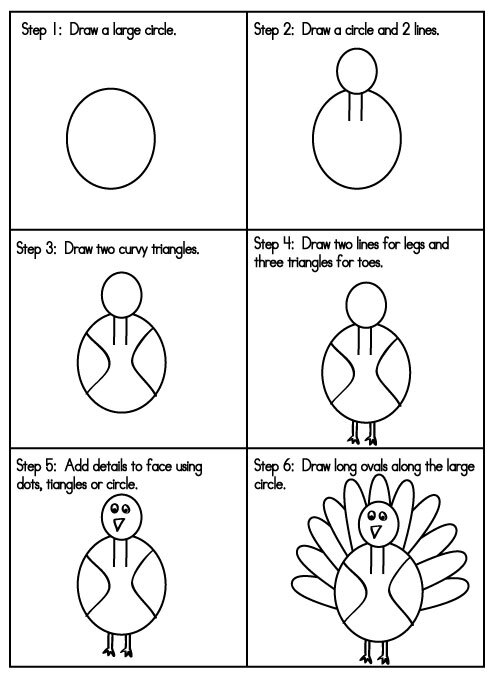
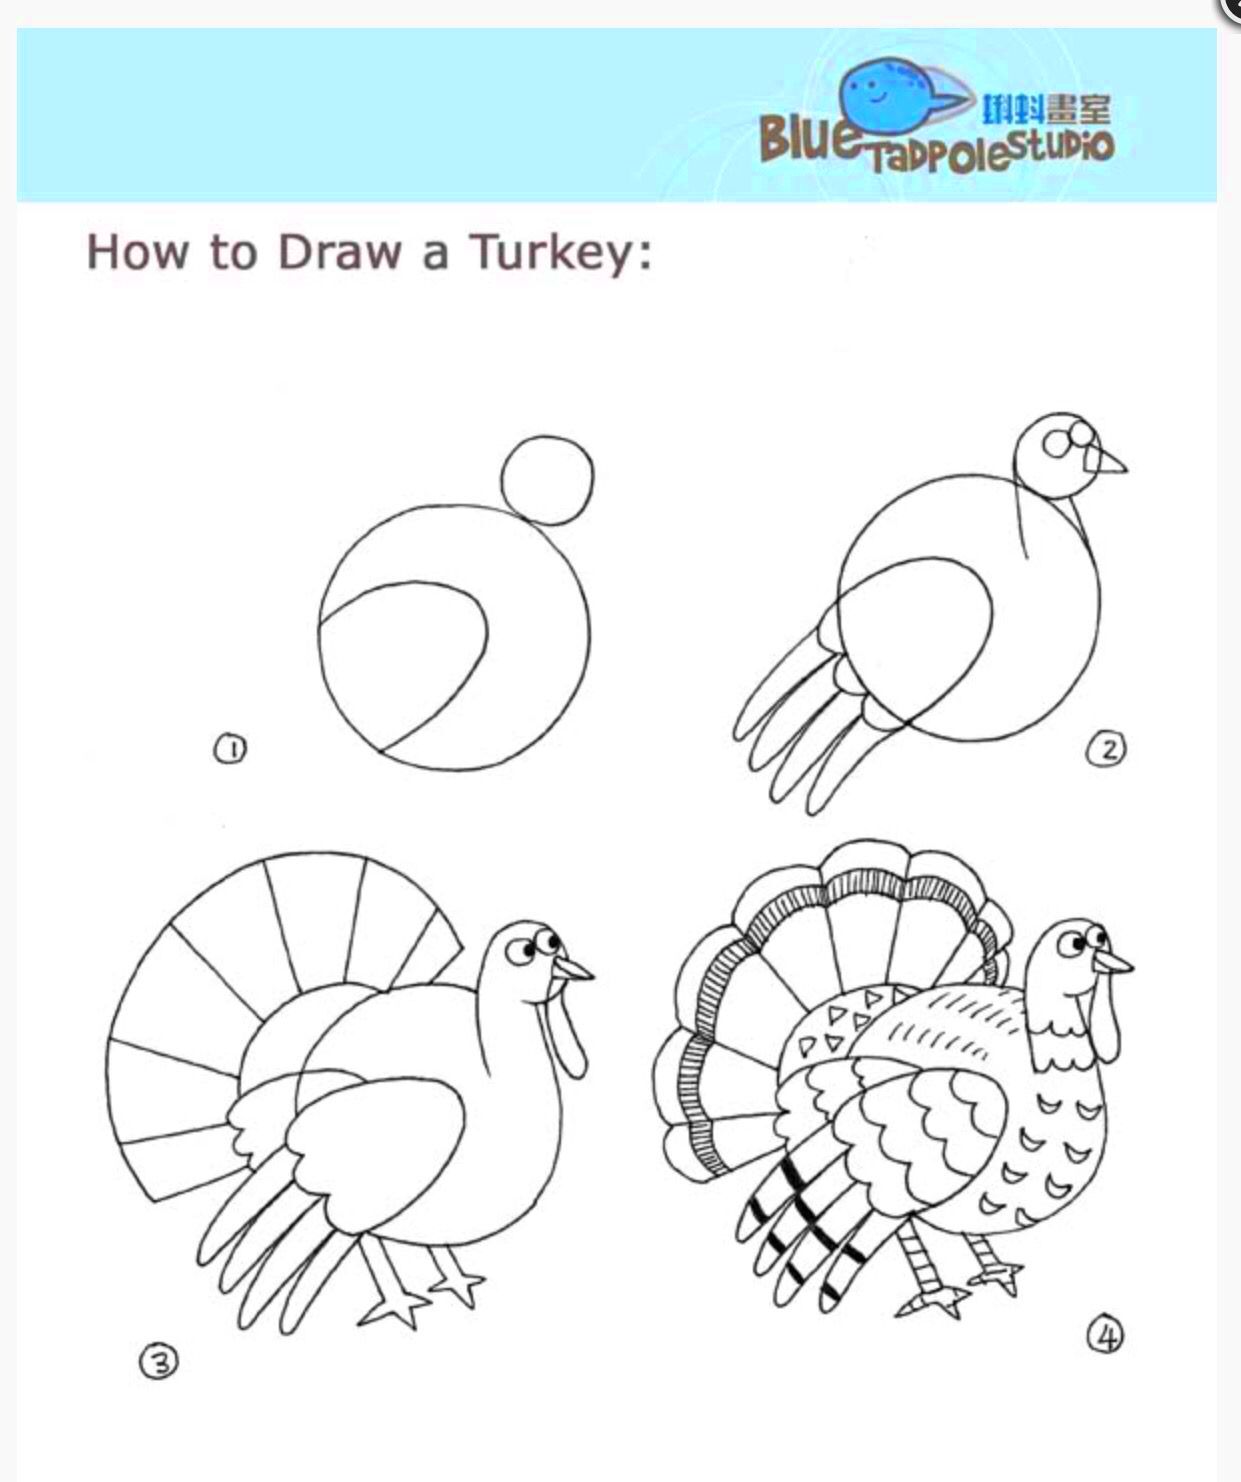
Let’s start by drawing the turkey’s body. Begin with a large oval shape to represent the main part of the turkey’s body. This oval will serve as the base for your turkey’s body, so make it big enough to fit the head, feathers, and legs later on.
Next, lightly sketch two circles on either side of the oval to outline the position of the turkey's wings. These circles don't have to be perfect; they’re just guides that will help you shape the wings later.
Now, it’s time to move on to the head. The body oval will act as a guide for placing the turkey's neck and head, which we’ll add in the next step. Keep your lines light for now, as you’ll refine them later.
Remember, don’t worry about getting everything perfect on the first try. Take your time and adjust the shapes as needed. This stage is all about laying the foundation for your turkey drawing!
Drawing the Turkey’s Head and Beak
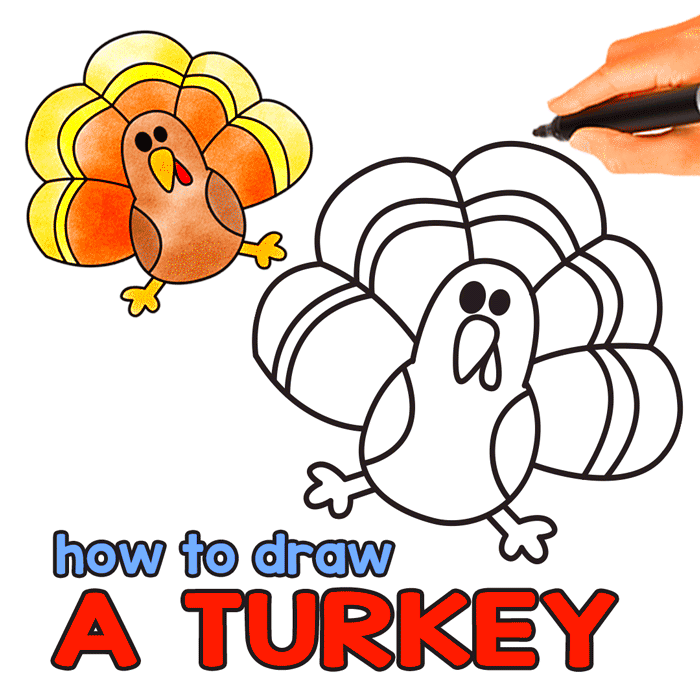
Now that you’ve got the body laid out, it’s time to focus on the turkey’s head and beak. Start by drawing a small oval shape at the top of the turkey's body to represent the head. Place it slightly to one side of the body for a more natural look. The head should be proportionate to the body, so don't make it too large or small.
Next, add a small, triangular shape at the front of the oval for the beak. The point of the triangle should face downward. You can curve the sides of the beak a little for a more realistic appearance.
To complete the face, sketch a small circle for the eye. The eye should be placed near the top of the head, slightly above the center. Draw a few small lines around the beak to create the wattle, the fleshy part that hangs from a turkey’s beak.
Once you have the basic shapes, you can refine the lines to make the turkey’s head and beak more defined. Add a few light, curved lines for texture to represent the turkey’s skin. With these simple steps, you’ll have the turkey's head ready to go!
Adding the Turkey's Feathers
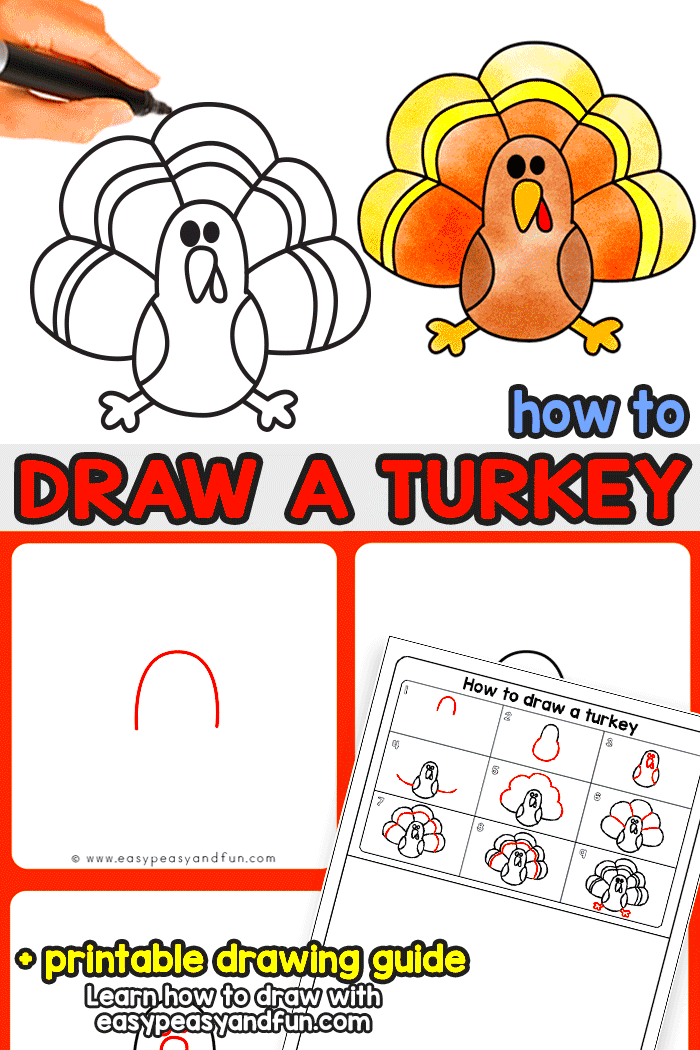
Feathers are a key feature of a turkey, so let's focus on getting them right. Start by sketching the general shape of the feathers. Draw several long, curved lines radiating from the back of the turkey’s body. These will serve as the basic structure for the tail feathers.
Next, start outlining the individual feathers. Begin at the outer edges of the body and work your way inward. Feathers should gradually get smaller as they reach the center of the tail. To give the feathers texture, add small lines along the edges to create the feather-like pattern.
As you work on the body feathers, you can add some smaller feathers to the wings. Start by creating a few curved lines on each side of the body and filling them in with a feather pattern similar to the tail feathers. Make sure the wings look natural by varying the size of the feathers and their placement.
Don’t be afraid to get creative with the feather design. You can make them more detailed with various curved and jagged lines, or keep them simpler for a cleaner look. Once you’re happy with the feather shapes, you’re all set for the next step!
Details to Complete the Turkey Drawing
At this stage, your turkey drawing is beginning to take shape. Now, let’s add the finishing touches to give it that extra level of realism. First, look at your turkey’s overall outline and refine any areas that need adjustment. Smooth out rough lines, and make sure the head, body, and feathers are well-proportioned.
Start adding more detail to the head. You can add small lines around the eyes and beak to make them pop. Draw in the wattle more clearly by adding a few more curved lines around the base of the beak. Make sure the neck looks smooth by blending the lines that connect the head to the body.
Now, let’s move on to the feathers. Add additional texture by darkening the lines on the outer edges of the feathers. This will give the appearance of depth and shading. You can also add some extra detail by drawing small lines inside the feathers to mimic the natural lines seen in real turkey feathers.
For the legs, draw two lines extending from the body and add small triangular shapes for the feet. Make the legs look realistic by adding a few lines along the legs for detail, and don't forget to add some curved lines to represent the toes.
Finally, finish up with shading. Lightly shade under the wings, behind the feathers, and along the legs to give your turkey some depth and dimension. Once you’ve added all the details, step back and admire your work—you’ve just completed a beautiful turkey drawing!
Shading and Coloring Your Turkey Drawing
Once you've drawn your turkey and added all the necessary details, it’s time to bring your artwork to life with shading and coloring. This is where your turkey will really start to stand out! If you’re using colored pencils, markers, or even watercolor, shading and coloring will help create depth and make your turkey more realistic.
Start by choosing your colors. Turkeys typically have rich browns, reds, and oranges, but feel free to get creative with your color choices! Here's a general guide:
- Body: Use shades of brown, ranging from light tan for the underbelly to dark brown for the back and wings.
- Feathers: Add vibrant colors like red, orange, yellow, and green. These colors will bring out the turkey’s beauty and give it a festive look.
- Beak and Wattle: These are typically yellow or orange, but you can add some red or pink for extra detail.
- Legs: A light brown or tan shade works best for the legs, while the feet can be shaded darker for contrast.
When shading, use gentle strokes with your pencil or marker to gradually build up the color. Add darker tones along the edges and lighter tones in the center to create the appearance of light and shadow. For feathers, try layering your colors to create a natural gradient. Don't forget to blend with a blending stump or tissue if you're using colored pencils!
Once the shading is done, go over the lines with a fine-tip pen to make the details pop. This final step will give your turkey a more polished look and add contrast between the colors and lines.
Tips for Improving Your Turkey Drawing Skills
If you want to improve your turkey drawing skills or any other drawing for that matter, practice is key. The more you draw, the more comfortable you'll become with the process. Here are a few tips that can help you along the way:
- Practice the Basics: Before tackling a full turkey drawing, practice simple shapes like circles, ovals, and triangles. These are the building blocks of all your drawings.
- Use Reference Images: Look at real pictures of turkeys to understand their proportions and features. This will help you draw more realistically.
- Break it Down: Instead of trying to draw everything at once, break your drawing into manageable parts—start with the body, then move to the head, and finish with the feathers and legs.
- Take Your Time: Don’t rush through the process. It’s important to be patient and add details step by step. Quality takes time!
- Experiment with Different Mediums: Try using various art supplies like charcoal, watercolor, or even digital tools to explore different textures and styles in your drawings.
Lastly, don’t be afraid to make mistakes! Drawing is a learning process, and every mistake is an opportunity to improve. With time and effort, your turkey drawings will only get better!
FAQ
1. How long does it take to draw a turkey?
The time it takes to draw a turkey depends on your skill level and the amount of detail you want to include. On average, it can take anywhere from 30 minutes to 2 hours. If you're focusing on fine details and coloring, expect it to take a bit longer.
2. Do I need to use color in my turkey drawing?
No, you don’t need to use color. You can keep your turkey drawing in black and white, focusing on shading to create depth and texture. However, adding color can make the drawing more vibrant and eye-catching.
3. Can I draw a turkey digitally?
Absolutely! Many artists prefer digital tools for their flexibility. You can follow the same steps using software like Procreate, Photoshop, or even simple drawing apps on your phone or tablet. Digital tools allow you to experiment with layers and colors easily.
4. What should I do if I make a mistake?
If you make a mistake, don’t worry! Simply erase the part you’re not happy with and try again. It’s part of the process, and it’s important to be patient with yourself. Practice makes perfect!
Conclusion
Drawing a turkey can be a fun and rewarding experience, whether you’re preparing for a holiday or simply exploring your artistic skills. By following these simple steps—from gathering your materials to adding the finishing touches—you can create a realistic and detailed turkey drawing. Remember, the key to improving your skills is practice, patience, and a willingness to experiment. Don’t be afraid to try new techniques, add your personal touch, and most importantly, enjoy the process of creating something special!
 admin
admin


