Are you ready to elevate your makeup game? The smokey eye is a timeless look that can add drama and intensity to your eyes, making them the focal point of your beauty routine. Whether you're getting ready for a night out, a special event, or just want to feel fabulous, mastering the smokey eye technique is essential. With the right approach, anyone can achieve this stunning look. Let's dive into the essentials!
Essential Tools and Products for Smokey Eye Makeup
Before you start creating that gorgeous smokey eye, it's crucial to gather the right tools and products. Having everything on hand not only makes the process smoother but also helps you achieve the best results. Here’s what you’ll need:
- Eyeshadow Palette: Choose a palette with a mix of matte and shimmer shades. Look for colors like charcoal, deep brown, and soft taupe to create depth.
- Eye Primer: A good eye primer prevents creasing and ensures your eyeshadow lasts all night. Apply a small amount before starting your look.
- Brushes: Invest in a few essential brushes:
- Fluffy Blending Brush: Perfect for blending colors seamlessly.
- Packing Brush: Great for applying eyeshadow directly onto the lid.
- Detail Brush: Useful for precise application, especially in the inner corners.
- Gel or Liquid Eyeliner: A black or dark brown eyeliner is key for defining your eyes. Gel liners can create a smoky effect when smudged.
- Mascaras: Volumizing and lengthening mascaras help to lift your lashes and frame your eyes beautifully.
- False Lashes (optional): For an extra dramatic touch, consider applying false lashes to enhance your smokey eye.
Now that you have your tools, it’s essential to choose the right products. Here are some recommendations:
| Product Type | Recommended Brands |
|---|---|
| Eyeshadow Palette | Urban Decay, Morphe, Too Faced |
| Eye Primer | Urban Decay Primer Potion, Too Faced Shadow Insurance |
| Eyeliner | Kat Von D Tattoo Liner, Maybelline Eye Studio Gel Liner |
| Mascaras | L'Oreal Voluminous, Too Faced Better Than Sex |
With these tools and products in your makeup bag, you’ll be more than ready to tackle the smokey eye look. Remember, practice makes perfect, so don’t hesitate to experiment and find what techniques work best for you. Now, let’s get ready to create that stunning smokey eye together!
Also Read This: How to Download Videos from Dailymotion: Comprehensive Methods
3. Preparation: Prepping Your Eyes for Makeup
Before diving into the world of bold smokey eyes, it’s essential to prep your eyes properly. This step is often overlooked, but trust me, it makes all the difference! Here’s how to get your eyelids ready for that stunning look:
- Cleanse Your Eyelids: Start with a clean canvas. Use a gentle makeup remover or micellar water to wipe away any previous makeup residue. This ensures that your smokey eye products adhere better and last longer.
- Moisturize: Apply a lightweight eye cream to hydrate the delicate skin around your eyes. This will not only keep your skin supple but also prevent any dryness that could affect how your eyeshadow blends.
- Use an Eye Primer: An eye primer is your best friend! It creates a smooth surface and helps your eyeshadow to pop. Apply a small amount to your eyelids, spreading it evenly up to the brow bone. This will lock in your look and keep it smudge-free.
- Set with Powder: For an even more flawless finish, lightly dust some translucent powder over the primer. This will help to absorb any excess oils and provide a perfect base for your smokey eye.
Once you've prepped your eyes, you're ready to start applying your smokey eye makeup. Remember, preparation is key, and a little extra time here will pay off with a stunning look!
Also Read This: Mastering Paper Crafts with a Step-by-Step Guide on Dailymotion
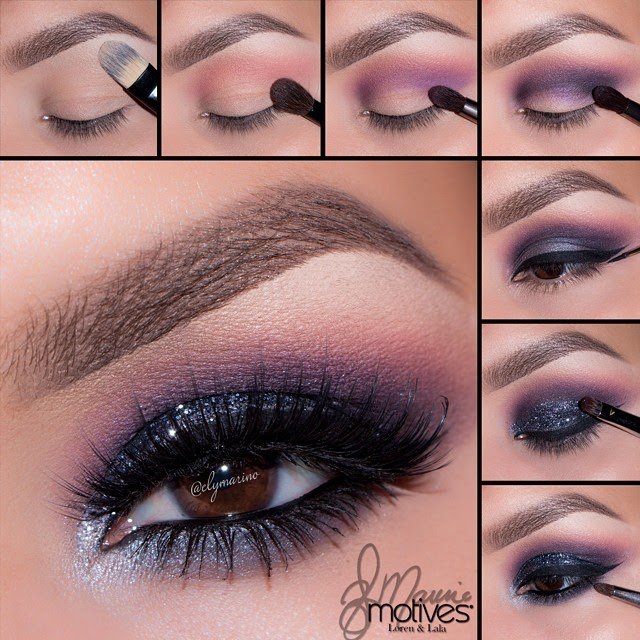
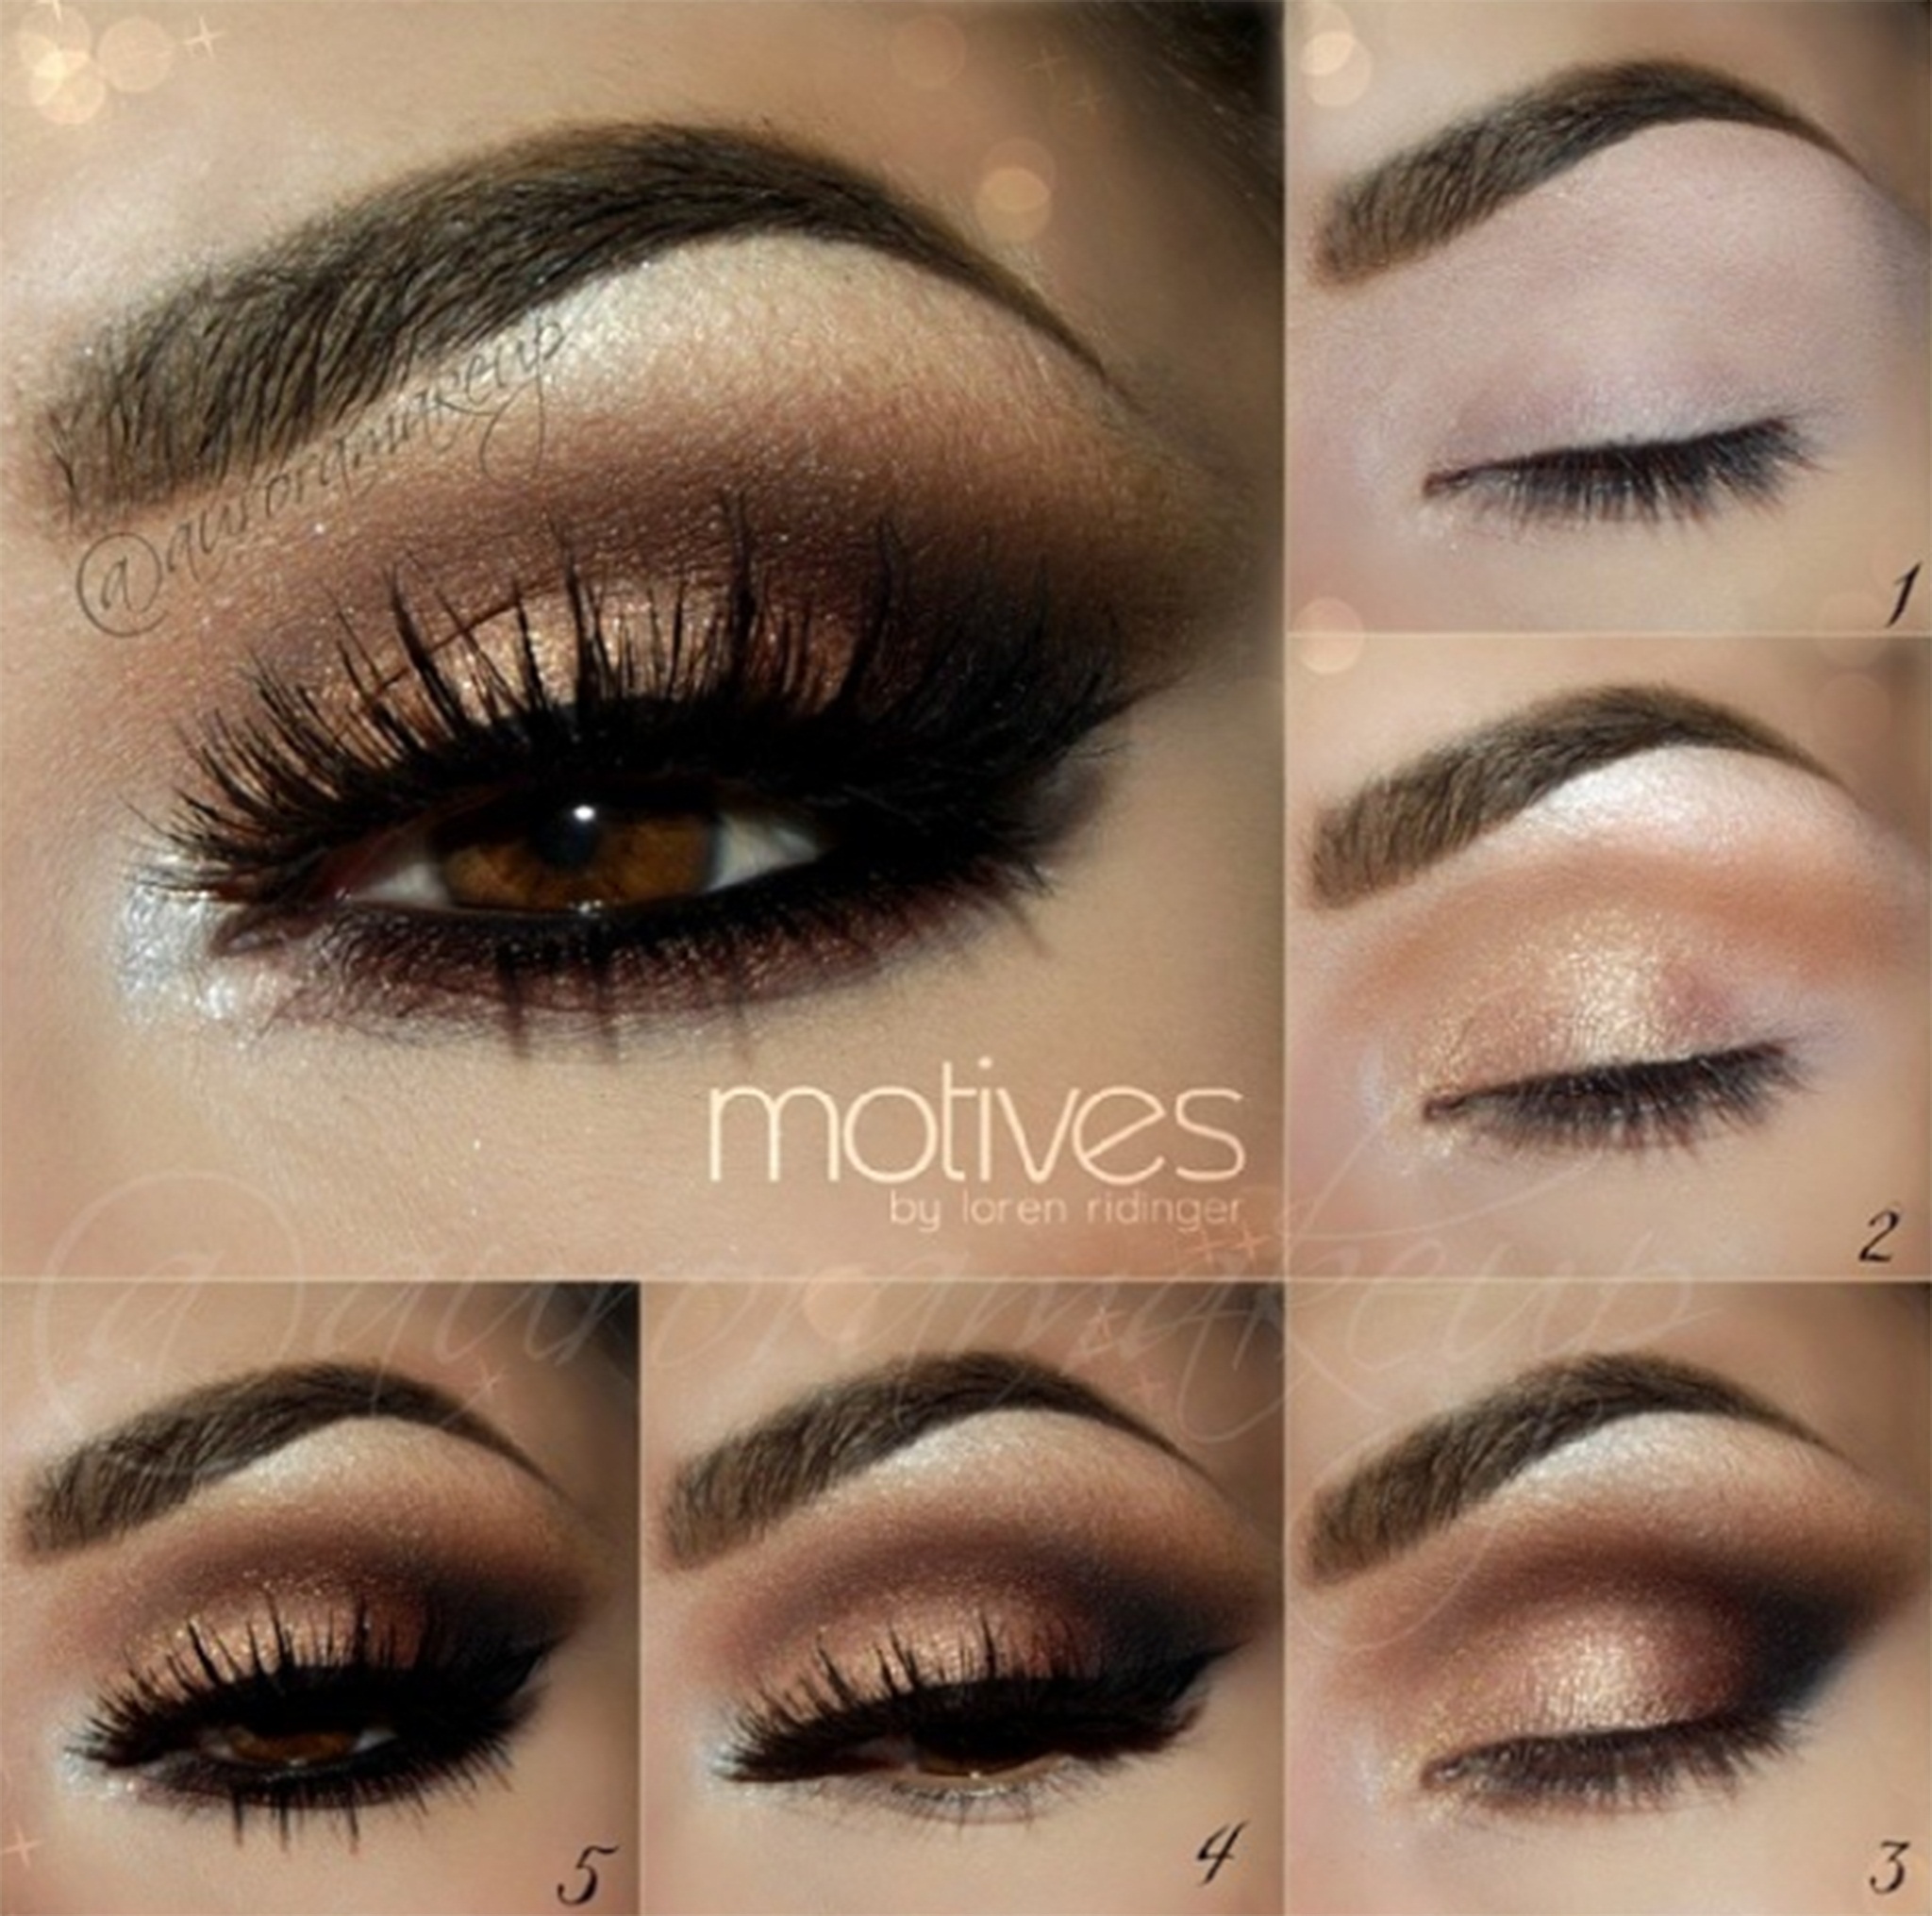
4. Step-by-Step Smokey Eye Application Process
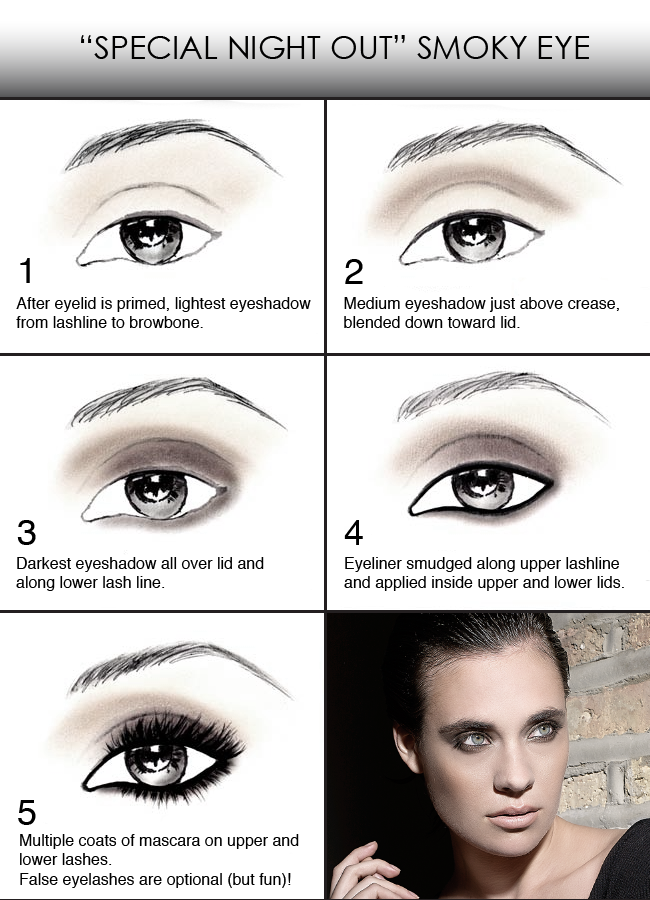
Now that your eyes are prepped, it's time to unleash your inner makeup artist! Follow these steps for a gorgeous smokey eye:
- Choose Your Eyeshadow Palette: Select a palette that has a range of colors, typically including a mix of dark shades (like black or deep brown), mid-tones (like taupe or grey), and a highlight shade. A good palette can make all the difference!
- Apply the Base Color: Start with a neutral base shade all over your eyelid. This sets the stage for the darker colors and helps everything blend seamlessly. Use a fluffy brush for an even application.
- Define the Crease: Grab a mid-tone shade and apply it to your crease with a blending brush. This adds depth and dimension. Blend in circular motions to avoid any harsh lines.
- Darken the Outer V: Using a small, dense brush, apply your darkest shadow to the outer corner of your eye, creating a “V” shape. Don’t be afraid to build up the color gradually so you can control the intensity.
- Blend, Blend, Blend: The key to a smokey eye is seamless blending. Go back in with your blending brush and soften any harsh edges. This step is crucial for that beautiful, diffused look.
- Add a Pop of Color: If you’re feeling adventurous, you can add a pop of color or shimmer to the center of your eyelid. This will catch the light and give your eyes a captivating sparkle!
- Line Your Eyes: Use a black or dark brown eyeliner to line your upper lash line. You can also line your lower lash line for more drama. Smudge it slightly for that classic smokey effect.
- Finish with Mascara: Finally, apply a few coats of your favorite mascara on both the top and bottom lashes. This will complete your smokey eye look and make your eyes pop!
And there you have it! With these steps, you'll create a bold smokey eye that will turn heads wherever you go. Don’t forget to practice, and most importantly, have fun with it!
Also Read This: Access YouTube in Pakistan with Dailymotion Video Instructions
5. Tips for Achieving the Perfect Blend

When it comes to creating a bold smokey eye, blending is your best friend! Proper blending ensures that your eyeshadow transitions smoothly and looks professional. Here are some tips to help you achieve that flawless blend:
- Use the Right Brushes: Invest in high-quality blending brushes. A fluffy blending brush is ideal for softening harsh lines. Try using a smaller brush for precise blending in the crease.
- Layer Gradually: Start with a light hand and build up the intensity. It's easier to add more color than to take it away. This method helps in achieving that seamless gradient.
- Use a Transition Color: Apply a neutral shade in your crease before diving into darker shades. This creates a base that helps blend colors smoothly.
- Employ the Windshield Wiper Motion: For blending in the crease, use a back-and-forth motion. This technique helps in softening edges and creating a more natural look.
- Don't Forget to Blend Downward: When working with darker shades, blend them slightly down onto the eyelid as well as outward. This prevents any harsh lines and ensures a more cohesive look.
- Set with a Clean Brush: After applying your final blend, use a clean, dry brush to go over the edges. This will help further diffuse any harsh lines.
- Check Your Work: Step back and assess the overall look in different lighting. This can help you identify spots that need a little more blending.
Remember, practice makes perfect! Don’t be discouraged if it doesn’t look flawless on the first try. With a little patience and practice, you’ll master the art of blending.
Also Read This: How Michael Jackson Died – Dailymotion Documentary and News
6. Common Mistakes to Avoid When Doing a Smokey Eye
Even the best makeup artists make mistakes, but knowing what to avoid can save you from potential makeup mishaps. Here’s a rundown of common errors to steer clear of:
- Skipping Primer: Not using an eyeshadow primer can lead to creasing and fading. Always apply a good primer to ensure your eyeshadow stays put and looks vibrant.
- Using Too Much Product: It’s easy to get carried away with dark shades. Start with a little and build up. Too much product at once can result in a muddy look.
- Neglecting the Lower Lash Line: A smokey eye isn’t just about the top lid! Don’t forget to balance your look by applying shadow to the lower lash line for a cohesive effect.
- Not Blending Enough: The smokey eye look should be soft and diffused. If you leave harsh lines, your makeup won’t have that polished finish. Blend, blend, blend!
- Forgetting to Set with Powder: If you skip setting your eyeshadow with a translucent powder, you risk having it smudge or crease throughout the day.
- Wrong Eyeliner Choices: Choosing a harsh, solid eyeliner can make your look too stark. Instead, go for a softer pencil or gel that can be easily blended out.
- Ignoring Eye Shape: Not every smokey eye suits every eye shape. Tailor your technique to enhance your unique features. For example, if you have hooded eyes, focus more on the outer corners.
By avoiding these common pitfalls, you can ensure that your smokey eye turns out stunning every time. Remember, makeup is all about having fun and expressing yourself, so don’t be afraid to experiment!
Also Read This: Wondering How to Download Song from Dailymotion in MP3 Format? Here’s The Best Method
7. Final Touches: Completing Your Bold Look
Alright, you've done an amazing job crafting that daring smokey eye! Now it’s time for those final touches that will truly elevate your makeup game. Here’s how to finish off your bold look:
- Highlight the Inner Corners: Use a shimmering highlighter or a light eyeshadow to brighten the inner corners of your eyes. This small step adds depth and opens up your eyes, making them look more awake.
- Define Your Brows: Well-groomed brows frame your face beautifully. Use a brow pencil or powder to fill in any sparse areas, ensuring they’re shaped to complement your smokey look. Don’t forget to set them with a clear brow gel!
- Line Your Waterline: For an extra punch, consider applying a black or dark brown eyeliner to your waterline. This enhances the intensity of your smokey eye and ties the look together.
- Apply Mascara: Give your lashes a good coat of volumizing mascara. This will add drama and make your eyes pop even more! If you’re feeling adventurous, consider adding false lashes for a more glamorous effect.
- Check for Fall-Out: Dark eyeshadows can sometimes leave traces on your cheeks. Gently brush away any fall-out with a fluffy brush or a makeup wipe, ensuring your skin stays flawless.
- Set Your Makeup: Finish your look with a setting spray to keep everything in place. A few spritzes will ensure your bold smokey eye lasts through the day or night!
And there you have it! These final touches will complete your bold smokey eye look, making you feel confident and ready to take on the world. Remember, practice makes perfect, so don’t be discouraged if it doesn’t come out just right the first time. Keep experimenting and have fun!
8. Where to Find Smokey Eye Tutorials on Dailymotion
Dailymotion is a fantastic platform for discovering creative content, including a plethora of smokey eye tutorials! If you’re looking to refine your skills or gather new techniques, here’s where to start:
- Search for Makeup Artists: Many professional makeup artists post their tutorials on Dailymotion. Use the search feature to find names like “NikkieTutorials” or “Jackie Aina” who often provide step-by-step guides for bold looks.
- Check Out Beauty Channels: There are dedicated beauty channels that focus on various styles. Look for channels specializing in smokey eyes; they often break down complex techniques into easy-to-follow steps.
- Use Hashtags: Search for hashtags like
#SmokeyEyeor#MakeupTutorialto filter through a wide range of tutorials. You’ll find everything from beginner-friendly to advanced techniques. - Save Your Favorites: Create a playlist or save your favorite tutorials for quick access. This way, you can revisit them whenever you’re ready to practice your smokey eye skills!
- Engage with the Community: Don’t hesitate to leave comments or ask questions on tutorials that pique your interest. The beauty community is often very supportive and can provide additional tips!
With Dailymotion at your disposal, you’ll never run out of inspiration for your smokey eye looks. Just remember to take your time, enjoy the process, and let your creativity shine!
 admin
admin


