Image resolution refers to the amount of detail an image holds. It's usually measured in pixels and can significantly affect the quality of your visuals. Understanding resolution is crucial, especially for designers, photographers, and anyone who uses images online. High-resolution images look sharp and professional, while low-resolution images can appear blurry or pixelated. Knowing how to determine and manage resolution helps you create compelling visuals that effectively convey your message.
Types of Image Resolutions Explained

When we talk about image resolution, there are a few key types to keep in mind:
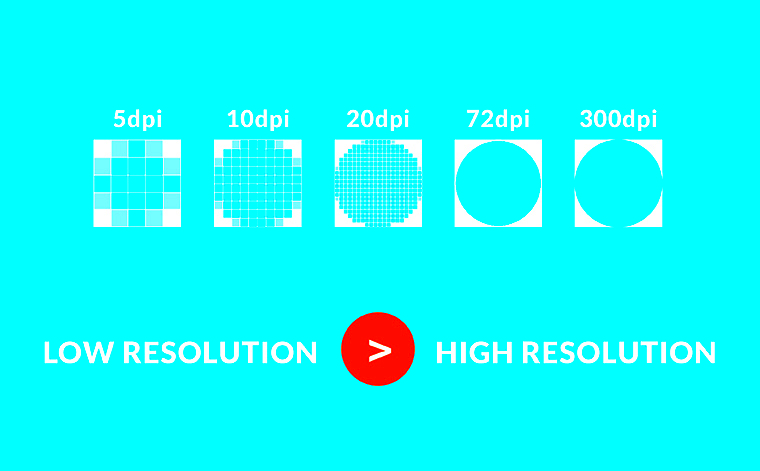
- Low Resolution: Typically, low-resolution images are under 72 DPI (dots per inch) and are suitable for web use but not for print.
- Medium Resolution: Medium resolution ranges from 72 to 150 DPI. These images can be used for both digital and print purposes but may not be ideal for larger prints.
- High Resolution: High-resolution images are usually 300 DPI or more. They are necessary for professional print materials, ensuring that every detail is clear.
Choosing the right resolution depends on your project's needs. Always consider the medium in which the image will be displayed.
Also Read This: Exploring the Profit Potential of Storyblocks for Creators
Methods for Checking Image Resolution

There are several straightforward methods to check the resolution of an image:
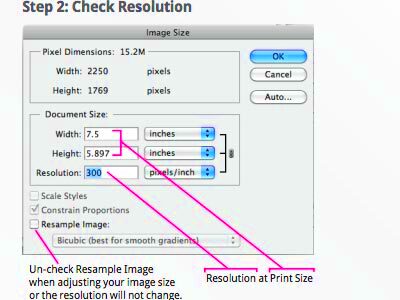
- Using Image Editing Software: Most image editing software, like Adobe Photoshop or GIMP, allows you to check resolution easily. Simply open the image and look for the "Image Size" or "Properties" option.
- Right-Click on the Image: On Windows, right-click the image file and select "Properties." Then, under the "Details" tab, you will find the dimensions and resolution. On Mac, right-click and select "Get Info."
- Online Tools: There are many online tools available that can check image resolution by uploading the file. These can be handy if you don’t have software installed.
By using these methods, you can quickly determine the resolution of any image, ensuring that you select the right visuals for your projects.
Also Read This: Updating Your Adobe Website with Behance Integration
Using Online Tools for Quick Resolution Checks

In today’s digital age, online tools make it super easy to check the resolution of images quickly and efficiently. These tools can save you time and help you avoid the hassle of downloading software. With just a few clicks, you can find out the resolution of any image. Let’s look at some popular online tools that can help you with this task.
- ImageMagick: This is a powerful tool that allows you to check image properties, including resolution. You can use it directly on your browser by uploading an image.
- Get-Metadata: This tool extracts metadata from images, including resolution details. It’s user-friendly—just upload your image, and you’ll see all the information you need.
- CheckFileType: This site lets you not only check the resolution but also find out the file type and other details about your image.
Most of these tools work similarly: you upload your image, and within seconds, you receive detailed information. This quick process makes it easier to manage your image quality, especially if you need to make fast decisions for your projects.
Also Read This: Crafting Compelling Project Descriptions on Behance to Attract Clients
Checking Resolution on Different Devices
Checking the resolution of images may vary slightly depending on the device you’re using. Whether you’re on a computer, smartphone, or tablet, it’s essential to know how to access this information. Here’s how you can check image resolution on different devices:
- On a Windows PC: Right-click on the image file, select "Properties," then navigate to the "Details" tab. Here, you’ll see the dimensions and resolution.
- On a Mac: Right-click on the image and select "Get Info." You’ll find the dimensions under "More Info."
- On a Smartphone: For both Android and iOS, open the image in your gallery app, tap the options or share button, and look for details or information about the image. Some apps may display resolution directly.
By knowing how to check resolution on various devices, you can ensure your images meet quality standards, regardless of where you’re working.
Also Read This: Creating an Impressive Behance Portfolio to Attract Clients
Common Image Resolution Standards to Know
Understanding common image resolution standards can be helpful when working with digital media. Here’s a breakdown of the most frequently used resolution standards:
| Resolution | Use Case | Pixel Dimensions |
|---|---|---|
| Low Resolution | Web Images | 72 DPI, typically 640x480 pixels |
| Medium Resolution | Social Media and Presentations | 150 DPI, commonly 1280x720 pixels |
| High Resolution | Print Media | 300 DPI or higher, often 2400x3000 pixels |
Knowing these standards helps you choose the right image for your needs. Always consider the final output—whether it's for web or print—so your visuals look their best!
Also Read This: How to Convert Raw Images to JPEG
Tips for Optimizing Image Resolution
Optimizing image resolution is key to maintaining high-quality visuals while ensuring your files aren’t too large. Whether you’re designing for a website, creating marketing materials, or uploading photos to social media, these tips will help you get the best results.
- Choose the Right Format: Different image formats (JPEG, PNG, TIFF) have varying qualities and file sizes. JPEG is great for photographs, while PNG works well for graphics with transparency.
- Resize Before Uploading: If you know the exact dimensions you need, resize your images beforehand. This helps maintain quality and reduces loading times.
- Use Compression Tools: Tools like TinyPNG or JPEGmini can help compress images without sacrificing quality. This is especially useful for web images where load speed matters.
- Keep a Master Copy: Always save a high-resolution version of your images. This way, you can create various sizes as needed without losing quality.
- Test Your Images: After optimizing, test how your images look across different devices and screen sizes to ensure they appear crisp and clear everywhere.
By applying these tips, you’ll create visuals that look great while being efficient in terms of file size, ensuring a better experience for your audience.
Also Read This: How to Stretch Images on an iPhone for Full-Screen Views
Frequently Asked Questions about Image Resolution
As you explore image resolution, you may have some questions. Here are answers to common queries that might help clarify things:
- What is DPI, and why is it important? DPI stands for dots per inch and indicates the resolution of printed images. Higher DPI means better print quality.
- Can I increase the resolution of a low-quality image? While you can increase the pixel dimensions, it won’t improve quality. The image may still appear blurry or pixelated.
- What resolution is best for social media? For most social media platforms, a resolution of around 1080x1080 pixels works well for images and videos.
- How do I know if my image is high resolution? Generally, images above 300 DPI are considered high resolution, ideal for printing and professional use.
These FAQs can help you navigate the often confusing world of image resolution, making it easier to choose the right images for your projects.
Conclusion and Key Takeaways
Understanding image resolution is crucial for anyone working with visuals, whether you're a designer, photographer, or marketer. Here are the key takeaways from our discussion:
- Resolution Matters: Higher resolution images provide better quality, especially for print.
- Different Standards Exist: Familiarize yourself with common resolution standards to choose the right images for your projects.
- Optimization is Key: Use the right file formats, resize images as needed, and employ compression tools to balance quality and file size.
- Check on Different Devices: Always verify how your images look on various devices to ensure consistency.
By applying these insights, you can create stunning visuals that enhance your work and effectively communicate your message. Remember, good quality images can make a significant difference in engaging your audience!

 admin
admin


