Digital illustration program Procreate is very strong and well-known for artists, designers and craft people. On iPad is available that offers different functions to make drawing, painting or editing fun and straightforward. It is not meant for just the specialists; it can also improve the creative work of everyone else. In image editing field, Procreate excels with its simplicity and effectiveness particularly in operations like removing parts of pictures, producing masks plus including levels in images.
Procreate is loved by all because of its intricate software features with easy-to-use interface. Be it a novice or an experienced artist; Procreate’s tools enable you to acquire a neat and sophisticated appearance effortlessly.
Tools and Features in Procreate for Cutting Out an Image
Procreate has various instruments and characteristics that make it simple and accurate to prepare pictures. Here’s a summary of the things you can use:
- Selection Tool: This is the primary tool used to select the parts of the image you want to cut. You can choose from options like freehand, automatic, rectangle, or ellipse, depending on your needs.
- Feathering: Feathering allows you to soften the edges of your selection, making your cut-out look smoother and more natural.
- Layers: By working on different layers, you can isolate the area you want to cut out without affecting the rest of your image. This is especially useful for non-destructive editing.
- Alpha Lock: Once you’ve made your selection, Alpha Lock ensures that only the selected area will be edited, allowing for finer control over the details.
- QuickShape: This feature helps you create perfect shapes, which can be useful when cutting out geometrical or defined edges.
Professional quality is guaranteed in the end product as all the mentioned tools are significant in achieving clean and precise cutouts.
Also Read This: Microphones Used by YouTubers for Clear and Professional Sound
Step-by-Step Guide to Cutting Out an Image in Procreate
Here is a straightforward strategy for cropping an image in Procreate:
- Open Your Image: Import the image you want to work on by tapping the wrench icon and selecting "Insert a photo."
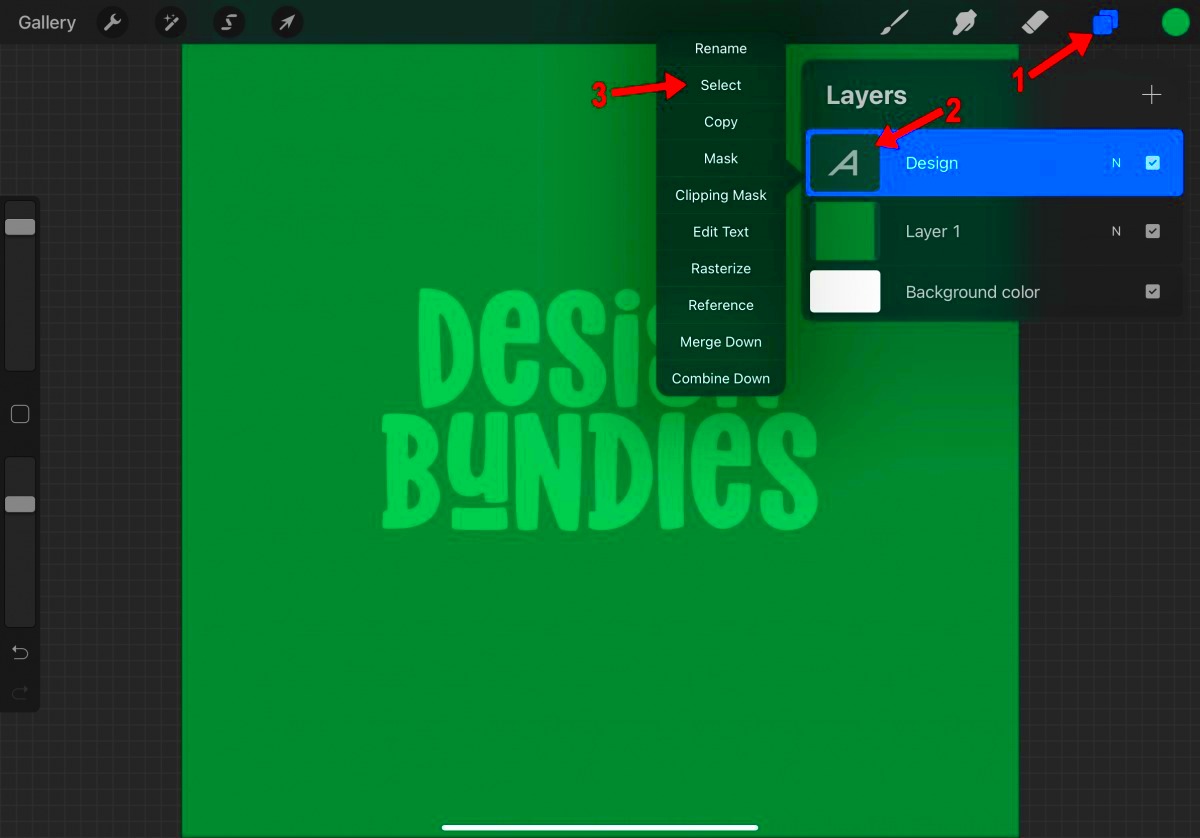
- Choose the Selection Tool: From the top toolbar, select the "S" shape icon to activate the Selection tool. Now, choose a selection mode like freehand, rectangle, or automatic.
- Make Your Selection: Trace around the part of the image you want to cut out. If you're using the automatic mode, Procreate will automatically detect the edges for you.
- Feather and Adjust: Use the feather slider to soften the edges if needed. This ensures your cut-out doesn’t have harsh lines.
- Copy or Cut the Selection: After selecting, tap on "Copy and Paste" from the wrench icon. This will place your cut-out on a new layer, allowing for easy adjustments.
- Refine the Edges: If the edges need cleaning up, use the eraser tool to carefully refine the cut-out, making sure everything looks smooth and natural.
- Final Adjustments: Once you’re satisfied, you can further adjust the cut-out using tools like Transform, Opacity, or even blending modes for a polished look.
To cut out any portion of an image with great accuracy and convenience in Procreate, follow the given steps.
Also Read This: How to Add Space Between Two Images in Word for Layout Clarity
Common Mistakes to Avoid When Cutting Out an Image
Just because cutting out an image in Procreate is easy does not mean that anyone can just cut out anything without thinking. You may think that it is easy to cut out an image from a photograph using Procreate however, this is actually not true as there are some common errors that can ruin your work. If you understand where these mistakes happen then you would be able to prevent any errors and do better.
Essentially, those are common errors:
- Not Zooming In: A lot of people forget to zoom in closely when making detailed selections. If you don’t zoom in, you might miss fine details, leading to rough or jagged edges.
- Overusing the Eraser Tool: While the eraser is helpful, using it excessively can result in uneven or unnatural edges. Try to rely more on the selection tools and use the eraser only for small touch-ups.
- Forgetting to Feather: Skipping the feathering option can leave harsh, unnatural lines where you made the cut. Feathering helps smooth out the transition, making the cut-out blend more naturally with the background or other elements.
- Cutting on the Same Layer: Always cut on a new layer! If you work on the same layer, you risk accidentally damaging the original image, making it harder to correct mistakes later.
- Ignoring Lighting and Shadows: Cutting out an object without considering its natural lighting and shadows can make the final composition look off. Always check how the object fits into the new scene to maintain consistency.
In Procreate, by avoiding these mistakes you can make cut outs that will appear tidier and more polished.
Also Read This: Can You Add Your Product to an iStock Image?
Tips to Refine Your Cut-Outs for a Professional Look
In order to elevate your paper cuts beyond the usual, simply utilizing elementary tools will not suffice. The appearance of cut-outs changes dramatically through focusing on intricate features and compound finesse. Below are suggestions to consider:
- Use Multiple Selections: Instead of selecting the whole area in one go, try breaking your selection into smaller, more manageable parts. This can give you greater precision, especially for complex shapes.
- Refine with the Smudge Tool: After cutting out your image, you can use the smudge tool to blend edges and smooth out any imperfections. This works great for areas with hair or fabric that require a more delicate touch.
- Experiment with Opacity: Adjusting the opacity of your layers can help you see how well your cut-out fits within the composition, making it easier to catch small imperfections or areas that need further refining.
- Check Your Cut-Out on Different Backgrounds: After cutting out the image, try placing it against different backgrounds. This helps you spot any inconsistencies or areas that need to be refined, such as rough edges or leftover pixels.
- Use a Soft Brush for Final Touches: If your edges look too sharp or unnatural, gently run a soft brush along them to soften the transition. This makes your cut-out blend more seamlessly into the new image or background.
The suggestions listed here will lead to sophisticated and seamless cut-outs regardless of the intricate images used.
Also Read This: Download Bilibili Mp3 Content With This Easy Guide
Alternative Methods for Cutting Out Images in Procreate
Obtaining control over cutting images in Procreate can also be achieved through other means besides using selection tool which is commonly used for such activities.
Some of the techniques you might want to experiment with are:
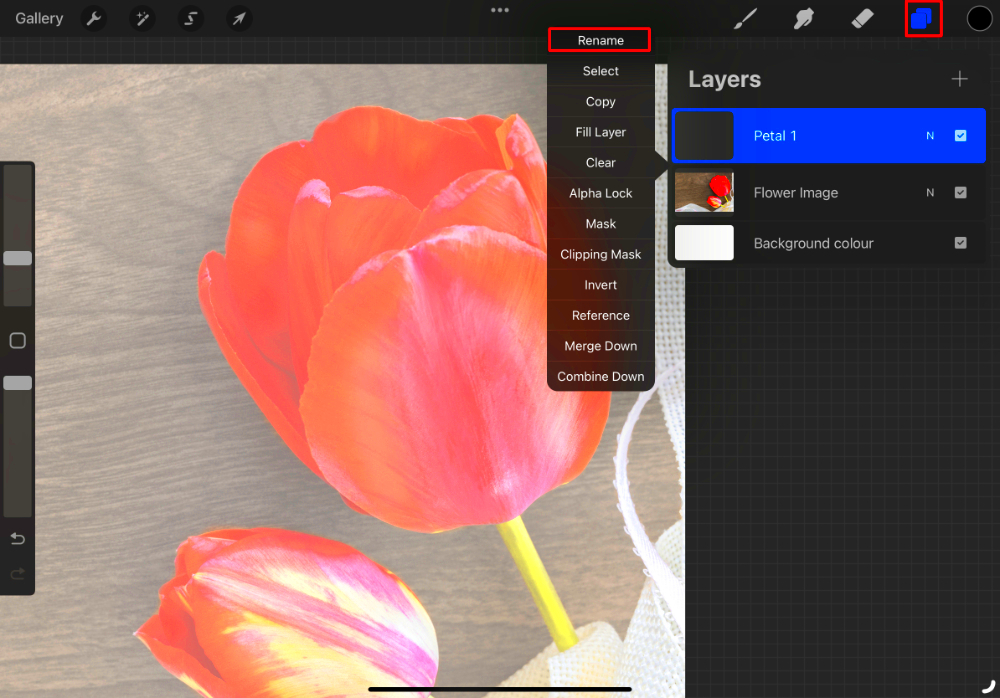
- Using Layer Masks: A layer mask allows you to hide parts of an image without permanently erasing them. This is a non-destructive method, meaning you can always revert to the original if needed. Simply create a mask on your layer and use the brush tool to paint black over areas you want to hide.
- Alpha Lock and Clipping Masks: Alpha Lock locks the transparency of a layer, so when you paint, it only affects the visible parts. This is great for refining edges after cutting out. Clipping masks, on the other hand, allow you to apply changes to a specific layer based on the transparency of the layer below, which can help in creating smooth, controlled edits.
- Using the Eraser Tool with Precision: While over-relying on the eraser can be problematic, using it with a soft, precise brush can help when cleaning up small details. Just be sure to use it on a separate layer or after making a duplicate of your image.
- Combining Selection Modes: You don’t have to stick to just one selection mode. For more complex shapes, try combining freehand and automatic selections to achieve more accurate results.
Such alternate techniques offer a certain degree of freedom involving more mastery over your cut-outs regardless of the task they are intended for.
Also Read This: Reducing Image Size for Easy Email Sharing
FAQ About Cutting Out Images in Procreate
Many users often have similar queries regarding image cropping in Procreate. Some common questions that may assist you with your initial stage or perfecting your method are outlined herein:
- What file formats does Procreate support?
Procreate supports various file formats, including PNG, JPEG, and PSD. For optimal editing and cut-out work, PNG is preferred as it supports transparency.
- Can I use Procreate on devices other than the iPad?
As of now, Procreate is designed exclusively for iPad. However, there is a version called Procreate Pocket for iPhone, but it has limited features compared to the iPad version.
- Is there a way to undo my cuts if I make a mistake?
Absolutely! Procreate has an "Undo" function that allows you to revert changes quickly. Simply tap with two fingers to undo the last action or three fingers to redo.
- What should I do if my cut-out looks jagged?
If your cut-out appears jagged, zoom in and use the eraser tool or the smudge tool to smooth the edges. You can also adjust the feathering to soften the selection.
- Can I cut out images from photos taken with my iPad?
Yes! You can import photos directly from your camera roll into Procreate, making it easy to cut out images from your own photography.
- Are there any tutorials available for learning Procreate?
Yes, many tutorials are available online, including YouTube videos, blogs, and even Procreate's own website, which offers tips and tricks to enhance your skills.
These frequently asked questions are meant to address common concerns and give you the assurance to begin cropping photos with Procreate.
Conclusion: Mastering Image Cut-Outs in Procreate
Within this article, we will discuss how mastering image cut-outs in Procreate can lead to endless creative possibilities. To obtain results that are comparable in quality with those produced by professionals, it is important to learn about the tools and techniques at your disposal, avoid common pitfalls, and apply refinement tips. This will make you not only a better beginner but also an expert who can produce impressive digital art pieces effortlessly.
 admin
admin


