Cutting out an image in Adobe Illustrator is a skill every designer should know. It’s about isolating a specific part of an image, making it ready to use independently in various designs. Whether you’re creating a logo, a flyer, or digital content, knowing how to cut out images gives you flexibility and precision. The best part? Illustrator offers multiple tools that make the process smooth and efficient, even for beginners.
This guide will walk you through the basics and help you master the techniques needed to create clean, professional image cutouts.
Understanding Why Cutting Out Images is Important

Isolating images isn’t just about aesthetics; it’s a practical design need. Here’s why:
- Versatility: Cut-out images can fit into different designs without the clutter of a background.
- Focus: Highlight the main subject of an image by removing distractions.
- Consistency: Ensure your designs maintain a uniform look across various platforms.
For example, businesses often need isolated product images for online stores, advertisements, or presentations. Clean cutouts make their content look polished and professional. Whether you’re designing for print or digital, cutting out an image is a fundamental step in creating standout visuals.
Also Read This: Getty Images Image Quality Guidelines: Ensuring High Standards for Acceptance
Tools You Need to Cut Out Images in Illustrator

Adobe Illustrator provides several tools to make cutting out images precise and easy. Here’s what you’ll typically use:
| Tool | Purpose |
|---|---|
| Pen Tool | Draw custom shapes and paths for precise cutouts. |
| Clipping Mask | Mask parts of the image to isolate the desired area. |
| Shape Builder Tool | Combine or subtract shapes for custom cutouts. |
| Magic Wand | Select and isolate areas of similar color or texture. |
Having these tools in your arsenal ensures that no matter the complexity of the image, you can achieve a clean and professional cutout.
Also Read This: Share Your Portfolio Directly from the Behance Mobile App
Step-by-Step Guide to Cutting Out an Image
Cutting out an image in Illustrator can seem daunting at first, but once you understand the steps, it becomes second nature. Here’s a simple guide to help you get started with isolating any image in Illustrator.
Step 1: Open the Image
Start by opening your image in Illustrator. Simply go to File > Open, and choose your image file. You’ll be working directly on this image, so make sure it’s high quality.
Step 2: Create a Path
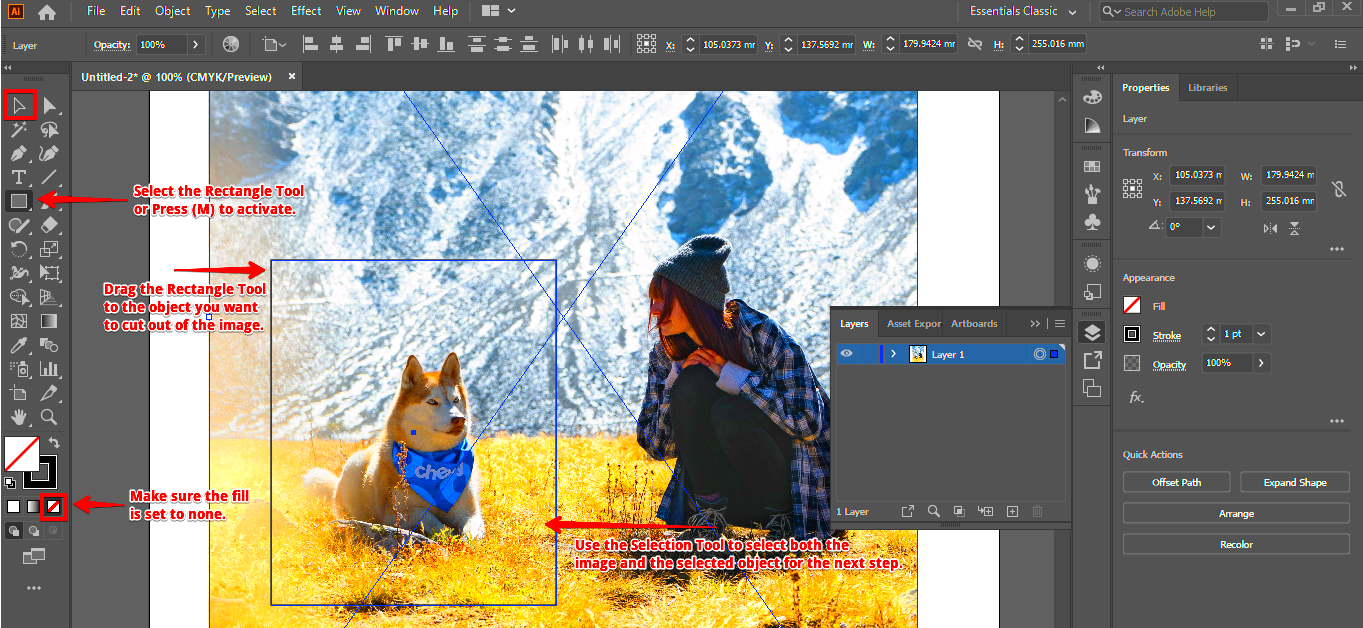
Use the Pen Tool (P) to draw around the edges of the image. Click to place anchor points and outline the object you want to cut out. You can adjust the curve by dragging the handles of the anchor points.
Step 3: Close the Path
Once you’ve traced the image, close the path by clicking on the first anchor point. This will create a complete outline around the object.
Step 4: Create a Clipping Mask
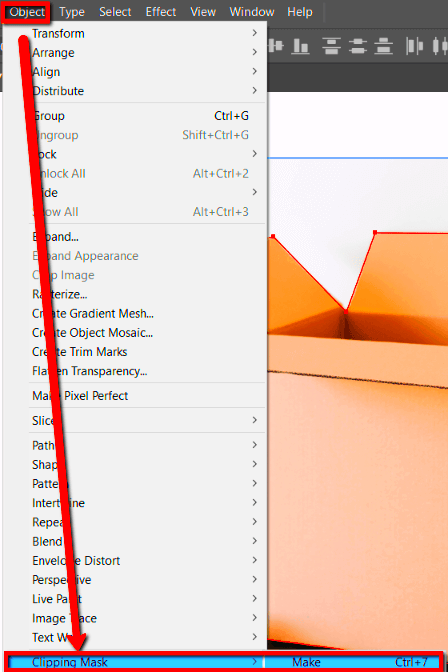
Now that the path is complete, select both the image and the path. Right-click and choose Make Clipping Mask. This will hide everything outside the path, leaving only the isolated part of your image visible.
Step 5: Refine the Cutout
Use the Direct Selection Tool (A) to adjust the anchor points for a more accurate outline. You can tweak the shape to match the edges of the image more closely.
And that’s it! With these steps, you can create professional-looking cutouts quickly and efficiently.
Also Read This: how submit photos to adobe stock
Tips for Clean and Precise Image Cutouts
To make your cutouts look sharp and professional, here are some helpful tips to ensure precision and cleanliness in your designs:
- Zoom In: When cutting out intricate details, zoom in to make sure your path is as accurate as possible. This helps avoid jagged edges or uneven curves.
- Use the Pen Tool Wisely: The Pen Tool offers complete control over your paths, so take your time to add anchor points in strategic places. Adding too many anchor points can make your path look unnatural.
- Refine Edges: After making the clipping mask, you can use the Direct Selection Tool (A) to adjust the path. Adjusting anchor points and handles helps smooth out the edges.
- Make Use of Layering: If you’re working on complex images, break them down into layers. This will help you focus on one section at a time, making your cutout process more manageable.
- Use the Shape Builder Tool: For more complex cutouts, the Shape Builder Tool (Shift + M) allows you to quickly combine and remove parts of the shape, helping you create more precise cutouts.
These tips will help ensure that your cutouts look clean and seamless, making them easy to integrate into your designs.
Also Read This: How to Change Eye Color in Photoshop CS6
Common Mistakes to Avoid When Cutting Out Images
While cutting out images in Illustrator, it’s easy to make mistakes that can affect the quality of your final product. Let’s look at some common errors to watch out for:
- Not Using Layers: Forgetting to work with layers can make the process messy, especially when handling multiple elements. Always separate different parts of your image into different layers for more control.
- Creating Jagged Edges: Overusing anchor points or not adjusting them properly can create jagged lines. Make sure your paths are smooth by refining anchor points and handles.
- Rushing the Path Creation: Don’t rush when tracing the object. A rushed path leads to poor results. Take your time to ensure your path follows the object’s contours closely.
- Ignoring Image Resolution: Working with low-resolution images can affect your cutout quality. Always work with high-quality images to get the sharpest and cleanest cutout.
- Inconsistent Masking: When using clipping masks, ensure that the mask follows the shape of the object exactly. If there are gaps, parts of your image might remain visible or parts of the background could sneak through.
By being mindful of these common mistakes, you’ll save yourself time and frustration while working on your image cutouts.
Also Read This: Understanding the Cost of an Adobe Stock License
Exporting Your Cut-Out Image for Use
Once you’ve successfully cut out your image, the next step is exporting it for use in your designs. Whether you’re working on a website, a printed flyer, or social media content, exporting in the right format ensures your image retains its quality and is ready to be used across different platforms.
Step 1: Choose the Right Format
When exporting your cut-out image, the format you choose will depend on its intended use. Here are some of the most common formats:
| Format | Best For |
|---|---|
| PNG | Images that require a transparent background, perfect for web use or layering. |
| JPEG | Photographs or images that do not need transparency, great for web or print. |
| SVG | Scalable vector images, ideal for logos and icons, which need to maintain high resolution at any size. |
Step 2: Export the Image
After selecting the format, go to File > Export > Export As. Choose your desired location and format. Make sure to select "Use Artboards" if you want to export only the content within your artboard’s boundaries.
Step 3: Adjust Settings
For PNG files, ensure you choose the appropriate resolution (72 ppi for web or 300 ppi for print). For SVG, make sure all text is converted to outlines for compatibility. After making these adjustments, click Export, and your image will be ready for use!
Also Read This: Exploring the Extensive Video Content Collection of Getty Images
Frequently Asked Questions
Here are some common questions about cutting out images in Illustrator:
- What is the best tool to use for cutting out images in Illustrator?
The Pen Tool is often the best option because it gives you precise control over your paths, but you can also use the Shape Builder Tool or the Magic Wand Tool for quicker selections depending on the complexity of your image. - Can I cut out an image with a transparent background?
Yes, if you export your cut-out image as a PNG, you can maintain the transparency of the background, making it suitable for layering over other images. - Why is my cut-out image looking rough?
Check the anchor points and curves. If they are too sharp or uneven, use the Direct Selection Tool to adjust them for smoother edges. Also, make sure you are using high-quality images to begin with. - Can I cut out complex shapes or only simple ones?
Illustrator is versatile and can handle both simple and complex shapes. However, for intricate areas, take your time refining the path or use additional tools like the Shape Builder Tool to simplify the process.
Conclusion
Mastering the process of cutting out images in Illustrator is a valuable skill for any designer. Whether you’re working with simple shapes or intricate images, knowing how to isolate parts of your image with precision opens up endless possibilities. By following the right steps, using the correct tools, and avoiding common mistakes, you’ll be able to create professional, clean cutouts that can be used in a variety of designs. The ability to export these cutouts in the right format ensures they’re ready to be implemented in your projects, no matter the medium.
With practice and patience, you’ll become more efficient at cutting out images, making your design workflow faster and more streamlined. So, take your time, experiment with the tools, and soon you’ll be cutting out images like a pro!

 admin
admin


