Hey there! If you’re diving into video editing using iMovie, you’re in for a treat. One fantastic resource at your disposal is Storyblocks Music, a treasure trove of royalty-free tracks to elevate your projects. Whether you’re crafting a family video, a business presentation, or anything in between, the right music can set the perfect mood. In this guide, we’ll explore how seamlessly you can integrate Storyblocks Music into your iMovie edits. Ready to enhance your videos? Let’s get started!
Creating a New Project in iMovie
Before you can start adding those fantastic tunes from Storyblocks Music, you need to create a new project in iMovie. Here’s a simple step-by-step guide to help you out:
- Open iMovie: Launch the iMovie application on your Mac. If it's not installed, grab it from the App Store—it's free and user-friendly!
- Start a New Project: On the main interface, look for the “Create New” button. You’ll have two options: Movie or Trailer. Select Movie for a more flexible editing experience.
- Name Your Project: A pop-up will prompt you to name your project. Choose a name that reflects the content. This will help keep you organized, especially if you're working on multiple projects!
- Select Your Aspect Ratio: iMovie will ask you to choose an aspect ratio, typically 16:9 for standard videos or 9:16 for vertical videos. Choose what works best for your audience.
- Add Clips: After setting up your project, you’ll see the Libraries section on the left. Here, you can import videos directly from your computer or use the iMovie Event library.
Now that your project is set up, it’s time to add some flavor with music! Here’s how you can source tracks from Storyblocks:
- Visit Storyblocks: Head to the Storyblocks Music website and browse through their extensive collection. You can search by mood, genre, or even specific instruments.
- Select Your Track: Once you find a track that fits your project, click on it. You’ll usually find options to preview, download, or save to a playlist.
- Download Your Music: After you've chosen the perfect tune, download it to your computer. Make sure you comply with any licensing agreements, though—it's all about respecting creators!
- Import to iMovie: Back in iMovie, go to your project and click on “Import Media.” Navigate to the location where you saved your Storyblocks track and select it for import.
With your music now in iMovie, you can drag it onto your timeline, adjust the length, and position it just right to enhance the content you've created. Play around with the audio levels to ensure your music complements the visuals rather than overpowering them.
And just like that, you’re on your way to creating stunning videos! With Storyblocks Music and iMovie, your projects can come to life in a vibrant and engaging way. Happy editing!
Also Read This: How to Delete Your Storyblocks Account: A Step-by-Step Guide
3. Accessing Storyblocks Music Library
Ready to dive into the world of audio? Accessing the Storyblocks Music Library is your first step to finding the perfect soundtrack for your project. Whether you're creating a vlog, marketing video, or a short film, the library offers a broad selection of music to set the right tone. Here’s how to get started:
- Create Your Storyblocks Account: If you haven’t already, head over to the Storyblocks website and sign up for an account. They offer various plans, so pick one that suits your needs best!
- Log In to Your Account: Once you’ve set up your account, log in. You’ll find yourself in the user dashboard, where you can explore a world of creative assets.
- Navigating the Music Library: From the dashboard, click on the 'Music' tab. This will take you to the music library where you can search, filter, and browse through a vast collection of tracks.
- Use Filters: To save time, use the various filters to narrow down your search. You can filter by genre, mood, tempo, and even specific instruments. This makes it easier to find tracks that fit your project’s vibe.
- Preview Tracks: Most tracks offer a preview option. Listen to a snippet to see if it resonates with your vision. Take notes on the ones you love!
- Download Your Selection: Once you’ve found the perfect track, hit the download button. Remember to choose the download format that suits your project best, typically an MP3 or WAV file.
And that’s it! You now have access to an entire library of music at your fingertips. Remember to explore different genres and moods - you never know when something unexpected might be the perfect fit for your project!
Also Read This: Is Storyblocks Safe to Use Without Any Risk of Legal Issues?
4. Choosing the Right Music for Your Project
Choosing the right music is like finding the perfect outfit for an occasion; it sets the entire mood! Here are some tips to help you make the best choice:
- Understand Your Project's Theme: What story are you trying to tell? If your video is a heartfelt documentary, softer, emotional music might resonate better than upbeat pop. Consider the themes involved.
- Identify the Mood: Music can evoke emotions. Do you want your audience to feel happy, nostalgic, excited, or reflective? Pick tracks that enhance those feelings to complement your visuals.
- Know Your Audience: Who will be watching your project? Tailor the music to their tastes to create a better connection. Younger audiences might prefer current hits, while older viewers may appreciate classic tunes.
- Consider the Pace of Your Edits: Fast cuts and energetic visuals often pair well with upbeat music. Conversely, slow transitions may benefit from a more subdued track. Listen to how the music aligns with your editing style.
- Experiment! Don’t be afraid to try out different tracks in your editing software. Sometimes, a piece that doesn’t seem to fit on paper can create an interesting contrast and enhance the overall impact.
Finally, remember that licensing is important. Storyblocks provides music clips that are royalty-free, meaning you can use them without worrying about legal complications. This makes them a great choice for all types of projects!
In the end, the right track can elevate your project, making it unforgettable. So take your time, explore, and enjoy the process of finding that perfect piece of music to accompany your visual storytelling!
Also Read This: How to Use Storyblocks for Commercial Use and Avoid Legal Issues
5. Importing Music into iMovie
So, you've found the perfect track on Storyblocks, and now you're ready to bring it into iMovie. Importing music is a straightforward process, and it's essential for setting the right tone in your project. Let’s walk through how to do this step-by-step.
First off, make sure you have your Storyblocks music file downloaded and ready to go. Typically, you’ll download it in a standard audio format like .mp3 or .wav, which are both compatible with iMovie. Once your audio file is secure, follow these steps to get it into your iMovie project:
- Open iMovie: Launch iMovie and open the project you’re working on.
- Access the Media Library: In the upper left corner of the iMovie interface, click on the "Import Media" button. This will open a window for you to navigate to your downloaded music file.
- Locate Your Music: Find the folder where you saved your music from Storyblocks, select the track you want to use, and click "Import Selected."
- View Your Music: Once imported, the music will appear in the "Audio" section of your media library. You can now drag and drop it directly into your timeline where you want it to start.
And that’s it! Once you’ve imported your track, it's ready to be cut and edited to fit your video. Remember that your project might flow better if the music complements the visuals, so take some time to position it correctly in the timeline.
Don't forget to adjust the volume levels as well. Sometimes, music tracks can be too loud or too soft compared to your other audio elements (like dialogue or sound effects), so make sure to balance those out in the audio settings.
Also Read This: Who Owns Storyblocks and How Is It Managed as a Platform
6. Cutting and Editing Music in iMovie
With your music track imported into iMovie, the real fun begins! Cutting and editing your music can make a significant difference in how well it enhances your video. Here’s how to do it effectively:
iMovie provides a simple and intuitive interface to help you cut and edit your music. Here’s what to do:
- Position Your Track: Drag your imported music file to the timeline where you want it to begin. This might be at the start of your video or synced with specific scenes.
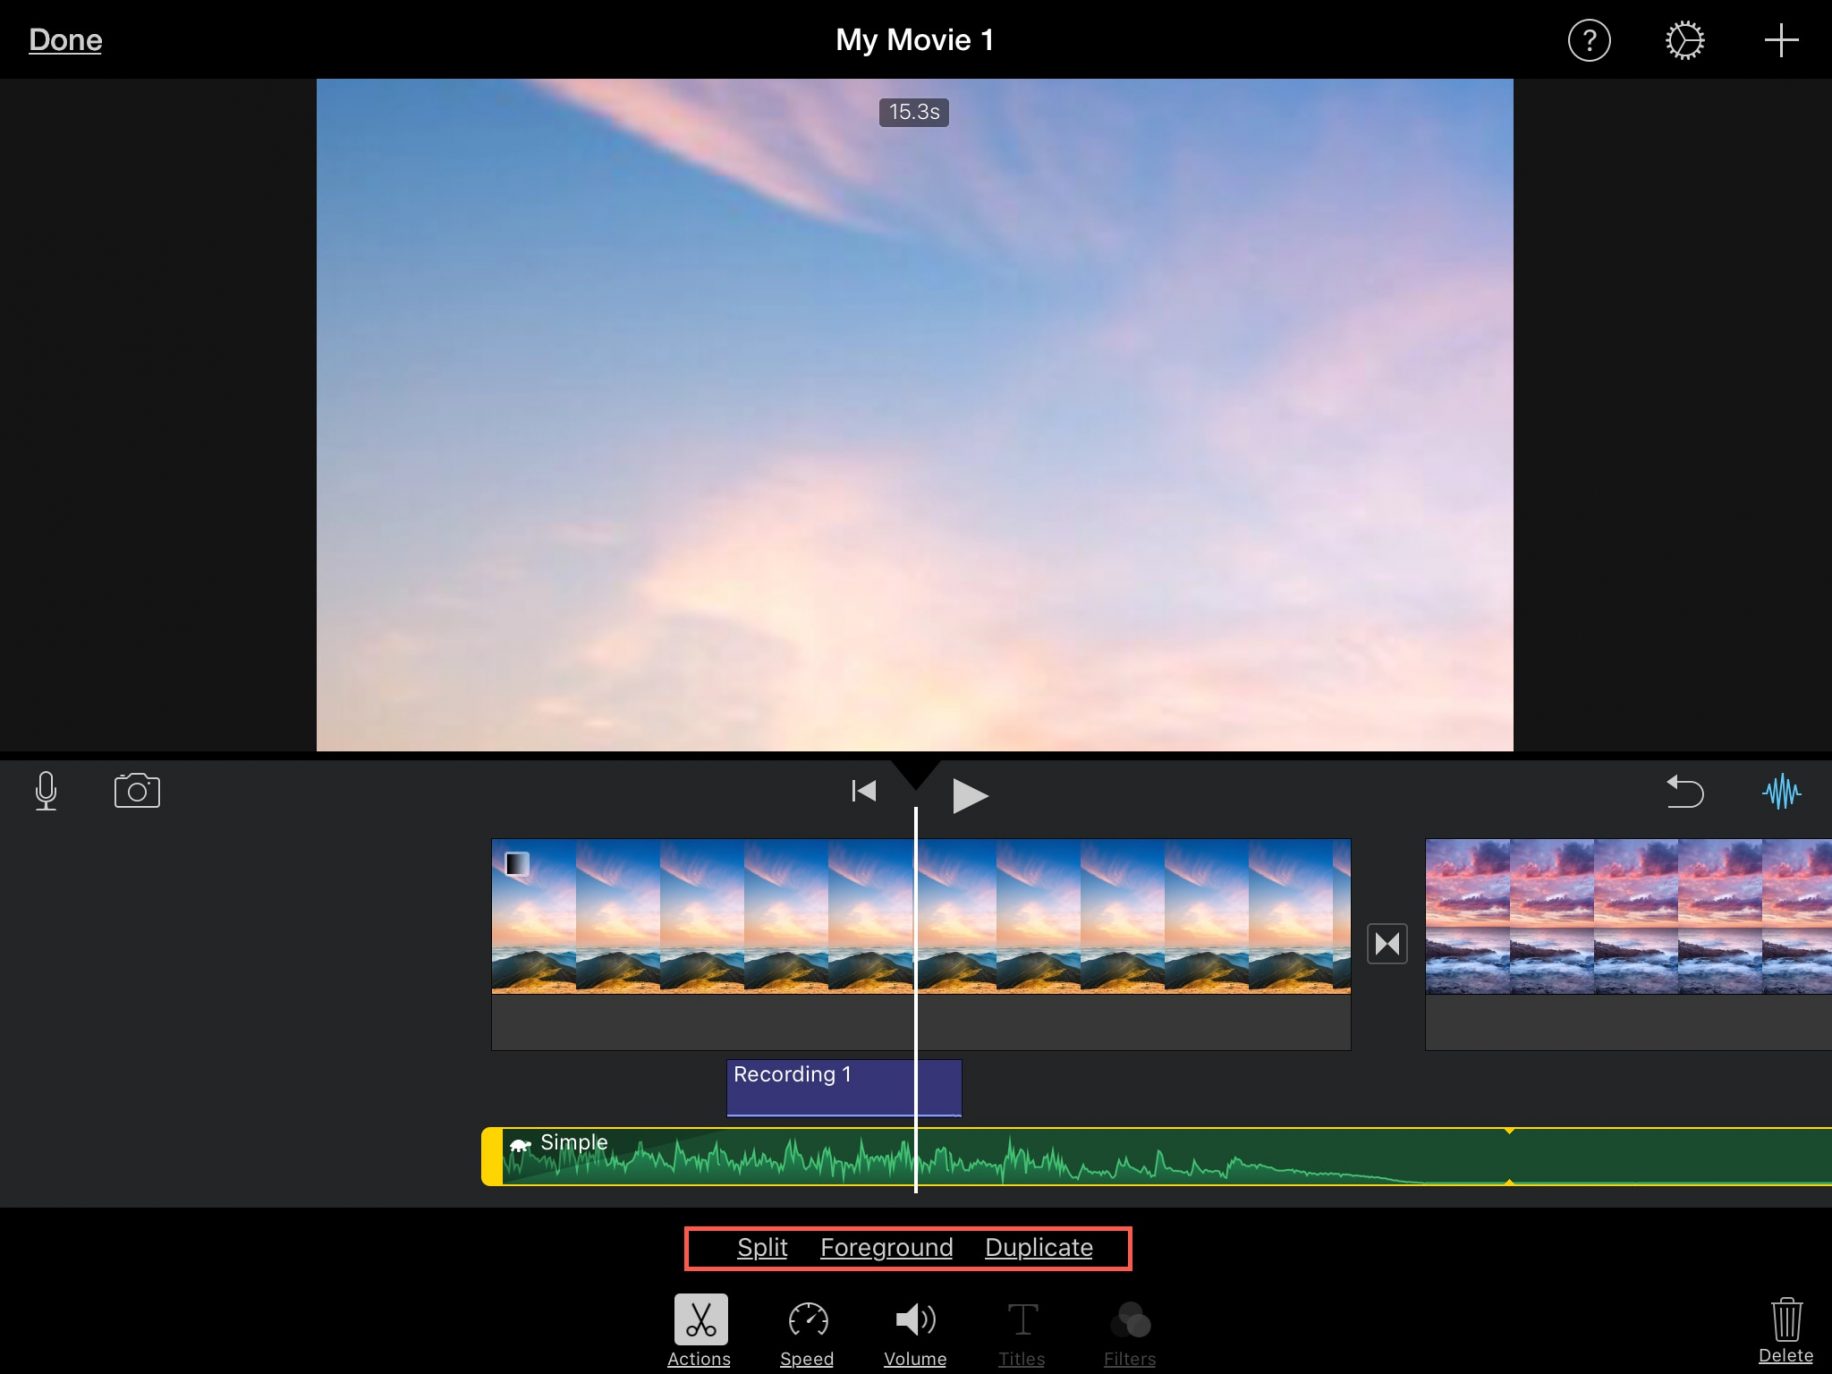
- Select the Music Clip: Click on the audio track in the timeline, and you should see a yellow outline around it. This indicates that it’s selected and ready for editing.
- Cutting the Track: To cut the music, place the playhead (the vertical line that shows your current position in the timeline) at the point where you want to cut. Right-click and choose "Split Clip," or simply use the shortcut Command + B. This will create two segments of your music track.
- Delete Unwanted Segments: After splitting the audio, you may want to remove parts you don’t need. Just select the segment while it’s highlighted and hit the Delete key.
- Audio Adjustments: After cutting, consider adjusting the audio levels. Click on the audio clip in the timeline and use the volume slider in the top-right corner to increase or decrease the volume as needed.
- Fades and Transitions: To make your audio blend seamlessly into your project, add fade-ins and fade-outs. Simply drag the small circular handles at the beginning and end of the audio clip to adjust the fade.
Additionally, don’t be afraid to experiment with the timing! Sometimes, shifting the track slightly forward or backward can create a more engaging audio experience.
By following these steps, you'll have polished music that enhances your project, keeps your audience engaged, and ensures a professional finish. Happy editing!
Also Read This: What Exactly Are Storyblocks and How Do They Work for Content Creators?
7. Tips for Syncing Music with Video Clips
Syncing music with video clips can make your project shine! It’s one of the most enjoyable parts of video editing, allowing you to enhance the mood and emotion of your visuals. Here are some handy tips to help you master this skill:
- Listen and Visualize: Before you start syncing, watch your video a few times while listening to the music. Try to visualize where the beats fall, and how the transitions in your video can align with these beats.
- Use Markers: In iMovie, you can add markers to your video timeline. This is particularly helpful since it allows you to pinpoint key moments in your video where you want to sync the music. Just press Command + Shift + M to place a marker!
- Match Energy Levels: Pay attention to the energy of the music. If there’s a dramatic change, like a crescendo, make sure it aligns with a dramatic moment in your footage. Conversely, keep softer sections paired with calmer visuals.
- Experiment with Cuts: Don’t hesitate to experiment! Play around with where you cut your music to fit your video. Sometimes, a small adjustment can lead to a much more impactful connection between the audio and visual elements.
- Adjust Clip Speed: If you find your music perfectly synced but just slightly too fast or slow for the clip, don’t despair! You can experiment with adjusting the speed of your video clip slightly to achieve better synchronization.
- Fade Effects: For a seamless transition, use fade-in and fade-out effects on your music. This can make the entry and exit of your audio feel smoother, especially on video clips that may have abrupt cuts.
Syncing music may take time and patience, but when done well, it enriches your storytelling and captivates your audience. Find the natural rhythm of your footage and let the music play off that energy!
Also Read This: Is Storyblocks Audioblocks Legit for Music and Audio Editing?
8. Exporting Your Final Project
Congratulations! You’ve created a fantastic video using Storyblocks music in iMovie. Now, it’s time for the exciting part - exporting your final project. The process might seem straightforward, but there are a few important steps to ensure your video looks great no matter where you share it.
Here’s how to properly export your project:
- Review Your Project: Before exporting, take a moment to watch your video in its entirety. Check for any issues, like audio levels or visual cuts that might not feel right. It’s always better to catch these things before you export!
- Select the Correct Resolution: Depending on where you plan to share your video (YouTube, social media, etc.), you’ll want to choose the right resolution. For most standard uploads, a resolution of 1080p (1920 x 1080) is sufficient. Navigate to File > Share > File, and you’ll see options for resolution and quality.
- Choose the Format: iMovie typically exports in MP4 format, which is ideal for most platforms. However, adjust any settings under the Format dropdown if necessary to fit your needs.
- Optimize for Web: If you’re sharing online, consider using the option to optimize for web. This ensures that the file size is manageable while maintaining quality, making it easier for viewers to stream your video without significant buffering.
- Name Your Project: Give your project an identifiable name and choose a location on your computer that’s easy to remember. Keeping your files organized will save you headaches in the future!
- Export and Wait: Once you’ve set everything up, click Next and then Export. Depending on the length and complexity of your video, this might take a few minutes. Use this time to grab a snack and celebrate!
After the export is complete, locate your video file and give it a final watch. Let the excitement sink in; you’ve just created something beautiful! Now, share it with the world and let the music play.
Conclusion and Additional Resources
In conclusion, cutting music effectively with Storyblocks in iMovie can elevate your projects significantly. By leveraging the extensive library of high-quality music available on Storyblocks, you can create engaging videos tailored to your audience's needs. Remember to consider the emotional tone of your music, ensure proper synchronization with your visuals, and respect copyright laws by utilizing royalty-free tracks.
To further enhance your skills and streamline your video editing process, here are some additional resources that you might find helpful:
- Storyblocks Blog - Stay updated with tips and tutorials for using music effectively in your projects.
- Apple iMovie Training - Comprehensive guides and video tutorials on mastering iMovie.
- YouTube - iMovie Music Editing Tutorials - A plethora of visual guides teaching music integration in iMovie.
- PremiumBeat Blog - Insights on the importance of music in video storytelling.
As you continue your video editing journey, utilize these resources to refine your skills and explore the creative possibilities that music can bring to your visual narratives.
 admin
admin


