Welcome to the world of Cricut crafting! If you're eager to take your designs to the next level by curving images, you're in the right place. Curving images can add a unique flair to your projects, making them more visually appealing. Whether you're creating custom t-shirts, cards, or home décor, learning how to curve images in Cricut Design Space is essential. In this post, we'll guide you step-by-step through the process, ensuring you can easily give your designs that special touch. Let's get started!
Understanding the Cricut Design Space Interface
Navigating the Cricut Design Space interface is crucial for efficiently curving images. It might seem a bit overwhelming at first, but once you get acquainted with its features and layout, you’ll feel right at home. Here’s a breakdown of the main components you'll encounter:
- Toolbar: At the top, you'll see various tools such as the Save, Undo, and Redo buttons. This is where you initiate actions to manage your design.
- Canvas Area: The large white area in the center is your workspace. This is where you'll drag and drop images, text, and shapes to create your design.
- Layers Panel: On the right side, the Layers Panel displays all your design elements. It’s crucial for organizing and managing layers, including images that require curving.
- Design Panel: Located on the left side, this panel allows you to explore, upload, and modify designs. You can choose from pre-made images or upload your own for curving.
- Templates & Fonts: You’ll also find sections for accessing different templates and fonts that can be manipulated and curved according to your project’s needs.
Now that you're familiar with the layout, let’s discuss how to actually curve your images:
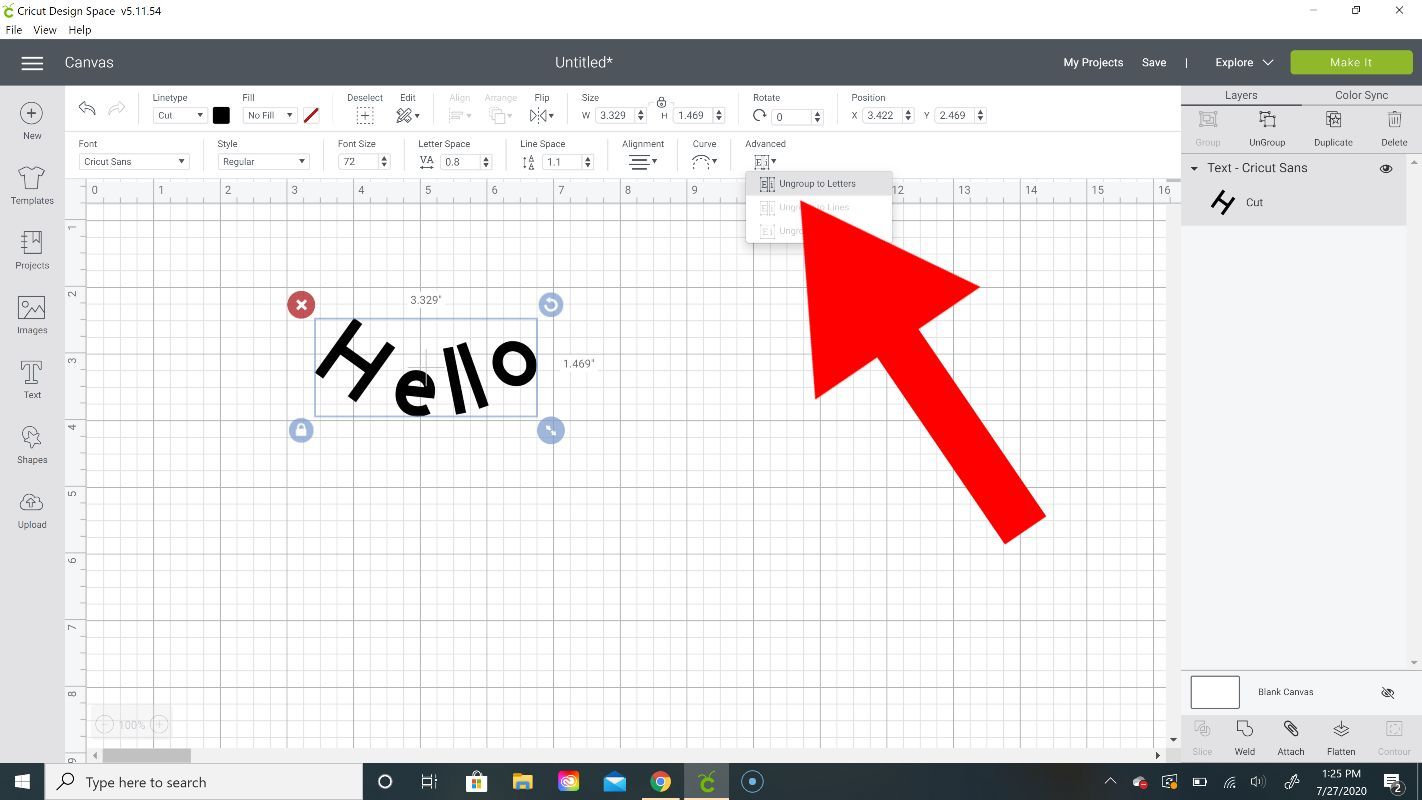
1. *Start by selecting your text or image: Click on the item you want to curve; it will be highlighted in the Layers Panel. You can choose text or an image that can be adjusted.
2. Use the 'Curve' Tool: If you’re curving text, select the text layer, then look for the 'Curve' option on the right sidebar. Here, you’ll have a slider that allows you to arch your text either upward or downward. Adjust until you achieve the desired curve.
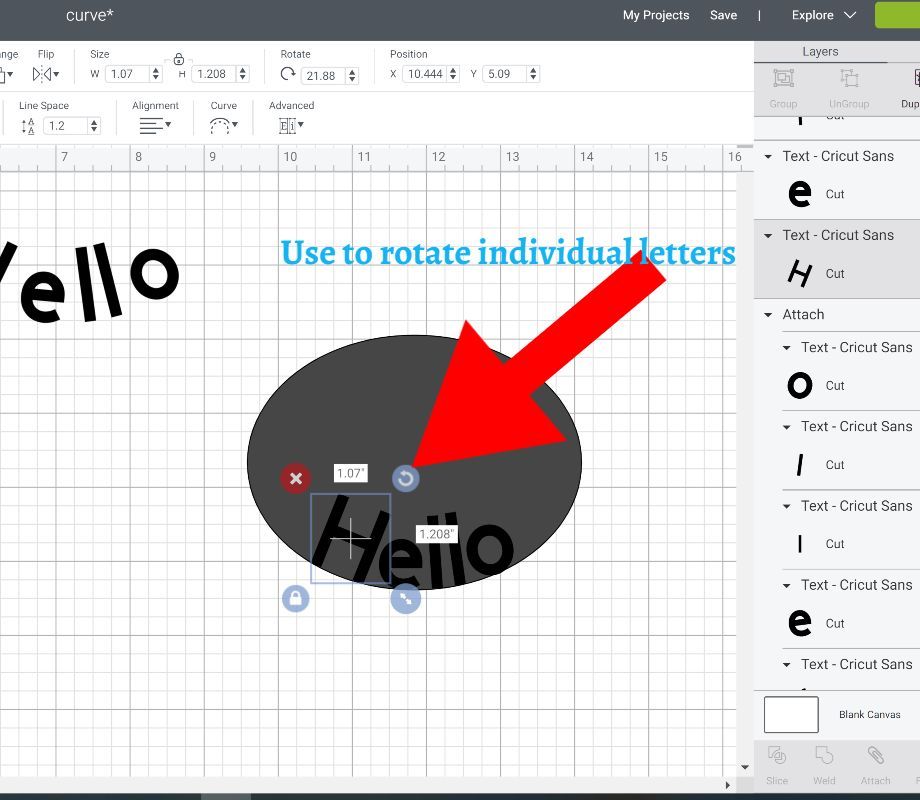
3. Positioning: After curving, you might need to reposition your text or image. Click and drag to place it perfectly within your design frame.
4. Experiment with Styles: Don’t hesitate to try different fonts, layers, and colors while curving! The beauty of Cricut is that you can always undo and redo any step if you’re not satisfied with the outcome.
5. Preview Your Design*: Before finalizing your project, preview how everything looks together. This is where you can make last-minute adjustments to ensure it’s just right.
Understanding the interface makes the curving process smoother and less daunting. With a little practice and experimentation, you’ll be curving images like a pro in no time. Happy crafting!
Also Read This: how to put transparent image on google slides
3. Step-by-Step Guide to Curving Images
Curving images with your Cricut machine can seem a bit daunting at first, but once you break it down into steps, you'll find it's pretty straightforward! Let’s walk through the process, shall we?
- Open Design Space: Start by launching Cricut Design Space on your computer or mobile device. If you're using a tablet or phone, be sure you have the app installed!
- Create a New Project: Click on the “New Project” button to start fresh. This is where all the magic will happen.
- Upload Your Image: If you have an image you want to curve, click on “Upload” on the left-hand menu. Once your image is uploaded, select it and insert it into your project.
- Select the Image: Click on the image to make sure it’s selected. You'll see a bounding box around it.
- Open the Text Tool: Now, if you want to add text alongside your image, select the “Text” tool. Type out what you want, and choose a font that complements your design!
- Curve Your Text: With your text selected, look for the “Curve” option in the text editing toolbar at the top. There, you’ll find a slider that allows you to adjust the curve of your text.
- Adjust the Curve: Move the slider left or right to create the desired curvature. The text will bend as you slide, giving you a visual representation of your adjustments. Play around with it until it looks just right.
- Position Your Image: Drag your curvy text and image around the canvas to position them perfectly together. Don’t forget to group them if you want to keep them in the same place during cutting!
- Set Your Cut Settings: Once you’re happy with your design, hit the “Make It” button. Make sure you double-check the cut settings for the material you’re using.
- Cut and Assemble: Finally, load your mat, cut the design, and assemble your project! Remember to weed out the excess material carefully.
That’s all there is to it! Once you've mastered curving images, you’ll find endless possibilities for your Cricut projects. Whether it's for personalized gifts, home decor, or craft fairs, curving images adds that special touch!
Also Read This: How Nonprofits Can Leverage Imago Images to Enhance Their Campaigns
4. Tips for Choosing the Right Image to Curve
Now that you know how to curve images, let's discuss how to select the right images for curving. Not all images work well with this technique, so here are some handy tips!
- Choose Simple Designs: For best results, select images that aren’t overly complex or detailed. Simple designs tend to curve more easily and look cleaner when applied to various surfaces.
- Pick High-Quality Images: Always opt for high-resolution images. Low-quality images can pixelate or look blurry when resized, ruining your project.
- Consider Text-Based Designs: Text can be very effective when curved, especially catchy phrases or quotes. Just make sure you choose a font that's legible even after curving.
- Avoid Busy Patterns: Images with busy patterns may distract from the curved text or design. Solid colors or gradients work better to enhance the impact of curving.
- Test with Free Images: If you’re unsure about a specific design, try testing it out with free images available from sites like Freepik or Canva. This way, you can see how they curve without any cost involved!
- Balance Your Design: Make sure your curved image balances well with any other elements you’re planning to use in your project. A smart composition can elevate the overall look!
Choosing the right image is crucial for achieving the best results when curving. Keep these tips in mind next time you're selecting an image, and you’ll find yourself creating stunning designs that will impress everyone!
Also Read This: Using iStock Photos for Your Projects – A Complete Guide for Beginners
5. Common Mistakes to Avoid When Curving Images
When it comes to curving images on your Cricut, there are several pitfalls you might encounter. Avoiding these common mistakes will save you time and ensure that your projects turn out beautifully. Here are some key points to keep in mind:
- Not Choosing the Right Font: Some fonts are easier to curve than others. If you notice that your text isn’t curving well, consider switching to a more suitable font. Bold and wide fonts tend to work better.
- Ignoring Image Resolution: Low-resolution images can result in pixelated designs after curving. Always use high-resolution images to maintain quality.
- Forgetting to Weld: After curving, many users forget to weld their designs, which can lead to separate layers that don't work together. Make sure to select all elements and weld them together before cutting.
- Overlooking Alignment: Make sure your text or image is centered before curving. Misalignment may result in awkward designs. Use the alignment tools in Cricut Design Space to keep everything in check.
- Neglecting to Preview: Always use the preview function before cutting your design. This helps catch any mistakes that might not be apparent right away, such as improperly spaced letters or uneven curves.
By being aware of these common mistakes, you can ensure a smoother and more enjoyable crafting experience. Take your time during the design process, and don’t hesitate to experiment with different settings until you achieve the perfect curve!
Also Read This: how to make an image circular in google slides
6. Additional Techniques for Enhancing Curved Images
Curving images on Cricut can be a lot of fun, but did you know there are additional techniques to enhance your curved designs? Here are some creative ideas to take your projects to the next level:
- Add Shadows or Outlines: Adding a shadow or outline can create depth and make your curved text or images stand out. Use contrasting colors to add visual interest.
- Layering for Effects: Consider layering multiple curves over one another. This can create a lovely 3D effect that adds dimension and intrigue to your project.
- Using Patterns: Instead of a solid color, try filling your curved images with patterns. This not only makes the design eye-catching but also shows off creative flair.
- Experimenting with Textures: If you’re using physical materials, consider adding layers with different textures. For instance, glitter vinyl versus matte vinyl can create interesting contrasts.
- Customizing Size and Placement: Don’t be afraid to vary the size of your curved text or images. Place smaller text or images within a larger arch or curve for a unique twist!
By incorporating these techniques, you can enhance your curved images and add a personalized touch to your projects. It’s all about letting your creativity shine! So grab your Cricut, play around with these ideas, and watch your designs truly come to life.
Conclusion and Recommended Resources
Curving an image on Cricut can enhance your designs significantly, allowing for more creativity and personalization in your projects. By following the step-by-step process outlined in this blog, you can easily manipulate text and images to fit your creative vision. Remember, practice makes perfect—you may need to experiment with different settings and techniques to achieve the desired effect.
To further assist you on your Cricut journey, here are some recommended resources:
- Cricut Official Website - The go-to resource for all Cricut tools and accessories.
- Cricut Help Center - A great place to find tutorials and troubleshoot common issues.
- Cricut YouTube Channel - A visual guide that provides video tutorials for all skill levels.
- Cricut Design Space - Utilize design tools directly within the software to perfect your projects.
- Facebook Groups - Join Cricut-specific groups where you can exchange ideas and tricks with fellow crafters.
With these resources at your fingertips, you'll be well-equipped to dive into the world of Cricut crafting. Be sure to stay curious, keep learning, and share your creations with the community!
 admin
admin