Welcome to your ultimate guide on curling hair! If you’re looking to transform your straight locks into gorgeous, bouncy curls, you’ve come to the right place. Curling hair can seem daunting at first, but with the right techniques and tools, you’ll be able to create stunning curls in no time. Whether you're preparing for a special occasion or simply want to change up your everyday look, mastering the curling iron is a game-changer. Let’s dive in and get those curls popping!
Choosing the Right Curling Iron
When it comes to curling hair, choosing the right curling iron is crucial for achieving the style you desire. With so many options available, you might feel overwhelmed. But don’t worry! Here are some key factors to consider:
- Barrel Size: The size of the barrel greatly influences the type of curls you’ll create. Here’s a quick breakdown:
- 1-inch: Perfect for medium-sized, bouncy curls.
- 1.5-inch: Ideal for loose waves and larger curls.
- 0.5-inch: Great for tight, defined curls.
- Material: The material of the curling iron can affect the health of your hair as well as the longevity of your curls. Common materials include:
- Ceramic: Provides even heat distribution, reducing the risk of hot spots that can damage hair.
- Tourmaline: Emits negative ions, which help to reduce frizz and enhance shine.
- Metal: Heats quickly but can cause damage; not recommended for fine or damaged hair.
- Heat Settings: Look for a curling iron with adjustable heat settings. This way, you can choose a lower temperature for fine or damaged hair and a higher temperature for thick or coarse hair. Generally, here’s a handy guide:
- Fine Hair: 250-300°F (120-150°C)
- Medium Hair: 300-350°F (150-175°C)
- Thick Hair: 350-400°F (175-200°C)
- Auto Shut-off Feature: Safety first! A curling iron with an auto shut-off feature will give you peace of mind if you’re prone to forgetting to turn it off.
In summary, take your time choosing a curling iron based on the size of curls you want, the material that will best suit your hair type, and the heat settings available. A good curling iron is an investment that will pay off in beautifully styled hair!
Also Read This: How to Work on Microsoft Excel on Dailymotion: Tutorials and Tips
3. Preparing Your Hair for Curling
Before diving into the curling process, it's crucial to prepare your hair properly. Think of this as setting the stage for a stunning performance. Here’s how to get started:
- Start with Clean Hair: Wash your hair the day before or the morning of your curling session. Clean hair holds curls better but avoid washing it right before, as freshly washed hair can be too slippery.
- Dry Your Hair Thoroughly: If you’re starting with damp hair, blow-dry it completely. Damp strands can lead to uneven curls and frizz.
- Apply a Heat Protectant: This is a non-negotiable step! Apply a heat protectant spray or cream evenly through your hair. It helps shield your locks from the heat damage caused by the curling iron.
- Use a Lightweight Mousse or Styling Cream: For added hold, consider applying a lightweight mousse or styling cream. This will give your curls some extra bounce and longevity.
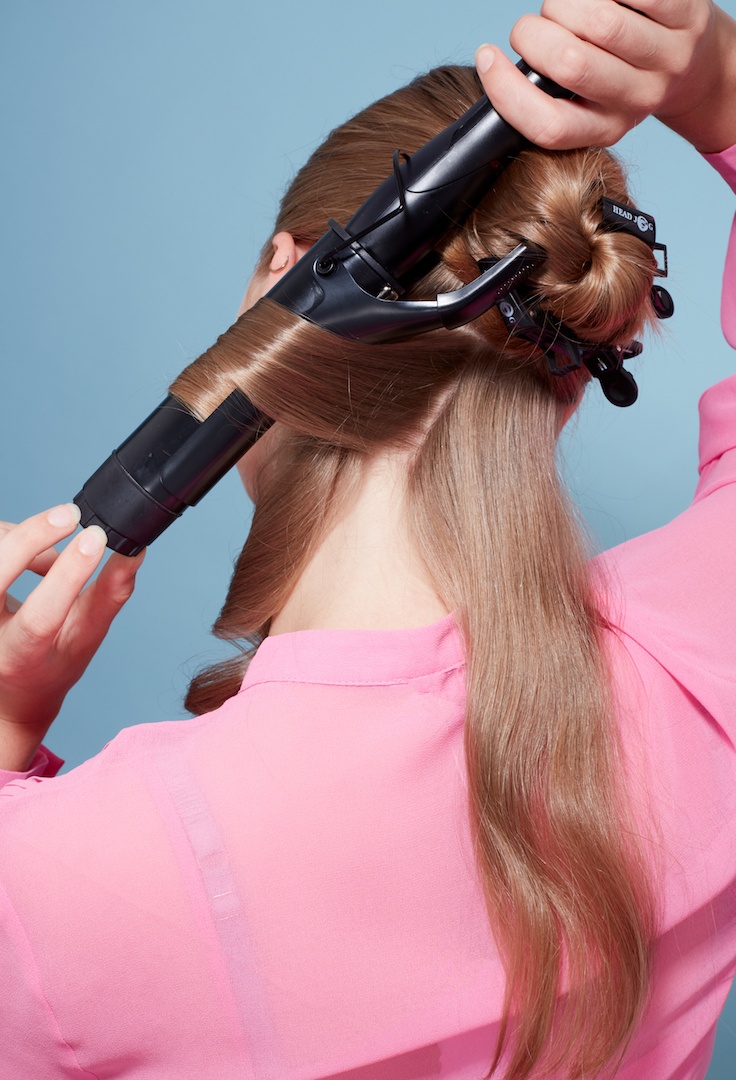
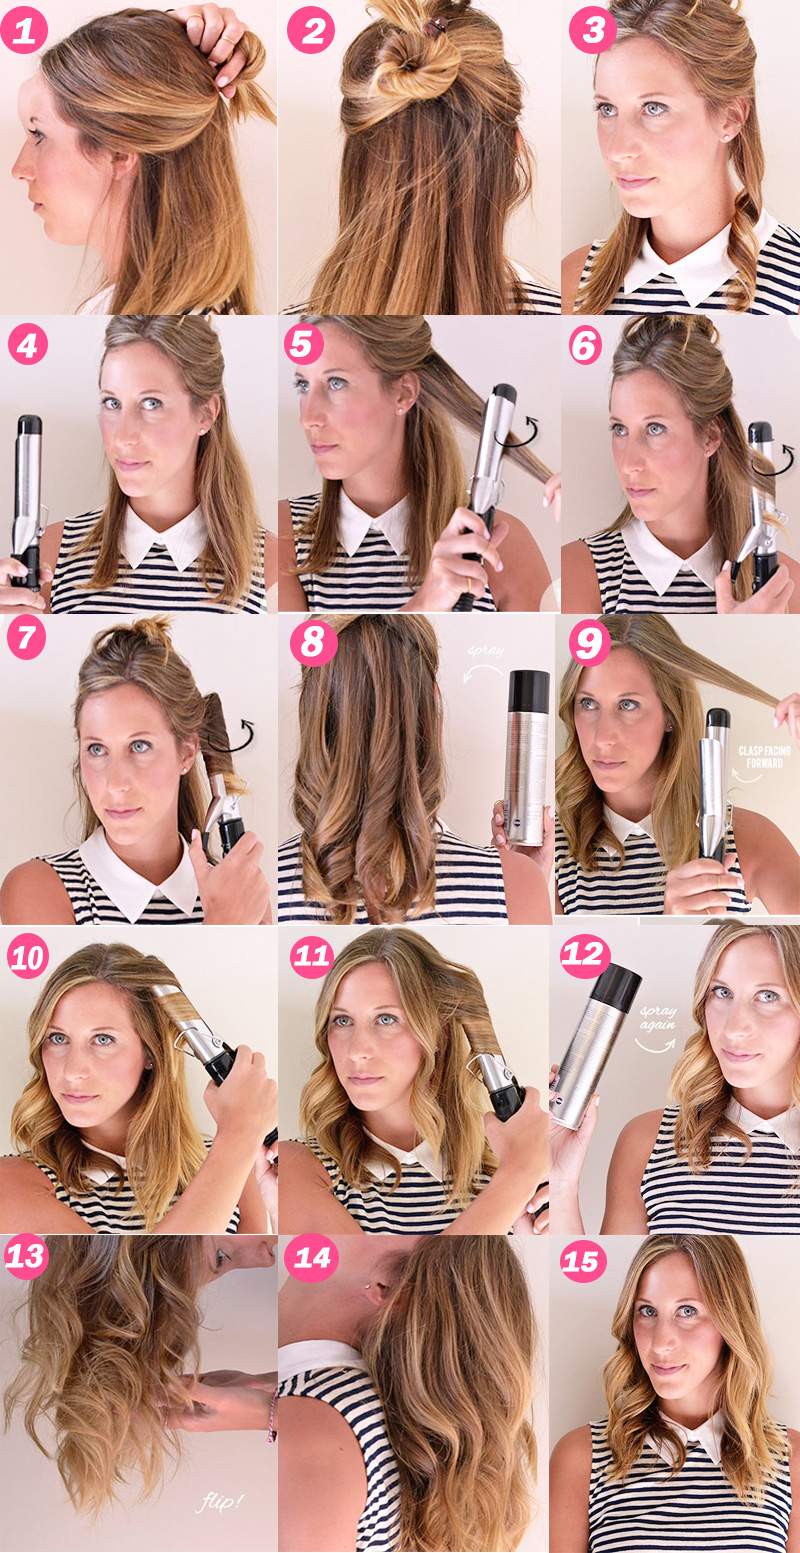
- Section Your Hair: Divide your hair into manageable sections. Use clips to hold the top sections away while you work on the bottom layers. Typically, four sections work well: two at the bottom and two at the top.
With your hair prepared, you're not only protecting it but also setting yourself up for success in achieving those beautiful curls!
Also Read This: How to Create Stunning 3D Art with Step by Step Guidance from Dailymotion Videos
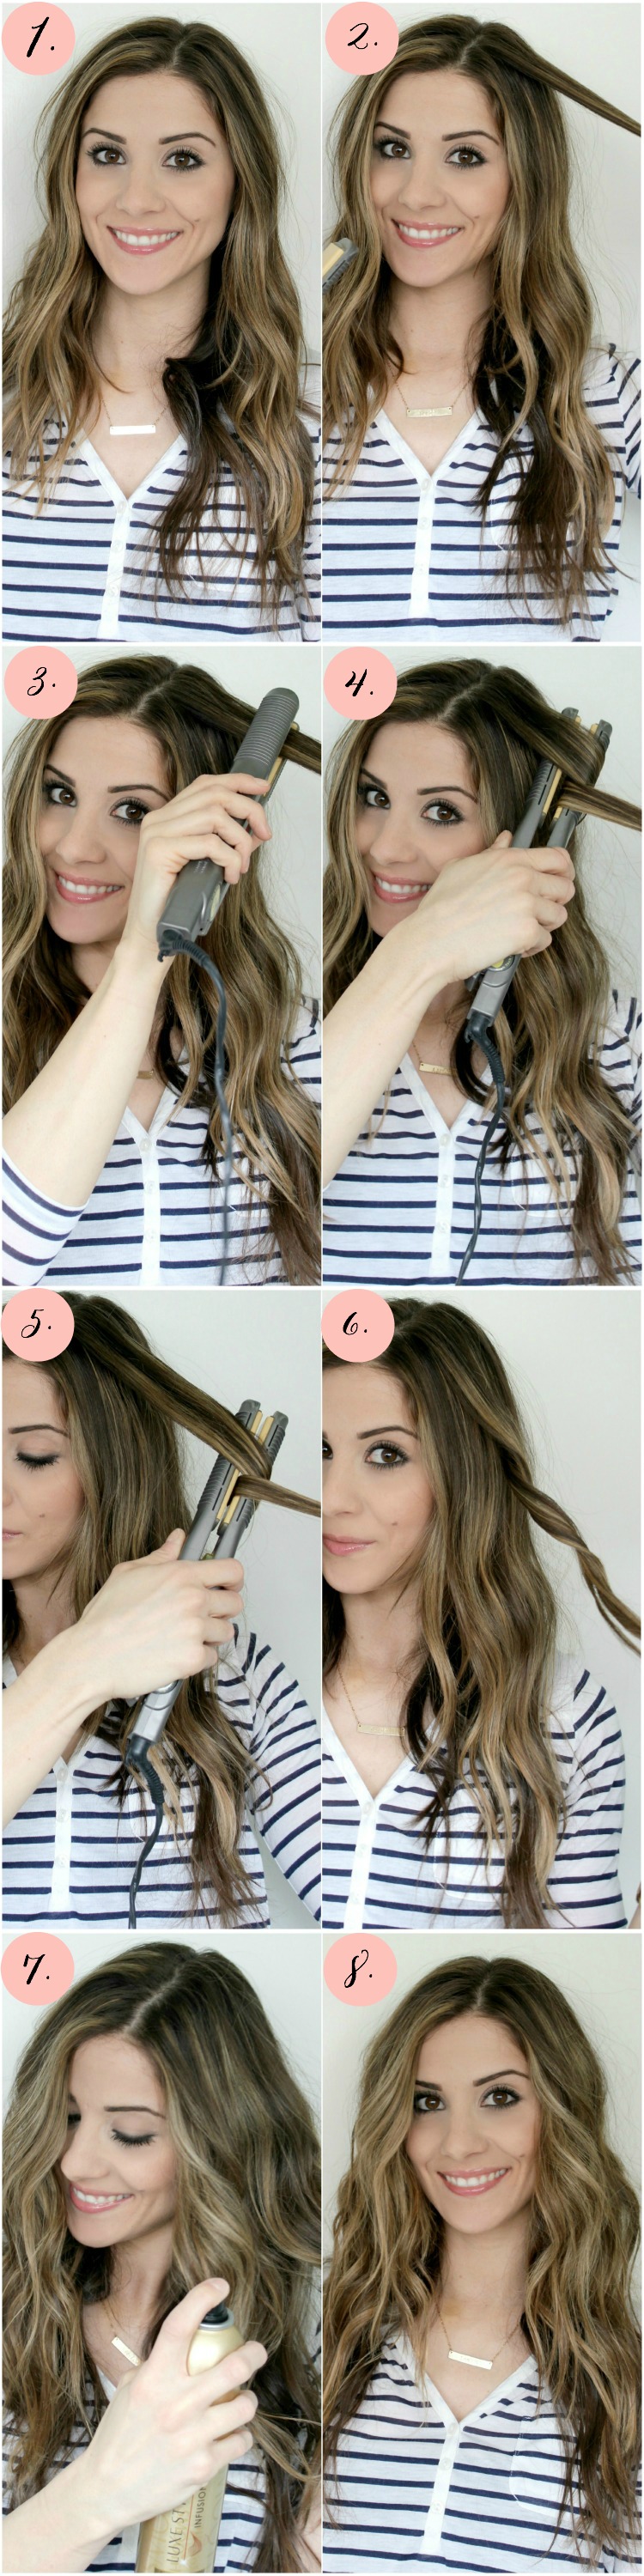
4. Step-by-Step Curling Process
Now for the fun part: curling your hair! Follow these simple steps to create stunning curls that will turn heads:
- Choose the Right Curling Iron: Depending on the size of curl you want, select a curling iron with a barrel size that suits your hair type. A 1-inch barrel is perfect for classic curls, while a larger barrel works well for beachy waves.
- Heat the Curling Iron: Set your curling iron to the appropriate temperature. Typically, 300°F is great for fine hair, while thicker hair can handle up to 400°F. Always adjust based on your hair's needs!
- Take a Small Section: Grab a small section of hair (about 1 inch wide). The smaller the section, the tighter the curl. Larger sections will create looser waves.
- Wrap the Hair Around the Barrel: Place the mid-length of the hair on the barrel and wrap it away from your face. Hold the ends of the hair with your fingers (use a heat-protective glove if needed) and wrap until you reach the root.
- Hold and Release: Hold the curl for about 10-15 seconds, then carefully release it from the iron. Allow the curl to cool in your hand for a few seconds before letting it drop. This helps the curl set!
- Repeat: Continue this process with the rest of your hair, working in sections from the bottom to the top. Remember to alternate the direction of your curls for a more natural look.
Once you’ve curled all your hair, give it a gentle tousle with your fingers. Finish off with a light hairspray to keep those curls bouncy and in place. And there you have it: gorgeous, stunning curls ready to shine!
Also Read This: How to Apply for Ads on Dailymotion: A Complete Guide
5. Tips for Maintaining Curls Throughout the Day
So, you've taken the time to curl your hair, and now you want those gorgeous curls to last from morning to night. Here are some tried-and-true tips to help you maintain your stunning curls throughout the day:
- Use a Good Hairspray: Once you've curled your hair, give it a light spritz with a flexible hold hairspray. This will help lock in your curls without making them stiff. Look for products labeled “flexible hold” for a natural finish.
- Avoid Touching Your Hair: We get it; you want to admire your curls! But touching your hair too much can cause them to fall flat. Try to resist the urge to run your fingers through your curls and save that for the end of the day!
- Pin Curls for Extra Hold: If you have the time, pin your curls up after curling them. Use bobby pins or clips to secure each curl against your scalp. Let them cool in this position for about 15 minutes before letting them down. This technique helps the curls set better.
- Use a Silk Scarf or Bonnet: If you’re going out for a long day, consider wrapping your curls in a silk scarf or using a silk bonnet when you’re not showing them off. This material helps reduce frizz and keeps your curls intact.
Remember that every hair type reacts differently to products, so don't hesitate to experiment with various techniques and products to find what works best for you!
6. Common Mistakes to Avoid When Curling Hair
Curling hair can seem simple, but there are common pitfalls that can lead to disappointment. Here’s a rundown of some mistakes to avoid for the best curling iron experience:
- Using the Wrong Barrel Size: Not all curls are created equal! The barrel size of your curling iron plays a significant role in the type of curl you achieve. For tighter curls, go for a smaller barrel (around 1 inch), while larger barrels (1.5 inches and up) create looser, beachy waves.
- Skipping Heat Protectant: This is a big no-no! Always apply a heat protectant spray before using your curling iron. It helps shield your hair from heat damage and keeps it looking healthy.
- Not Sectioning Hair Properly: If you grab too much hair at once, you risk uneven curls. Section your hair into manageable parts, about 1 to 2 inches wide, and curl each section thoroughly. This ensures that every strand gets the attention it deserves!
- Rushing the Process: Good things take time! Don’t rush through curling your hair. Allow the curl to sit in the curling iron for at least 10 seconds before releasing it. The longer you hold it, the better the curl will set.
- Neglecting to Cool Your Curls: One common mistake is releasing the curls right after curling. Allow them to cool down in their curled shape for at least 5-10 minutes before you touch or style them. Cooling helps the curl hold its shape for longer.
By avoiding these mistakes, you’ll be well on your way to achieving stunning curls that last all day long! Happy curling!
 admin
admin


