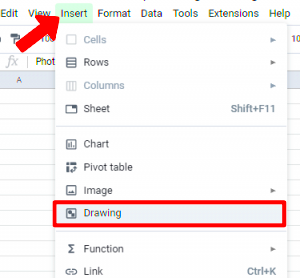
When working with data in Google Sheets, you may want to add images to make your sheet visually appealing or provide context to the data. However, the images you insert might not always fit perfectly within the cells. Cropping images in Google Sheets helps you trim unnecessary parts, making your sheet more organized and professional-looking. This feature is especially useful when you want to display only a portion of an image or adjust its size to match the layout of your spreadsheet.
In this guide, we'll walk you through the process of cropping images directly in Google Sheets, as well as provide helpful tips for achieving the best results. Whether you're working on a presentation, report, or simply want to make your data more engaging, knowing how to crop images in Google Sheets will save you time and effort.
Step-by-Step Guide to Cropping Images in Google Sheets
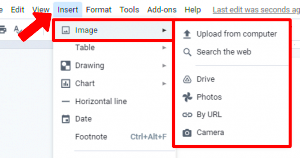
Now, let’s dive into the process of cropping images in Google Sheets. It’s easier than you think! Follow these simple steps:
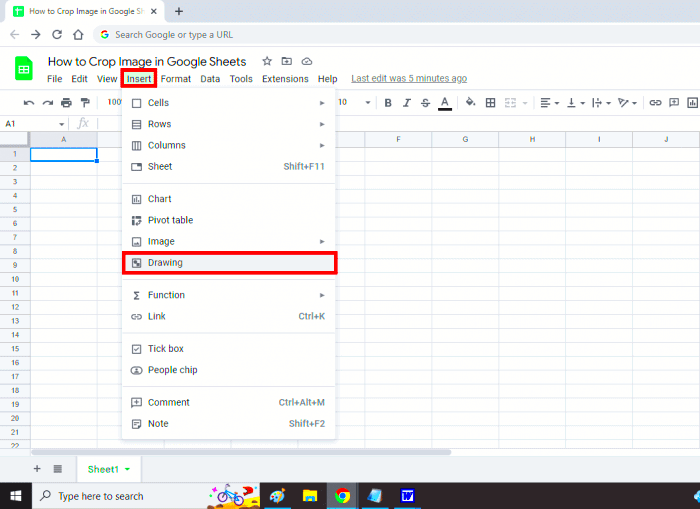
- Insert the Image: First, you’ll need to insert an image into your Google Sheets. Click on the cell where you want the image to appear, go to the Insert menu, and select Image. You can either upload an image from your computer or insert it from a URL or Google Drive.
- Select the Image: Once the image appears in the cell, click on it to select it. You should see a border around the image with small blue squares at the corners and edges.
- Crop the Image: To crop, click on the image and then click the small crop icon (a square with a diagonal line) in the toolbar. Drag the edges of the image to the desired crop area. You can also adjust the size and position by dragging the image inside the cropping frame.
- Adjust the Image Further: After cropping, you can resize the image by clicking and dragging the corners to fit it better into the cell. Use the Image Options sidebar for more adjustments like brightness and contrast.
And that's it! Cropping images in Google Sheets is straightforward and adds a lot of flexibility when working with visual content. You can crop multiple images in the same way, making your spreadsheet look clean and polished.
Using the Image Function to Add Images in Google Sheets
Google Sheets offers an IMAGE function that allows you to insert images directly into cells using a URL or a file path. This function can be incredibly useful when you want to insert images programmatically or when you need to display images in a consistent, structured way within your data.
Here’s how you can use the IMAGE function to add images to Google Sheets:
- Enter the Formula: Click on the cell where you want the image to appear. Then, type the following formula:
=IMAGE("image_url"), replacing "image_url" with the link to the image you want to display. - Adjust Image Size: The IMAGE function allows you to specify how the image should be resized. You can do this by adding parameters to the formula:
- 1: The image will be resized to fit the cell while maintaining its aspect ratio.
- 2: The image will be stretched to fill the entire cell, possibly distorting its aspect ratio.
- 3: The image will be displayed at its original size.
- 4: You can manually adjust the height and width of the image.
- Example Formula: If you want to insert an image and resize it to fit the cell, you would enter:
=IMAGE("https://example.com/image.jpg", 1).
Once you insert the image using this function, you can still crop and resize it using the steps mentioned earlier in this guide. The IMAGE function is an excellent option when you have a lot of images to work with or need to automate the process of adding images to a large number of cells.
Methods to Crop Images in Google Sheets
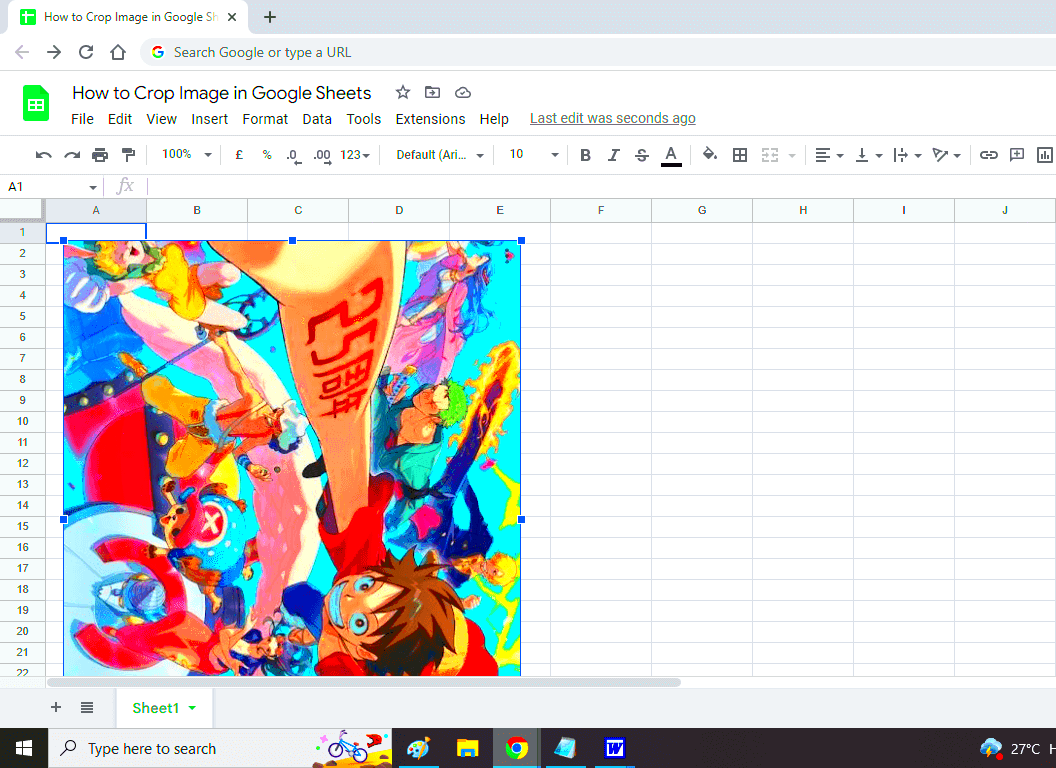
There are a few different methods to crop images in Google Sheets, depending on how you want the image to appear and how much control you need over the cropping process. While Google Sheets doesn’t offer an advanced image editor, it does provide basic cropping tools that can help you get the job done quickly.
Here are the most common ways to crop images in Google Sheets:
- Using the Crop Tool: The simplest method is to use the built-in crop tool. Click on the image you’ve inserted, then click the crop icon in the toolbar. This will allow you to adjust the visible portion of the image by dragging the crop handles. You can remove unwanted edges of the image or highlight a specific section.
- Resizing with Aspect Ratio: Another method is to adjust the size of the image. Click on the image and drag the corner handles while holding down the Shift key to maintain the aspect ratio. This method doesn’t technically crop the image but resizes it to fit better within your desired dimensions.
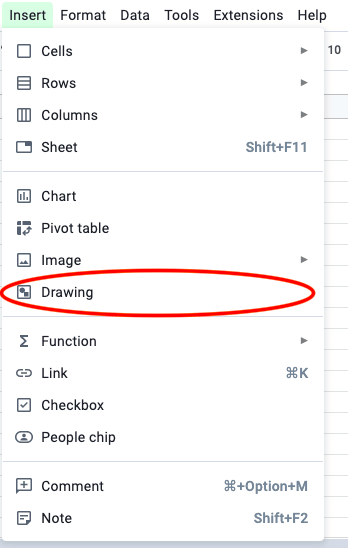
- Using the Masking Technique: For more flexibility, you can use a masking technique. Insert the image into a drawing, shape, or cell, and crop it using the shape’s boundaries. This method offers more control over the shape and position of the crop, allowing you to focus on specific parts of the image.
Each method has its own benefits, so choose the one that works best for your specific needs. If you need quick and simple cropping, the crop tool should be sufficient. For more complex adjustments, consider using resizing or masking options.
Adjusting the Image Size After Cropping
After cropping an image in Google Sheets, you may find that the image size still doesn’t fit well within the cell or the desired area. Fortunately, Google Sheets allows you to easily adjust the size of the
Follow these steps to adjust the image size after cropping:
- Click on the Image: Select the image that you’ve cropped. You’ll see a border around the image with small blue squares at the corners.
- Resize the Image: To resize, click and drag the corner handles. If you want to maintain the aspect ratio (i.e., prevent distortion), hold down the Shift key while dragging a corner.
- Resize to Fit a Cell: If you want the image to fit neatly inside a cell, adjust the row height and column width first, and then resize the image. This will make sure the image fits within the dimensions of the cell without overlapping or distorting the data.
- Use Image Options: For more advanced control, open the Image Options panel on the right by clicking on the image and selecting Image Options from the toolbar. Here, you can adjust the image’s brightness, contrast, and other settings to make it blend well with your data.
By resizing your cropped images appropriately, you can create a clean, organized sheet that looks both professional and functional. This is especially useful for presentations or when dealing with large amounts of data where clarity matters.
Best Practices for Cropping Images in Google Sheets
While cropping images in Google Sheets can be a simple task, there are a few best practices you should follow to make sure your images look their best and your spreadsheet stays organized.
Here are some tips to help you crop images effectively:
- Maintain Image Quality: Always make sure the quality of your image is high before cropping. Low-quality images may become blurry or pixelated when cropped or resized. If necessary, consider using a higher-resolution image to maintain a professional appearance.
- Crop for Relevance: Only crop the part of the image that is relevant to the content of your sheet. Avoid excessive cropping that might remove important details or make the image unclear.
- Stay Consistent with Image Size: If you’re working with multiple images in the same sheet, try to keep them consistent in size. This helps maintain a clean and organized layout, making your sheet easier to read and more visually appealing.
- Avoid Overcrowding: Don’t overcrowd your sheet with too many images. A few well-placed images can add value, but too many can make the sheet look cluttered and detract from the content. Ensure that the images serve a purpose and don’t overwhelm the data.
- Use Shapes or Borders: If you want to make your cropped images stand out, consider using shapes, borders, or drop shadows. This can give a polished look to your images and help them integrate seamlessly with your spreadsheet.
By following these best practices, you’ll ensure that your images are not only cropped effectively but also contribute positively to the overall design of your Google Sheets. Whether you’re creating a report, presentation, or just organizing data, these tips will help you make the most of your images.
Common Issues and Troubleshooting Tips for Cropping Images
While cropping images in Google Sheets is generally straightforward, you may run into a few common issues along the way. These problems can make the process frustrating, but with a little troubleshooting, you can get things back on track. Let’s look at some of the most frequent challenges and how to solve them.
Here are a few common issues you might encounter when cropping images in Google Sheets and how to fix them:
- Images Not Cropping as Expected: Sometimes, the crop tool might not work as anticipated, leaving the image looking distorted or cropped incorrectly. To fix this, make sure you’re using the crop tool correctly—click on the image, then use the blue crop handles to adjust the size. If the issue persists, try refreshing the page or re-inserting the image.
- Image Stretched or Distorted: If an image becomes stretched or distorted after resizing or cropping, ensure you’re holding down the Shift key while resizing to maintain the aspect ratio. This prevents the image from stretching unevenly. Alternatively, you can resize the image manually to better fit the desired space.
- Image Not Fitting Within the Cell: This is a common problem when trying to fit an image neatly inside a cell. To resolve this, first adjust the row height and column width to suit the image size. You can also resize the image manually by dragging the edges while maintaining the aspect ratio.
- Unable to Crop Image in a Specific Shape: Google Sheets doesn't allow you to crop images into complex shapes directly. If you need an image to fit into a particular shape, use the image within a drawing or mask it with a shape to achieve the desired result.
- Image Quality Reduces After Cropping: Cropping too much of the image can sometimes cause a loss in quality, especially if the image was already low-resolution. Ensure you’re starting with a high-quality image, and avoid excessive cropping.
By following these troubleshooting tips, you should be able to resolve most issues with cropping images in Google Sheets. If problems persist, try clearing your browser cache or using a different browser to rule out any browser-related issues.
FAQ
Here are some frequently asked questions about cropping images in Google Sheets that may help clarify any doubts you have:
- Can I crop an image after inserting it into Google Sheets? Yes, you can crop an image after it’s inserted into a Google Sheet. Simply select the image and click on the crop icon to adjust it.
- How can I crop multiple images at once in Google Sheets? Currently, Google Sheets doesn’t offer a batch cropping feature. You’ll need to crop each image individually. However, you can use the same method for each image to maintain consistency.
- Can I crop images into shapes in Google Sheets? Google Sheets does not support cropping images into complex shapes. You can mask images with basic shapes, but for more intricate shapes, you’ll need to use other tools like Google Drawings.
- Why is my image not fitting within the cell after cropping? This might happen if the image is too large or small for the cell. Adjust the row height and column width to fit the image properly, or resize the image to make it fit.
- How do I crop an image without distorting it? To crop an image without distortion, make sure to hold down the Shift key when resizing, which will maintain the image’s original aspect ratio.
If you have any additional questions, don’t hesitate to reach out or explore more resources to learn about working with images in Google Sheets.
Conclusion
Cropping images in Google Sheets is a handy feature that allows you to manage visual content in your spreadsheets efficiently. Whether you need to crop a photo to fit a cell, focus on a specific part of an image, or simply improve the overall presentation of your sheet, these tips and techniques can help you achieve the best results.
By following the steps outlined in this guide, you should now be able to insert, crop, and resize images in Google Sheets with ease. Remember to use the image options, maintain consistent image sizes, and troubleshoot common issues if they arise.
Start experimenting with cropping images in Google Sheets today and take your spreadsheets to the next level. With just a few adjustments, your data and visuals can work together seamlessly to create professional and visually appealing documents!
