Welcome to the world of image manipulation in HTML! Whether you're a web developer or a casual blogger, knowing how to crop images effectively can enhance your content's appeal. Cropping allows you to focus on essential parts of an image, ensuring your visuals are not only attractive but also relevant. In this post, we'll explore the fundamentals of
Understanding the Basics of HTML Image Elements
To effectively crop images in HTML, it's crucial to understand the basic elements that handle images on web pages. At the core, the <img> tag is your best friend when it comes to displaying images. Here’s a quick breakdown:
- Tag Structure: The
<img>tag is a self-closing tag, meaning it doesn't require an ending tag. Example:<img src="image.jpg" alt="Description"> - Attributes:
src:Specifies the path to the image file.alt:Offers a text alternative for accessibility and SEO.widthandheight:Control the size of the image on the page.
Here's an example of an image element:
<img src="example.jpg" alt="A beautiful landscape" width="600" height="400">But, cropping isn't solely about adjusting the width and height; it requires some creativity! Here are some common techniques to crop images effectively:
Using CSS for Cropping
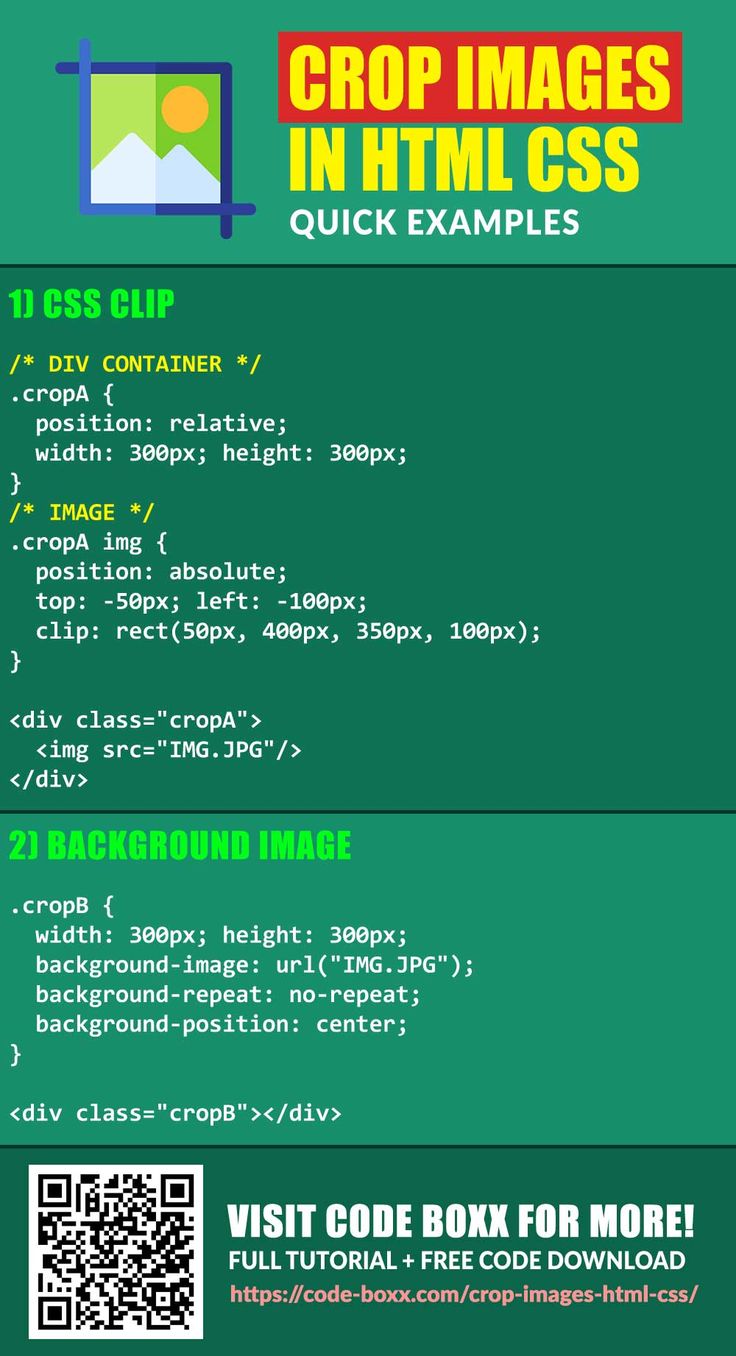
One of the most effective ways to crop images is through CSS. By using the overflow property and setting a specific width and height, you can create a cropping effect. For instance:
.crop {
    width: 300px;  / Desired width /
    height: 200px; / Desired height /
    overflow: hidden; / Hides overflow /
    position: relative;
.crop img {
    position: absolute; / Allows positioning /
    top: -50px; / Adjust to show desired part /
    left: -30px; / Adjust to show desired part /
code>
In this example, the image is placed within a div that has a fixed width and height, effectively cropping the visible area.
HTML5 and the <canvas> Element
If you’re looking to go beyond simple CSS cropping, the HTML5 <canvas> element provides a powerful tool for image manipulation. Here’s how it works:
<canvas id="myCanvas" width="400" height="300"></canvas>Once your canvas is set up, you can use JavaScript to draw and crop images. For example:
var canvas = document.getElementById('myCanvas');
var ctx = canvas.getContext('2d');
var img = new Image();
img.src = 'example.jpg';
img.onload = function() {
    ctx.drawImage(img, 50, 50, 200, 200, 0, 0, 400, 300); // Crop and scale to canvas
This approach allows you to crop images on the fly, offering flexibility for dynamic content. However, it does require a bit of coding knowledge!
In summary, understanding HTML image elements is the first step toward effective image cropping. With the right mix of HTML and CSS (or even JavaScript), you can create stunning visuals that capture your audience’s attention. So, roll up your sleeves and start cropping!
Also Read This: Exploring Hidden YouTube Tools and What ‘Other YouTube Features’ Mean
3. Methods for Cropping Images in HTML
Cropping images in HTML can be accomplished in several ways. Depending on your needs and the tools at your disposal, you might choose one method over another. Let’s dive into a few effective techniques!
1. Using the HTML canvas Element
The canvas element provides a powerful way to crop images dynamically. By drawing the image on the canvas and specifying which part to display, you can achieve precise control over what gets shown. Here’s a simple example:
<canvas id="myCanvas" width="300" height="300"></canvas>
<script>
var canvas = document.getElementById('myCanvas');
var ctx = canvas.getContext('2d');
var img = new Image();
img.src = 'your-image.jpg';
img.onload = function() {
    ctx.drawImage(img, 50, 50, 200, 200, 0, 0, 300, 300); // Crop from (50,50) and display at full (300,300)
</script>
This snippet crops a 200x200 area from the image starting at coordinates (50, 50) and displays it resized to 300x300 pixels on the canvas.
2. Using the object-fit Property
For a simpler approach, especially with responsive designs, the object-fit property in CSS can be a game-changer. You can easily crop an image to fit its container while maintaining its aspect ratio. Here’s how you do it:
<div class="image-container">
    <img src="your-image.jpg" class="cropped-image">
</div>

<style>
.image-container {
    width: 300px;
    height: 200px;
    overflow: hidden;
.cropped-image {
    width: 100%;
    height: auto;
    object-fit: cover; / This will crop the image /
</style>
In this example, the image will fill the container while cropping off any overflow, ensuring a neat look!
3. Using CSS Clip Paths
If you want to get creative, using CSS clip paths allows you to crop images into various shapes. Here’s a quick example:
<div class="clip-path">
    <img src="your-image.jpg">
</div>

<style>
.clip-path {
    clip-path: circle(50% at 50% 50%);
    width: 200px;
    height: 200px;
    overflow: hidden;
</style>
This will crop the image into a circular shape, providing a unique visual effect!
Also Read This: How to Edit a LinkedIn Post Effectively
4. Using CSS for Image Cropping
CSS offers a multitude of options for cropping images that can enhance your web design without altering the original image files. Let's explore some of the most popular methods!
1. Overflow Hidden
One of the simplest ways to crop an image using CSS is through the overflow: hidden; property. Here’s how it works:
<div class="crop-image">
    <img src="your-image.jpg">
</div>

<style>
.crop-image {
    width: 300px;
    height: 200px; / Set the desired height /
    overflow: hidden; / This hides the overflow /
.crop-image img {
    width: 100%;
    height: auto; / Maintain aspect ratio /
</style>
In this setup, the image will be constrained to the dimensions of the div, effectively cropping out the excess parts.
2. Aspect Ratio Boxes
Another handy method is to use the aspect ratio box. It allows you to maintain a specific aspect ratio while cropping:
<div class="aspect-ratio-box">
    <img src="your-image.jpg">
</div>

<style>
.aspect-ratio-box {
    position: relative;
    width: 100%; / or fixed width /
    padding-top: 75%; / 4:3 aspect ratio /
    overflow: hidden;
.aspect-ratio-box img {
    position: absolute;
    top: 50%;
    left: 50%;
    width: auto;
    height: 100%;
    transform: translate(-50%, -50%);
</style>
This method keeps your image centered while cropping to the defined ratio!
3. Masking Techniques
For more complex cropping needs, CSS masks can be used. This technique is especially useful if you want to create custom shapes:
<div class="mask">
    <img src="your-image.jpg">
</div>

<style>
.mask {
    width: 300px;
    height: 300px;
    -webkit-mask-image: url('mask-shape.png'); / Your custom mask shape /
    mask-image: url('mask-shape.png');
    -webkit-mask-size: cover;
    mask-size: cover;
    overflow: hidden;
</style>
With this approach, your image will take the shape defined by the mask, allowing for creative effects that enhance your webpage's aesthetic!
Each of these CSS techniques can be tailored to fit your design needs, ensuring that your images look crisp and polished on any device.
Also Read This: How to Edit a YouTube Video That Is Not Yours
5. Implementing JavaScript for Dynamic Cropping
When it comes to cropping images dynamically on your website, JavaScript is your best friend! Using JavaScript, you can create interactive cropping tools that allow users to select the area of the image they want to keep. This not only enhances user experience but also adds a level of customization that static cropping simply can't offer.
One popular way to implement dynamic cropping is through the use of libraries such as Cropper.js. This library provides a powerful and easy-to-use interface for cropping images. Here’s how you can get started:
-
Include the Cropper.js library:
First, you need to include the Cropper.js CSS and JavaScript in your project. You can download these files or link to them via a CDN:
<link rel="stylesheet" href="https://cdnjs.cloudflare.com/ajax/libs/cropperjs/1.5.12/cropper.min.css"> <script src="https://cdnjs.cloudflare.com/ajax/libs/cropperjs/1.5.12/cropper.min.js"></script> -
Set up your HTML:
Create an image element that will be cropped and ensure it has a unique ID:
<img id="image" src="path/to/your/image.jpg" alt="Sample Image"> -
Initialize Cropper.js:
Once your image is loaded, initialize the cropper in your JavaScript. Here’s a simple example:
const image = document.getElementById('image'); const cropper = new Cropper(image, { aspectRatio: 16 / 9, viewMode: 1, -
Get cropped data:
You can retrieve the cropped area using:
const croppedCanvas = cropper.getCroppedCanvas();
const croppedImage = croppedCanvas.toDataURL();
This setup provides a flexible way for users to crop images on your website. With additional options, like changing the aspect ratio or enabling free cropping, you can tailor the cropping tool to fit your needs. So go ahead, play around with it, and see how dynamic cropping can elevate your website’s functionality!
Also Read This: How to Convert Raw Images to JPEG
6. Best Practices for Image Cropping
Cropping images might seem straightforward, but there are several best practices that can make a big difference in the quality and effectiveness of your images. Here are some key points to keep in mind:
-
Maintain Aspect Ratio:
Always consider the aspect ratio when cropping images. This ensures that your images maintain their intended look across different devices. For instance, if you’re cropping for a social media banner, stick to the platform's recommended dimensions to avoid any unwanted stretching or compression.
-
Focus on Composition:
Use the rule of thirds to guide your cropping decisions. Place important elements along the grid lines or at intersections to create a more balanced and engaging image.
-
Consider the Context:
Think about where the image will be used. If it’s for a hero section on a website, ensure that the cropped image retains the focal point that draws users in. This may mean cropping closer to the subject or ensuring the background complements the overall design.
-
Optimize for Load Times:
After cropping, make sure to optimize your images for web use. Tools like ImageOptim or TinyPNG can help reduce file sizes without compromising quality, which is essential for keeping your website fast.
-
Test Across Devices:
It’s crucial to view your cropped images on different devices. What looks good on a desktop may not translate well to mobile. Always check your images responsively to ensure they maintain their impact.
By following these best practices, you’ll ensure that your cropped images not only look great but also perform well, enhancing the overall aesthetics and functionality of your website. Happy cropping!
Also Read This: How to Use Imago Images to Improve Your SEO
7. Common Issues and Troubleshooting Tips
When cropping images in HTML, you might encounter a few bumps along the road. But don’t worry! Let’s tackle some of the most common issues and their solutions.
Issue 1: Image Not Cropping as Expected
One of the frequent problems is when the image doesn’t crop to the desired dimensions. This usually happens due to incorrect CSS properties. Make sure you’re using the object-fit property correctly. For example:
img {
    width: 200px;
    height: 150px;
    object-fit: cover;  / Ensures the image covers the entire area /
This will keep your image proportional while filling the specified dimensions.
Issue 2: Cropping Doesn’t Work on All Browsers
Some older browsers may not support advanced CSS properties like clip-path or object-fit. To ensure compatibility, consider using fallback images or simpler methods such as the overflow property. Here’s a quick example:
.crop {
    width: 300px;
    height: 200px;
    overflow: hidden;  / Hides the overflow part of the image /
Wrap your image in a div with the crop class to create a straightforward cropping effect.
Issue 3: Images Not Loading
If your images aren’t showing up, check the source paths. Incorrect image URLs are often the culprit. You can inspect the element in your web browser’s developer tools to see if the correct path is being used.
Issue 4: Performance Problems
Heavy images can slow down your website. Always optimize images before uploading. Use tools like TinyPNG or Image Compressor to reduce file sizes without sacrificing quality. This can help maintain a faster loading time, enhancing user experience.
Quick Tips:
- Double-check your CSS properties.
- Always optimize images for the web.
- Use browser developer tools to troubleshoot loading issues.
8. Conclusion and Further Resources
And there you have it! Cropping images in HTML can be straightforward when you know the ropes. By leveraging CSS properties and understanding common pitfalls, you can enhance the visual appeal of your website significantly.
As you dive deeper into web design, consider exploring more advanced techniques and tools. Here are some resources to help you on your journey:
- W3Schools: CSS object-fit Property - A great overview of how to use
object-fit. - CSS Tricks: Clip Path - Learn about using
clip-patheffectively. - Google Developers: Image Optimization - Tips for optimizing images for web performance.
Keep experimenting, and soon you’ll be cropping images like a pro! Happy coding!
 admin
admin


