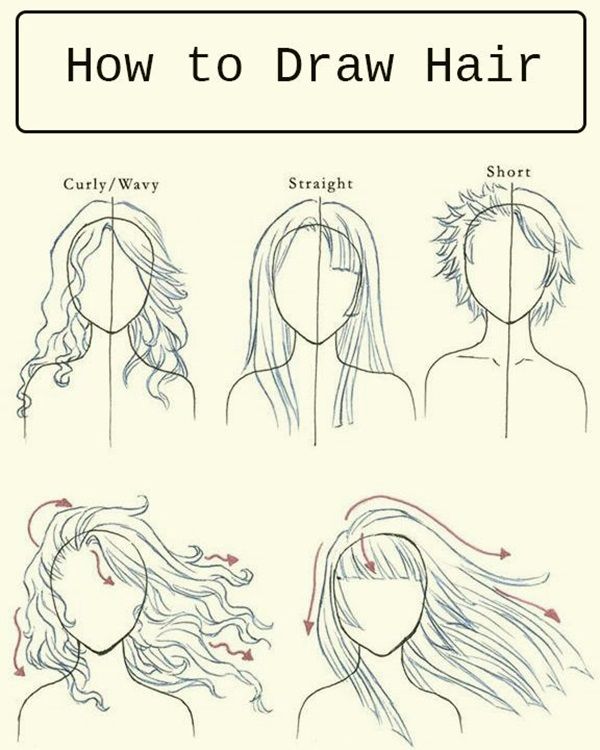
How to Create Art through Step-by-Step Drawing Tutorials

How to Create Art through Step-by-Step Drawing Tutorials


Tom - Author
January 18, 2025
18 0


Drawing is one of the most fundamental forms of artistic expression. It's a gateway to creativity, allowing us to communicate ideas, feelings, and observations through lines, shapes, and shades. Whether you’re a complete beginner or someone looking to refine your skills, understanding the basics of drawing is essential. In this journey, you'll discover that drawing isn't just about putting pencil to paper; it's about seeing the world in a different way, one that enables you to translate what you observe into your own unique visual language.

Step-by-step drawing tutorials can be incredibly beneficial in this process. They break down complex images into simpler components, making it easier to grasp the essentials of technique, perspective, and proportion. Through these guided lessons, you’ll learn various skills, such as:

  • Understanding shapes and forms – Recognizing how to deconstruct objects into basic shapes.
  • Practicing shading techniques – Adding depth and realism through light and shadow.
  • Enhancing observation skills – Training your eyes to notice the subtle details in your subjects.
  • Developing personal style – Encouraging self-expression as you gain confidence in your skills.

With persistence and practice, anyone can develop the ability to draw. So grab your materials and prepare to embark on an exciting artistic adventure!

Choosing the Right Materials

40 Easy Step By Step Art Drawings To Practice  Bored Art  How to draw

One of the most exciting aspects of drawing is selecting the materials you'll use. Your choices can significantly influence your experience and results, so it’s worth taking some time to explore what’s available. Here’s a breakdown of the essential items you might consider for your drawing toolkit:

1. Pencils

Pencils are the foundation of most drawing activities. They come in various grades, from hard (H) to soft (B) pencils. Here’s a quick guide:

GradeCharacteristics
H Grades (e.g., 2H, 4H)Harder, lighter lines perfect for fine details.
B Grades (e.g., 2B, 6B)Softer, darker lines great for shading and expression.

2. Paper

The type of paper you choose can affect the texture and finish of your drawings. Here are some common types:

  • Sketch Paper – Lightweight and ideal for practice.
  • Drawing Paper – Slightly heavier and perfect for detailed work.
  • Watercolor Paper – Thick and suited for watercolor pencil techniques.

3. Erasers

Having a good eraser is crucial for refining your drawings. You might want a combination of:

  • Kneaded Erasers – Great for lifting graphite without damaging the paper.
  • Rubber Erasers – Effective for erasing larger areas cleanly.

4. Blending Tools

Lastly, don’t forget about blending tools! Items like tortillons or blending stumps can help you smooth out your shading for a polished look. So, take the time to explore different materials and find what resonates with you. Remember, the right tools can make a world of difference in your drawing journey!

Also Read This: Understanding LinkedIn’s Search Appearances Feature for Enhanced Outcomes

Understanding Basic Drawing Techniques

Before diving into the world of art through drawing, it’s essential to grasp some basic techniques that will serve as your foundation. These techniques might seem simple, but they can significantly enhance your skills and provide a solid groundwork for more complex creations. Let’s break down some key fundamentals:

  • Line Drawing: This is the most fundamental aspect of drawing. Practice creating various types of lines — straight, curved, broken, and zigzag. The more control you have over your lines, the better your drawings will turn out.
  • Shading: This technique adds depth and dimension to your drawings. Understanding the differences between light and shadow can dramatically elevate your work. Start by practicing with a single light source and observe how it interacts with your subject.
  • Proportions: Whether you’re drawing a figure, an animal, or an object, understanding proportions is vital. Use guidelines or measurement techniques like the “sight-sizing” approach to achieve accurate ratios.
  • Textures: Textures bring your drawings to life! Experiment with various techniques, like hatching and cross-hatching, to depict different surfaces, such as skin, fur, or fabric.
  • Perspective: This technique helps you create a sense of depth. Learning about one-point and two-point perspectives is key, especially if you’re drawing landscapes or architectural scenes.

Before moving on to actual drawing, take time to practice these basic techniques. They will not only help you feel more confident but also enrich your artistic expression.

Also Read This: Understanding the Factors Behind the Pricing and Value of 123RF Images

Step-by-Step Drawing Guide

Now that you have a grasp on basic drawing techniques, let’s embark on a structured approach to create your artwork through step-by-step drawing tutorials. Following systematic steps can make any drawing much easier, breaking down what might initially seem like an overwhelming task. Here’s how you can approach it:

  1. Gather Your Materials: Start with the right tools. You’ll need paper, a variety of pencils (ranging from hard to soft), an eraser, and perhaps some colored pencils or markers to bring your artwork to life.
  2. Choose Your Subject: Whether it’s a simple object, a character, or a scene, pick something that inspires you. It’s often best to start with something familiar.
  3. Sketch the Basic Shapes: Begin by lightly sketching basic shapes that form the foundation of your subject. Use circles, squares, and triangles to outline where everything will go.
  4. Add Details: Once you’re satisfied with the basic shapes, start refining your drawing. Add details like facial features, textures, and other defining elements. Don’t be afraid to make adjustments as needed!
  5. Line Work: Go over your drawing with a darker pencil or fine liner to create clean lines. Make sure to capture the essence of your subject accurately.
  6. Shading and Texturing: Use the shading techniques you practiced earlier to add depth. Focus on how light interacts with your subject to create realistic shadows and highlights.
  7. Final Touches: Review your drawing and make any necessary adjustments. You might want to enhance certain areas with color or add background elements for context.

By following these steps, you’ll find that drawing can be both enjoyable and rewarding. Remember, the key is to practice regularly and be patient with yourself. Every line you draw brings you one step closer to mastering your art!

Also Read This: How to Connect Dailymotion with Roku from S9 Plus

5. Helpful Tips for Improving Your Skills

Improving your drawing skills doesn't happen overnight—it takes time, patience, and a sprinkle of creativity. But don't worry; there are plenty of helpful tips that can elevate your artistic journey.

First of all, practice regularly. Just like any skill, the more you draw, the better you'll get. Try to set aside a little time each day to draw, even if it's just for 15-30 minutes. You’ll be amazed at how quickly you begin to see improvement!

Next, don't forget to study the basics. Mastering fundamental techniques such as shading, perspective, and anatomy lays a solid foundation for more complex concepts. You can find numerous online resources and books dedicated to these topics.

Additionally, consider utilizing references. Draw from real life, photographs, or other artists' works. This practice will give you a better understanding of proportions, colors, and perspectives. Just make sure you don't copy directly—use references as a source of inspiration instead.

Don't be shy to seek feedback! Share your artwork with fellow artists or online communities. Constructive criticism can be invaluable in identifying areas where you may need more practice or improvement.

Lastly, be sure to experiment. Try out different styles, mediums, and techniques. Not every drawing has to be a masterpiece; use your sketchbook to play around with new ideas. It’s okay to make mistakes—they often lead to unexpected creative breakthroughs!

Also Read This: Should You Share Your Mission and Vision Statement on LinkedIn

6. Showcasing Your Artwork

Once you’ve honed your drawing skills, it’s time to show off your hard work! Showcasing your artwork is not only satisfying but can also connect you with fellow art enthusiasts and potential opportunities.

To begin, consider creating an online portfolio. Websites like Behance, ArtStation, or even a personal blog are excellent platforms for displaying your best work. Make sure to curate your pieces—only include the ones you're truly proud of, as this will set the tone for your artistic brand.

Social media is another powerful tool for showcasing your art. Platforms like Instagram, Pinterest, and Facebook allow you to post your drawings, engage with followers, and build a community. Utilize relevant hashtags to reach a wider audience, and don’t hesitate to interact with others in the art community.

If you’re interested in getting more exposure, consider participating in art contests and exhibitions. These events can give you a platform to display your work publicly and even win awards or recognition, which is always a confidence boost!

Finally, remember the age-old advice: networking matters. Connect with other artists, join local art clubs, or attend workshops. Building relationships in the art community can lead to collaboration opportunities and valuable insight into the art world.

So go ahead, let the world see your art! Trust in your journey and enjoy the process of sharing your creativity with others.

How to Create Art through Step-by-Step Drawing Tutorials

Creating art can be an incredibly fulfilling and therapeutic activity, and step-by-step drawing tutorials are an excellent way to unlock your creativity. These tutorials provide a structured approach that simplifies the drawing process, making it accessible to everyone, regardless of their experience level.

Here are some key benefits of using step-by-step tutorials:

  • Structured Learning: Follow along with clear instructions ensures you don’t skip any vital steps.
  • Builds Confidence: Completing each step successfully boosts your confidence and encourages you to tackle more complicated pieces.
  • Skill Development: Each tutorial focuses on specific techniques and concepts, enhancing your overall drawing ability.
  • Variety of Styles: You can explore various art styles and mediums, from realistic portrayals to cartoons and abstract art.

When selecting tutorials, consider the following:

  1. Choose the Right Tutor: Look for artists or platforms that resonate with your style preferences.
  2. Equipment: Gather the necessary materials, including pencils, erasers, paper, and any digital tools if you're working on a computer.
  3. Environment: Set up a comfortable workspace free of distractions.

During the drawing process, remember to take breaks, practice patience, and enjoy the creative journey. Don’t worry about making mistakes; each line you draw is a part of the learning experience!

Conclusion: By immersing yourself in step-by-step drawing tutorials, you can effectively enhance your artistic skills, explore new styles, and enjoy the process of creating art, paving the way for your unique artistic expression.

Next Steps: Begin your artistic journey by selecting a tutorial that excites you, gather your materials, and start drawing today!

About Author
Author:

Related Articles